background image

5 Mounting

27

BA5789879-01 EN

5.1 Mounting pressure relief device with standard protective
cover

In order to mount the device, you must open it. Only close it again once
mounted.

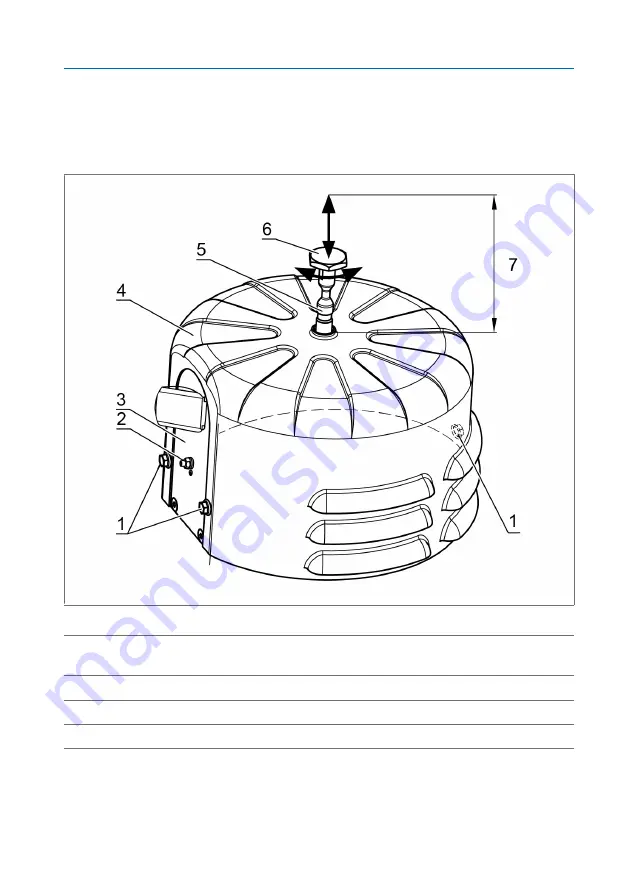
Figure 5: Mounting pressure relief device with standard protective cover

1 3 hexagon screws M6x10, wrench

size 10

2 Ground connection (only with plug

connection)

3 Stand plate

4 Protective cover

5 Signal pin, wrench size 12

6 Signal pin cap, wrench size 32

7 Clearance above: min. 100 mm [4"] / with semaphore 170 mm [6.7"]

Summary of Contents for MESSKO MPREC

Page 1: ...Pressure Relief Device MESSKO MPREC Operating Instructions BA5789879 01 EN ...

Page 2: ...mpensation All rights reserved in the event of the granting of patents utility models or designs The product may have been altered since this document was published We reserve the right to change the technical data design and scope of supply Generally the information provided and agreements made when processing the individual quotations and orders are binding The original operating instructions we...

Page 3: ...2 Fundamental safety instructions 11 2 3 Personnel qualification 12 2 4 Personal protective equipment 14 3 Product description 16 3 1 Scope of delivery 16 3 2 Pressure relief device function description 16 3 3 Design versions 17 3 3 1 Pressure relief device with standard protective cover 18 3 3 2 Pressure relief device with OD protective cover 19 3 4 Nameplate 21 4 Packaging transport and storage ...

Page 4: ...ble screw connections 36 5 3 2 Connecting the cable to the terminal box 38 5 3 3 Connecting the plug connector ANSI or Westinghouse 39 6 Commissioning 41 7 Operation 43 7 1 Pressure relief device operating state 43 7 2 Venting the pressure relief device 44 8 Maintenance and inspection 46 9 Fault elimination 47 9 1 Testing the tripping circuit and reason for tripping 47 10 Disposal 48 11 Technical ...

Page 5: ...40 Oberursel Germany Phone 49 6171 6398 0 Fax 49 6171 6398 98 E mail messko info reinhausen com Internet www reinhausen com messko Further information on the product and copies of this technical document are available from this address if required 1 2 Subject to change without notice The information contained in this technical file comprises the technical speci fications approved at the time of pr...

Page 6: ...cal file are displayed as follows 1 5 1 1 Warning relating to section Warnings relating to sections refer to entire chapters or sections sub sec tions or several paragraphs within this technical file Warnings relating to sections use the following format WARNING Type and source of danger Consequences Action Action 1 5 1 2 Embedded warning information Embedded warnings refer to a particular part wi...

Page 7: ...es a hazardous situation which if not avoided could result in death or serious injury CAUTION Indicates a hazardous situation which if not avoided could result in minor or moderate injury NOTICE Indicates measures to be taken to prevent damage to property Table 1 Signal words in warning notices Pictograms warn of dangers Pictogram Definition Warning of a danger point Warning of dangerous electrica...

Page 8: ...technical file it is laid out as follows Important information 1 5 3 Instruction system This technical file contains single step and multi step instructions Single step instructions Instructions which consist of only a single process step are structured as fol lows Aim of action ü Requirements optional Step 1 of 1 ð Result of step optional ð Result of action optional Multi step instructions Instru...

Page 9: ...typographic conventions are used in this technical file Typographic convention Purpose Example UPPERCASE Operating controls switches ON OFF Brackets PC keyboard Ctrl Alt Bold Software operating con trols Press Continue button Menu paths Parameter Control pa rameter Italics System messages error messages signals Function monitoring alarm triggered Number of pages Cross reference 41 Table 3 Typograp...

Page 10: ... At a predefined pressure the pressure relief device opens relieves the pressure and closes tightly again once the pressure has been relieved The product is designed solely for use in electrical energy systems and facili ties If used as intended and in compliance with the requirements and condi tions specified in this technical document and the warning notices in this technical document and attach...

Page 11: ...nger of becoming trapped or caught up in rotating parts and the danger of getting caught on protruding parts This results in danger to life and limb All necessary devices and personal protective equipment required for the specific task such as a hard hat safety footwear etc must be worn Ob serve the Personal protective equipment Section 2 4 Page 14 sec tion Never wear damaged personal protective e...

Page 12: ...allation location Modifications and conversions Unauthorized or inappropriate changes to the product may lead to personal injury material damage and operational faults Only modify the product after consultation with Messko GmbH Spare parts Spare parts not approved by Messko GmbH may cause physical injury and damage the product Only use spare parts approved by the manufacturer Contact Messko GmbH W...

Page 13: ... dangers in the event of inappropriate handling as well as the protective devices and safety measures The electrically trained person works exclu sively under the guidance and supervision of an electrically skilled person Operator The operator uses and operates the product in line with this technical docu ment The operating company provides the operator with instruction and training on the specifi...

Page 14: ...work area Personal protective equipment to be worn at all times Protective clothing Close fitting work clothing with a low tearing strength with tight sleeves and with no protrud ing parts It mainly serves to protect the wearer against being caught by moving machine parts Safety shoes To protect against falling heavy objects and slip ping on slippery surfaces Special personal protective equipment ...

Page 15: ...15 BA5789879 01 EN Hard hat To protect from falling and flying parts and mate rials Hearing protection To protect from hearing damage Protective gloves To protect from mechanical thermal and electri cal hazards ...

Page 16: ...n the transformer tank or on the on load tap changer If the internal pressure of the transformer or on load tap changer exceeds the predefined tripping pres sure of the pressure relief device the spring loaded valve plate lifts off of its seal seat within a few milliseconds As a result the internal pressure is re lieved as quickly as possible and the valve plate again closes the pressure relief de...

Page 17: ...ly signal pin and protective cover as an option also with 1 or 2 micro switches and with semaphore The design and the designation of the key device components are to be found in the following drawings Pressure relief device with standard protective cover Section 3 3 1 Page 18 Pressure relief device with OD protective cover Section 3 3 2 Page 19 Oil Directed with directed oil flow The device flange...

Page 18: ...ling contacts are encapsulated physically separate from the functioning part of the valve and therefore pro tected against environmental influences and leaking oil 3 3 1 Pressure relief device with standard protective cover The following graphic shows the key parts of the pressure relief device Figure 1 Pressure relief device with standard protective cover 1 Device flange 2 3 housing screws M6x10 ...

Page 19: ...spring assem bly 14 6 fixing screws 15 Valve plate 16 Mounting seal ring Ø 200 x Ø 178 5 x 4 25 mm Ø 7 87 x Ø7 03 x 0 17 optional 3 3 2 Pressure relief device with OD protective cover The OD protective cover has an escape opening for draining the oil in the event of tripping The escape opening is designed as a flange for closing a pipe in order to enable the directed drainage of the escaping oil A...

Page 20: ... washer wrench size 19 3 OD protective cover 4 4 housing screws M8x100 wrench size 13 max torque 12 Nm 5 Signal pin with signal pin cap 6 1 or 2 micro switches optional 7 Cable bushing M20x1 5 for cable diameter 8 15 mm alternatively without with terminal box with ANSI plug or with Westinghouse plug 8 Ground connection only with ver sion with plug 9 Mounting seal ring Ø 200 x Ø 178 5 x 4 25 mm Ø 7...

Page 21: ...879 01 EN 3 4 Nameplate The nameplate is on the stand plate for the pressure relief device with stan dard protective cover and on the flat surface on the cover for the version with OD protective cover Figure 3 Nameplate on the MPREC ...

Page 22: ...at none of its parts touch the loading surface of the means of transport or touch the ground after unloading Inlays inside the box or crate stabilize the goods preventing impermissible changes of position and protecting them from vibration 4 3 Markings The packaging bears a signature with instructions for safe transport and cor rect storage The following symbols apply to the shipment of non hazard...

Page 23: ...ecision has been made by the transport company or the insurance company Record the details of the damage on site immediately with the transport company involved This is essential for any claim for damages If possible photograph damage to packaging and packaged goods This also applies to signs of corrosion on the packaged goods due to moisture rain snow condensation infiltrating the packaging Make ...

Page 24: ...gular intervals Also take appropriate action after storms heavy rain or snow etc 4 6 Further transport Use the original product packaging for further transport If you transport the product to the final installation site in a mounted state observe the following information in order to protect the product against me chanical damage due to external influences Transport packaging requirements Select p...

Page 25: ... on electri cal equipment Disconnect the system Lock the system to prevent an unintentional restart Ensure all poles are de energized Ground and short circuit Cover or cordon off adjacent energized parts NOTICE Property damage The function of the device will be impaired due to drying As a result the transformer will no longer be protected against impermissible pressure in creases Ensure that the d...

Page 26: ...pening Section 3 3 2 Page 19 must face down wards in order to ensure complete drainage of the oil in the event of tripping Figure 4 Possible mounting positions There must be a clearance of at least 100 mm above or in front of the de vice and at least 170 mm with a semaphore Thus in the Alarm position the signal pin can be pushed fully out of the housing and the semaphore can fold out completely ...

Page 27: ...t Only close it again once mounted Figure 5 Mounting pressure relief device with standard protective cover 1 3 hexagon screws M6x10 wrench size 10 2 Ground connection only with plug connection 3 Stand plate 4 Protective cover 5 Signal pin wrench size 12 6 Signal pin cap wrench size 32 7 Clearance above min 100 mm 4 with semaphore 170 mm 6 7 ...

Page 28: ...ective cover 3 Lift off protective cover 4 Mounting the device The dimensions and connection data for mounting are specified in the ap pendix 1 Place the mounting seal ring delivered as an option under the device see Dimensions with standard protective cover Section 12 1 Page 53 2 Mount the device onto the counter flange on the transformer on load tap changer by inserting 6 screws M12 or 1 2 not s...

Page 29: ...ligned with the corresponding threaded holes in the device 3 To secure the protective cover screw in the 2 screws wrench size 10 on the stand plate and the screw wrench size 10 on the opposite side with a maximum torque 12 Nm Establishing operational readiness 1 Screw the signal pin cap wrench size 32 onto the signal pin wrench size 12 with max torque 8 Nm 2 Push the signal pin into the device as ...

Page 30: ... 2 Protective cover 3 Signal pin wrench size 12 4 Signal pin cap wrench size 32 5 Clearance above min 100 mm 4 with semaphore 170 mm 6 7 Opening the device Prepare for mounting the device as follows 1 Remove protective cover 2 To do so pull out signal pin 3 and screw off the signal pin cap 4 using 2 open ended wrenches wrench size 12 and 32 2 Then unscrew the 4 screws 1 wrench size 13 from the pro...

Page 31: ...ws M12 or 1 2 not supplied through the drill holes in the device flange Figure 8 Mounting the device 1 Mounting seal ring Ø 200 x Ø 178 5 x 4 25 mm Ø 7 87 x Ø7 03 x 0 17 2 6 screws M12 or 1 2 3 Through bar of the device flange Closing the device After mounting close the device as follows 1 If the device is equipped with micro switches for remote transmission of the signals first connect these micr...

Page 32: ...ower the protective cover parallel to the device flange and place lightly on the spring assembly without pressing the protective cover over the o ring When aligning the protective cover ensure that the through bar of the device flange is vertical under the connection plate of the protective cover The threaded bolts of the spring assembly must be visible precisely in the center of the oil escape op...

Page 33: ...m whilst it is being lowered Figure 11 Positioning and closing the OD protective cover 6 Then tighten the 4 housing screws in a crosswise sequence up to a maxi mum torque 23 Nm NOTICE Malfunction of the pressure relief device The oil escape opening of the pressure relief device is closed with a plastic cap as protection during transport The pressure relief device will not func tion with this in pl...

Page 34: ...the drainage unit dimensions see Section 12 2 Page 56 3 Plastic cap as transport lock 4 O ring 95x3 supplied Flange mount a drainage unit onto the oil escape opening ð The o ring as seal and the 3 hexagon screws wrench size 19 with spring washers and washers are included with the device ð A suitable connecting flange with internal thread or for welding can be or dered as an option ...

Page 35: ...essure relief de vice is visually and electrically in the tripped position ð This ensures that the pressure relief device is visibly in the operating posi tion 5 3 Electrically connecting the pressure relief device WARNING Danger of death or severe injury Danger of death or severe injury due to improper electrical connection of the pressure relief device When the pressure relief device trips the t...

Page 36: ...tion 5 3 2 Page 38 Plug ANSI or Westinghouse Section 5 3 3 Page 39 Each micro switch is designed as an electrically isolated normally open and normally closed contact 5 3 1 Connecting cable screw connections Figure 14 Connecting micro switches in the pressure relief device with standard protective cover 1 Micro switch 1 2 Micro switch 2 if not installed the outer cable screw connection is re place...

Page 37: ...n a stable surface with the opening facing upwards for connecting the cables 1 Remove the 4 cover bolts of the micro switch housing and remove the cover crosshead screwdriver 2 Remove an amount of sheathing from the double insulated cable cable diameter 8 15 mm appropriate for the wiring strip off 7 mm of insulation from the individual wire and cap off with ferrules 3 Open the cable screw connecti...

Page 38: ...inal box To connect the device to the terminal box proceed as follows 1 Undo the 4 screws in the cover of the terminal box using a crosshead screwdriver 2 Remove the sheathing of the cable to be connected strip off approx 7 mm of insulation from the braided leads and cap off with ferrules 3 Open the cable screw connection M25x1 5 for cables Ø 13 20 mm wrench size 32 and pull the cable through Figu...

Page 39: ... connection wrench size 10 max torque 5 Nm and the housing of the transformer or on load tap changer 2 Remove the sheathing of the free end of the socket connection cable strip off approx 7 mm of insulation from the braided leads and cap off with ferrules 3 Lay the socket connection cable between the device and control box and connect the braided leads in the control box in accordance with the pin...

Page 40: ... supplied cable Pin 1 black Pin 4 green Pin 6 white Pin 1 red Pin 5 blue Pin 6 orange Pin 2 white Pin 4 black Pin 8 green 4 Attach the socket of the connection cable to the plug of the pressure relief device 5 Hold the connection cable tightly and tighten the socket housing clockwise as far as it will go The connection cable must not be twisted during this operation ...

Page 41: ...event of an error deactivate the fire extinguishing unit prior to the function test Otherwise the unintended tripping of the fire extinguishing unit can lead to death due to asphyxiation Check the signal transmission in accordance with the fire extinguishing unit operating instructions or con tact the manufacturer 4 Pull the signal pin out of the housing into the position alarm to actuate the micr...

Page 42: ... the fire extinguishing unit was deactivated prior to the test recommis sion this in accordance with the manufacturer operating instructions ð Once this function test has been performed the transformer on load tap changer can be commissioned ...

Page 43: ... Pressure relief device operating state The operating state of the pressure relief device can be determined exter nally from the position of the signal pin and from the position of the sema phore optional Figure 19 Operating positions of the signal pin and the semaphore optional 1 Operation 2 Alarm pressure relief device has tripped ...

Page 44: ...ure relief device is only neces sary if this is recommended by the transformer on load tap changer manu facturer WARNING Danger of explosion Explosive gases in the pressure relief device in the trans former or under the on load tap changer head cover can blow out or explode and thus lead to death or serious injury Ensure that there are no ignition sources such as naked flames hot sur faces or spar...

Page 45: ...n the vent screw a few turns using a wrench of wrench size 10 or a screwdriver without unscrewing it completely Figure 20 1 Vent screw 4 As soon as oil begins to escape tighten the screw again with max torque 12 Nm 5 Then continue with Closing the device with standard protective cover Section 5 1 Page 27 or with OD protective cover Section 5 2 Page 30 ð This ensures that the pressure relief device...

Page 46: ... for leakages corrosion and damage Function test see Commissioning Section 6 Page 41 In addition the following checks are necessary during every second trans former inspection Visual inspection for leakages corrosion and damage under the cover To do so remove the cover see Section 5 1 Page 27 For OD cover only First remove the pipe connection of the oil escape opening see Section 5 2 Page 30 Visua...

Page 47: ...ger manufacturer in order that further measures can be introduced Has oil escaped from the pressure relief device Was the transformer subjected to a mechanical load How large was the load on the transformer at the instant of tripping Was the on load tap changer moved immediately before or during trip ping Did any other protective devices respond at the instant of tripping Were switching operations...

Page 48: ...10 Disposal 48 BA5789879 01 EN Observe the national disposal regulations in the country of use ...

Page 49: ...ce with IEC 60529 available as an op tion for Standard protective cover with cable screw connec tion OD protective cover with cable screw connection OD protective cover with terminal box Contamination level 3 Overvoltage category III external protection miniature circuit breaker maxi mum 16 A C characteristic Materials MESSKO MPREC All parts Weather resistant and transformer oil resistant all exte...

Page 50: ...n accordance with EN 10270 1 SH com pression springs with configuration specific parts paint ing in German KTL for identification and as corrosion protection Signal pin Seawater proof aluminum anodized Red for standard sealing lip NBR blue for Viton Vent screw Self securing stainless steel wrench size 10 Semaphore Optional corrosion resistant steel with powder coating RAL 1026 luminous yellow not ...

Page 51: ...rox 6 kg with standard protective cover Approx 11 kg with OD protective cover Operating pressure See table above Section 3 2 Page 16 Micro switches MESSKO MPREC Contacts 1 x NO contact normally open 1 x NC contact nor mally closed per micro switch Special version Micro switch 2 x NO contacts normally open Housing material Seawater proof aluminum Rated operating voltage Ue 240 V Limit switch standa...

Page 52: ... Single wire 1 4 mm2 AWG 18 8 braided leads with ferrule 0 5 2 5 mm2 AWG 20 10 Cable glands IP65 M25x1 5 for cable diameters 13 20 mm IP66 M25x1 5 for cable diameters 11 20 mm Offshore version M25x1 5 for cable diameters 9 17 mm stainless steel If only 1 cable screw connection dummy plug as re placement for second Degree of protection IP65 IP66 as an option in accordance with IEC 60529 for enclose...

Page 53: ...12 Appendix 53 BA5789879 01 EN 12 1 Dimensions with standard protective cover Figure 21 MPREC with standard protective cover view from below ...

Page 54: ...12 Appendix 54 BA5789879 01 EN Figure 22 Side view with signal positions 1 Alarm position 2 Operation position 3 Mounting seal ring ...

Page 55: ...12 Appendix 55 BA5789879 01 EN Figure 23 Connection options for the micro switches detail venting 1 Terminal box 2 Vent screw 3 Connection via cable screw con nection gland 4 ANSI plug ...

Page 56: ...12 Appendix 56 BA5789879 01 EN 12 2 Dimensions with OD protective cover Figure 24 Side view with signal positions 1 Alarm position 2 Operation position ...

Page 57: ...12 Appendix 57 BA5789879 01 EN Figure 25 View from below and from the side in the OPERATION position 1 Dimensions in the alarm position 342 mm 13 47 2 Dimensions in the alarm position 246 mm 9 69 ...

Page 58: ......

Page 59: ......

Page 60: ...An den Drei Hasen Messko Platz 1 61440 Oberursel Germany 49 0 6171 6398 0 49 0 6171 6398 98 messko info reinhausen com www reinhausen com messko BA5789879 01 EN MESSKO MPREC F0358701 07 19 Messko GmbH 2019 THE POWER BEHIND POWER ...

Reviews: