


PAGE 8 — WHITEMAN WM-900S, 900P — PARTS & OPERATION MANUAL — REV. #7 (03/17/06)
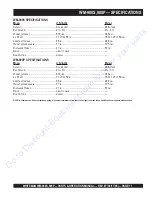
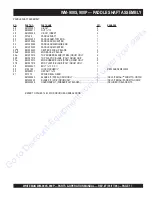
WM-900S, 900P — OPERATIONS
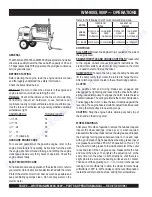
GENERAL
The Whiteman WM-700 and WM-900 Series plaster and mortar
mixers are quality mixers that have a batch capacity of 2.5 and
3.5 bags respectively. With proper care, they will give continuous
service year-after-year.
BEFORE STARTING
Before starting the engine, read the engine owners manual
and thoroughly understand the safety information.
Check the items listed below:
Oil Levels. Be sure to check the oil levels in the engine and
engine reduction unit before starting the unit.
Hardware. Check all hardware on the mixer before starting.
Periodically inspect all hardware. Loose hardware can
contribute to early component failure and poor performance.
Use the torque chart below as a general guideline and keep
all hardware tight:
HARDWARE DIA
TORQUE (LB./FT.)
%/16
" - 18
14
#/8"
- 16
24
#/8"
- 24
37
½" - 13
39
½" - 13 (Grade 8)
90
GASOLINE ENGINE CARE
For care and operation of the gasoline engine, refer to the
engine manufacturer’s operating instructions furnished with
the engine. We recommend draining and refilling the engine
crankcase at least every thirty hours of operation. Check the
engine oil level daily.
Refer to the following chart. For recommend plug sizes.
CONTROLS
KILL SWITCH: (Gasoline Engine Only) Located on the side of
the engine cover.
ENGINE THROTTLE AND CHOKE CONTROLS: Please refer
to the engine owners manual for specific instructions. The
electric motor switch ( electric motor only) located on the motor
— is used to start and stop the mixer.
DUMP LATCH: To dump the tub, grasp the dump handle and
lift the dump latch, then rotate the tub to discharge the mix.
After, discharge, return the tub to the vertical mixing position.
R
O
T
O
M
Ø
1
T
L
O
V
5
1
1
0
0
7
M
W
Ø
1
T
L
O
V
0
3
2
0
0
9
M
W
E
S
R
O
H
R
E
W
O
P
P
A
C
L
I
A
T
G
I
P
/
A
M
E
N
N
A
M
E
T
I
H
W
Y
D
O
B
N
N
O
C
/
A
M
E
N
N
A
M
E
T
I
H
W
P
A
C
L
I
A
T
G
I
P
/
A
M
E
N
N
A
M
E
T
I
H
W
Y
D
O
B
N
N
O
C
/
A
M
E
N
N
A
M
E
T
I
H
W
P
H
3
&
½
1
5
4
5
0
4
9
/
P
0
3
-
5
L
6
4
5
0
4
9
/
R
0
3
-
5
L
0
5
5
0
4
9
/
P
5
1
-
6
L
1
5
5
0
4
9
/
R
5
1
-
6
L
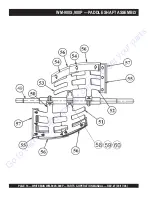
CLUTCH
The paddle shaft and mixing blades are engaged and
disengaged by tightening and loosening the drive belts with a
spring loaded idler pulley. To engage the clutch, rotate the lever
counterclockwise. The spring maintains the correct belt tension.
To disengage the clutch, rotate the lever clockwise against the
lever stop. The engine base is slotted to adjust for belt wear and
to bring the idler pulley into operating range.
CAUTION: Stop the engine before allowing anybody to put
their hands in the mixing drum.
WHEEL BEARINGS
After every 3 months of operation, remove the hub dust cap and
inspect the wheel bearings. Once a year, or when required,
disassemble the wheel hubs remove the old grease and repack
the bearings forcing grease between rollers, cone and cage
with a good grade of high speed wheel bearing grease (never
use grease heavier than 265 A.S.T.M. penetration (“No. 2.”) Fill
the wheel hub with grease to the inside diameter of the outer
races and also fill the hub grease cap. Reassemble the hub
and mount the wheel. Then tighten the adjusting nut, at the
same time turn the wheel in both directions, until there is a
slight bind to be sure all the bearing surfaces are in contact.
Then back-off the adjusting nut
!/6
to ¼ turn or to the nearest
locking hole or sufficiently to allow the wheel to rotate freely
within limits of .001" to .010" end play. Lock the nut at this position.
Install the cotter pin and dust cap, and tighten all hardware.
ELECTRIC MOTOR CARE
For lubrication care and operation of the electric motor, refer to
your electric motor instruction booklet furnished with the motor.
Protect the electric motor from dust as much as possible and
keep ventilating openings clean. Do not spray water on the
electric motor.
Go to Discount-Equipment.com
to order your parts


