background image

17

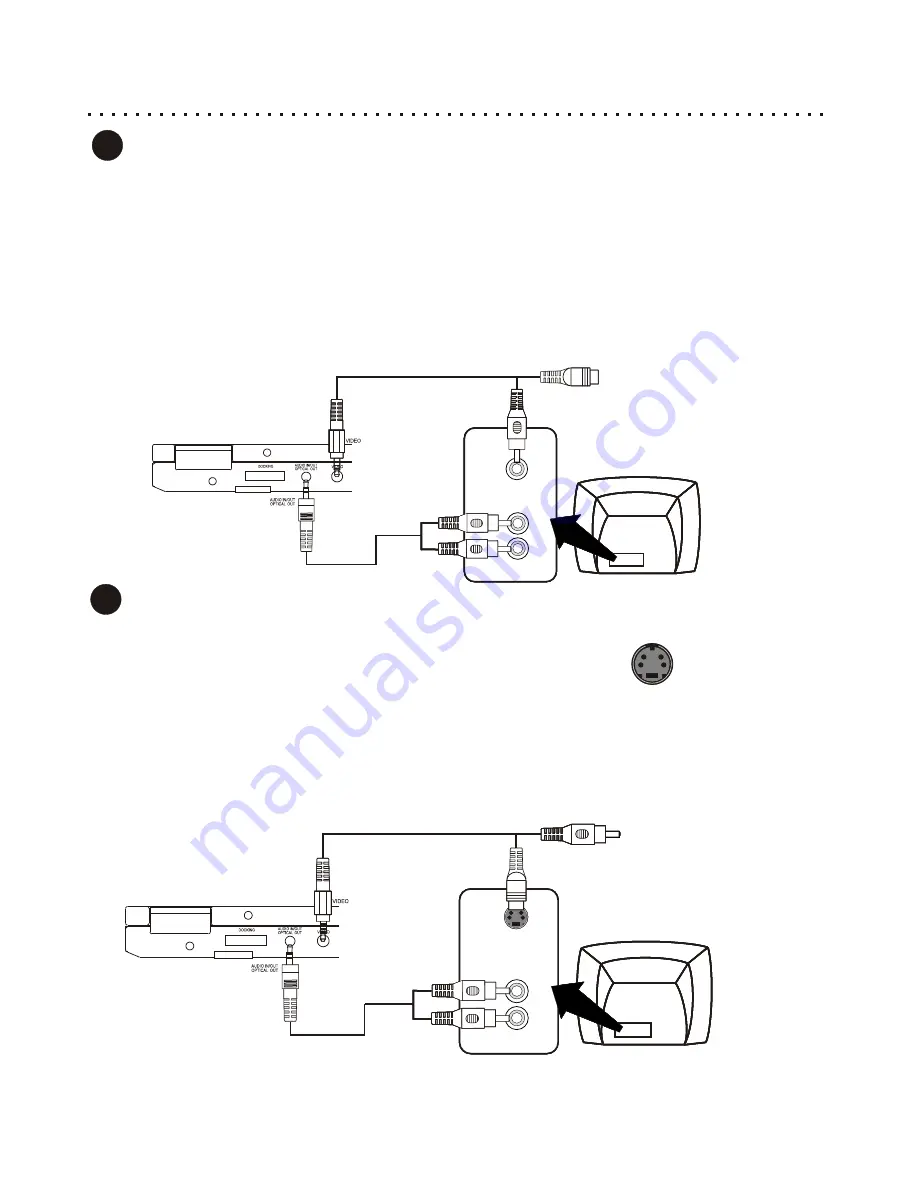
 Connecting to a TV with S-Video In and Stereo Audio In

If your TV has an S-Video Input, it

s recommended that you use this connection. S-Video separates brightness and 

color signals, resulting in higher video quality than Standard Composite Video.


Ÿ

Connect the Video Out from the DVD Player to the S-Video In of your TV.

Ÿ

If you are not using a separate receiver for audio, connect the Stereo Audio outputs of the DVD Player to the 
corresponding Inputs of your TV

.

Ÿ

Connect the Power Plug to the DVD Player and AC Power Outlet/Battery Pack. 

Ÿ

Press the MONITOR button on the DVD Player or Remote to switch the video mode to EXTERNAL MONITOR.

Ÿ

Turn on the TV and DVD Player and select the S-Video Input on your TV. On some models, this may be called 

Input 2

 or 

Video 2

. You should now see the DVD Player

s splash screen on your TV. 

S-Video Connector

 Typical Connection - Connecting to a TV with Composite Video In and Stereo Audio In

If your TV has only a single Video Input jack, typically a yellow-colored plug, you will use the Composite Video output 
of the DVD Player for the Video Connection. We

ll also assume your TV has Red and White Stereo Audio In 

connectors. You will use these for the Audio Connection. 

Ÿ

Use the included Video Cable to connect the Video Out of the DVD Player to the Video In of your TV. 

Ÿ

Connect the Stereo Audio outputs of the DVD Player to the matching Inputs of your TV.

Ÿ

Connect the Power Plug to the DVD Player and AC Power Outlet/Battery Pack. 

Ÿ

Press the MONITOR button on the DVD Player or Remote to switch the video mode to EXTERNAL MONITOR.

Ÿ

Turn on the TV and DVD Player and select the Video Input on your TV. On some models, this may be called 

Input 1

 or 

Aux In

. You should now see the DVD Player

s splash screen on your TV.

TV

VIDEO
   IN

  STEREO  AUDIO  IN

R

(RED)

L

(WHITE)

1

Composite / S-Video & Stereo Audio Connections

2

DVD

TV

VIDEO
   IN

  STEREO  AUDIO  IN

R

(RED)

L

(WHITE)

DVD

TV

VIDEO
   IN

  STEREO  AUDIO  IN

R

(RED)

L

(WHITE)

DVD

TV

VIDEO
   IN

  STEREO  AUDIO  IN

R

(RED)

L

(WHITE)

DVD

TV

  STEREO  AUDIO  IN

R

(RED)

L

(WHITE)

DVD

TV

  STEREO  AUDIO  IN

R

(RED)

L

(WHITE)

DVD

TV

  STEREO  AUDIO  IN

R

(RED)

L

(WHITE)

DVD

TV

  STEREO  AUDIO  IN

R

(RED)

L

(WHITE)

DVD

S-VIDEO

IN

S-VIDEO

COMPOSITE

Summary of Contents for DVL 7

Page 1: ...Portable DVD Player User s Manual DVL7 PORTABLE DVD PLAYER...

Page 2: ...on or pinched particularly at plugs convenience receptacles and the point where they exit from the apparatus 11 Only use attachments accessories specified by the manufacturer 12 Use only with the cart...

Page 3: ...e hot turn off the power and disconnect the AC power cord CONDENSATION If smoke odors or noises are emitted from the unit Moisture may form on the lens in the following cases turn off the power and di...

Page 4: ...nals with metal objects Keep out of reach of children If any electrolyte contacts with your hands or clothes wash it off thoroughly with water The battery may present a risk of fire or chemical burn i...

Page 5: ...ssive Scan Connections 18 Optical Digital Audio Connections 19 External Video Audio Sources to DVD Player Connections 19 Basic Playback Functions Getting Started Powering On Playing a Disc 20 Stopping...

Page 6: ...Table of Contents Cont d 5...

Page 7: ...n Function Key provides convenience operation built in Progressive Scan Video out feature present the execllent video effect through YPbPr cable Product Features a 7 LCD monitor 26 5mm height ultra sl...

Page 8: ...ey may damage the disc surface Never add labels or adhesive tapes on the discs and be careful not to scratch or damage the disc surface Storage of Discs To prevent discs from becoming bent or deformed...

Page 9: ...out the Battery If the unit will not be used for an extended length of time it s wise to remove the battery before storage The life of the battery depends on the amount of usage With typical usage a b...

Page 10: ...cycle through available angles FAST REVERSE Press to reverse play the disc at high speed for searching Press again to cycle through available speeds 2x 4x 8x 16X 32X LEFT RIGHT UP DOWN ARROWS Use the...

Page 11: ...ALL Press to enable repeat mode Press again to cycle through choices Repeat Chapter Title or Disc REPEAT A B Press this button to set the start of the segment you wish to repeat Press again to set the...

Page 12: ...TANDBY mode press to power on system quickly VOLUME Press to raise the volume level MENU Press to enter the menu of a DVD disc VOLUME Press to lower the volume level MONITOR VIDEO MODE Changes the Inp...

Page 13: ...ate and execute Disc Menus Function Menu and other options Function Menu allows you to operate simplified operations such as Display Brightness LCD Mode Battery and Setup on your DVD player without us...

Page 14: ...rd into the AC Adapter Connect the Power Plug into the Power Jack Plug the Power Plug firmly into the DC IN 10 V Power Jack on the Left Side of the unit Plug in to Wall Power Outlet Plug the Power Cor...

Page 15: ...s into place Charging the battery pack Plug the Power Adapter into the Battery DC IN 9 V Jack on the Left Side of the Battery Pack Plug the other end of the Power Cord into a household wall Power Outl...

Page 16: ...Hold the tab in this position 1 2 You can use a Car Adapter while in a vehicle Connect the Car Adapter Power Plug into the unit s Power Jack and the other end to the Vehicle Cigarette Lighter Socket U...

Page 17: ...Audio Television Connections One Required In order to use your DVD Player your TV must support at least one of the Video Input types shown below To get started identify the best Video Connection show...

Page 18: ...ly a yellow colored plug you will use the Composite Video output of the DVD Player for the Video Connection We ll also assume your TV has Red and White Stereo Audio In connectors You will use these fo...

Page 19: ...e Player using the Component Video Cables At this point connect the separate Component Video Cables to the appropriate jacks Normally cables and jacks are color coded to make connection easier Power o...

Page 20: ...VER OPTICAL DIGITAL AUDIO IN 4 DVD DVD DVD DVD Connecting Video Audio Sources from External Devices Connecting to a Video Source with Composite Video Out and Stereo Audio Out Your DVD Portable feature...

Page 21: ...ill see the Player s Power Indicator is Green Once there is a disc inside and the disc lid s closed your player starts to play automatically Sliding the Latch Open Slide the Latch open and hold the ta...

Page 22: ...s you can pause playback on a still frame with the PAUSE button Pressing PAUSE while playing Audio CDs will mute the sound and hold the play position Press AGAIN to resume normal playback Stopping and...

Page 23: ...itle menus are available on some DVDs These menus allow you to select a particular Title or Chapter to play With some DVD discs pressing this button will bring up the normal DVD menu If the not availa...

Page 24: ...W REVERSE REVERSE 1 NEXT NEXT PREVIOUS PREVIOUS Fast Forward Reverse Slow Motion Scanning Skip Forward and Skip Back 23 Slow Motion Scanning With DVDs you can slow the speed of playback to a mere frac...

Page 25: ...egin playback GOTO GOTO 1 Jumping to a Specific Chapter Track or Time Position 24 2 Navigating the GOTO Menu Select the Title Chapter or Time categories by pressing the LEFT and RIGHT ARROW keys to mo...

Page 26: ...h the available Bookmark locations 1 12 to the one that you would like to save the current disc play position to In the example here all locations are open so we ll choose the first one 2 3 Press ENTE...

Page 27: ...A B Button While viewing or listening to a disc when you get to the point that you would like to mark as the Beginning of your repeating segment press the REPEAT A B button The following display will...

Page 28: ...ER Program Mode does not work with DVDs Add a Track to the Program List with ENTER Hit the ENTER key on a Track Number that you want to add to the Program List In this example we press ENTER on track...

Page 29: ...le Plays tracks in a random order REPEAT REPEAT 1 2 Navigate to a File or Folder Use the arrow keys to select the File you wish to play or the Folder you want to open To return to a previous folder pr...

Page 30: ...ow mode press the LEFT RIGHT ARROW keys to Rotate the picture and the SLOW button to see a Negative of the image MENU MENU 2 RETURN RETURN 1 Exit the Slide Show with RETURN If your disc contains only...

Page 31: ...ause Disc Playback Optional Zoom is most effective if you Pause the video on a single frame to examine However Zoom will work while playing a movie as well If you wish to Pause the action press the PA...

Page 32: ...when you are raising or lowering the Volume but the Volume function is working 31 OR Built in Screen Playing Player to External Devices Playing External Video AudioSources to Player Playing Green Gree...

Page 33: ...or watching movies recorded in FULL SCREEN or normal 4 3 format The OFF Mode shuts down the built in LCD screen This is ideal for listening to audio CDs Press repeatedly to cycle through the Video Mod...

Page 34: ...htness levels Using Function Menu BRIGHTNESS Adjusting Brightness Levels with BRIGHTNESS Button Your DVD Player provides a convenient function allowing you to adjust Brightness either by pressing the...

Page 35: ...GUAGE SECURITY EXIT OR Video Setup Page Go to language setup page Language Setup Page Subtitle Disc Menu Audio OSD Language ENG ENG Off ENG Video Setup Page Go to language setup page Language Setup Pa...

Page 36: ...pan and many other countries The PAL TV system is used in Europe Africa and the Middle East among other places Refer to your TV s documentation to make sure which model you have VIDEO OUTPUT Default s...

Page 37: ...UP SPDIF OUTPUT Default setting SPDIF On SPDIF Sony Philips Digital InterFace refers to the digital audio format used by most consumer electronics equipment If you are using the Stereo Audio Outputs l...

Page 38: ...to both speakers DYNAMIC Default setting Off Dynamic Range Compression makes watching a movie at low volumes more enjoyable by boosting the quieter sounds while suppressing the louder sounds This red...

Page 39: ...age PBC Version Default Off ANGLE MARK Default setting On Requires disc to support the multi angle feature the Angle Mark continuously displays the current angle you re viewing on screen Setting ANGLE...

Page 40: ...f the player In this case the disc cannot be used Disc may not be industry standard No Sound from TV or Speakers Once you close the unit Disc Cover the unit is still running but No Sound comes out Dis...

Page 41: ...nd Flutter Less than 0 001 W PEAK Connections Component Video Out Y 1 0Vpp 75 Ohm Negative Sync Pb Pr 7 Vpp 75 Ohm S Video Out Mini DIN 4 Pin 75 Ohm Video In Out One Pin Jack 1Vpp 75 Ohm Analog Audio...

Page 42: ...rging 0 60 C Storage 0 60 C RH 60 20 Internal Impedance 150 m ohms Estimate Cycle Life 80 initial capacity remaining after 300 cycles Charging Time 2 7 4 hours LED Indicator Charging Red Fully Charged...

Page 43: ...most DVD discs DTS Digital Theater System Another digital surround sound system with 5 1 channels DTS is supported on some newer DVD discs Dual Layer DVD A DVD disc that has two layers on each side A...

Page 44: ...USA and Japan among others PAL Video standard used in most European countries and elsewhere Progressive Scan Scans all horizontal lines of a monitor or TV display in one pass as opposed to Interlaced...

Reviews: