background image

Moxa MXNVR-RO 

DriverView 


6-3 

Bottom 

Function 


Rotation speed control   


In the same car, Back and forth between different IP cameras 


Switch to single view 


Switch to quad view 

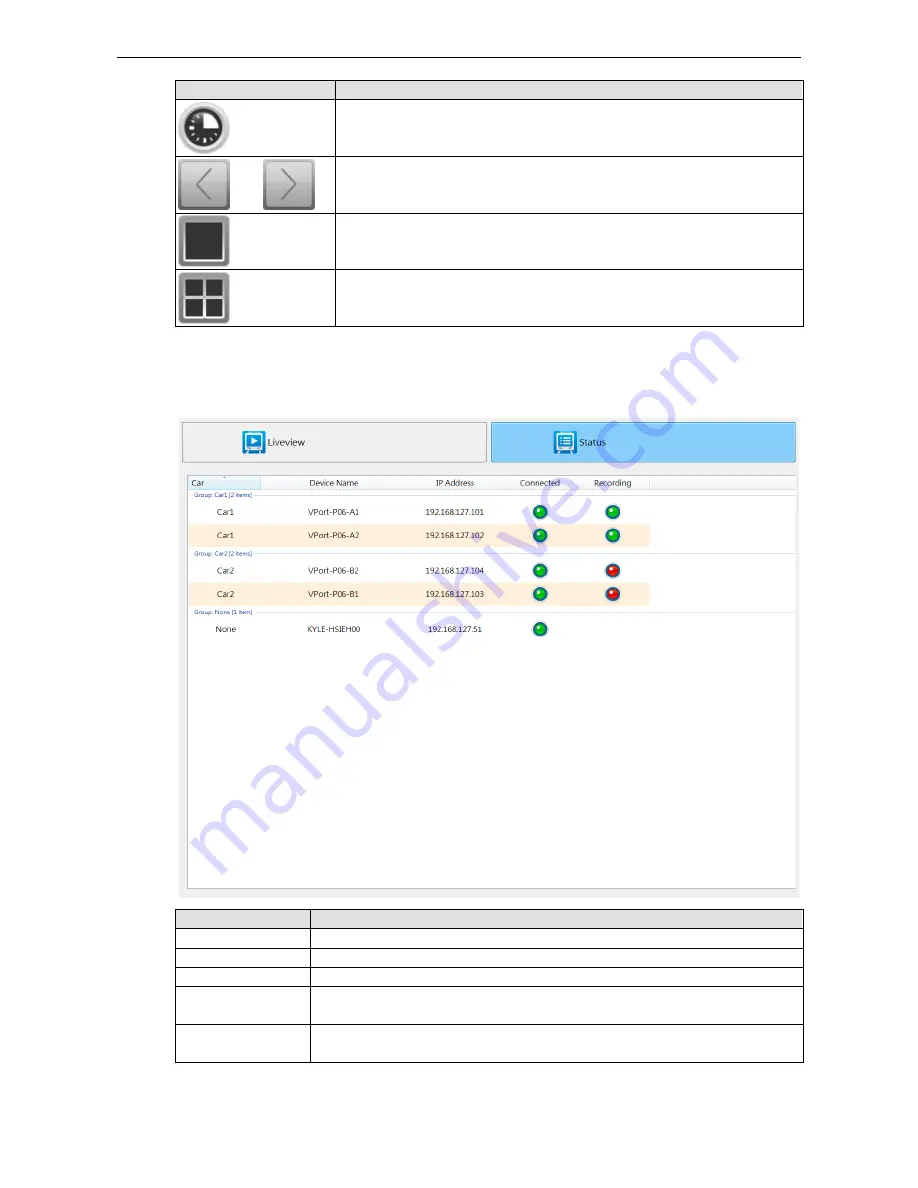
Status 

On the status it will show all of the chosen cameras and NVRs that are connected and the recoding status. 


Setting 

Description 

Car 

The name of the car 

Device Name 

Name of the IP camera and the NVR device 

IP address 

Each device’s IP address 

Connected 

Device connection status, green light indicates connection red light indicates 
disconnection 

Recording 

The status of the IP camera, green light indicates the video is recording, the red light 
indicates video is not recording 


Summary of Contents for MXNVR-RO

Page 1: ...Moxa MXNVR RO Industrial Network Video Recorder User s Manual Edition 2 0 February 2017 www moxa com product 2017 Moxa Inc All rights reserved...

Page 2: ...and or changes to this manual or to the products and or the programs described in this manual at any time Information provided in this manual is intended to be accurate and reliable However Moxa assum...

Page 3: ...ings and reinstall the system The Industrial Network Video Recorder has been designed for various environments and can be used to build various applications for general security or demonstration purpo...

Page 4: ...cting to a DVI D Monitor 3 7 Connecting to the USB Ports 3 7 Installing an Internal Storage Device 3 8 Making a Storage Drive Hot Swappable 3 9 4 Access the MXNVR RO T Web interface 4 1 Overview of th...

Page 5: ...1 1 Introduction This chapter gives a general overview of the MXNVR RO T computer s hardware features and specifications The following topics are covered in this chapter Overview Package Checklist...

Page 6: ...puter comes with a CFast socket that provides ample secure data buffering or additional storage expansion as well as 2 hot swappable storage trays that accept 2 5 solid state or hard disk storage driv...

Page 7: ...trouble spots multiple serial ports allow you to connect a variety of devices for wireless operation and the reliable and stable hardware platform lets you devote your attention to developing your app...

Page 8: ...Moxa MXNVR RO Hardware Introduction 2 2 Appearance Front View Rear View...

Page 9: ...data Off CFast card HDD SSD is not transmitting data LAN 1 2 Green 100 Mbps Ethernet mode Yellow 1000 Mbps Ethernet mode Off 10 Mbps or no activity Tx P1 P2 Green Serial ports P1 P2 transmitting data...

Page 10: ...the battery needs to be changed we suggest you contact the Moxa RMA service team ATTENTION There is a risk of explosion if the wrong type of battery is used To avoid this potential danger always use t...

Page 11: ...ed in this chapter Installing the MXNVR RO T Wiring Requirements Connecting the Power Grounding the Unit Connecting Data Transmission Cables Connecting to a Serial Device Connecting an Audio Input Dig...

Page 12: ...with different signal characteristics should be routed separately Use the type of signal transmitted through a wire to determine which wires should be kept separate The rule of thumb is that wiring t...

Page 13: ...emove the power supply during a BIOS upgrade since doing so may cause the system to crash ATTENTION When you use a USB drive larger than 4 GB you will need to convert the file system type to FAT32 The...

Page 14: ...nt the cable so that The indicator on the M12 X coded cable aligns with the key notch on the port or The notch on the M12 X coded cable pin core aligns with the notch on the port socket 3 Connect the...

Page 15: ...D GND GND GND 6 DSR 7 RTS 8 CTS 9 NOTE This is the pin assignment for the computer side connectors on the MXNVR RO T If you are wiring peripheral side connectors for a serial cable you will need to ma...

Page 16: ...ion both DI and DO can only be wired as sink types Connecting to a VGA Monitor The MXNVR RO T comes with a D Sub 15 pin female connector on the front panel to connect a VGA monitor To ensure that the...

Page 17: ...8 N C 20 N C 9 T M D S Data1 21 N C 10 T M D S Data1 22 T M D S Clock Shield 11 T M D S Data1 Shield 23 T M D S Clock 12 N C 24 T M D S Clock Connecting to the USB Ports On its rear panel the MXNVR R...

Page 18: ...ows users to install a 2 5 inch SATA storage device such as a hard disk or a SSD drive Take the following steps to install your storage device 1 Remove the 6 screws from the MXNVR RO T s rear panel 2...

Page 19: ...appable MXNVR RO T computers come with 2 faceplates over the storage drive trays users may attach storage drives to the faceplates to install additional storage media such as hard disks HDD or solid s...

Page 20: ...he tray into the slot 4 Carefully align the drive with the drive slot and gently insert the drive into the computer taking care that it slides smoothly and firmly into the SATA mounts 5 When finished...

Page 21: ...Moxa MXNVR RO Hardware Connection Description 3 11 3 When the LED stops blinking you may remove the storage drive 4 After reinstalling the HDD please press the button again to remount...

Page 22: ...information about how to access the MXNVR RO T Onboard Network Video Recorder for the first time The following topics are covered in this chapter Overview of the MXNVR RO T Web Homepage Network Setti...

Page 23: ...Overview of the MXNVR RO T Web Homepage NOTE The MXNVR RO T s web homepage is best viewed at 1280 x 1024 screen resolution We strongly recommend using IE 10 0 Microsoft Internet Explorer or above to...

Page 24: ...more suitable to use DHCP or to use a fixed IP address Setting Description Default DHCP Get the IP address automatically from the DHCP server Get IP address automatically Manual Use the IP address as...

Page 25: ...S Enter the IP address of the DNS Server used by your network The VPort will try to locate the secondary DNS Server if the primary DNS Server fails to connect Obtained automatically from the DHCP serv...

Page 26: ...Appendix B for your region s time zone System Config This section shows the date and time and the HDD information of the system The System Config page allows you to export import and control the serv...

Page 27: ...3 The system will start the firmware upgrade process NOTE Updating process will take about 2 minutes Upgrading the firmware will not change most of the original settings Download Tool Download Tool a...

Page 28: ...Moxa MXNVR RO Access the MXNVR RO T Web interface 4 7 Step 2 start the installation process Step 3 select installation components Step 4 select the install destination folder...

Page 29: ...Moxa MXNVR RO Access the MXNVR RO T Web interface 4 8 Step 5 wait for installation to complete Step6 complete the installation process...

Page 30: ...next step is to configure the MXNVR RO T s setting through the configuration tool The following topics are covered in this chapter Overview of the MXNVR RO T Configuration Tool NVR Management System S...

Page 31: ...arch for devices Server Name set the research IP in a specific area Group Name MXNVR RO s group name can be changed here Model Name MXNVR RO s model name MAC Address MXNVR RO s MAC address Software Ve...

Page 32: ...the NVR Group View View of all the devices that are connected to the Car Discover NVR Discover NVR There are 3 ways to search for an MXNVR RO Setting Description Broadcast Using broadcast to search fo...

Page 33: ...ress MXNVR RO s MAC address number Software Version MXNVR RO s software number Enter Username and Password Setting Description User Name Login authorization s user name Password Login authorization s...

Page 34: ...Setting Description Reboot To reboot the MXNVR RO system Shutdown To shut down the MXNVR RO System Configuration Setting Description Export configuration When exporting the NVR configuration file a di...

Page 35: ...Safe Space Safe storage capacity on disk Hardware Slot The disk slot that is being used Modify Modify the currently selected disk group Disk List Setting Description Hardware Slot The disk slot that i...

Page 36: ...time setting Keep current date and time Automatic Use the NTP server to set the NVR s date and time setting NTP Client Set NVR as a NTP client and the time will be synced with the other NTP server NA...

Page 37: ...ifferent network interfaces DHCP Get the IP address automatically from the DHCP server DHCP Manual Use the IP address assigned by the administrator Security Setting Account List Setting Description Na...

Page 38: ...User account s name Group Choose the permission group Administrator or Operator Password Input the password Confirm Password If a new password is typed in you will need to retype the Confirm Password...

Page 39: ...ding service or authentication service Date Choose the dates you want to search Clear All Log Clear all saved logs DateTime Show the date and time of the log Priority Level of log Source Source of the...

Page 40: ...d then upgrade MXNVR RO Software Upgrade Setting Description File Path Choose the Path for file to upgrade MXNVR RO T Software Version Setting Description Driver View Driver View s software version Re...

Page 41: ...that the device is connected to Model Name Model of the device MAC Address MAC address of the device Firmware Firmware version of the device Connection Info Setting Description Stream Type Shows the...

Page 42: ...e is connected to Model Name Model name of the connected device MAC address MAC address of the connected device Firmware Firmware version of the connected device Device Presetting Setting Description...

Page 43: ...nected Also to check if it is the right device that wants to connect Devices Modification All of the settings can be modify here Device Modification Setting Description IP Address IP address of the co...

Page 44: ...Protocol type The protocol type of the device Select Stream Select streaming type Stream URI Shows streaming s URI Media Type The media type of the device Keep Days The amount of days the file will be...

Page 45: ...tus of the recording Event Event type of the recoding Disk Group Disk group that is going to keep the recorded video Record Rule List Setting Description Record Type Event Event type that is going to...

Page 46: ...the detailed information will be listed below Rule List Setting Description Record Type Event Event type that is going to trigger the recording Name The name of the rule Description Description of the...

Page 47: ...18 Rule Setting Wizard mode The wizard helps the user set the rule that describes the events obtained by the camera or NVR and also the related actions Shows step Summary of rule setting 4 different w...

Page 48: ...y choose Record Event Recording Event can choose any event except continuous recording Action can only choose recording Event Trigger Actions Event can choose any event except Continuous recording Act...

Page 49: ...customers event description Type Show the current event type Continuous When the type chosen is continuous recording the event will be recorded VPort DI Device to choose the DI trigger IP camera DI I...

Page 50: ...t MXNVR RO DI situation CGI CGI Start customer setting CGI Event trigger command CGI Stop customer setting CGI Event end trigger command CGI Note add note after CGI command Note Note String Note will...

Page 51: ...on Description of the action Action Setting Name Name of the action Description Description of the action Bottom Add Add a new action Modify Modify the chosen action Delete Delete the chosen action Cl...

Page 52: ...g CGI command User Name Password CGI command s username and password VPort DO Device to choose the DO control IP camera DO Index can choose between 1 to 8 Status after the action the relay statue will...

Page 53: ...onnection List all the device that is Connected to MXNVR Video Popup List video Popup priority list Up Down adjust the Video Popup sequence Step4 Schedule Setting set the Schedule Setting as always da...

Page 54: ...R RO Configuration Tool 5 25 Step5 Summary It shows all the information of the Rule setting in the last step and you can double check all the parameters have been set and decide to enable the rule for...

Page 55: ...e of the Event Description description of the Event Event multiple event to choose Continuous VPort DI NVR DI CGI and Tamper all categories are same as Wizard Mode Step2 Action s setting Name Name of...

Page 56: ...t Setting Description Name Schedule s name Type Schedule s type Daily or weekly Description Description of the recording schedule Information Setting Description Daily Every day apply daily schedule s...

Page 57: ...chedule Description Description of the recording schedule Mode Setting Description Daily Using mouse drag to select the recording period The red bar is the interval that has been set The green bar is...

Page 58: ...ype Choose search Event Type Name Filter Type in search event filter name Event result Setting Description Event Name Name of the event Event Type Type of the event Start Time Start time of the event...

Page 59: ...Type Choose search Event Type Action Type Choose search Action Type Name Filter Type in search event filter name Action result Setting Description Action Name Name of the action Action Type Type of th...

Page 60: ...port them from the NVR to the computer where the configuration tool is installed Playback Setting Description Start Date Search start date Start Time Search start time End Date Search end date End Tim...

Page 61: ...live view at the remote side where the configuration tool is installed Remote Playback Playback Setting Description Start Date Search start date Start Time Search start time End Date Search end date E...

Page 62: ...to drag the device to the left window so it can be displayed Connection List Setting Description 1 4 6 9 Choose between different windows layout Disconnect Disconnect the connection to the device tha...

Page 63: ...tting Description Add new Group Delete the Group Move the Group up or down Order Order of the Group Group Name Group s name Sync From Group View Sync Group View s Device into liveviews s group Camera...

Page 64: ...Moxa MXNVR RO Configuration Tool 5 35 Status Config Camera list Setting Description IP Address IP address of the NVR that is connected...

Page 65: ...e MXNVR RO T s setting through the configuration tool the MXNVR RO T is ready to be tested onboard through the driver view s monitor The following topics are covered in this chapter Overview of the MX...

Page 66: ...can get its IP address from a DHCP server automatically when it is connected to a TCP IP network The administrator should determine if it is more suitable to use DHCP or to use a fixed IP Toolbar Bott...

Page 67: ...ameras and NVRs that are connected and the recoding status Setting Description Car The name of the car Device Name Name of the IP camera and the NVR device IP address Each device s IP address Connecte...

Page 68: ...lan GMT 07 00 Mountain Time US Canada GMT 06 00 Central America GMT 06 00 Central Time US Canada GMT 06 00 Guadalajara Mexico City Monterrey GMT 06 00 Saskatchewan GMT 05 00 Bogota Lima Quito GMT 05 0...

Page 69: ...30 Tehran GMT 04 00 Abu Dhabi Muscat GMT 04 00 Baku Tbilisi Yerevan GMT 04 30 Kabul GMT 05 00 Ekaterinburg GMT 05 00 Islamabad Karachi Tashkent GMT 05 30 Chennai Kolkata Mumbai New Delhi GMT 05 45 Kat...

Page 70: ...GMT 10 00 Canberra Melbourne Sydney GMT 10 00 Guam Port Moresby GMT 10 00 Hobart GMT 10 00 Vladivostok GMT 11 00 Magadan Solomon Is New Caledonia GMT 12 00 Auckland Wellington GMT 12 00 Fiji Kamchatka...

Page 71: ...DP HTTP SMTP FTP Telnet NTP DNS DHCP UPnP RTP RTSP ICMP IGMPv3 QoS ToS SNMP V1 V2c V3 DDNS Modbus TCP 802 1X Ethernet 1 auto sensing 10 100 1000BaseT X RJ45 connector Connection Max 10 Audio ports Aud...

Page 72: ...non condensing Regulatory Approvals Safety UL 60950 1 EMI FCC Part 15 Subpart B Class A EN55032 class A EMS EN61000 4 2 ESD Level 3 EN61000 4 3 RS Level 3 EN61000 4 4 EFT Level 2 EN61000 4 5 Surge Le...

Reviews: