background image

- 5 - 

Installing a SATA HDD or SSD 


The MPC-2150 comes with an HDD/SSD installation kit accessory. To 
install the 2.5-inch SATA storage, follow these instructions. For better 
system reliability, we suggest using a solid state disk (SSD). A list of 
compatible SSD models is available on Moxa’s website. 
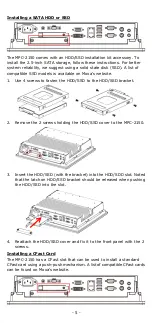
1.


Use 4 screws to fasten the HDD/SSD to the HDD/SSD bracket. 


2.


Remove the 2 screws holding the HDD/SSD cover to the MPC-2150. 


3.


Insert the HDD/SSD (with the bracket) into the HDD/SDD slot. Noted 
that the latch on HDD/SSD bracket should be released when pushing 
the HDD/SSD into the slot. 


4.


Reattach the HDD/SSD cover and fix it to the front panel with the 2 
screws. 

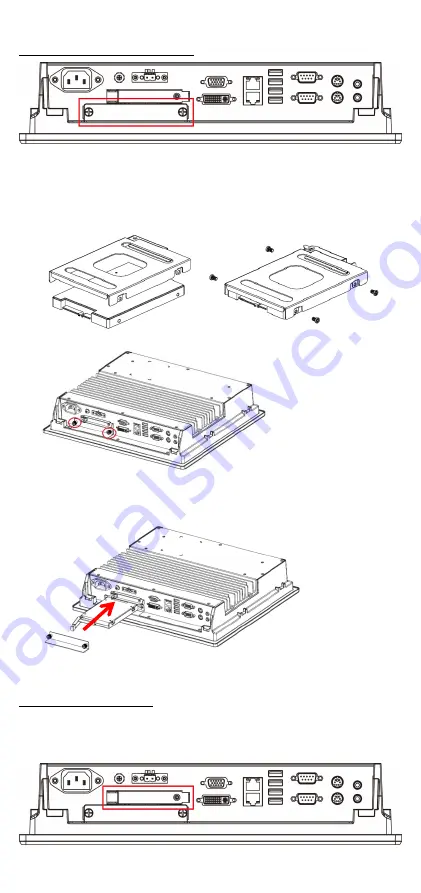
Installing a CFast Card 
The MPC-2150 has a CFast slot that can be used to install a standard 
CFast card using a push-push mechanism. A list of compatible CFast cards 
can be found on Moxa’s website. 


Summary of Contents for MPC-2150 Series

Page 1: ...Americas Toll free 1 888 669 2872 Tel 1 714 528 6777 Fax 1 714 528 6778 Moxa China Shanghai office Toll free 800 820 5036 Tel 86 21 5258 9955 Fax 86 21 5258 5505 Moxa Europe Tel 49 89 3 70 03 99 0 Fax 49 89 3 70 03 99 99 Moxa Asia Pacific Tel 886 2 8919 1230 Fax 886 2 8919 1231 Moxa India Tel 91 80 4172 9088 Fax 91 80 4132 1045 2015 Moxa Inc All rights reserved ...

Page 2: ...tdoor environments such as are found at oil and gas fields and on drilling platforms The MPC 2150 also features a 1 000 nit LCD panel with a sunlight readable and projected capacitive glove friendly multi touch screen providing an excellent user experience for outdoor applications Package Checklist Before installing the MPC 2150 verify that the package contains the following items MPC 2150 panel c...

Page 3: ...ase brightness of panel To decrease brightness of panel Info Off System functioning normally Red System hardware error Storage Red on Storage drive is functioning properly Red blinking Drive is accessing or writing data Off Drive is offline Display mode White Displays the brightness mode Off Panel brightness out of ECDIS standard range Connector Description AC DC Power Input The MPC 2150 allows us...

Page 4: ...85 4 wire RS 485 2 wire 1 DCD TxDA TxDA 2 RxD TxDB TxDB 3 TxD RxDB RxDB DataB 4 DTR RxDA RxDA DataA 5 GND GND GND GND 6 DSR 7 RTS 8 CTS Ethernet Ports The pin assignments for the two Fast Ethernet 100 1000 Mbps RJ45 ports are shown in the following table Pin 100 Mbps 1000 Mbps 1 ETx TRD 0 2 ETx TRD 0 3 ERx TRD 1 4 TRD 2 5 TRD 2 6 ERx TRD 1 7 TRD 3 8 TRD 3 Refer to the following table for a descrip...

Page 5: ...D SSD to the HDD SSD bracket 2 Remove the 2 screws holding the HDD SSD cover to the MPC 2150 3 Insert the HDD SSD with the bracket into the HDD SDD slot Noted that the latch on HDD SSD bracket should be released when pushing the HDD SSD into the slot 4 Reattach the HDD SSD cover and fix it to the front panel with the 2 screws Installing a CFast Card The MPC 2150 has a CFast slot that can be used t...

Page 6: ...onnecting the Terminal Block to Power Jack Converter to the terminal block and then connect a power adapter or you may connect the computer to an AC power source using the power cord After the power source is connected touch the Menu button to turn the computer on It takes about 10 to 30 seconds for the system to boot up To power off the MPC 2150 Series touch the MENU button for 4 seconds dependin...

Reviews: