background image

CB Series PC104 Plus User’s Manual 

Software Installation 

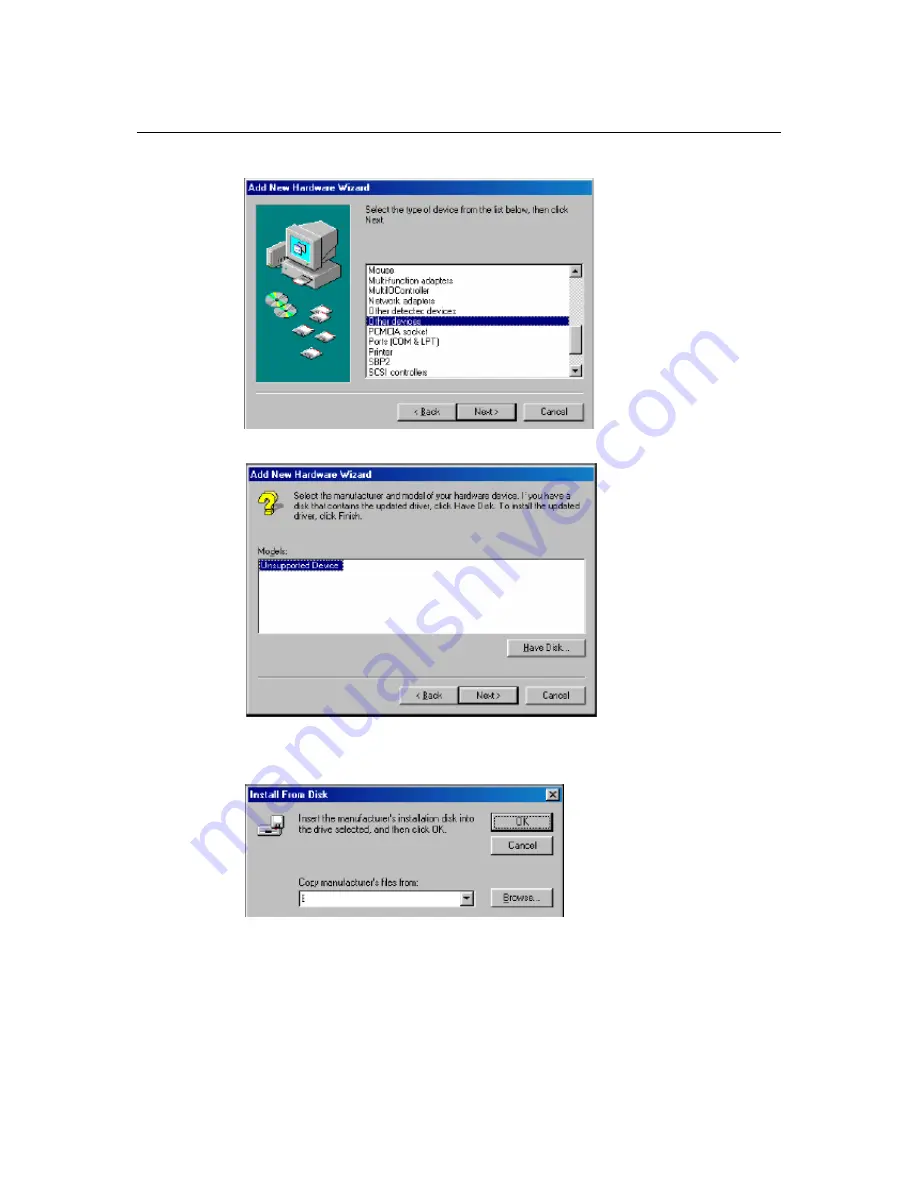
3.


Select 

Other Devices

 and click 

Next


4.


Select 

Have Disk…


5.


Click 

Browse

 and select the appropriate directory on the Document & Software CD for the 

driver. Drivers for all operating systems are located under the product folder in the 

\Software


directory. Select the 

\Win9x

 folder and click 

OK

 to continue. 


3-12

Summary of Contents for CB Series

Page 1: ...CB Series PC 104 Plus Multiport Serial Module User s Manual www moxa com product Fourth Edition January 2008 2008 Moxa Inc all rights reserved Reproduction without permission is prohibited ...

Page 2: ...ose Moxa reserves the right to make improvements and or changes to this manual or to the products and or the programs described in this manual at any time Information provided in this manual is intended to be accurate and reliable However Moxa assumes no responsibility for its use or for any infringements on the rights of third parties that may result from its use This product might include uninte...

Page 3: ...dating the Driver 3 15 Removing the Driver 3 17 Windows Vista 32 bit and 64 bit 3 18 Installing the Driver 3 18 Using Device Manager to Verify Installation 3 25 Port Configuration 3 26 Windows XP 2003 32 bit and 64 bit 3 28 Installing the Driver 3 28 Using Device Manager to Verify Installation 3 34 Port Configuration 3 35 Using PComm 3 37 Using Event Log 3 37 Disabling the Module 3 37 Uninstalling...

Page 4: ... Programming Library 4 2 PComm Utilities 4 2 Installation 4 2 PComm Diagnostic 4 2 PComm Monitor 4 3 PComm Terminal Emulator 4 3 Chapter 5 Pin Assignments 5 1 Box Header Pin Assignments 5 1 RS 232 5 1 RS 422 4 wire RS 485 5 1 2 wire RS 485 5 2 Serial Cable Pin Assignments 5 2 DB9 M Connectors 5 2 DB25 M Connectors 5 3 ...

Page 5: ...ws up to 921 6 Kbps data transmission The CB Series includes the following models CB 108 8 ports RS 232 CB 108 T 8 ports RS 232 wide temperature CB 114 4 ports RS 232 422 485 CB 114 T 4 ports RS 232 422 485 wide temperature CB 134I 4 ports RS 422 485 optical isolation protection CB 134I T 4 ports RS 422 485 optical isolation protection wide temperature 2 KV optical isolation is provided on optical...

Page 6: ...r scratches Please handle the module by the edges only since your body s static charge can damage the integrated circuits When the module is not in use please keep it in the anti static package provided You may also use this package to return the module if it requires repair The CB Series module is shipped with the following items y CB Series PC 104 Plus multiport serial module y Documentation and...

Page 7: ... Baudrate 50 bps to 921 6 Kbps Configuration Parity None Even Odd Space Mark Data Bits 5 6 7 8 Stop Bit s 1 1 5 2 IRQ BIOS assigned FIFO 128 bytes Additional Settings Serial interface selection by DIP switch Driver Support DOS Windows 2000 Windows XP 2003 Vista x86 and x64 Linux 2 4 Linux 2 6 x86 and x64 Power and Environment Operating Temperature Standard models 0 to 55 C 32 to 131 F T models 40 ...

Page 8: ...allation This chapter explains how to install the CB Series PC 104 Plus multiport serial module The following topics are covered Hardware Installation Block Diagrams Rotary Switch Termination Resistor Serial Interface Selection ...

Page 9: ...ut off power to your embedded PC and to any peripheral devices After shutting off power remove the cover of your embedded PC Step 2 Use the DIP switches on the module to select the serial interface Details for each model are provided later in this chapter Step 3 Insert the module firmly into the embedded PC s PC 104 Plus slot Step 4 Screw the control board in place Step 5 Connect the cables Step 6...

Page 10: ...rticularly when installing multiple PC 104 Plus modules in the same unit The rotary switch which looks like a clock provides a bi directional path with no signal propagation delay The first module on the stack should be set to CLK0 the second to CLK1 etc to eliminate clock skew between modules Termination Resistor Onboard termination resistors can be activated individually for each serial port usi...

Page 11: ...rface Selection For the CB 114 and CB 134I the serial interface is selecting using the onboard DIP switches CB 114 Mode S1 S2 S3 RS 232 ON RS 422 ON off 4 wire RS 485 ON off off 2 wire RS 485 off off off CB 134I Mode S1 S2 RS 422 off 4 wire RS 485 off ON 2 wire RS 485 ON ON ...

Page 12: ...ers for various operating systems are provided including DOS Windows and Linux This chapter explains how to install and remove the CB Series driver The following topics are covered in this chapter Windows NT Windows 95 98 ME Windows Vista 32 bit and 64 bit Windows XP 2003 32 bit and 64 bit Windows 2000 Linux 32 bit and 64 bit DOS Windows CE 5 0 ...

Page 13: ...priate folder for your board s drivers on the Document Software CD The NT drivers will be located under the product folder in the Software WinNT directory e g under CB 114 Series Software Copy this folder to the PC s hard disk and remember its location 3 In the Control Panel open Network applet On the Adapters tab click Add When prompted to select a product click Have Disk You will be prompted to ...

Page 14: ...s already been installed on the system it will already be listed Windows NT does not automatically detect Moxa UPCI boards so you will need to click Add for a newly installed board 6 Under Board Type select the UPCI board that is being installed The window will show the COM settings for the serial ports on the board You can modify the COM settings for any port at this time by selecting a port and ...

Page 15: ...t 8 Restart the PC After you have logged back into Windows NT you may check the event log issued by the Moxa driver to see if the board s ports have been initialized successfully In the Administrative group open Event Viewer and select Log and System For each newly installed or configured Moxa UPCI board check for a message stating that the board has been enabled e g MoxaCB 114 board with first se...

Page 16: ...t In the Adapters tab UPCI boards will appear as a type of Moxa adapter MOXA Smartio Industio Family Adapter in this example Select the Moxa adapter and click Properties 2 The configuration panel will open with a list of installed boards Select your board and click Property Up to 4 Moxa UPCI boards can be installed at a time 3 5 ...

Page 17: ... subsequent ports in numerical order For example if COM 3 is assigned to Port 1 then COM 4 will be automatically assigned to Port 2 4 Select an Rx FIFO Trigger and Tx FIFO Size The default Rx FIFO Trigger is 120 bytes high level The default Tx FIFO Size is 128 bytes high level Select Set the change to all ports to use this setting for all serial ports on the board TxFIFO RxFIFO High 128 120 Middle...

Page 18: ...t the Network applet Removing the Board To remove a board shut of your PC and physically remove the board from the PCI slot The next time you start up the PC Windows NT will automatically remove the configuration You do not need to go through the Windows control panel Updating the Driver 1 In Windows Control Panel open the Network applet In the Adapters tab UPCI boards will appear as a type of Mox...

Page 19: ...vers using the new drivers Removing the Driver 1 In Windows Control Panel open the Network applet In the Adapters tab UPCI boards will appear as a type of Moxa adapter MOXA Smartio Industio Family Adapter in this example Select the Moxa adapter and click Remove 2 Click OK to exit the Network applet and restart the system 3 8 ...

Page 20: ...ndows 95 98 ME Installing the Driver Windows 95 1 After the board is physically installed and the PC boots up Windows will automatically detect the new board and the Found New Hardware Wizard window will open Click Next to continue 2 Select Other Locations 3 9 ...

Page 21: ...ment Software CD for the driver Drivers for all operating systems are located under the product folder in the Software directory Select the Win9x folder and click OK to continue 4 After Windows finds the drivers click Finish You may begin configuring and using the new COM ports right away without restarting Windows 3 10 ...

Page 22: ...lation Windows 98 and ME 1 After the board is physically installed and the PC boots up Windows will automatically detect the new board and the Found New Hardware Wizard window will open Click Next to continue 2 Select Display a list and click Next 3 11 ...

Page 23: ... and click Next 4 Select Have Disk 5 Click Browse and select the appropriate directory on the Document Software CD for the driver Drivers for all operating systems are located under the product folder in the Software directory Select the Win9x folder and click OK to continue 3 12 ...

Page 24: ...l Software Installation 6 After Windows installs the drivers click Finish Configuring the Ports You may configure the COM ports after the board and drivers have been installed 1 In the Windows Control Panel open the System applet 3 13 ...

Page 25: ...t Select the desired board and click Properties 3 On the Ports Configuration tab select a port to configure and click Port Setting Under Port Number select a COM number to assign to the serial port Select Auto Enumerating COM Number to map subsequent ports in numerical order For example if COM 3 is assigned to Port 1 then COM 4 will be automatically assigned to Port 2 3 14 ...

Page 26: ...IFO RxFIFO High 128 120 Middle 64 60 Low 1 1 5 Click OK to approve the settings for the selected port Continue in the same way to configure the other ports When you have finished setting up the ports click OK to close the Properties window and apply the new port settings Click OK again to close the Device Manager and restart the system Updating the Driver You may configure the COM ports after the ...

Page 27: ...al Software Installation 2 In the Device Manager tab expand the Moxa Smartio Industio multiport board category by clicking the sign next to it Select the desired board and click Properties 3 In the Driver tab click Update Driver 3 16 ...

Page 28: ...rivers for all operating systems are located under the product folder in the Software directory Select the Win9x folder and click OK to continue 6 You will be prompted to restart the system The new drivers will be in effect the next time you restart Removing the Driver 1 In the Windows Control Panel open the Add Remove Programs applet On the Install Uninstall tab select MOXA Smartio Industio Drive...

Page 29: ...indows Vista 32 bit 64 bit drivers conform to the Win32 COMM API standard and support all models in the CB Series In the following instructions the CB 114 is used as an example Installing the Driver 1 After the module has been plugged into a PC 104 Plus slot turn the embedded computer on 2 Windows will automatically detect the new module and the Found New Hardware Wizard will open automatically Se...

Page 30: ...B Series PC104 Plus User s Manual Software Installation 3 When prompted to insert the disc select I don t have the disc Show me other options 4 Select Browse my computer for drier software advanced 3 19 ...

Page 31: ...wse to manually specify the folder in which to find the driver For 32 bit x86 platforms select the CB Series Software Windows Vista x86 folder on the CD For 64 bit x64 platforms select the CB Series Software Windows Vista x64 folder on the CD Click Next to continue 3 20 ...

Page 32: ...4 Plus User s Manual Software Installation 6 If you see a warning that the software has not passed Windows Logo testing click Install this driver software anyway 7 After the files have been installed click Close 3 21 ...

Page 33: ...dule is installed you will be prompted to install the new serial ports A Found New Hardware Wizard window will open for the first serial port port 0 Select Locate and install driver software recommended to continue 9 Select I don t have the disc Show me other options 3 22 ...

Page 34: ...ick Browse to manually specify the folder in which to find the driver For 32 bit x86 platforms select the CB Series Software Windows Vista x86 folder on the CD For 64 bit x64 platforms select the CB Series Software Windows Vista x64 folder on the CD Click Next to continue 12 Windows will install the driver software 3 23 ...

Page 35: ...ation 13 If you see a warning that the software has not passed Windows Logo testing click Install this driver software anyway 14 After the files have been installed click Close The remaining serial ports will automatically install in the background 3 24 ...

Page 36: ...nager to Verify Installation You can use Windows Device Manager to verify proper installation of the CB Series module In the following instructions the CB 114 is used as an example 1 Under My Computer click System Properties 2 In the System window click Device Manager 3 25 ...

Page 37: ...xclamation mark next to the Moxa items the installation of your module or serial ports was not successful Examine the Windows event log for details Port Configuration After the driver is installed a CB Series Properties window will appear The system will map the serial ports automatically It will prompt you to take care of port configuration if another CB Series module has been installed on the PC...

Page 38: ...en COM 4 will be automatically assigned to Port 2 Tx FIFO Rx FIFO High 128 bytes 120 bytes Middle 64 bytes 60 bytes Low 1 byte 1 byte Select an Rx FIFO Trigger The default value is 120 bytes high level Select Set the change to all ports to use this setting for all serial ports on the module Select a Tx FIFO Size The default value is 128 bytes high level Select Set the change to all ports to use th...

Page 39: ...the Win32 COMM API standard and support all models in the CB Series In the following instructions the CB 114 is used as an example Installing the Driver 1 After the module has been plugged into a PC 104 Plus slot turn the embedded computer on 2 Windows will automatically detect the new module and the Found New Hardware Wizard will open automatically Select No not this time and click Next 3 Select ...

Page 40: ...the driver For 32 bit x86 platforms select the CB Series Software Windows XP_2003 x86 folder on the CD For 64 bit x64 platforms select the CB Series Software Windows XP_2003 x64 folder on the CD Click Next to continue 5 If you see a warning that the software has not passed Windows Logo testing click Continue Anyway 3 29 ...

Page 41: ...install the drivers When the installation is complete click Finish 7 After the module is installed you will be prompted to install the new serial ports A Found New Hardware Wizard window will open for the first serial port port 0 Select No not this time and click Next 3 30 ...

Page 42: ...d click Next 9 Select Search for the best driver in these locations and Include this location in the search For 32 bit x86 platforms select the CB Series Software Windows XP_2003 x86 folder on the CD For 64 bit x64 platforms select the CB Series Software Windows XP_2003 x64 folder on the CD Click Next to continue 3 31 ...

Page 43: ...Series PC104 Plus User s Manual Software Installation 10 If you see a warning that the software has not passed Windows Logo testing click Continue Anyway 11 Windows will install the necessary drivers 3 32 ...

Page 44: ...CB Series PC104 Plus User s Manual Software Installation 12 After the installation is complete click Finish 13 Repeat the installation process for the remaining serial ports 3 33 ...

Page 45: ...rify Installation You can use Windows Device Manager to verify proper installation of the CB Series module In the following instructions the CB 114 is used as an example 1 Right click My Computer and select Properties in the context menu 2 In the Hardware tab click Device Manager 3 34 ...

Page 46: ...xclamation mark next to the Moxa items the installation of your module or serial ports was not successful Examine the Windows event log for details Port Configuration After the driver is installed a CB Series Properties window will appear The system will map the serial ports automatically It will prompt you to take care of port configuration if another CB Series module has been installed on the PC...

Page 47: ...O High 128 bytes 120 bytes Middle 64 bytes 60 bytes Low 1 byte 1 byte Select an Rx FIFO Trigger The default value is 120 bytes high level Select Set the change to all ports to use this setting for all serial ports on the module Select a Tx FIFO Size The default value is 128 bytes high level Select Set the change to all ports to use this setting for all serial ports on the module 3 Click OK to appr...

Page 48: ...orts are working properly You can download the free version of PComm at Moxa s website www moxa com Using Event Log You may refer to the Windows event log to verify operation of the module To view the event log open Event Viewer which is located under Administrative Tools in the Control Panel Information about the module will be located under the System category Disabling the Module 1 Right click ...

Page 49: ...anager right click your module under Multi port serial adapters and select Disable in the context menu This will disable the module Uninstalling the Module 1 Right click My Computer and select Properties in the context menu 2 In the Hardware tab click Device Manager 3 38 ...

Page 50: ...Windows 2000 The Windows 2000 drivers conform to the Win32 COMM API standard and support all models in the CB Series In the following instructions the CB 114 is used as an example Installing the Driver 1 After the module has been plugged into a PC 104 Plus slot turn the embedded computer on 2 Windows will automatically detect the new module and the Found New Hardware Wizard will open automatically...

Page 51: ...Series PC104 Plus User s Manual Software Installation 3 Select Search for a suitable driver for my device recommended and click Next to continue 4 Select Specify a location and click Next to continue 3 40 ...

Page 52: ...y the folder in which to find the driver Select the CB Series Software Windows 2K folder on the CD and click Next to continue 6 To begin installing the module click Next 7 If you see a warning that the Microsoft digital signature was not found click Yes to proceed with the installation 3 41 ...

Page 53: ...ows will install the drivers When the installation is complete click Finish 9 After the module is installed you will be prompted to install the new serial ports A Found New Hardware Wizard window will open for the first serial port port 0 Click Next to proceed 3 42 ...

Page 54: ...nual Software Installation 10 Select Search for a suitable driver for my device recommended and click Next 11 Select Specify a location and click Next 12 Select the CB Series Software Windows 2K folder on the CD and click Next 3 43 ...

Page 55: ... Installation 13 When the driver has been found click Next to proceed 14 Windows will install the necessary drivers After the installation is complete click Finish The remaining serial ports will be installed automatically in the background 3 44 ...

Page 56: ...of the CB Series module In the following instructions the CB 114 is used as an example 1 Right click My Computer and select Properties in the context menu 2 In the Hardware tab click Device Manager 3 In the Device Manager window you should see your CB Series module under Multi port serial adapters You should also see Moxa communication ports under Ports COM LPT 3 45 ...

Page 57: ... was not successful You can check the Windows event log for details Port Configuration After the driver is installed a CB Series Properties window will appear The system will map the serial ports automatically It will prompt you to take care of port configuration if another CB Series module has been installed on the PC 1 Select a specific port under the Port Configuration tab and click Port Settin...

Page 58: ...vel Select Set the change to all ports to use this setting for all serial ports on the module Select a Tx FIFO Size The default value is 128 bytes high level Select Set the change to all ports to use this setting for all serial ports on the module 3 Click OK to approve the port settings Click OK again to close the CB Series Properties window and apply the new port settings Using PComm PComm Diagno...

Page 59: ... Windows event log to verify operation of the module To view the event log open Event Viewer which is located under Administrative Tools in the Control Panel Information about the module will be located under the System category Disabling the Module 1 Right click My Computer and select Properties in the context menu 2 In the Hardware tab click Device Manager 3 48 ...

Page 60: ...anager right click your module under Multi port serial adapters and select Disable in the context menu This will disable the module Uninstalling the Module 1 Right click My Computer and select Properties in the context menu 2 In the Hardware tab click Device Manager 3 49 ...

Page 61: ...4 Plus User s Manual Software Installation 3 Right click your module under Multi port serial adapters and select Uninstall in the context menu 4 A confirmation dialog will appear Click OK to uninstall the device 3 50 ...

Page 62: ...y to test the tty ports cd moxa mxser utility term msterm DOS Moxa DOS API 232 is a software package that can help you develop or debug serial communications programs This section will explain how to install the package set up the driver and load or unload the driver For additional information about the API 232 library and utilities please refer to Chapter 4 The DOS drivers support all models in t...

Page 63: ...re detailed information please refer to the help files by pressing F1 in the setup program 1 Run the setup program BIN SETUP EXE 2 Select your CB Series model and press Enter 3 A window will open displaying all configuration information for all installed modules Press PgDn to view advanced port setup options and to make configuration changes Your module s configuration will be displayed along with...

Page 64: ...g as it does not overlap with another port Generally you should consider the convenience of programming when specifying the port number TxD buffer size This is the transmission output buffer allocated in the system for each port RxD buffer size This is the receiving input buffer allocated in the system for each port F5 Group Edit This allows you to configure several ports simultaneously as a group...

Page 65: ...explain how to install Moxa CB series boards under WinCE 5 0 These instructions are intended for users who are familiar with the Windows CE Platform Builder 5 0 Toolkit and would like to install one or more Moxa Tech products Here we only give the step by step installation instructions for the development environment You will need to download the image file to the target host yourself The WinCE 5 ...

Page 66: ...CB Series PC104 Plus User s Manual Software Installation 2 Start WinCE Platform Builder select File and open New Platform 3 Enter a Name for Workspace and press Next 3 55 ...

Page 67: ... Packages Design Template Applications Media Networking Communications OBEX Server select what you need to build your own environment The Completing the New Platform Wizard window will open to indicate that it has finished creating a new platform Click Finish to complete the setup 3 56 ...

Page 68: ...CB Series PC104 Plus User s Manual Software Installation 3 57 ...

Page 69: ...e driver Prefix COM or Prefix MXU you would like to include and choose Add to OS Design Note You can only select either Prefix COM or Prefix MXU but not both Prefix COM supports up to 10 ports from COM0 to COM9 Prefix MXU supports more than 10 ports so it is better for you to select Prefix MXU if you are not sure how many ports the device has Otherwise you will only be allowed to use one multiport...

Page 70: ...e the drivers included in your OS Design Note If you would like to use Terminal Emulator tool please modify mxserce5 reg and keyboard like below This is only just for one COM port You have to notice number of ports COM MXU and enter the correct information HKEY_LOCAL_MACHINE ExtModems HayesCompat1 Port COM2 DeviceType dword 1 FriendlyName Hayes Compatible on COM2 7 Finally open Build OS select Bui...

Page 71: ...104 Plus User s Manual Software Installation 8 Finally copy your image file to the target Host Note If you have created a Windows CE Platform Builder in the development environment you can skip steps 2 3 and 4 3 60 ...

Page 72: ...e access data acquisition and industrial control It provides a simpler solution compared to the more complex Windows Win32 COMM API PComm is a professional serial communication tool for Windows PCs PComm includes the following features y Useful utilities for diagnostics port monitoring and terminal emulation y Sample programs y Comprehensive help files The following topics are covered in this chap...

Page 73: ...rting Notes or PComm Programming Guide You may also refer to the sample programs in the PComm directory PComm Utilities This section provides brief descriptions of the PComm utilities For more information about these utilities please refer to the help files or to the API 232 txt file for DOS Installation To install PComm run Setup exe from the installation diskette Please note that the PComm diagn...

Page 74: ...ication parameters and status To run PComm Monitor go to Start Æ Program Æ PComm Lite Æ Monitor PComm Terminal Emulator PComm Terminal Emulator can be used to connect to a serial port to verify that data transmission is functioning correctly It supports multiple windows and both VT100 and ANSI terminal types You can interactively transfer data periodically send patterns and transfer files using AS...

Page 75: ...CB Series PC104 Plus User s Manual Serial Programming Tools 4 4 ...

Page 76: ...s to 4 serial ports Pin Signal Pin Signal Pin Signal Pin Signal 1 DCD0 11 DCD1 21 DCD2 31 DCD3 2 DSR0 12 DSR1 22 DSR2 32 DSR3 3 RxD0 13 RxD1 23 RxD2 33 RxD3 4 RTS0 14 RTS1 24 RTS2 34 RTS3 5 TxD0 15 TxD1 25 TxD2 35 TxD3 6 CTS0 16 CTS1 26 CTS2 36 CTS3 7 DTR0 17 DTR1 27 DTR2 37 DTR3 8 18 28 38 9 GND0 19 GND1 29 GND2 39 GND3 10 20 30 40 RS 422 4 wire RS 485 These pin assignments apply to the CB 114 an...

Page 77: ...ta3 B 7 Data0 A 17 Data1 A 27 Data2 A 37 Data3 A 9 GND0 19 GND1 29 GND2 39 GND3 Serial Cable Pin Assignments DB9 M Connectors 1 5 6 9 The CBL F40M9x4 50 and CBL F20M9x4 50 cables provide DB9 M connectors for each serial port with pin assignments as follows Pin RS 232 RS 422 4 wire RS 485 2 wire RS 485 1 DCD TxD A 2 RxD TxD B 3 TxD RxD B Data B 4 DTR RxD A Data A 5 GND GND GND 6 DSR 7 RTS 8 CTS 5 2...

Page 78: ...13 25 The CBL F40M25x4 50 and CBL F20M25x4 50 cables provide DB25 M connectors for each serial port with pin assignments as follows Pin RS 232 RS 422 4 wire RS 485 2 wire RS 485 2 TxD RxD B Data B 3 RxD TxD B 4 RTS 5 CTS 6 DSR 7 GND GND GND 8 DCD TxD A 20 DTR RxD A Data A 5 3 ...

Reviews: