If you have any questions , please contact us.
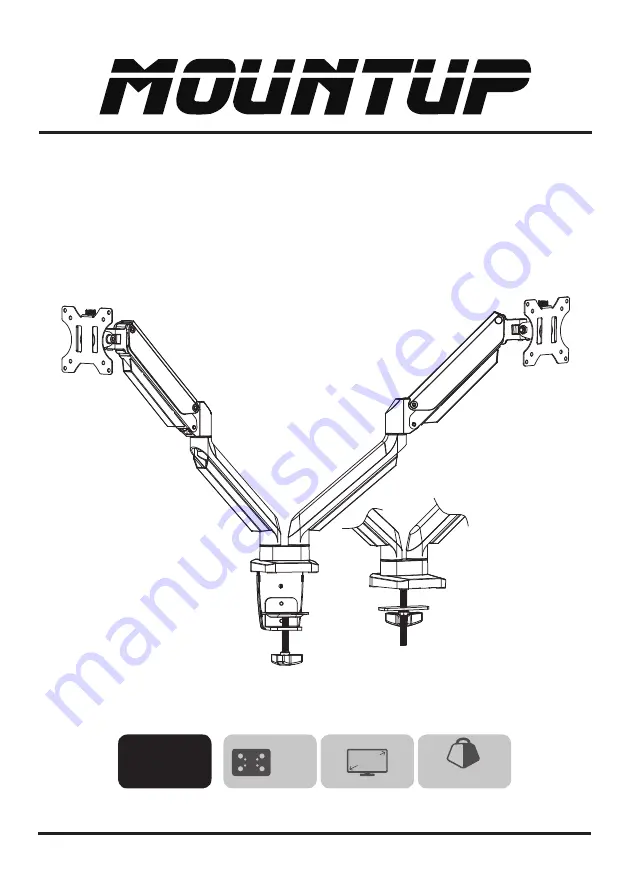
MU0024
V3.0
75x75
100x100
32"
(1.5~8kg)x2
(3.3~17.6lbs)x2
Dual Monitor Counterbalance Desk Mount
Instruction Manual
Page 1: ...If you have any questions please contact us MU0024 V3 0 75x75 100x100 32 1 5 8kg x2 3 3 17 6lbs x2 Dual Monitor Counterbalance Desk Mount Instruction Manual...
Page 2: ...used by improper mounting incorrect assembly or inappropriate use This product contains small items that could be a choking hazard if swallowed NOT FOR CHILDREN UNDER 3 YEARS ADULT SUPERVISION IS REQU...
Page 3: ...sk scratches Attach Clamp D to clamp base support C with Bolts J and 4mm Allen Key M ASSEMBLY STEPS STEP 1 Choose a mounting option OPTION A Clamp Installation Adjust the Clamp width to fit with desk...
Page 4: ...e support G Mount grommet base to monitor stand A Bottom with Bolts J and tighten by 4mm allen key M Apply pads L to the monitor stand A bottom to avoid desk scratches Run long screw F through grommet...
Page 5: ...rews M A or M C with washers M E using 6mm Allen key N Do not tighten the screws excessively or your monitor might be damaged OPTION B Curved Back Monitor Attach the VESA plate B to back of monitor an...
Page 6: ...ts down Note 1 Loosen the tilting bolt 2 Adjust monitor to your desired tilting angle 3 Retighten the tilting bolt to Important Notice The gas spring tension is pre set to the weakest level by default...
Page 7: ...he desired height by itself Turn counter clockwise direction to increase gas spring tension until the monitor can stay at the desired height by itself After being attached to the arm the monitor rises...
Page 8: ...tinued STEP 5 Cable Management For both bottom and upper portion of the arm just slide the cable cover up and away from the arm do not need to take much effort to pull the ends of the cable cover away...
Page 9: ...he bottom portion of the arm insert the cable and slide the cable cover down On the upper portion of the arm insert the cable and press the tabs on the inside of the cable cover slightly inward and sl...
Page 10: ...install Allen key M N can be stored in Base Support Cover E for next time using Note When tilted if the monitor sags or does not stay please fasten the tilting bolt on the mount until the monitor can...
Page 11: ...Product Dimensions 10 0 39 3 3 3 9 6 7 1 97 2 4 5 3 16 3 8 7 10 8 270 360 180 360 2 9 3 9 4 5 2 9 3 9 4 5 45 45...
Page 12: ...of monitor or stand This product is intended for indoor use only Using this product outdoors could lead to product failure and personal injury Check that the bracket is secure and safe to use at regul...