88 LBS (40 kg)
Before hanging TV, please conduct "wall plate installation integrity test" first.
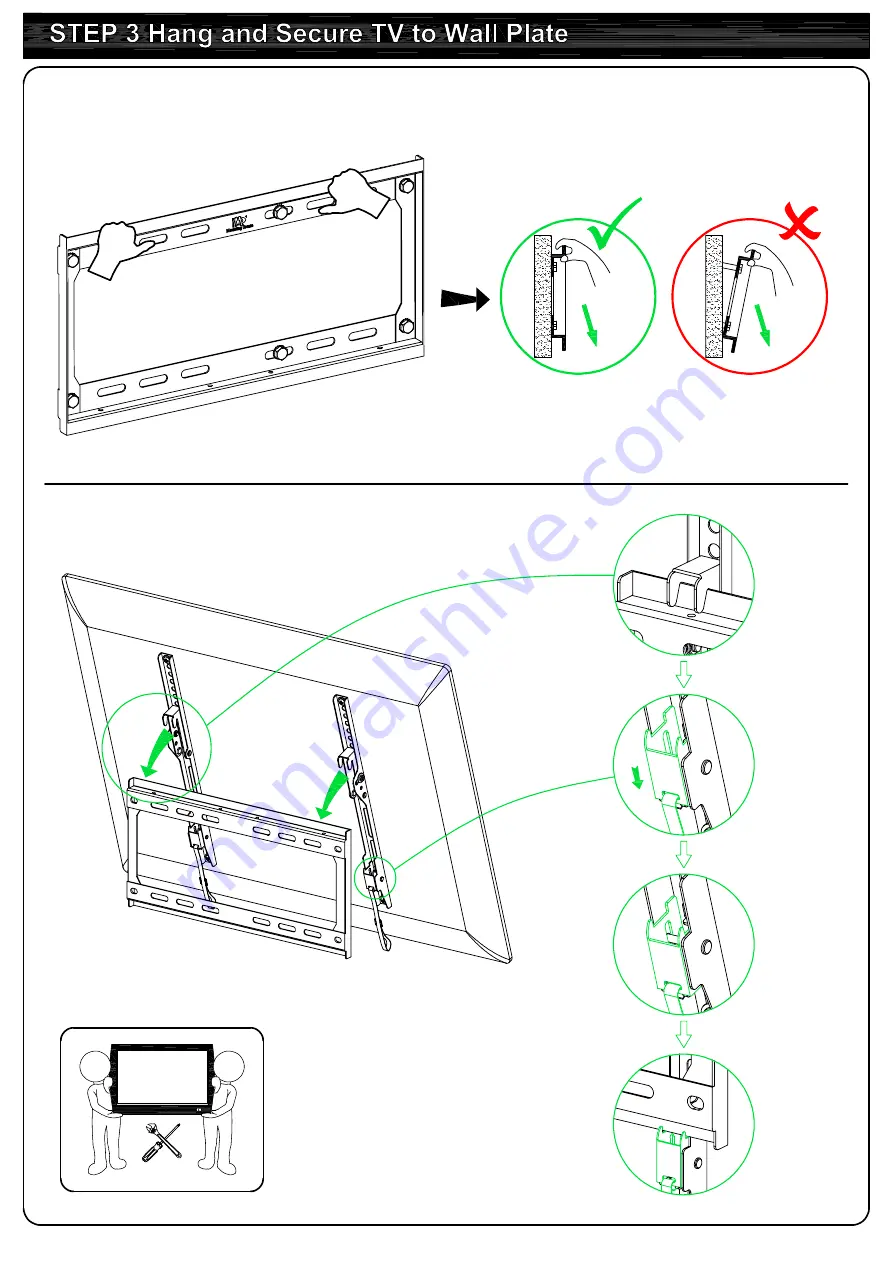
7
Pull down
TV
1
2
Page 1: ...75mm 3x3 F r die Installationsanweisungen auf Deutsch siehe Seite 10 11 Pour l instruction en Fran ais veuillez vous reporter la page 12 13 Para las instrucciones de la instalaci n en Espa ol favor ve...
Page 2: ...ully before installation This product is designed for use in wood stud and solid concrete wall DO NOT install into drywall alone The wall must be capable of supporting five times the weight of the TV...
Page 3: ...M8 M6 M4 1 1 Select TV Screws TV back Bracket Long Screw Spacer Yes go to PAGE 3 for detailed combination 2 1 2 Need Spacer Washer x1 Highly recommended to add spacers for more spacing between wall m...
Page 4: ...3 Tips If you need to combine M6 e or M8 c f screw with 2 5mm spacer j you have to remove the inner circle 1 3 Attach the TV Brackets Spacer s screw and washer No Screw and washer...
Page 5: ...mm Min Wood Stud Size nominal 2 51mm actual 1 1 2 38mm Min Wood Stud Size nominal 4 102mm actual 3 1 2 89mm Parts and Hardware Wood Stud Installation O 4 Centre line Wall Plate x1 Lag Bolt M7x70mm x6...
Page 6: ...ge All 4 lag bolts MUST BE firmly tightened to prevent unwanted movement of the wall plate assembly Ensure the wall plate assembly is securely fastened to the wall before continuing on to the next ste...
Page 7: ...10mm DANGER CAUTION To avoid potential personal injury or property damage All 6 lag bolts MUST BE firmly tightened to prevent unwanted movement of the wall plate assembly Ensure the wall plate assembl...
Page 8: ...88 LBS 40 kg Before hanging TV please conduct wall plate installation integrity test first 7 Pull down TV 1 2...
Page 9: ...0 8 Pull TV to your desired angle then fasten 2 tilting bolts with Allen key 0 8 Option To keep TV in vertical position please use two pins to insert the holes on two brackets respectively as shown in...
Page 10: ...MAX 400mm 435mm 222mm MAX 400mm 420mm 38mm 0 8 Pull down the straps 9...
Page 11: ...gern und Massivbetonwand NICHT an einer reinen Gipskartonwand montieren Die Wand muss das F nffache des Gesamtgewichts des Fernsehapparats und der Halterung tragen k nnen Verwenden Sie dieses Produkt...
Page 12: ...e sechs Sechskant Holzschrauben m ssen festgezogen werden um ein ungewolltes Verrutschen der Wandplatte zu verhindern Achten Sie darauf dass die Wandplatte sicher an der Wand befestigt ist bevor Sie m...
Page 13: ...en bois au mur en b ton plein Ne l installez pas la place o il n y a que la plaque de pl tre La force portante du mur doit atteindre au moins cinq fois du poids total de votre t l viseur et du support...
Page 14: ...tape 2B Installation du mur en b ton plein Voir la page 6 Attention Tous les six boulons tire fond doivent tre fermement serr s pour viter le mouvement non souhait de la plaque murale Veuillez v rifie...
Page 15: ...oducto es apto para paredes con pilares de madera y muro de hormig n s lido No instalar en paredes de solo yeso La capacidad de soporte de la pared debe ser cinco veces m s que el peso total del telev...
Page 16: ...stalaci n en pared de hormig n s lido Ver p gina 6 Atenci n Los seis tornillos de cabeza hexagonal deben apretarse firmemente para evitar que la placa mural en la pared se mueva Favor de asegurarse qu...
Page 17: ...in calcestruzzo solido NON installarlo in soli cartongessi Il muro deve essere capace di portare almeno cinque volte il peso totale del televisore e del supporto Non applicare questo prodotto ad altr...
Page 18: ...nstallazione sul muro in calcestruzzo Vedi pagina 6 Cautela Le sei viti per Legno a testa esagonale devono essere avvitate bene in modo da evitare movimenti indesiderati della piastra a muro Assicura...