3
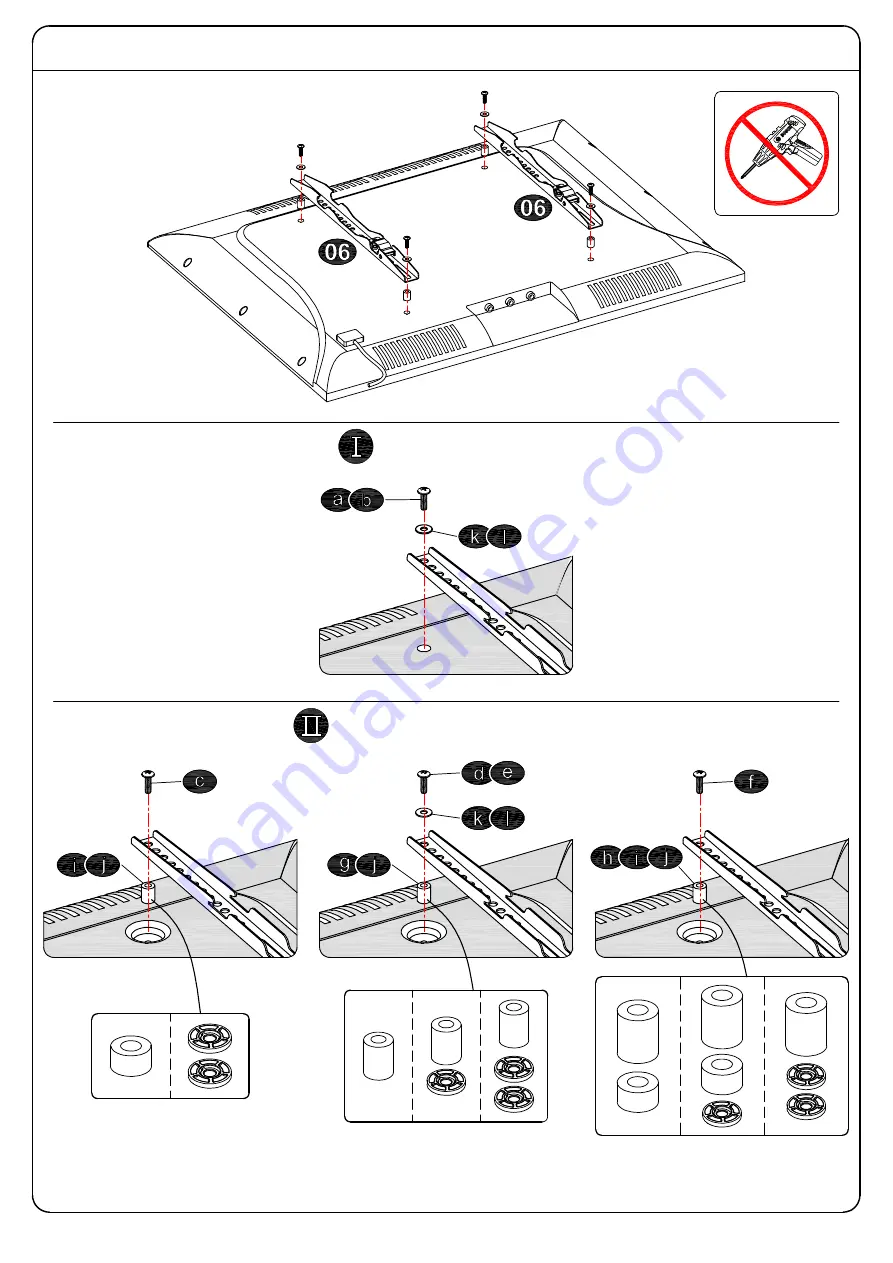
Tips: If you need to combine M6(e) or M8(c/f) screw with 2.5mm spacer(j), you have to
remove the inner circle.
1-3 Attach the TV Brackets
Screw and washer
Spacer(s), screw and washer
No!
Page 1: ...m 8x4 F r die Installationsanweisungen auf Deutsch siehe Seite 12 13 Pour l instruction en Fran ais veuillez vous reporter la page 14 15 Para las instrucciones de la instalaci n en Espa ol favor vea l...
Page 2: ...product is designed for use in wood stud and solid concrete wall DO NOT install into drywall alone The wall must be capable of supporting five times the weight of the TV and mount combined Do not appl...
Page 3: ...ware included will be used TV Brackets x2 M8 M6 M4 1 1 Select TV Screws TV back Bracket Washer Bracket Long Screw Spacer No go to PAGE 3 for detailed combination Yes go to PAGE 3 for detailed combinat...
Page 4: ...3 Tips If you need to combine M6 e or M8 c f screw with 2 5mm spacer j you have to remove the inner circle 1 3 Attach the TV Brackets Screw and washer Spacer s screw and washer No...
Page 5: ...2B on PAGE 6 16mm 5 8 Max 16 406mm Min Wood Stud Size nominal 2 51mm actual 1 1 2 38mm Min Wood Stud Size nominal 4 102mm actual 3 1 2 89mm Parts and Hardware Lag Bolt M8x60mm Wood Stud Installation O...
Page 6: ...njury or property damage All 4 lag bolts MUST BE firmly tightened to prevent unwanted movement of the wall plate assembly Ensure the wall plate assembly is securely fastened to the wall before continu...
Page 7: ...jury or property damage All 4 lag bolts MUST BE firmly tightened to prevent unwanted movement of the wall plate assembly Ensure the wall plate assembly is securely fastened to the wall before continui...
Page 8: ...7 Parts and Hardware Extension Arm x2 Extension Arm x2 M6x16mm Bolt x2 3 1 Extension Arms Assembly Supporting Bar x2 M5x12mm Bolt x4 Allen Key x1 M6x12mm Bolt x4...
Page 9: ...8 3 3 Hang and Secure TV to Wall Plate TV 1 2 100 LBS 45 5 KG Before hanging TV please conduct wall plate installation integrity test first 3 2 Wall Plate Installation Integrity Test...
Page 10: ...bolts on the rear of TV plate by maximum 2 turns adjust to level and retighten to secure 9 4 2 Tilting angle adjustment 5 15 Pull TV to your desired angle then fasten 2 tilting bolts with Allen key T...
Page 11: ...10 Allen key storage For easy adjustment you might put the Allen key on the wall plate as illustration...
Page 12: ...11 MAX 600mm MIN 200mm 435mm 730mm 172 5mm 422mm 64mm MAX 400mm MIN 100mm 420mm 267mm 45 45 5 15...
Page 13: ...rn und Massivbetonwand NICHT an einer reinen Gipskartonwand montieren Die Wand muss das F nffache des Gesamtgewichts des Fernsehapparats und der Halterung tragen k nnen Verwenden Sie dieses Produkt ni...
Page 14: ...H ngen und befestigen Sie den Fernseher an der Wandplatte Siehe Seite 7 3 1 Montage der Verl ngerungsarme 3 2 Eine Sicherheitspr fung f r die Montage der Wandplatte Bevor Sie den Fernseher an die Wan...
Page 15: ...t en bois au mur en b ton plein Ne l installez pas la place o il n y a que la plaque de pl tre La force portante du mur doit atteindre au moins cinq fois du poids total de votre t l viseur et du suppo...
Page 16: ...e sur le mur avant de passer l tape suivante Pour viter que le t l viseur ne tombe la t te du boulon doit faire face vers le haut tape 3 Suspendre et fixer votre t l viseur sur la plaque murale Voir...
Page 17: ...producto es apto para paredes con pilares de madera y muro de hormig n s lido No instalar en paredes de solo yeso La capacidad de soporte de la pared debe ser cinco veces m s que el peso total del tel...
Page 18: ...on los siguientes pasos de su instalaci n Para prevenir que el televisor se caiga durante este paso la cabeza del tornillo debe ir hacia arriba Paso 3 Colgar y sujetar del televisor a la placa mural V...
Page 19: ...i in calcestruzzo solido NON installarlo in soli cartongessi Il muro deve essere capace di portare almeno cinque volte il peso totale del televisore e del supporto Non applicare questo prodotto ad alt...
Page 20: ...ia ben fissata sul muro prima di eseguire il prossimo passo Per evitare che la TV cada la testa del bullone deve essere rivolta verso l alto Passo 3 Appendi e fissa la TV alla piastra a muro Vedi pagi...