3
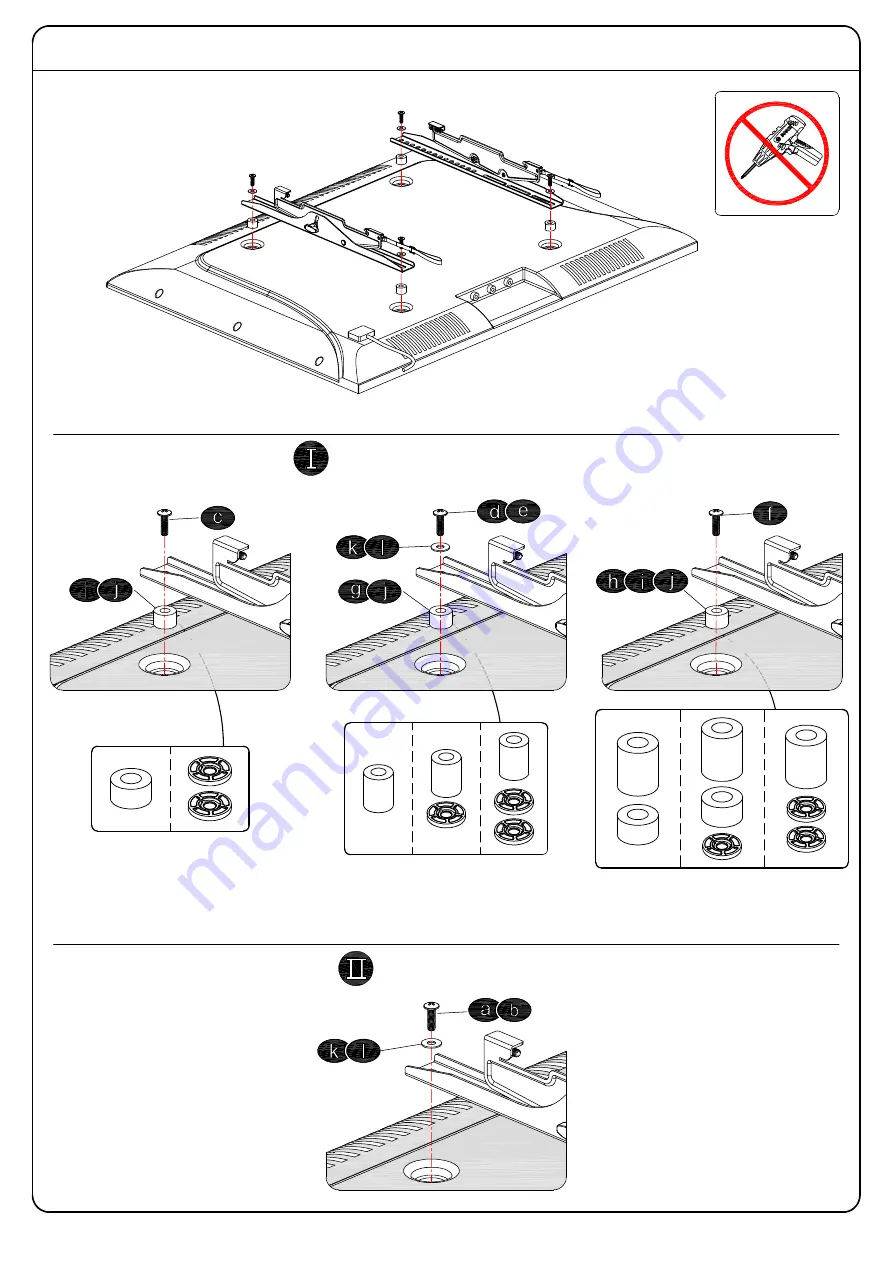
Tips: If you need to combine M6(e) or M8(c/f) screw with 2.5mm spacer(j), you have to
remove the inner circle.
1-3 Attach the TV Brackets
Spacer(s), screw and washer
No!
Screw and washer
Page 1: ...For more information please visit our website www mountingdreamonline com B1 42 70 Max 600x400mm 24x16 Min 200x100mm 8x4 TV 1 2 F r die Installationsanweisungen auf deutsch Siehe Seite 10 11 Pour l in...
Page 2: ...or use of this product contact Customer Service via customerservice mountingdream com or call us at telephone 626 604 9048 USA Mon Fri 10am 6pm Pacific time This product is designed for use in wood st...
Page 3: ...M6x35mm M8x45mm M6x17mm M8x22mm M4 M6 10mm 2 5mm Washers Spacers TV Screws x4 x4 x4 x4 x4 x4 x4 x4 x4 x4 x8 x4 Bracket Washer No go to PAGE 3 for detailed combination TV back Short Screw x1 WARNING T...
Page 4: ...3 Tips If you need to combine M6 e or M8 c f screw with 2 5mm spacer j you have to remove the inner circle 1 3 Attach the TV Brackets Spacer s screw and washer No Screw and washer...
Page 5: ...l 3 1 2 89mm Wood Stud Installations 4 x4 Parts and Hardware x1 Assemble Wall plate Contact us at telephone 626 604 9048 USA Mon Fri 10am 6pm Pacific time or email us by customerservice mountingdream...
Page 6: ...ud CAUTION To avoid potential personal injury or property damage All 4 lag bolts MUST BE firmly tightened to prevent unwanted movement of the wall plate assembly Ensure the wall plate assembly is secu...
Page 7: ...AUTION To avoid potential personal injury or property damage All 4 lag bolts MUST BE firmly tightened to prevent unwanted movement of the wall plate assembly Ensure the wall plate assembly is securely...
Page 8: ...7 110 LBS 50 KG Before hanging TV please conduct wall plate installation integrity test first TV 1 2 Pull down...
Page 9: ...2 leveling bolts on the rear of TV plate by maximum 2 turns adjust to level and retighten to secure 4 2 Tilting angle adjustment 5 15 Loosen handle adjust TV to your desired position then tighten hand...
Page 10: ...9 Pull down the straps 5 15 MAX 600mm MAX 400mm 430mm 651mm 222mm 65mm...
Page 11: ...ingdream com Oder rufen Sie 626 604 9048 USA an B rozeiten Montag bis Freitag 10 00 18 00 Uhr Pazifikzeit Dieses Produkt ist f r die Installation an W nden mit Holztr gern und Massivbetonwand NICHT an...
Page 12: ...em Schritt mit 3 Schritt auf der Seite 7 fort Schritt 2B Die Montage von Massivbetonwand Siehe Seite 6 Vorsicht Alle vier Sechskant Holzschrauben m ssen festgezogen werden um ein ungewolltes Verrutsch...
Page 13: ...merservice mountingdream com Ou appelez nous au 626 604 9048 USA Temps de travail du lundi au vendredi de 10h 18h Heure du Pacifique Ce produit s applique au montant en bois au mur en b ton plein Ne l...
Page 14: ...fini cette tape allez directement la page 7 et continuez l tape 3 tape 2B Installation du mur en b ton plein Voir la page 6 Attention Tous les quatre boulons tire fond doivent tre fermement serr s pou...
Page 15: ...o servicio al cliente customerservice mountingdream com O ll menos al 626 604 9048 USA Horario de oficina de lunes a viernes de 10 a m a 6 p m Hora del Pac fico Este producto es apto para paredes con...
Page 16: ...rminar este paso favor continuar con el paso 3 en la p gina 7 Paso 2B Instalaci n en pared de hormig n s lido Ver p gina 6 Atenci n Los cuatro tornillos de cabeza hexagonal deben apretarse firmemente...
Page 17: ...chiamaci al numero 626 604 9048 USA Orario d ufficio dal luned al venerd dalle 10 00 alle 18 00 ora del Pacifico Questo prodotto progettato per pilastri in legno e muri in calcestruzzo solido NON ins...
Page 18: ...sto passo va direttamente alla pagina 7 per il passo 3 Passo 2B Installazione sul muro in calcestruzzo Vedi pagina 6 Cautela Le quattro viti per Legno a testa esagonale devono essere avvitate bene in...