background image

Driving

Check the laws and regulations on the use of cellular
telephones in the areas where you drive. Always obey
them. Also, when using your phone while driving, please:

• give full attention to driving,

• use hands-free operation, if available, and

• pull off the road and park before making or

answering a call if driving conditions so require.

Vehicle Electronic Equipment

RF energy may affect some electronic systems in
motor vehicles. Check with your vehicle
manufacturer’s representative to be sure your phone
will not affect the electronic systems of your vehicle.

Children

Do not allow children to play with your phone. It is not
a toy. Children could damage the phone, or make
calls that increase your telephone bills.

Blasting Areas

To avoid interfering with blasting operations, turn your
unit off when in a ‘blasting area’ or in areas posted:
‘turn off two-way radio’. Construction crews often use
remote control RF devices to set off explosives.

Potentially Explosive Atmospheres

Turn your phone off when in any area with a
potentially explosive atmosphere. It is rare, but your
phone or its accessories could generate sparks.
Sparks in such areas could cause an explosion or fire
resulting in bodily injury or even death.

Installation Manual

46

Summary of Contents for T5ZX1

Page 1: ...APPLICANT MOTOROLA INC FCC ID IHDT5ZX1 EXHIBIT 8c A draft copy of the installation manual follows Note RF exposure information is provided on page 33 ...

Page 2: ...Cellular Mobile and Attache Accessory Installation Manual ...

Page 3: ...lanning and Installation 27 Transceiver Location 27 Standard Transceiver Mounting Bracket Installation 27 Handset Location 28 Control Unit Mounting Cup Installation 30 Adjustable Angle Mounting Bracket Installation optional 30 Antenna Location 32 Antenna Installation 33 Hands Free Microphone Installation 33 Optional External Speaker Installation 34 Control Power Cable Routing 35 Control Power Cabl...

Page 4: ...that is powered by your vehicle s electrical system through the cigarette lighter socket This phone is completely self contained and may be moved easily between your personal car s a company truck or car or a rental car because it requires no complex wiring installation within the vehicle The unit is installed in the vehicle by simply securing it to a spare seat with a lap belt and plugging it int...

Page 5: ...omes complete with a battery an AC charger and an integrated hands free microphone contained in the connector assembly An external full duplex hands free microphone can be purchased separately The hands free feature allows you to place or answer calls without removing your hands from the steering wheel except to enter the number to be called See Installation Manual 2 Bag Handset Battery Battery Ad...

Page 6: ...hown in Figure 1 The following procedure will guide you through the assembly of your Attache Assembly Procedure Step 1 Remove the transceiver from its Attache compartment Step 2 Carefully connect the 25 pin connector of the power connector assembly to the front of the transceiver and tighten the two thumbscrews as shown in Figure 2 Figure 2 Installation Manual 3 ...

Page 7: ...Carefully place the transceiver antenna and connector assembly into the transceiver pocket as shown in Figure 4a and zip the pocket closed leaving the antenna outside of the pocket as shown in Figure 4b Be sure to connect the cigarette lighter plug to the cigarette lighter socket on your vehicle dashboard when you are ready to use your phone Installation Manual 4 ...

Page 8: ...Figure 4a Figure 4b Installation Manual 5 ...

Page 9: ...uipped with a battery Step 5 Locate the battery adapter cable and snap the battery connector clip onto the battery as shown in Figure 5a Attach the other end to the battery connector assembly as shown in Figure 5b Figure 5a Figure 5b Installation Manual 6 ...

Page 10: ...to the transceiver pocket as shown in Figure 6 and zip closed Figure 6 Step 7 Plug the handset modular connector into the jack located on the side of the transceiver as shown in Figure 7 and place the handset into the hang up cup Figure 7 Installation Manual 7 ...

Page 11: ...as calendars notepads business cards etc as shown in Figure 8 NOTE These items are purchased separately NOTE Be sure to charge the battery for at least 10 hours or overnight using the AC charger before attempting to use the cellular telephone Figure 8 Installation Manual 8 ...

Page 12: ...rvicing or to place them in a vehicle equipped with a permanent mobile installation use the following procedure Step 1 Turn the unit off by pressing on the handset Step 2 Unplug the handset from the modular connector jack on the side of the transceiver and remove it from the hang up cup Step 3 Unzip the transceiver compartment and carefully lift the transceiver connector assembly out of the pocket...

Page 13: ... connector assembly from the transceiver by gently pulling it away from the transceiver front plate Step 6 Return the antenna and power connector assembly into the carrying case for safe keeping Reverse the above procedure to re assemble See page 20 for Basic Operation Installation Manual 10 ...

Page 14: ...ght three watt unit that is powered by your vehicle s electrical system through the cigarette lighter socket This phone is completely self contained and may be moved easily between your personal car s a company truck or car or a rental car because it requires no complex wiring installation within the vehicle The unit is installed in the vehicle by simply securing it to a spare seat with a lap belt...

Page 15: ... and an integrated hands free microphone contained in the connector assembly An external full duplex hands free microphone can be purchased separately The hands free feature allows you to place or answer calls without removing your hands from the steering wheel except to enter the number to be called See Digital Hands Free Operation on page 22 for more information about hands free calling Installa...

Page 16: ...ur carry phone Assembly Procedure Step 1 Remove all components from the bag Step 2 Carefully connect the 25 pin connector of the power connector assembly to the front of the transceiver and tighten the two thumbscrews as shown in Figure 11 Figure 11 Step 3 Locate the antenna and screw it tightly onto the connector as shown in Figure 12 Figure 12 Installation Manual 13 ...

Page 17: ...onnector Be sure the telephone jack located on the side of the transceiver lines up with the opening in the sleeve See Figure 13 Figure 13 Step 5 Place the handset in the hang up cup and plug the handset modular connector into the jack located on the side of the transceiver See Figure 14 Figure 14 Installation Manual 14 ...

Page 18: ...the antenna folds conveniently down into the bag to prevent possible damage NOTE Be sure to connect the cigarette lighter plug to the cigarette lighter socket on your vehicle dashboard when you are ready to use your phone Figure 15a Figure 15b Steps 7 and 8 should be followed if your carry phone is equipped with a battery Installation Manual 15 ...

Page 19: ...ector assembly as shown below Figure 16 Feed the cable through the opening to the battery compartment in the lower corner of the bag Place the battery into the battery compartment and snap the battery connector clip onto the battery as shown in Figure 17 Figure 17 Installation Manual 16 ...

Page 20: ...vernight using the AC charger before attempting to use the cellular telephone Please note that there is an opening in the lower left corner of the bag to allow for connection of an external antenna The transceiver unit can positioned in either direction when placed in the bag See Figures 19a and 19b Figure 19a Installation Manual 17 ...

Page 21: ...Figure 19b Secure the Unit To secure the unit in your vehicle run a standard lap belt through the loop located on the outside of the carry case as shown in Figure 20 Figure 20 Installation Manual 18 ...

Page 22: ...t from the hang up cup Step 3 Lift the transceiver assembly out of the carry bag using the loop handle Unwrap the Velcro tab and slide the transceiver out of the Velcro sleeve Step 4 Unscrew and remove the antenna Step 5 Unscrew the two thumbscrews on the front of the power connector and remove the power connector assembly from the transceiver by gently pulling it away from the transceiver front p...

Page 23: ...dset backlighting will remain lit and the handset display will stay on as long as the telephone remains on Battery Saving Mode When you press on the handset and the cigarette lighter plug is not plugged in or there is no voltage present at the cigarette lighter socket your Attache Carry phone will automatically shut off the handset backlighting and blank the display after six seconds Pressing any ...

Page 24: ...the Attache Carry phone is not in use However for best performance when using the Attache Carry phone you should always place the antenna in the full upright position Also when using the Attache Carry phone remember to keep the cigarette lighter cord handset coil cord and optional hands free microphone cord as far away from the antenna as possible To Hang Up Target Hang Up Cup Engage Notch in Top ...

Page 25: ...al for further details For enhanced hands free sound quality an external microphone can be purchased as an accessory and is typically positioned on your sun visor Full Duplex Hands Free provides improved audio quality relative to Enhanced Simplex Hands Free and makes it easier to enter the conversation while the other party is talking Detailed instructions for placing and receiving hands free call...

Page 26: ...ttache Carry phone using the vehicle cigarette lighter receptacle the battery will charge at various rates depending upon whether the telephone is on whether it is being used to place a call your vehicle s engine speed and the number of accessories e g air conditioning blower window defrosters etc that are in operation in your vehicle The best circumstances for charging your battery are when your ...

Page 27: ...t to use the Attache Carry phone Battery Care The useful lifetime of a rechargeable battery is affected by how it is used and how often it is recharged The Attache Carry phone battery is a sealed lead acid battery that is somewhat similar to the battery used in your car Unlike some other types of batteries your Attache Carry phone battery is not subject to the memory affect associated with frequen...

Page 28: ...ion for Attache Phone Model If your unit was purchased without the battery option a battery conversion kit may be purchased and installed This kit consists of a battery battery charger and a battery clip connector The installation should be performed according to the instructions below Step 1 Turn the unit off by pressing on the handset Step 2 Disconnect the handset modular connector from the jack...

Page 29: ...d without the battery option a battery conversion kit may be purchased and installed This kit consists of a battery battery charger and a battery clip connector The installation should be performed by following Steps 7 8 of the assembly procedure beginning on page 7 Installation Manual 26 ...

Page 30: ...e clearances for the control power cable connector and antenna coaxial cable Standard Transceiver Mounting Bracket Installation Install the standard mounting bracket as follows Horizontal Mounting Step 1 Use the mounting bracket fitted over the transceiver as a template to determine the mounting screws 2 locations Be sure to first snap the mounting bracket over the transceiver since the bracket wi...

Page 31: ...crews use two suitable size bolts nuts and washers installer supplied Place a lock washer between each bolt and the mounting bracket insert the bolts through the bracket and holes drilled in mounting surface and secure with flat washers and nuts Handset Location Consider the following factors when deciding the handset mounting location The mounting surface must have sufficient strength to support ...

Page 32: ...Figure 22 8 18 x 1 Mounting Screws Mounting Bracket Transceiver Antenna Connector Mounting Surface Installation Manual 29 ...

Page 33: ...nvenient means for mounting the control unit In a typical application the control unit hang up cup mounts directly to the adjustable angle mounting bracket Install the adjustable angle mounting bracket as follows Step 1 Temporarily position the control unit and mounting bracket to verify the desired mounting location Check for clearance and Rubber Tip Bumper 2 Machine Screws 4 M4 x 0 7 x 10 Upper ...

Page 34: ...sary Step 2 Using an awl or similar device open four holes in the carpet at marked locations This must be done prior to drilling to avoid ruining the carpet Step 3 Using a 3 2 mm 1 8 bit drill the four mounting holes and secure the surface base using the four 8 1 8 x 3 4 tapping screws provided Step 4 Mount the base to the surface base at the desired angle and securely tighten the angle adjusting ...

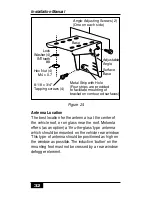
Page 35: ... of antenna should be positioned as high on the window as possible The inductive button on the mounting foot must not be crossed by a rear window defogger element Angle Adjusting Screws 2 One on each side Metal Strip with Hole Four strips are provided to facilitate mounting of bracket on contoured surfaces Lock Washer 4 INT tooth 8 Hex Nut 4 M4 x 0 7 Surface Base 8 1 8 x 3 4 Tapping screws 4 Base ...

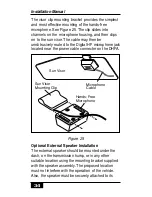
Page 36: ... influence on the performance of the Vehicular Speaker Phone V S P hands free operation The microphone should be mounted either on the sun visor directly above the driver or on the headliner above the driver The microphone should never be mounted near the window or in a location where the road and ambient background noise would be substantially high above 85 dB SPL Installation Manual 33 CombinedC...

Page 37: ...located near the power cable connector on the DHFA Figure 25 Optional External Speaker Installation The external speaker should be mounted under the dash on the transmission hump or in any other suitable location using the mounting bracket supplied with the speaker assembly The proposed location must not interfere with the operation of the vehicle Also the speaker must be securely attached to its ...

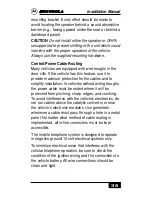
Page 38: ...without wiring troughs the power cable must be routed where it will be protected from pinching sharp edges and crushing To avoid interference with the vehicle s electronics do not run cables above the catalytic converter or near the vehicle s electronic modules Use grommets whenever a cable must pass through a hole in a metal panel No matter what method of cable routing is implemented all in line ...

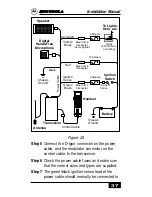
Page 39: ...ll fuses and tape them to their respective holders Step 4 Bolt the black lead s of the power control cable to a suitable grounded point on the vehicle frame using the ring lug provided NOTE Special attention should be given to locating a good vehicle ground Optimum radio performance can only be achieved with a ground connection having a very low resistance The vehicle frame makes the best ground b...

Page 40: ...n sense lead of the power cable should normally be connected to To Lights Horn etc 2 Ampere Blue Crimp Connector not supplied AUX Alert Yellow Black Speaker Digital Hands Free Microphone 10 Ampere Blue Crimp Connector Black 4 Ampere Blue Crimp Connector Ignition Sense Green Black Antenna Transceiver Control Cable Handset Chassis Ground Chassis Ground Battery Power Cable Relay 500 mA max coil ratin...

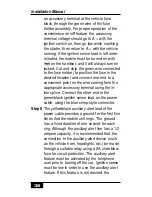
Page 41: ...ccessory terminal using the in line splice Connect the other end to the green black ignition sense lead on the power cable using the blue crimp style connector Step 8 The yellow black auxiliary alert lead of the power cable provides a ground for the first five times that the mobile unit rings The ground has a fixed duration of one second for each ring Although the auxiliary alert line has a 1 2 am...

Page 42: ...ng the blue crimp style connector Step10Connect the external speaker and microphone connectors if equipped to the speaker and microphone jacks on the control power cables It is recommended that the plugs not be installed in an area exposed to excessive moisture Step 11 Carefully inspect all cables and connections then insert the 10A fuse into the fuse holder on the red lead and the 4A fuse into th...

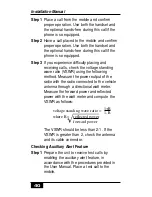
Page 43: ...tio VSWR using the following method Measure the power output of the radio with the radio connected to the vehicle antenna through a directional watt meter Measure the forward power and reflected power with the watt meter and compute the VSWR as follows The VSWR should be less than 2 1 If the VSWR is greater than 2 check the antenna and its cable connector Checking Auxiliary Alert Feature Step 1 Pr...

Page 44: ...r the call Step 3 With the auxiliary alert feature enabled place a second test call to the mobile Do not answer the call Verify that after approximately 20 seconds 5 6 rings the alert device has been deactivated and that the handset displays CALL after being enabled in the manner described in the User Manual ...

Page 45: ...low are included in all telephone models If your telephone is equipped with digital hands free with an external microphone do you hear excessive feedback noise during a hands free call Because of audio variations in the cellular system excessive feedback noise or howling may sometimes be heard when a full duplex if your telephone is so equipped hands free call is placed or received If this occurs ...

Page 46: ...ree digit unlock code LOCKED will disappear Does the red No Svc message continue to display This may indicate that you are outside of the service area or in a marginal reception area Marginal reception may also be indicated by the fast busy or alternating high low sound when attempting to place a call Have you programmed a unique operating mode into the unit Constant flashing of the Roam indicator...

Page 47: ...cy range of 824 MHz to 894 MHz and employs commonly used frequency modulation FM techniques When you use your phone the cellular system handling your call controls the power level at which your phone transmits The power level can range from 0 005 of a watt to 3 watts Exposure to Radio Frequency Energy In 1991 the Institute of Electrical and Electronics Engineers IEEE and in 1992 the American Natio...

Page 48: ...y cause your phone to operate at a higher power level than is necessary and may expose that person to RF energy in excess of that established by the updated ANSI Standard Antenna Care and Replacement Do not use the phone with a damaged antenna Replace a damaged antenna immediately Consult your manual to see if you may change the antenna yourself If so use only a manufacturer approved antenna Other...

Page 49: ...fect the electronic systems of your vehicle Children Do not allow children to play with your phone It is not a toy Children could damage the phone or make calls that increase your telephone bills Blasting Areas To avoid interfering with blasting operations turn your unit off when in a blasting area or in areas posted turn off two way radio Construction crews often use remote control RF devices to ...

Page 50: ... the National Fire Protection Association One Batterymarch Park Quincy MA 02269 Attn Publications Sales Division Other Electronic Equipment Most modern electronic equipment for example personal medical devices equipment in hospitals and cars is shielded from RF energy However RF energy from cellular telephones may affect some electronic equipment Consult your physician or ask the manufacturer of a...

Page 51: ...ular telephones complies with all applicable RF Safety Standards Motorola meets the standards and recommendations for the protection of public exposure to RF electromagnetic energy established by governmental bodies and other qualified organizations such as the following National Council on Radiation Protection and Measurements NCRP Report 86 Department of Health and Welfare Canada Safety Code 6 V...

Page 52: ... your phone in close proximity to magnetic storage media such as diskettes or credit cards for extended periods of time Batteries CAUTION To prevent injuries or burns do not allow metal objects to contact or short circuit the battery terminals Installation Manual 49 ...

Page 53: ...ish to use your cellular radiotelephone in both the U S and Canada please consult with your system operator Furthermore you should remember that your cellular phone is a radiotelephone i e it combines both wireline technology as used in your home or office telephone system and radio technology and that the scope of regulations and precautions is therefore broader than the scope of regulations and ...

Page 54: ...pect to harassing calls false distress calls obscene language etc apply to cellular phone usage Privacy As a telephone user you have come to assume a certain standard of privacy when you place or receive a telephone call via the traditional wireline systems However because cellular radiotelephones utilize radio transmissions to effect calls the same standard cannot always be assured While it is un...

Page 55: ...e Canadian Department of Communications has granted technical acceptance to the model of cellular telephone which you have purchased and both have allocated a specific frequency range for cellular service No changes or adjustments are to be made to your cellular phone Installation Manual 52 ...

Page 56: ......

Page 57: ......
Page 58: ...rican Cellular Subscriber Group 600 North U S Highway 45 Libertyville Illinois 60048 1 800 331 6456 U S A 1 800 461 4575 Canada 6809383A19 B 01 31 00 RGC Motorola Inc 1995 All Rights Reserved Printed in U S A ...

Reviews: