

2
3
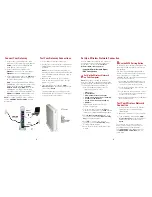
1. Connect the coaxial cable to the cable
wall outlet or RF splitter (optional) and the
Cable
connector on the SBG6782-AC.
Hand tighten each connector.
2. Connect the Ethernet cable to the
Ethernet
port on your computer and an
Ethernet
port on the SBG6782-AC.
3. Connect the power cord to the
Power
port
on the SBG6782-AC and then plug it into
an electrical wall outlet.
Note
: This automatically powers ON the
SBG6782-AC. Check the front panel LEDs.
During the initial startup, the
Power
,
Receive
,
Send
, and
Online
LEDs on the
SBG6782-AC will FLASH. Afterwards,
check that all four LEDs are lit SOLID. The
Wireless
and
MoCA
LEDs will light only
when the devices are connected.
Note
: To configure a MoCA network, please
see the
SBG6782-AC User Guide
for more
information.
1. Power ON your computer and log in.
2. Contact your service provider to activate the
SBG6782-AC, if automatic activation is not
available.
Note
: Your service provider may allow for
automatic activation which will automatically
launch a special website when you open a
web browser.
3. Open a web browser on your computer,
such as Internet Explorer, Firefox, Google
Chrome, or Safari.
4. Type a valid URL (for example,
www.
motorola.com
) in the address bar and then
click or press
Enter
.
The Motorola website should open. If the
web page did not open, please contact your
service provider for assistance.
Connect Your Gateway
Test Your Gateway Connections
Set Up a Wireless Network Connection
Choose
one
of the following two options to
set up your wireless network connection.
When done, continue with
“Test Your
Wireless Network Connection.”
•
Computer Wireless Network Options
•
WPS Pairing Button
Note
: The steps for setting up a wireless
network may differ slightly depending on the
operating system installed on your computer.
The followng steps apply to Windows
©
7.
1. From the Windows taskbar, click the
following in sequential order:
• Start
button
• Control Panel
• View network status and tasks
• Set up a new connection or network
• Connect to the Internet
• Set up a new connection anyway
• Wireless
The
Wireless Network Connection
window should open.
2. Scroll down and click the MOTOROLA
wireless network name (see
SSID
number
listed on the SBG6782-AC gateway label).
3. Enter
Network security key
code in the
Security key field listed as
Wi-Fi Security
key
on the gateway label.
4. Click
OK
to complete the wireless
network connection.
Connected
status
message should display.
5. Close the Wireless Network Connection
window.
Set Up the Wireless Network
on Your Computer
Use the WPS Pairing Button
Test Your Wireless Network
Connection
A
B
To use WPS, your computer hardware must
support WPS and also have WPA security
compatibility.
The WPS option automatically assigns a
random SSID wireless network name and
Wi-Fi Security Key to connect the
SBG6782-AC and other WPS-enabled devices
to your wireless network.
1. Power ON the SBG6782-AC and other
WPS-enabled devices that you want to
connect to your wireless network.
2. Press the WPS button located on the top
of the SBG6782-AC.
3. Press and hold the WPS button on your
WPS-enabled computer or other device
for five or more seconds.
4. Repeat steps 2 and 3 for each additional
WPS-enabled device.
1. If connected, disconnect the Ethernet
cable from your computer and the
SBG6782-AC.
2. Open a web browser on your computer.
3. Type a valid URL (for example,
www.
motorola.com/us
) in the web browser
address bar, and then click or press
Enter
.
To customize your wireless network
and security settings, you must access
the SBG6782-AC configuration URL.
Type
192.168.0.1
in the address bar. See
the
SBG6782-AC User Guide
for more
information.