background image

18

Help

7. Help

Display

No display

•  Try recharging or replacing the battery pack.
•  Reset the units. Disconnect the battery pack of the owner unit and 

unplug both the units' electrical power, then plug them back in.

•  Is the unit turned on?

Press and hold the ON/OFF button 

P

 on the owner unit to turn it 

ON.

•  Is the correct camera selected?

Change the camera number, if necessary.

•  Is the video display turned on?

Press the VIDEO ON/OFF button 

V

 to turn it on.

•  When operating using batteries only, the Display will go blank after 

4 minutes to save power. The unit is still active and will give you audio 
alerts. You can reactivate the screen by pressing any button. 

Registration

If the Pet Unit has lost its link with the Owner Unit

•  Try recharging or replacing the battery pack.
•  If the Pet Unit is too far away it may be going out of range, so move the 

Pet Unit closer to the Owner Unit.

•  Reset the units by disconnecting them from the battery and electrical 

power. Wait about 15 seconds before reconnecting. Allow up to one 
minute for the Pet Unit and the Owner Unit to synchronise.

•  See 2.4 Registration (Pairing), if there is a need to re-register the 

units. 

Summary of Contents for SCOUT500

Page 1: ...USER S GUIDE Models SCOUT500 SCOUT500 2 SCOUT500 3 SCOUT500 4 PET MONITOR USER S GUIDE The features described in User s Guide are subject to modifications without prior notice ...

Page 2: ...tions please call This User s Guide provides you with all the information you need to get the most from your product Before you can use the pet monitor we recommend you insert and fully charge the battery in the owner unit so that it continues to work if you disconnect it from the power supply to carry it to another location Please read the Safety Instructions on page 6 before you install the unit...

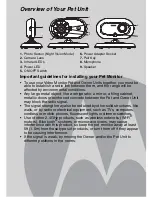
Page 3: ...l mode 1x 7 Talk Key Press and hold to talk back through the camera 8 Power indicator LED Blue when main adaptor power ON 9 Unit ON OFF LED Green 10 Audio Level LED Green Orange Red Red 11 Power Video On Off Button P Press and hold to turn the unit ON or OFF In monitor mode press to turn the display ON OFF 12 Battery cover 13 Stand 14 Speaker 15 Power Adapter Socket 1 Signal Level Indication 3 Lev...

Page 4: ... like walls or by radio or electrical equipment such as TVs computers cordless or mobile phones fluorescent lights or dimmer switches Use of other 2 4GHz products such as wireless networks Wi Fi routers Bluetooth systems or microwave ovens may cause interference with this product so keep the pet monitor away at least 5ft 1 5m from these types of products or turn them off if they appear to be causi...

Page 5: ... Using the Pet Monitor 12 3 1 Setting up 12 3 2 Night Vision Mode 12 3 3 Video ON OFF 12 3 4 Talk Mode 12 4 Owner Unit Menu Options 13 4 1 Volume 13 4 2 Brightness 13 4 3 Zoom Pan and Tilt 13 4 4 Alarm 13 4 5 Camera Control 14 4 5 1 Add pair a camera 14 4 5 2 View a camera 14 4 5 3 Delete a camera 14 4 5 4 Scan the cameras 15 5 Disposal of The Device environment 16 6 Cleaning 17 7 Help 18 8 Genera...

Page 6: ...r future reference WARNING STRANGULATION HAZARD In case this unit is being to monitor infants or children keep the unit and adapter cord more than 3 feet from the crib and out of their reach Never place camera or cords within a crib or near a bed Secure the cord away from children s reach Never use extension cords with AC Adapters Only use the AC Adapters provided As with any electrical device sup...

Page 7: ... and all its functions so that you are familiar with it prior to actual use Do not use the digital video pet monitor near water Do not install the digital video pet monitor near a heat source Only use the chargers and power adapters provided Do not use other chargers or power adapters as this may damage the device and battery pack Only insert a battery pack of the same type Do not touch the plug c...

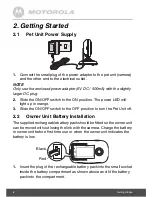
Page 8: ...t up in orange 3 Slide the ON OFF switch to the OFF position to turn the Pet Unit off 2 2 Owner Unit Battery Installation The supplied rechargeable battery pack should be fitted so the owner unit can be moved without losing the link with the camera Charge the battery in owner unit before first time use or when the owner unit indicates the battery is low 1 Insert the plug of the rechargeable batter...

Page 9: ...to operate on battery in the event of a power failure or when moving to a different room 1 Connect the small plug of the power adapter to the owner unit and the other end to the electrical outlet Only use the enclosed power adapter 6V DC 500mA with the slightly smaller DC plug 2 Press and hold the P POWER ON OFF button for 1 second to turn ON the owner unit 3 Once the pet and owner units are switc...

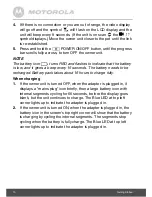
Page 10: ... battery needs to be recharged Battery pack takes about 16 hours to charge fully When charging 1 If the owner unit is turned OFF when the adapter is plugged in it displays a mains plug icon briefly then a large battery icon with internal segments cycling for 60 seconds before the display goes blank but the unit continues to charge The Blue LED at top left corner lights up to indicate the adapter i...

Page 11: ... 2 1 2 3 4 will pop up press the UP button or DOWN button to select the desired Camera identification number and press the button to start searching for a camera unit The Green Audio Level LED turns on while searching 3 Press and hold the PAIR button under the bottom left edge of the camera unit until the owner unit finds the camera beeps and the video from the camera appears NOTE If a particular ...

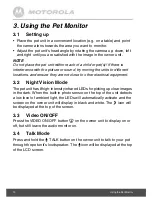
Page 12: ...e not close to other electrical equipment 3 2 Night Vision Mode The pet unit has 8 high intensity infrared LEDs for picking up clear images in the dark When the built in photo sensor on the top of the unit detects a low level of ambient light the LEDs will automatically activate and the screen on the owner unit will display in black and white The N icon will be displayed at the top of the screen 3...

Page 13: ...ons of the UP DOWN and buttons are changed to allow you to view different areas of the original 1X video screen 2 When in the 2X Zoom mode press the UP button or DOWN button to move up or down the display view or press the or buttons to pan the display left and right 3 Press the ZOOM button Z to return to normal mode 4 4 Alarm 1 Press the button and the first menu option will appear 2 Press the DO...

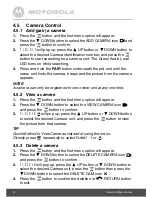
Page 14: ...y one time 4 5 2 View a camera 1 Press the button and the first menu option will appear 2 Press the DOWN button to select the VIEW CAMERA icon and press the button to confirm 3 1 2 3 4 will pop up press the UP button or DOWN button to select the desired Camera unit and press the button to view the picture from that camera TIP Quick Method to View Cameras instead of using the menu Directly press re...

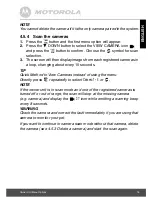
Page 15: ...ging about every 10 seconds TIP Quick Method to View Cameras instead of using the menu Directly press repeatedly to select Camera 1 4 or NOTE If the owner unit is in scan mode and one of the registered cameras is turned off or out of range the scan will stop at the missing camera e g camera and display the 3 icon while emitting a warning beep every 8 seconds WARNING Check the camera and correct th...

Page 16: ...mbol on the product user s guide and or box indicates this Some of the product materials can be reused if you take them to a recycling point By reusing some parts or raw materials from used products you make an important contribution to the protection of the environment Please contact your local authorities in case you need more information on the collection points in your area Dispose of the batt...

Page 17: ...s or other solvents and chemicals this may cause permanent damage to the product which is not covered by the warranty Keep your Digital Video Pet Monitor away from hot humid areas or strong sunlight and don t let it get wet Every effort has been made to ensure high standards of reliability for your Digital Video Pet Monitor However if something does go wrong please do not try to repair it yourself...

Page 18: ... batteries only the Display will go blank after 4 minutes to save power The unit is still active and will give you audio alerts You can reactivate the screen by pressing any button Registration If the Pet Unit has lost its link with the Owner Unit Try recharging or replacing the battery pack If the Pet Unit is too far away it may be going out of range so move the Pet Unit closer to the Owner Unit ...

Page 19: ... owner unit Make sure the pet and owner units are not near other electrical equipment such as a television computer or cordless mobile telephone Use of other 2 4GHz products such as wireless networks Wi Fi routers Bluetooth systems or microwave ovens may cause interference with this product so keep the pet monitor away at least 5ft 1 5m from these types of products or turn them off if they appear ...

Page 20: ...ct or certified accessory Accessory sold for use with this product that it manufactured to be free from defects in materials and workmanship under normal consumer usage for the period outlined below This Warranty is your exclusive warranty and is not transferable Who is covered This Warranty extends only to the first consumer purchaser and is not transferable What will BINATONE do BINATONE or its ...

Page 21: ...IGENCE FOR DAMAGES IN EXCESS OF THE PURCHASE PRICE OF THE PRODUCT OR ACCESSORY OR FOR ANY INDIRECT INCIDENTAL SPECIAL OR CONSEQUENTIAL DAMAGES OF ANY KIND OR LOSS OF REVENUE OR PROFITS LOSS OF BUSINESS LOSS OF INFORMATION OR OTHER FINANCIAL LOSS ARISING OUT OF OR IN CONNECTION WITH THE ABILITY OR INABILITY TO USE THE PRODUCTS OR ACCESSORIES TO THE FULL EXTENT THESE DAMAGES MAY BE DISCLAIMED BY LAW...

Page 22: ...or commercial purposes or subjecting the Product or Accessory to abnormal usage or conditions or d other acts which are not the fault of MOTOROLA or BINATONE are excluded from coverage Use of Non Motorola branded Products and Accessories Defects or damage that result from the use of Non Motorola branded or certified Products or Accessories or other peripheral equipment are excluded from coverage P...

Page 23: ...ion To obtain service or information please call You will receive instructions on how to ship the Products or Accessories at your expense and risk to a BINATONE Authorized Repair Center To obtain service you must include a the Product or Accessory b the original proof of purchase receipt which includes the date place and seller of the Product c if a warranty card was included in your box a complet...

Page 24: ...iver Connect the equipment into an outlet on a circuit different from that to which the receiver is connected Consult the dealer or an experienced radio TV technician for help Changes or modifications to this equipment not expressly approved by the party responsible for compliance could void the user s authority to operate the equipment This device complies with Part 15 of the FCC rules Operation ...

Page 25: ...al specifications were met This product meets the applicable Industry Canada technical specifications Le présent appareil est conforme aux CNR d Industrie Canada applicables aux appareils radio exempts de licence L exploitation est autorisée aux deux conditions suivantes 1 l appareil ne doit pas produire de brouillage et 2 l utilisateur de l appareil doit accepter tout brouillage radioélectrique s...

Page 26: ...ut 100 240V 50 60Hz 150mA Output 6V 500mA OR Adapter BLJ5W060050P Input 100 240V 50 60Hz 150mA Output 6V 500mA WARNING Use only with provided power supply OR Battery Model DESAY Ni MH AAA 3 x 1 2V 900mAh rechargeable battery pack WARNING Do not use non rechargeable batteries for the Owner Unit Risk of explosion if battery is replaced by an incorrect type Dispose of used batteries according to the ...

Page 27: ... for this product MOTOROLA and the Stylized M Logo are trademarks or registered trademarks of Motorola Trademark Holdings LLC and are used under license All other trademarks are the property of their respective owners 2013 Motorola Mobility LLC All rights reserved Version 1 0 Printed in China ...

Reviews: