background image

Deutsch

1

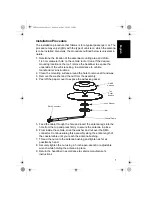
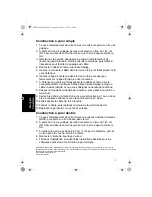
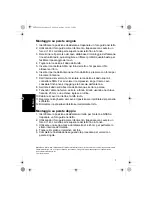
Einbauverfahren

Das im Folgenden beschriebene Einbauverfahren bezieht sich auf gängige 
Pkw. Das Einbauverfahren kann je nach Fahrzeugtyp geringfügig variieren, 
die unten genannte Vorgehensweise ist aber generell anwendbar.
1. Bestimmen Sie den Einbauort und bohren Sie ein Loch mit 1,43 cm 

Durchmesser in das Dach oder den Kofferraumdeckel. Soll der Einbau 
am Fahrzeugdach erfolgen, ist die Auskleidung laut Anweisungen des 
Fahrzeugherstellers zu entfernen, um die untere Seite des 
Fahrzeugdachs freizulegen.

2. Säubern Sie die Befestigungsfläche um das Loch und befreien Sie sie 

von Schmutz und Wachs.

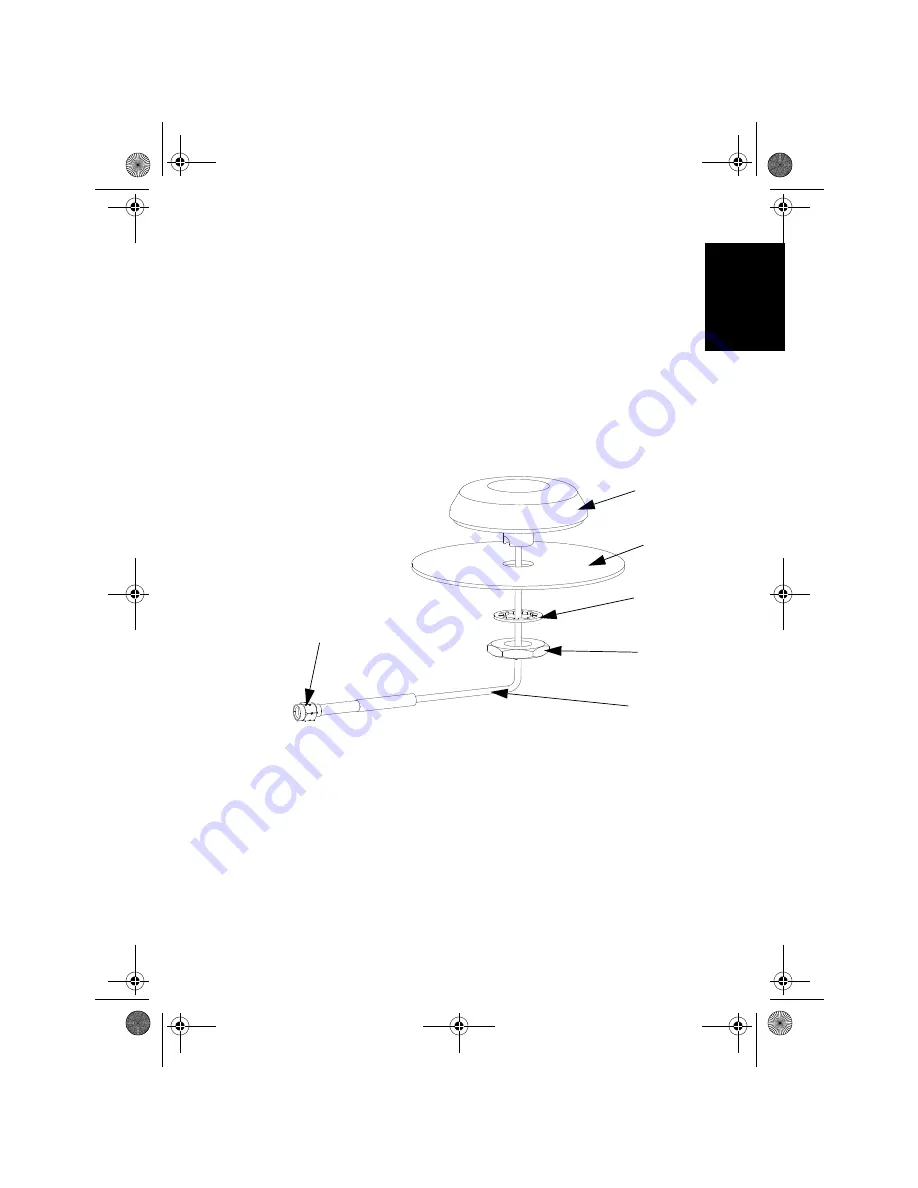
3. Entfernen Sie Mutter und Scheibe von der Antenne.
4. Ziehen Sie das Schutzpapier der Haftdichtung ab.

5. Führen Sie das Kabel durch das Loch, stecken Sie die Antennenfüße 

von oben ein und drücken Sie die Antenne fest auf, um sie in Solllage 
zu befestigen.

6. Schieben Sie im Fahrzeuginneren die Scheibe und Mutter über den 

SMA-Verbinder auf und dann auf dem Koaxialkabel entlang bis zur 
Antennenbuchse.

7. Schrauben Sie die Mutter auf die Antennenbuchse auf und ziehen Sie 

sie von Hand so fest wie möglich an.

8. Halten Sie die Antenne in Solllage fest und ziehen Sie die Mutter mit 

einem 1-Zoll-Gabelschlüssel oder einem 1-Zoll-Rollgabelschlüssel gut 
fest.

9. Die Auskleidung nach Anweisungen des Fahrzeugherstellers wieder 

anbringen.

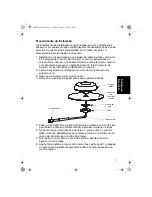
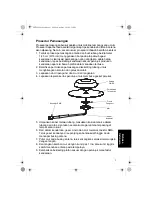
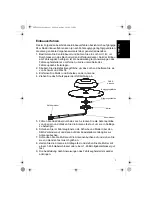
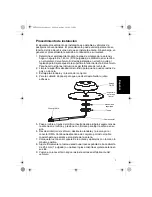
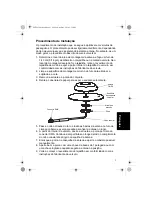
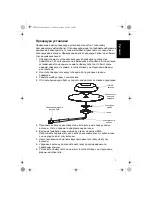
GNSS-

Antenne

Befestigungsfläche

Sicherungsscheibe

Mutter

Koaxialkabel

SMA-Verbinder

6871963L02.book  Page 1  Friday, October 3, 2014  2:32 PM

Summary of Contents for PMAN4008

Page 1: ...nne Antenne GNSS de toit Antena GNSS para la parte exterior del techo del vehículo Antenna GNSS esterna per tetto GNSS Dakantenne Antena GNSS de montagem no tejadilho GNSS антенна монтируемая на крыше автомобиля User Guide Accessories PMAN4008 GNSS GPS GALILEO QZSS GLONASS THROUGH HOLE MOUNT ANTENNA en es CO pt BR fr CA zh CN id de DE es ES fr FR it IT pt PT nl NL ru 6871963L02 book Page 1 Friday ...

Page 2: ...6871963L02 book Page 2 Friday October 3 2014 2 32 PM ...

Page 3: ...move the washer and the nut from the assembly 4 Peel off the paper cover to expose the adhesive gasket 5 Feed the cable through the hole and insert the antenna legs into the hole from the top and press firmly to secure the antenna in place 6 From inside the vehicle slide the washer and nut over the SMA connector Continue sliding this assembly along the entire length of the coaxial cable until you ...

Page 4: ...y hand 9 Securely tighten the nut using a 1 inch open wrench or adjustable wrench while holding the antenna in place 10 Route the cable between roof and radio set 11 Take up the slack in the cable and replace the headlining retainer molding 12 Replace headlining if removed Double Wall Construction 1 Using the desired location on the roof for the GNSS antenna drill a pilot hole through the roof 2 U...

Page 5: ...io y retire los restos de polvo y cera 3 Retire la arandela y la tuerca del conjunto 4 Quite la cubierta de papel para dejar expuesta la junta adhesiva 5 Coloque el cable a través del orificio e inserte las patas de la antena en el orificio desde la parte superior Después presione firmemente para sujetar la antena en su lugar 6 Desde el interior del vehículo deslice la arandela y la tuerca sobre e...

Page 6: ... tuerca con una llave de punta de 1 pulgada o con una llave ajustable mientras sostiene la antena en su posición 10 Instale el cable entre el techo y el equipo de radio 11 Suba el cable suelto y vuelva a colocar las molduras que retienen el forro del techo 12 Vuelva a colocar el forro del techo si lo retiró Estructura de dos capas 1 En la ubicación del techo que desea para la antena GNSS perfore u...

Page 7: ...agem ao redor do furo para remover sujeira e cera 3 Remova a arruela e a porca do conjunto 4 Remova a cobertura de papel para expor a gaxeta adesiva 5 Passe o cabo pelo furo e insira os terminais da antena no furo de cima para baixo e pressione firmemente para prender a antena no lugar 6 De dentro do veículo deslize a arruela e a porca sobre o conector SMA Continue deslizando esse conjunto por tod...

Page 8: ...Prenda a porca de forma segura usando uma chave de boca ou uma chave ajustável segurando a antena no lugar 10 Leve o cabo do teto até o aparelho de rádio 11 Preencha a folga do cabo e recoloque a moldura retentora do revestimento 12 Recoloque o revestimento se tiver sido removido Estrutura de camada dupla 1 Faça um furo piloto no local desejado para a antena GNSS no teto 2 Usando o local do furo p...

Page 9: ...cire 3 Retirez la rondelle et l écrou de l assemblage 4 Enlever la couverture de papier pour exposer le joint adhésif 5 Enfiler le câble dans le trou et insérer les bras de l antenne dans le trou à partir du haut et appuyer fermement dessus pour sécuriser l antenne en place 6 De l intérieur du véhicule passez le connecteur SMA à travers la rondelle et l écrou Faites glisser la rondelle et l écrou ...

Page 10: ...n l écrou à l aide d une clé à ouverture fixe de 1 po ou d une clé à ouverture variable tout en tenant l antenne en place 10 Faites passer le câble du toit à la radio 11 Tendez le câble puis replacez le moule de la garniture de toit 12 Replacez la garniture si vous l avez enlevée Construction à paroi double 1 Trouvez l emplacement de votre choix sur le toit pour installer l antenne GNSS puis perce...

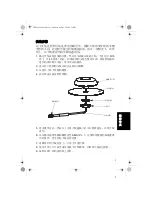
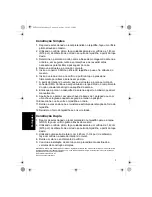
Page 11: ...3 厘米 的孔 如果需要的安装位置是车顶 请按照车辆制 造商的说明取下顶衬 将车顶内面露出 2 清洁孔口周围的安装表面以去除污垢和蜡 3 从组件上取下垫圈和螺母 4 剥开纸盖以露出粘性垫圈 5 将电缆穿过孔 然后从上方将天线腿插入孔中并紧紧按压 以使天线 就位 6 从车辆内部将垫圈和螺母套至SMA接头上 并继续沿整根同轴电缆滑 动此组件 直至到达天线衬套位置 7 将螺母拧到天线衬套上 并用手尽量拧紧 8 使用 1 英寸开口扳手或可调扳手拧紧螺母 同时将天线固定到位 9 按照车辆厂商的说明装上顶衬 GNSS 天线 顶盖表面 锁紧垫圈 螺母 同轴电缆 SMA 接口 6871963L02 book Page 1 Friday October 3 2014 2 32 PM ...

Page 12: ...到天线衬套上 并用手尽量拧紧 9 使用 1 英寸开口扳手或可调扳手拧紧螺母 同时固定好天线位置 10 在车顶和对讲机之间布好线 11 拉紧电缆并装上固定顶衬的嵌条 12 如果取下了顶衬 请将它装上 双层结构 1 根据在车顶上安装 GNSS 天线所需的位置 在车顶上钻一个定位孔 2 根据定位孔的位置 小心从车顶的顶部钻一个 9 16 英寸 1 43 厘米 的孔 一直钻到底部 3 使用直径为 1 3 4 英寸 4 45 厘米 的孔锯在金属内层开一个孔 4 去除孔上的金属和填充层 5 按照上述单层结构车辆的安装过程完成安装 MOTOROLA MOTO MOTOROLA SOLUTIONS 和独特的 M 标志均为 Motorola Trademark Holdings LLC 的商标或注 册商标 且获得使用授权 所有其他商标均为其各自所有者的财产 版权所有 2014 Motorola Soluti...

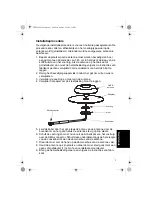
Page 13: ...ran dan polesan mobil 3 Lepaskan cincin pengunci dan mur dari rangkaian 4 Lepaskan lapisan kertas penutup untuk membuka gasket perekat 5 Umpankan kabel melalui lubang masukkan kaki antena ke dalam lubang dari atas dan tekan secara kuat agar antena terpasang di tempat secara kuat 6 Dari dalam kendaraan geser cincin dan mur melalui konektor SMA Terus geser keduanya di sepanjang kabel koaksial hingga...

Page 14: ...bil menahan antena pada tempatnya 10 Rutekan kabel melalui jalurnya dari atap hingga menuju pesawat radio 11 Berikan kabel sedikit ruang lalu pasang kembali molding penahan bekleding 12 Pasang kembali bekleding jika sebelumnya dilepas Konstruksi Dua Dinding 1 Di lokasi yang diinginkan pada atap untuk antena GNSS bor lubang pandu hingga menembus atap 2 Pada lokasi lubang pandu tersebut bor kembali ...

Page 15: ...Scheibe von der Antenne 4 Ziehen Sie das Schutzpapier der Haftdichtung ab 5 Führen Sie das Kabel durch das Loch stecken Sie die Antennenfüße von oben ein und drücken Sie die Antenne fest auf um sie in Solllage zu befestigen 6 Schieben Sie im Fahrzeuginneren die Scheibe und Mutter über den SMA Verbinder auf und dann auf dem Koaxialkabel entlang bis zur Antennenbuchse 7 Schrauben Sie die Mutter auf ...

Page 16: ... Solllage fest und ziehen Sie die Mutter mit einem 1 Zoll Gabelschlüssel oder Rollgabelschlüssel gut fest 10 Verlegen Sie das Kabel vom Dach bis zum Funkgerät 11 Beseitigen Sie sämtliche Kabellose und bringen Sie das Befestigungs formteil der Dachauskleidung wieder an 12 Bringen Sie die Dachauskleidung wieder an falls sie ausgebaut wurde Doppelwandige Bauweise 1 Bohren Sie am gewünschten Einbauort...

Page 17: ... l écrou 4 Retirez le film de protection du joint adhésif 5 Faites passer le câble dans l orifice puis le pied de l antenne Appuyez fermement pour fixer l antenne en position 6 Depuis l intérieur du véhicule faites glisser la rondelle et l écrou sur le connecteur SMA et sur toute la longueur du câble coaxial et jusqu à la base de l antenne 7 Vissez l écrou sur le pied de l antenne et serrez aussi ...

Page 18: ... 2 5 cm ou une clé à molette tout en maintenant l antenne en position 10 Faites passer le câble depuis le toit jusqu à la radio 11 Éliminez le mou du câble et remettez en place le moulage et la garniture 12 Remettez en place la garniture de toit le cas échéant Installation sur une paroi double 1 Percez un trou de guidage à l emplacement choisi sur le toit pour l antenne GNSS 2 À partir du trou de ...

Page 19: ... cera 3 Extraiga la arandela y la tuerca del conjunto 4 Pele la cubierta de papel para que quede al descubierto la junta adhesiva 5 Pase el cable a través del orificio inserte desde arriba los segmentos de la antena en el orificio y presione con firmeza para fijar la antena en su sitio 6 Desde el interior del vehículo deslice la arandela y la tuerca por el conector SMA Continúe deslizando este con...

Page 20: ...erta de 25 4 mm 1 pulgada o una llave inglesa mientras sujeta la antena en su sitio 10 Guíe el cable entre el techo y el conjunto del transceptor 11 Tense el cable y vuelva a colocar el molde de sujeción del forro del techo 12 Vuelva a colocar el forro del techo si lo había retirado Construcción de estructura doble 1 En la ubicación deseada del techo para la antena GNSS haga un agujero de prueba 2...

Page 21: ...co e cera 3 Togliere la rondella e il dado dal gruppo antenna 4 Staccare la carta protettiva per esporre la guarnizione adesiva 5 Far passare il cavo nel foro quindi inserire i gambi dell antenna nel foro dall alto verso il basso e premere con fermezza per fissare l antenna in posizione 6 Dall interno del veicolo far scivolare la rondella e il dado sul connettore SMA Quindi farli scivolare lungo i...

Page 22: ...ndo l antenna ferma serrare a fondo il dado usando una chiave fissa da 25 mm o una chiave inglese a rullino 10 Cablare il cavo tra il tetto e l unità radio 11 Regolare la lunghezza del cavo e riposizionare il profilato del pannello sottotetto 12 Rimontare il pannello sottotetto se inizialmente tolto Montaggio su parete doppia 1 Identificare la posizione desiderata sul tetto per l antenna GNSS e tr...

Page 23: ...r a sujidade e a cera 3 Remova a arruela e a porca do conjunto 4 Retire a cobertura de papel para expor o vedante autocolante 5 Passe o cabo através do furo e insira as hastes da antena no furo de cima para baixo e exerça pressão para fixar a antena no lugar 6 A partir do interior do veículo passe a arruela e a porca por cima do conector SMA Continue a empurrá las ao longo de todo o comprimento do...

Page 24: ...uma chave de bocas de 1 polegada ou com uma chave inglesa enquanto segura a antena na posição 10 Encaminhe o cabo entre o tejadilho e o rádio 11 Retire o excesso do cabo e reinstale a estrutura de retenção do forro do tejadilho 12 Reinstale o forro do tejadilho se o tiver retirado Construção Dupla 1 Depois de seleccionado o local pretendido no tejadilho para a antena GNSS faça um orifício piloto a...

Page 25: ...om vuil en was te verwijderen 3 Verwijder de veerring en moer van de antenne 4 Verwijder het papier om de kleefpakking bloot te leggen 5 Leid de kabel door het gat steek de poten van de antenne door de bovenkant van het gat en druk de antenne stevig op zijn plaats 6 Schuif de veerring en moer nu vanuit de binnenkant van het voertuig over de SMA connector Schuif deze onderdelen langs de hele lengte...

Page 26: ...plaats en draai de moer stevig vast met een open schroefsleutel 1 inch of een verstelbare moersleutel 10 Voer de kabel van het dak naar de portofoon 11 Trek eventueel overtollige kabellengte terug en plaats dan het dakbekledingsvormstuk weer 12 Breng de dakbekleding weer aan indien verwijderd Dubbelwandige constructie 1 Boor op de gewenste plaats een leigat door het dak voor de GNSS antenne 2 Gebr...

Page 27: ...тверстия для удаления грязи и парафина 3 Снимите шайбу и гайку с компоновки 4 Отслоите бумажную обертку под которой находится клейкая прокладка 5 Проденьте кабель через отверстие и вставьте в него сверху ножки антенны плотно прижмите для фиксации антенны 6 Внутри автомобиля наденьте шайбу и гайку на разъем SMA Продолжайте перемещать их по всей длине коаксиального кабеля пока они не упрутся во втул...

Page 28: ...тяните гайку однодюймовым или разводным ключом 10 Проложите кабель от крыши автомобиля к радиостанции 11 Натяните кабель чтобы не было провисания и установите накладку обивки 12 Установите обивку если она была снята Двухслойная конструкция 1 Просверлите сквозное направляющее отверстие для GNSS антенны в нужном месте на крыше автомобиля 2 В месте просверленного направляющего отверстия с верхней сто...

Page 29: ...Note 6871963L02 book Page 1 Friday October 3 2014 2 32 PM ...

Page 30: ...Note 6871963L02 book Page 2 Friday October 3 2014 2 32 PM ...

Page 31: ...6871963L02 book Page 1 Friday October 3 2014 2 32 PM ...

Page 32: ...m 6871963L02 6871963L02 AA 6871963L02 book Page 2 Friday October 3 2014 2 32 PM ...

Reviews: