background image


13


English

GETTING ST

AR

TED

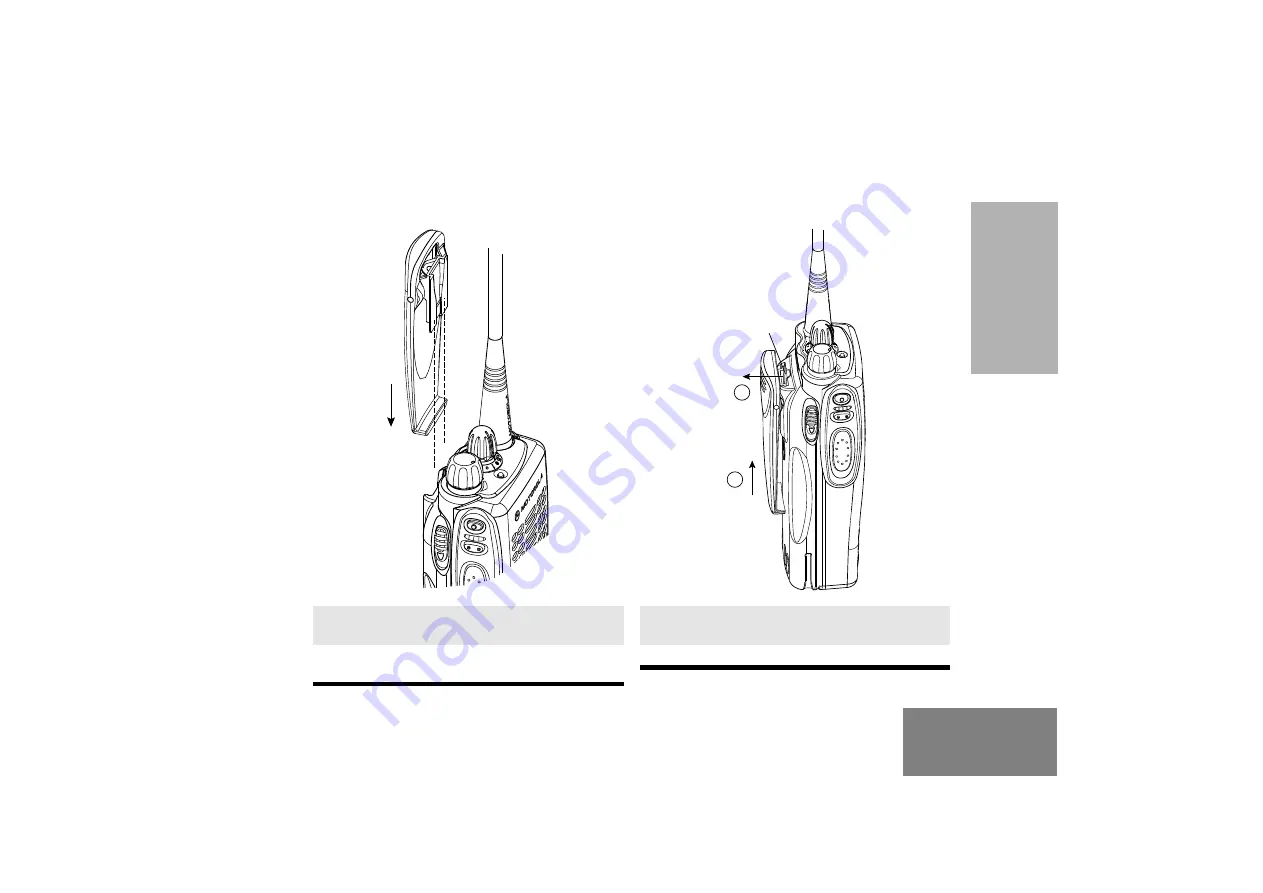
Attaching the Belt Clip

Removing the Belt Clip


1.


Align the grooves of the belt clip with those of 
the battery.


2.


Press the belt clip downward until you hear a 
click.


1.


Use a key to press the belt clip tab away 
from the battery.


2.


Slide the belt clip upward to remove it.

2

1

belt clip tab

Summary of Contents for P080

Page 1: ...Professional Radio P080 User Guide 68P64110B68 Issue September 1999 ...

Page 2: ...Radio Communications Supply Installation Specialist Website www radiotronics co uk Email sales radiotronics co uk Telephone Numbers 0345 0 955 955 02087 190 180 Motorola P080 User Guide ...

Page 3: ......

Page 4: ...ries 10 Charging your Battery 10 Accessory Information 11 Attaching the Battery 11 Removing the Battery 11 Attaching the Antenna 12 Removing the Antenna 12 Attaching the Belt Clip 13 Removing the Belt Clip 13 Turning the Radio On or Off 14 Adjusting the RadioÕs Volume 14 Selecting a Radio Channel 14 Sending a Call 15 Receiving a Call 15 Radio Call Information 16 Repeater or Talkaround Mode 16 Sett...

Page 5: ...l may include copyrighted computer programmes stored in semiconductor memories or other media Laws in the United States of America and other countries preserve for Motorola Europe and Motorola Inc certain exclusive rights for copyrighted computer programmes including the right to copy or reproduce in any form the copyrighted computer programme Accordingly any copyrighted computer programmes contai...

Page 6: ... THE RADIO On Off Volume Knob Microphone programmable Side Button 1 Push to Talk PTT Button LED Indicator programmable Side Button 2 Channel Selector Knob LCD Screen Menu Keys Keypad Dust Cover covering the Accessories Port Pull down from top to open ...

Page 7: ... buttons can be programmed by your dealer as short cut buttons for many of the radioÕs features Check with your dealer for a complete list of the functions your radioÕs programmable buttons support LED State Colour Indication Radio Call Continuous Red Blinking Red Sending message Receiving message Scan Blinking Green Scanning for activity Low Battery Blinking Red when sending message Low battery l...

Page 8: ...hort Press Long Press Hold Down Monitor Ñ Monitors the selected channel for any activity Volume Set Ñ Sounds a tone for adjusting the radioÕs volume level Scan Starts or stops the Scan operation Ñ NuisanceChannel Delete Deletes a nuisance channel while scanning Ñ Power Level Toggles your radioÕs transmit power level between High and Low settings Ñ Repeater Talkaround Toggles between using a repeat...

Page 9: ...nu Mode Used as a backspace key when editing Down Key Used for scrolling when in Menu Mode Moves the cursor right or inserts a space when editing Keypad Keys Used to dial a phone number or enter programming list entries When entering information for the programming lists each key can generate numeric information LCD Screen Used to display channel menu as well as other iconic information Exit Up Me...

Page 10: ...ated the Scan feature E Priority 1 Scan Indicator ßashing During Scan indicates that there is some activity on a Priority 1 channel C Monitor Indicator Indicates that you are monitoring the selected channel F Talkaround Indicator When lit indicates that you are not transmitting through the repeater When not lit you are transmitting through the repeater G Programming Mode Indicator Indicates that y...

Page 11: ... voice quality by compressing your voice at transmission and expanding it when receiving Companding also reduces extraneous noise However to enjoy this beneÞt ALL transmitting and receiving radios must have this feature activated Self Test Pass Tone Self Test Fail Tone Positive Indicator Tone Negative Indicator Tone Button Positive Indicator Tone Negative Indicator Tone Scan Start Scan operation S...

Page 12: ...may result in leakage of electrolyte and ultimately in failure of the battery Charging a hot battery above 35 C results in reduced discharge capacity affecting the performance of the radio Motorola rapid rate battery chargers contain a temperature sensing circuit to ensure that the battery is charged within these temperature limits New batteries can be stored up to two years without signiÞcant cyc...

Page 13: ...he chargerÕs LED indicator will indicate the charging progress NOTE Since new batteries or batteries that have not been used for several months could prematurely indicate full charge solid green LED charge the batteries for 14 to 16 hours prior to initial use to achieve optimal performance NiCd LED color Status Single ßash of Green Successful charger power up Flashing Red Battery is unchargeable F...

Page 14: ...f the battery into the slots at the bottom of the radioÕs body 2 Press the top part of the battery toward the radio until you hear a click 1 2 1 Turn off the radio if it is turned on 2 Slide the battery latches on both sides of the battery downwards 3 Pull the top part of the battery away from the radio body 3 2 battery latches ...

Page 15: ...12 English GETTING STARTED Attaching the Antenna Removing the Antenna Turn the antenna clockwise to attach it Turn the antenna counter clockwise to remove it ...

Page 16: ...ving the Belt Clip 1 Align the grooves of the belt clip with those of the battery 2 Press the belt clip downward until you hear a click 1 Use a key to press the belt clip tab away from the battery 2 Slide the belt clip upward to remove it 2 1 belt clip tab ...

Page 17: ... turn on the radio You will hear the Self Test Pass Tone and see a green LED if the radio powers up success fully If the radio fails its self test you will hear the Self Test Fail Tone Switch off and on again and if fault persists contact your dealer 2 To turn off the radio turn the On Off Volume Control knob counter clockwise until you hear a click ON OFF 1 Press and hold the preprogrammed Volume...

Page 18: ...ld the radio in a vertical position press the PTT button and talk at a distance of about 2 5 to 5 cm one to two inches from the microphone 4 Release the PTT button to listen 1 Turn your radio on 2 Adjust the radioÕs volume 3 Switch to the desired channel 4 If at any time a call comes through you will hear the call at the volume level you have set ...

Page 19: ...icator tone indicates that the radio is in repeater mode ÑorÑ SETTING TIGHT OR NORMAL SQUELCH Use this feature to Þlter out nuisance unwanted calls and or background noise However tightening squelch could cause calls from remote locations to be Þltered out as well In this case normal squelch may be more desirable To select tight or normal squelch Press the Squelch button only available if programm...

Page 20: ... positive indicator tone indicates that the radio is in high power mode while a negative indicator tone indicates that the radio is in low power mode ÑorÑ 1 to enter Menu Mode 2 or until 3 to select 4 or until 5 to select 6 or until tighten channelÕs squelch or until channel operates under nor mal squelch 7 to select the squelch setting UTILITY UTILITY SQUELCH SQUELCH TIGHT NORMAL 1 to enter Menu ...

Page 21: ...you start a scan operation The LED indicator blinks green during a scan operation NOTE If you enter Menu Mode while the radio is scanning scanning will stop It will resume when you exit Menu Mode To start or stop a scan operation ÑorÑ NOTE The LED indicator will blink green during a scan operation 1 Press the Scan button only available if programmed by your dealer to start a scan operation You wil...

Page 22: ...a particular channel more frequently for calls Prioritization of scan list members is done by your dealer using the Customer Programming Software Check with your dealer for details Even though your radio has switched to a non priority channel your radio will still check for activity on the priority channel If activity is detected the radio will switch to the priority channel 1 While the radio is o...

Page 23: ... the phone number having the phone conversation ending the phone call Entering the Phone Mode Before you can make a phone call you must enter the radioÕs Phone mode 1 Press the Phone button To enter the Phone mode via the menu Sending the Access Code Your radio can be programmed to send the access code in any of the following ways manual automatic delayed automatic immediate Check with your dealer...

Page 24: ... Last Number Redial Press and release the PTT the radio sends the last number dialled Phone List 1 Press or to scroll the phone list until you reach the desired phone number 2 Press and release the PTT to send the number Speed Dial 1 Press and release the programmed Speed Dial button 2 Press the numbered keys 1 9 corresponding to the Þrst nine phone numbers in the phone list Press Ò0Ó if you want ...

Page 25: ...ber by using the keypad the radio sends out the numbers as the keys are pressed Buffered Dial 1 Enter the phone number by using the keypad the radio saves the selected numbers in a buffer 2 Press and release the PTT the radio sends out the numbers in its buffer 1 Press and hold the PTT while talking into the microphone 2 Release the PTT when you Þnish what you want to say and wait for the response...

Page 26: ... 3 to select 4 or until 5 to select 6 or until 7 to select You will see PROGRAM PROGRAM PHONE PHONE ADD ADD NUMBER 8 Use the keypad to enter the phone number Press the numeric keys to enter the numbers You can also add a dash press and a Pause Indicator press and hold the key until the character on the LCD screen changes to a ÒPÓ 9 to store the phone number again to conÞrm its storage 10 to return...

Page 27: ...r until 5 to select DELETE DELETE DELETE PROGRAM PROGRAM PHONE PHONE 6 or until 7 to select 8 or until you see the entry you wish to edit 9 to select the entry or until to edit the entryÕs phone number or until to edit the entryÕs location in the phone list 11 to select the edit type 12 Use the keypad to edit the entry See Key pad Keys on page 6 13 to store the information 14 to return to or Hold ...

Page 28: ...ow 1 to enter Menu Mode 2 or until 3 to select TONES TONES 4 or until you see the audio tone setting you wish to change 5 to select the tones setting You will see the current status of the setting 6 or to see the available optional settings 7 to select the desired setting Menu Items Optional Settings Function ALERT ON OFF Allows you to turn all tones on or off KEYPAD ON OFF Allows you to turn the ...

Page 29: ...elect the setting to change You will see the current status of the setting 6 or to see the available optional settings 7 to select the desired setting Menu Items Optional Settings Function SQUELCH NORMAL TIGHT Allows you to change the squelch setting of the radio between normal and tight TX PWR HIGH LOW Allows you to change the power level of the radio between high or low LIGHT ON OFF Allows you t...

Page 30: ...to radio frequency electromagnetic energy Federal Communications Commission Report and Order No FCC 96 326 August 1996 American National Standards Institute C95 1 1992 National Council on Radiation Protection and Measurements NCRP 1986 International Commission on Non Ionizing Radi ation Protection ICNRP 1986 European Committee for Electrotechnical Standardisation CENELEC To assure optimal radio pe...

Page 31: ...e to external RF energy When instructed to do so turn off your radio when on board an aircraft Any use of a radio must be in accordance with airline regulations or crew instructions Operational Warnings Vehicles With an Air Bag Do not place a portable radio in the area over an air bag or in the air bag deployment area Air bags inßate with great force If a portable radio is placed in the air bag de...

Page 32: ...es into contact with your skin a minor burn can result Batteries All batteries can cause property damage and or bodily injury such as burns if a conductive material such as jewellery keys or beaded chains touch exposed terminals The conductive material may complete an electrical circuit short circuit and become quite hot Exercise care in handling any charged battery particularly when placing it in...

Page 33: ...30 English NOTES NOTES ...

Reviews: