background image

Glossary - 5

K

Key. A key is the specific code used by the algorithm to encrypt or decrypt the data. Also see, Encryption and Decrypting.

L

LASER.  Light Amplification by Stimulated Emission of Radiation.The laser is an intense light source. Light from a laser is 

all the same frequency, unlike the output of an incandescent bulb. Laser light is typically coherent and has a high energy 
density.

laser scanner. A type of bar code reader that uses a beam of laser light.

LCD. See Liquid Crystal Display.

LED Indicator. A semiconductor diode (LED - Light Emitting Diode) used as an indicator, often in digital displays. The 

semiconductor uses applied voltage to produce light of a certain frequency determined by the semiconductor's particular 
chemical composition.

Light Emitting Diode. See LED.

Liquid Crystal Display (LCD). A display that uses liquid crystal sealed between two glass plates. The crystals are excited 

by precise electrical charges, causing them to reflect light outside according to their bias. They use little electricity and 
react relatively quickly. They require external light to reflect their information to the user.

M

MC. Mobile Computer.

MDN. Mobile Directory Number. The directory listing telephone number that is dialed (generally using POTS) to reach a 

mobile unit. The MDN is usually associated with a MIN in a cellular telephone -- in the US and Canada, the MDN and 
MIN are the same value for voice cellular users. International roaming considerations often result in the MDN being 
different from the MIN.

MIN. Mobile Identification Number. The unique account number associated with a cellular device. It is broadcast by the 

cellular device when accessing the cellular system.

Mobile Computer. In this text, mobile computer refers to the MC55. It can be set up to run as a stand-alone device, or it can 

be set up to communicate with a network, using wireless radio technology.

N

Nominal. The exact (or ideal) intended value for a specified parameter. Tolerances are specified as positive and negative 

deviations from this value.

Summary of Contents for MC55 - Enterprise Digital Assistant

Page 1: ... Now support POSMicro com Monday Friday 6 AM to 5 PM Pacific Time Bulk Discounts FREE SHIPPING SE Habla Español Free ground shipping to the continental USA on orders over 100 For Help Call 1 800 241 6264 Motorola MC55 Manual More information available at POSMicro com ...

Page 2: ...MC55 Enterprise Digital Assistant User Guide ...

Page 3: ......

Page 4: ...MC55 Enterprise Digital Assistant User Guide 72E 108859 05 Rev A December 2010 ...

Page 5: ...ative work from a licensed program or use a licensed program in a network without written permission from Motorola The user agrees to maintain Motorola s copyright notice on the licensed programs delivered hereunder and to include the same on any authorized copies it makes in whole or in part The user agrees not to decompile disassemble decode or reverse engineer any licensed program delivered to ...

Page 6: ...ge Date Description 01 Rev A 11 21 08 Initial release 02 Rev A 03 12 09 Add MC5574 configuration support 03 Rev A 03 15 10 Add support for OEM version 02 35 000 and 02 35 001 04 Rev A 09 07 10 Add support for OEM version 03 38 0004 05 Rev A 12 15 10 Add MC55A0 configuration ...

Page 7: ...iv MC55 User Guide ...

Page 8: ...cessories 1 3 Getting Started 1 4 Installing a microSD Card 1 4 Installing the SIM Card 1 5 Installing the Battery 1 7 Charging the Battery 1 7 Charging the Main Battery 1 7 Charging Spare Batteries 1 8 Charging Temperature 1 9 Powering On the MC55 1 9 Calibrating the Screen 1 9 Checking Battery Status 1 9 Replacing the Battery 1 9 Removing the microSD Card 1 10 Battery Management 1 11 Changing th...

Page 9: ...C55 2 15 Locking the MC55 2 15 Keypad Locking 2 15 Password Locking 2 16 Keypads 2 18 Numeric Keypad Configuration 2 18 Alpha numeric Keypad Configurations 2 22 PIM Keypad Configuration 2 30 Special Character Key 2 31 Function Buttons 2 33 Stylus 2 33 Entering Data 2 34 Data Capture 2 35 Linear Scanning 2 35 Imaging 2 35 Operational Modes 2 35 Digital Camera 2 36 Scanning Considerations 2 36 Linea...

Page 10: ...ct 4 7 Using Call History 4 7 Making a Speed Dial Call 4 8 Making an Emergency Call 4 8 Answering a Call 4 8 Incoming Call Features 4 9 Smart Dialing 4 9 Muting a Call 4 10 Taking Notes 4 11 Using Speed Dial 4 12 Adding a Speed Dial Entry 4 12 Editing a Speed Dial Entry 4 14 Deleting a Speed Dial Entry 4 15 Using Call History 4 16 Managing Call History 4 16 Changing the Call History View 4 16 Rese...

Page 11: ...rvices 5 9 Connecting to the Internet Using an Access Point 5 11 Dial Up Networking Services 5 12 Object Exchange Push Services 5 12 Headset Services 5 16 Hands free Services 5 17 Serial Port Services 5 18 ActiveSync Using Serial Port Services 5 18 Personal Area Network Services 5 19 IrMC Synchronization Services 5 20 A2DP AVRCP Services 5 20 Connect to a HID Device 5 21 Bonding with Discovered De...

Page 12: ...et Connection 6 6 Modem Connection 6 6 Four Slot Charge Only Cradle 6 7 Charging 6 7 Battery Charging Indicators 6 7 Charging Temperature 6 7 Four Slot Ethernet Cradle 6 8 Charging 6 8 Battery Charging Indicators 6 8 Charging Temperature 6 8 VCD5000 Vehicle Cradle 6 9 Charging the MC55 Battery 6 9 Removing the MC55 6 9 Battery Charging Indicators 6 10 Charging Temperature 6 10 Four Slot Battery Ch...

Page 13: ...onnectors 7 5 Cleaning Frequency 7 5 Troubleshooting 7 6 MC55 7 6 Bluetooth Connection 7 8 Single Slot USB Cradle 7 9 Four Slot Ethernet Cradle 7 10 Vehicle Cradle 7 11 Four Slot Battery Charger 7 12 Cables 7 12 Magnetic Stripe Reader 7 13 Appendix A Technical Specifications MC55 Technical Specifications A 1 MC55 A 1 MC55 Accessory Specifications A 8 Single Slot USB Cradle A 8 Single Slot Ethernet...

Page 14: ...me Screen C 2 Classic Today Screen C 4 Status Bar C 5 Tile Bar C 8 Start Screen C 8 Speaker Icon C 14 Battery Icons C 14 Connectivity Icon C 14 Locking the MC55 C 15 Locking without PIN or Password C 15 Locking with Simple PIN C 16 Locking with Strong Password C 16 Password Locking Setup C 17 Using the RS507 Hands free Imager C 18 Assisted GPS C 18 UI Settings C 20 Start Screen Settings C 20 IE Zo...

Page 15: ...xii MC55 User Guide ...

Page 16: ...the MC55 EDA and accessories Microsoft Applications for Windows Mobile 6 User Guide describes how to use Microsoft developed applications Enterprise Mobility Application Guide describes how to use Enterprise Mobility developed sample applications Enterprise Mobility Developer Kit EMDK Help File provides API information for writing applications NOTE Screens and windows pictured in this guide are sa...

Page 17: ...h or 128 MB RAM 512 MB Flash 1D laser scanner 2D imager 1D laser scanner and camera or 2D imager and camera Windows Mobile 6 X Professional Numeric QWERTY QWERTZ AZWERTY or PIM MC5590 WLAN 802 11a b g WPAN Bluetooth v2 0 EDR 3 5 QVGA Color 128 MB RAM 256 MB Flash or 128 MB RAM 512 MB Flash 1D laser scanner 2D imager 1D laser scanner and camera or 2D imager and camera Windows Mobile 6 X Classic Num...

Page 18: ...he device is running AKU version 1 5 2 OEM Version To determine the OEM software version Tap Start Settings System tab System Info icon System tab BTExplorer Software To determine the BTExplorer software version Tap BTExplorer icon Show BTExplorer Menu About NOTE For configurations with Windows Mobile 6 5 operating system tap Start BTExplorer Menu About to view version information BTExplorer icon ...

Page 19: ...are To determine the Fusion software version Tap Wireless Strength icon Wireless Status Versions Phone Software To determine the Phone software version Tap Start Phone Menu Options PhoneInfo tab or Start Setting System PhoneInfo icon ...

Page 20: ... troubleshooting solutions for potential problems during MC55 operation Appendix A Technical Specifications provides the technical specifications for the MC55 Appendix B Voice Quality Manager provides information on Voice Quality Manager software Appendix C Windows Mobile 6 5 explains the new features in Windows Mobile 6 5 3 Notational Conventions The following conventions are used in this documen...

Page 21: ... When contacting Enterprise Mobility support please have the following information available Serial number of the unit found on manufacturing label Model number or product name found on manufacturing label Software type and version number Motorola responds to calls by email telephone or fax within the time limits set forth in support agreements If your problem cannot be solved by Motorola Enterpri...

Page 22: ... explains how to set up the MC55 for the first time Figure 1 1 MC55 Front View Scan Decode LED Charging Battery Status LED Radio Status LED MC5574 only Scan Action Button Keypad Alpha Numeric Keypad Shown Power Button I O Connector Volume Up Down Button Touch Screen with Protective Overlay Microphone ...

Page 23: ...tor installed on display window Regulatory Guide Quick Start Guide Inspect the equipment for damage If any equipment is missing or damaged contact the Motorola Enterprise Mobility Support center immediately See page xviii for contact information Prior to using the MC55 for the first time remove the protective shipping film that covers the scan window display and camera window Battery Speaker Exit ...

Page 24: ...0CR Charges up to four MC55 battery packs USB Charging Cable 25 108022 02R Provides power to the MC55 and USB communication with a host computer Charge Only Cable 25 112560 01R Connects to a power supply to provide power to the MC55 Auto Charge Cable VCA5500 01R Charges the MC55 using a vehicle s cigarette lighter Miscellaneous Magnetic Stripe Reader MSR5500 100R Snaps on to the MC55 and adds magn...

Page 25: ...or MC55A0 HC 3 pack Replacement stylus for MC55A0 HC 50 pack Spring Loaded Stylus STYLUS 00001 03R STYLUS 00001 10R Optional spring loaded stylus 3 pack Optional spring loaded stylus 10 pack Tether KT 122621 03R KT 122621 50R Replacement tether 3 pack Replacement tether 50 pack Anti bacterial Handstrap SG MC5523341 01R Replacement handstrap for MC55A0 HC only Wall Mounting Kit 8710 050006 01R Use ...

Page 26: ... place 8 Close rubber access door Installing the SIM Card GSM phone service requires a Subscriber Identification Module SIM card or smart card Obtain the card from the your service provider The card fits into the MC55 and can contain the following information Mobile phone service provider account details Information regarding service access and preferences Contact information which can be moved to...

Page 27: ...1 6 ensuring that the card slides into the holding tabs on each side of the door Figure 1 6 Inserting the SIM Card 5 Close SIM card holder door and slide down to lock into place 6 Close the rubber access door 7 Install the battery NOTE For more information about SIM cards refer to the service provider s documentation NOTE For detailed information about WWAN activation and settings refer to the MC5...

Page 28: ...tions To charge the MC55 use a cable or a cradle with the appropriate power supply For information about the accessories available for the MC55 see Chapter 6 Accessories The MC55A0 is equipped with a memory backup battery which automatically charges from the fully charged main battery When using the MC55A0 for the first time the backup battery requires approximately 40 hours to fully charge This i...

Page 29: ...n fully charged See Table 1 2 for charging indications The 2400 mAh battery fully charges in less than four hours and the 3600 mAh battery charges in less than six hours Charging Spare Batteries See Chapter 6 Accessories for information on using accessories to change spare batteries Table 1 2 LED Charge Indicators Charging Battery Status LED Indication Off MC55 is not charging MC55 is not inserted...

Page 30: ... of the stylus 1 Remove the stylus from its holder on the side of the MC55 2 Carefully press and briefly hold the tip of stylus on the center of each target that appears on the screen 3 Repeat as the target moves around the screen then tap the screen to continue Checking Battery Status To check the charge status of the main battery in the MC55 tap Start Settings System tab Power icon to display th...

Page 31: ...move an microSD card 1 Press the red Power button to suspend the MC55 On the MC55A0 the PowerKey Action window appears Tap Safe Battery Swap The Decode LED lights red and then turns off 2 Remove the battery 3 Lift the rubber access door 4 Slide SIM card holder door up to unlock 5 Lift SIM Card holder door 6 Lift the microSD card holder door 7 Remove microSD card from holder 8 Close microSD card ho...

Page 32: ...ange the backlight settings in order to conserve more battery power 1 Tap Start Settings System tab Backlight icon Battery Power tab 2 Select the Disable backlight if device is not used for check box and select a value from the drop down list 3 Select the Brightness tab 4 Tap the Disable backlight check box to turn off the display backlight or use the slider to set a low value for the backlight 5 ...

Page 33: ...anager on the Today screen Figure 1 9 Opening Wireless Manager Select Wireless Manager Figure 1 10 Wireless Manager Window To enable or disable a wireless connection tap the specific button To enable or disable all wireless connections tap and hold the All button To configure settings for a connection tap Menu NOTE On devices with Windows Mobile 6 5 3 see Status Bar on page C 5 for more informatio...

Page 34: ... 2 Press the red Power button to suspend the MC55 On the MC55A0 the PowerKey Action window appears Tap Safe Battery Swap The Decode LED lights red and then turns off 3 Remove the battery 4 Using a small flat screwdriver push the head of the screwdriver between the handstrap pin and the bottom of the housing as shown below CAUTION When removing handstrap pin be carefully not to damage handstrap mou...

Page 35: ...1 13 Handstrap and Pin Removal 6 Repeat for the other side of the handstrap 7 Remove pin from the handstrap Figure 1 14 Pin Removal 8 Pull handstrap through handstrap slot Installation To install a new handstrap 1 Feed bottom end of handstrap into handstrap slot on the bottom of the MC55 1 2 3 4 ...

Page 36: ...nto position in the mounting area Figure 1 16 Pin and Handstrap in Mounting Area Figure 1 17 Slide Handstrap and Tether Over Handstrap Mount 5 Slide tether loop over handstrap Insert the handstrap clip into the slot on the device Ensure that it is securely in place NOTE Handstrap and pin should fit securely into the handstrap mounting area When pulling on handstrap use enough force to engage pin i...

Page 37: ...1 16 MC55 User Guide ...

Page 38: ...and status indicators Tap a section on the screen to open the associated program Alternatively tap Start Today to display the Today screen Figure 2 1 Today Screen NOTE On devices with Windows Mobile 6 5 X the Today screen is different See Home Screen on page C 2 for more information Open the Start Menu Adjust volume Change the date and time Soft Keys Battery Status Command Bar WAN Signal Strength ...

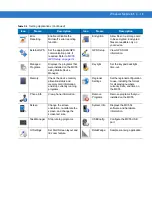
Page 39: ...able 2 1 Status Icons Icon Function Description Notification Notification that one or more instant messages were received Notification that one or more e mail text messages were received Notification that one or more voice messages were received There are more notification icons than can be displayed Tap to display remaining icons Indicates a reminder of an upcoming calendar event Connectivity Con...

Page 40: ... Main battery is charging Main battery level Main battery is low or very low Battery power critically low Time and Next Appointment Displays current time in analog or digital format Table 2 2 Task Tray Icons Icon Description Wireless connection status Indicates WLAN signal strength Out of network range not associated Indicates no wireless LAN network connection Notify the network administrator No ...

Page 41: ... Icon Description NOTE On devices with Windows Mobile 6 5 3 see Start Screen on page C 8 for more information Table 2 3 Programs in the Start Menu Icon Name Description Office Mobile Use the complete suite of Microsoft Office applications for your mobile device Excel Mobile Create new workbooks or view and edit Microsoft Excel workbooks OneNote Mobile Create new notes or view existing notes PowerP...

Page 42: ...on when the Microsoft Bluetooth stack is enabled BTExplorer Manages Bluetooth connections BTScannerCtlPanel Set the comm port used with the RS507 Hands free imager Calculator Perform basic arithmetic and calculations such as addition subtraction multiplication and division Display_BD_Address Displays the device s Bluetooth address in a bar code format File Explorer Organize and manage files on you...

Page 43: ...rm Console FTP server to the MC55 Refer to the Mobility Services Platform 3 2 User Guide for more information Remote Desktop Mobile Log onto Windows NT server type computers and use all of the programs that are available on that computer from the MC55 Search Search contacts data and other information on your MC55 Task Manager Enables viewing of memory and CPU allocations and stops running processe...

Page 44: ...what programs appear in the Start menu Owner Information Enter personal information on the MC55 Phone Make and receive calls switch between calls and set up conference calling Sounds Notifications Enable sounds for events notifications and more and set the type of notification for different events Today Customize the appearance and the information to be displayed on the Today screen System Tab Abo...

Page 45: ...orts if required You may need to do this when there are programs on your device that access GPS data or you have connected a GPS receiver to the MC55 GPS Setup View GPS SUPL information Keylight Set the keypad backlight time out Managed Programs Lists applications that have been installed remotely by your system administrator Memory Check the device memory allocation status and memory card informa...

Page 46: ...the Microsoft Bluetooth stack is enabled See Using Microsoft Bluetooth Stack on page 5 37 for more information Connections Set up one or more types of modem connections for your device such as phone dial up GPRS Bluetooth and more so that your device can connect to the Internet or a private local network Domain Enroll Make your device an AD domain member for device management and security USB to P...

Page 47: ...an also adjust the system volume using the Sounds Notifications window or use the Up Down button on the side of the MC55 Battery Status Indications Battery icons appear on the navigation bar indicating the battery power level When the main battery power falls below a predetermined level the icon indicates the status and a battery dialog box appears indicating the status of the battery Figure 2 3 B...

Page 48: ...ry status using the Power window Either Tap the Battery icon Tap Start Settings System tab Power icon Figure 2 5 Settings Power Window Battery Reserve Options If the charge of the battery reaches a critical threshold the MC55 shuts down This threshold can be changed but affects the amount of time that data can be retained 1 Tap Start Settings System tab Power icon RunTime tab A warning message app...

Page 49: ...within the battery exceeds specific temperature thresholds Level 1 Temperature Watch this level is similar to main battery low warning It indicates that the battery temperature has reached the first threshold level The user should move to an environment within proper operating temperature Level 2 Temperature Warning this level is similar to main battery very low warning It indicates the battery te...

Page 50: ...s the LED indications Figure 2 10 LED Indicators NOTE The Temperature Warning dialog box remains visible until you tap Hide Table 2 6 LED Indications LED State Indication Scan Decode LED Solid Green Successful decode capture Solid Red Laser enabled scanning imaging in process Off Not enabled Charging Battery Status LED Slow Blinking Amber Main battery in MC55 is charging Solid Amber Main battery i...

Page 51: ...t To perform a cold boot On a numeric keypad simultaneously press the red Power button and the and keys On an alphanumeric keypad simultaneously press the red Power button and the and keys On an PIM keypad simultaneously press the red Power button and the and keys Fast Blinking Amber Charging error Off Not charging Single Blink Amber when Power button pressed Battery depleted Blinking Amber when P...

Page 52: ...n and you want to prevent accidental key presses To lock the device tap the Device unlocked icon The icon changes to locked Figure 2 11 Device Locked Unlocked Icons To unlock the device and free it for use tap Unlock Table 2 7 Wake up Default Settings Condition for Wake up Power Button Automatic Time out AC power is applied No Yes Mobile computer is inserted into a cradle No Yes Mobile computer is...

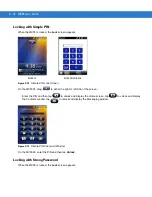
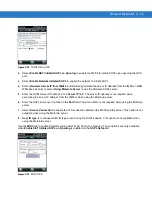
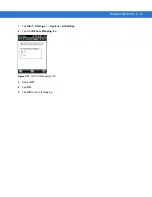
Page 53: ... for the protection to take affect after non use 4 From the Password type drop down list select either Simple PIN or Strong alphanumeric 5 For a simple password enter a four digit password in the Password field For a stronger password NOTE You can make emergency calls even when the MC55 is locked See Making an Emergency Call on page 4 8 for more information NOTE If the device is configured to conn...

Page 54: ...unctuation b Re enter the password in the Confirm field 6 Tap ok 7 To set a hint to remember the password tap the Hint tab Figure 2 14 Password Window Hint Tab 8 In the text box enter a hint for a password reminder 9 Tap ok When the MC55 is not used for a period of time and the user tries to access the device the Password window appears Figure 2 15 Enter Password Windows Enter the password to un l...

Page 55: ...lue Key Use this key to launch applications or access items shown on the keypad in blue Press the Blue key once to activate this mode followed by another key A single press illuminates the key and displays the following icon at the bottom of the screen until a second key is pressed Orange Key Use this key to access the secondary layer of characters and actions shown on the keypad in orange Press t...

Page 56: ...ing XML provisioning files Scan yellow Activates the scanner imager in a scan enabled application End OK End Red Phone press when the phone keypad window displays to stop dialing or end a call Use this key in conjunction with the Blue key as an OK or close button This function is user programmable To use a key as an application key APP key on the keyboard create and install a new keyboard remap ta...

Page 57: ...ress the SHIFT key in Alpha state to produce the upper case alphabetic characters on the key For example press and release the Orange key press and release the SHIFT key and then press the 4 key once to produce the letter G press and release the Orange key press and release the SHIFT key and then press the 4 key three times to produce the letter I Backspace Produces a backspace SHIFT Press and rel...

Page 58: ... 2nd Press 3rd Press 4th Press 1 1 F1 2 2 F2 a b c A B C 3 3 F3 d e f D E F 4 4 F4 g h i G H I 5 5 F5 j k l J K L 6 6 F6 m n o M N O 7 7 F7 p q r s P Q R S 8 8 F8 t u v T U V 9 9 F9 w x y z W X Y Z 0 0 F10 Up Up Up Hilight Up Left Left Down Down Down Hilight Down Right Right Enter Action Action Action Action Action Note An application can change the key functions The keypad may not function exactl...

Page 59: ... key to press to produce a particular character or action The keypad default is alphabetic producing lowercase letters See Table 2 10 for key and button descriptions and Table 2 11 on page 2 25 for the keypad s special functions AZERTY keypad is used on configurations installed with the French operating system QWERTZ keypad is used on configurations installed with the German operating system Figur...

Page 60: ... displays the following icon at the bottom of the screen Press and release the Blue key a third time to unlock Orange Key Accesses the secondary layer of characters and actions shown on the keypad in orange Press and release the Orange key once to activate this mode temporarily followed by another key This displays the following icon at the bottom of the screen until a second key is pressed Press ...

Page 61: ... provisioning files Scan yellow Activates the scanner imager in a scan enabled application End OK End Red Phone press when the phone keypad window displays to stop dialing or end a call Use this key in conjunction with the Blue key as an OK or close button This function is user programmable MC5590 To use a key as an application key APP key on the keyboard create and install a new keyboard remap ta...

Page 62: ...mode This displays the following icon at the bottom of the screen Press the Shift key a third time to unlock Backlight Turns the display backlight on and off Backspace Produces a backspace Enter Executes a selected item or function Star Produces an asterisk au Creates special characters Table 2 11 QWERTY Keypad Input Modes Key Normal Shift Key Orange Key Blue Key Q q Q q W w W 1 w E e E 2 e R r R ...

Page 63: ...ace Backspace Shift Shift Shift Lock Shift Shift Z z Z 7 z X x X 8 x C c C 9 c V v V v B b B b N n N n M m M m ENTER Enter Enter Enter Enter 0 0 0 0 TAB Tab Tab Back tab Tab SPACE Space Space Space Space Table 2 11 QWERTY Keypad Input Modes Continued Key Normal Shift Key Orange Key Blue Key Note An application can change the key functions The keypad may not function exactly as described ...

Page 64: ...4 s D d D 5 d F f F 6 f G g G g H h H h J j J j K k K k L l L l Backspace Backspace Backspace Backspace Backspace Shift Shift Shift Lock Shift Shift W w W 7 w X x X 8 x C c C 9 c Note An application can change the key functions The keypad may not function exactly as described Table 2 11 QWERTY Keypad Input Modes Continued Key Normal Shift Key Orange Key Blue Key Note An application can change the ...

Page 65: ... Shift Key Orange Key Blue Key Q q Q q W w W 1 w E e E 2 e R r R 3 r T t T t Z z Z _ z U u U u I i I i O o O o P p P áü p A a A a S s S 4 s D d D 5 d F f F 6 f G g G g Note An application can change the key functions The keypad may not function exactly as described Table 2 12 AZERTY Keypad Input Modes Continued Key Normal Shift Key Orange Key Blue Key Note An application can change the key functio...

Page 66: ...m M m ENTER Enter ENTER ENTER Enter 0 0 0 0 TAB Tab Tab Back tab Tab SPACE Space Space Space Space Backlight Backlight Backlight Backlight Backlight Period Table 2 13 QWERTZ Keypad Input Modes Continued Key Normal Shift Key Orange Key Blue Key Note An application can change the key functions The keypad may not function exactly as described ...

Page 67: ...eviceMap KYBD parm name GreenKeyOverride value xx datatype integer where xx is the new APP key code Provision the file to the MC55 to send an APP key code instead of the original key code upon pressing the green phone key Refer to the MC55 Integrator Guide for information on creating XML provisioning files End Red Phone This key is user programmable To use a key as an application key APP key on th...

Page 68: ...tivates the scanner imager in a scan enabled application Scroll Up Moves up one item Scroll Down Moves up down item Scroll Left Moves left one item Scroll Right Moves right one item Soft Keys Accesses the command or menu above it on the screen Enter Executes a selected item or function OK Use this key as an OK or close button Table 2 14 MC55 PIM Keypad Descriptions Continued Key Description NOTE S...

Page 69: ...ange key twice and then press the áü key until the special character replaces the original character Table 2 15 lists the special characters you can generate Table 2 15 Special Characters Key Special Characters Key Special Characters a A c C d D e E i I l L n N o O p P r R s S t T u U y Y z Z _ ...

Page 70: ...to increase or decrease the MC55 s volume Action Press to open an application or perform a function See the Microsoft Applications for Windows Mobile 6 User Guide to set an application to open Stylus Use the MC55 stylus to select items and enter information The stylus functions as a mouse Tap Touch the screen once with the stylus to press option buttons and open menu items Tap and Hold Tap and hol...

Page 71: ...ser Guide Entering Data When entering data on the keypad use either the single hand method or the two hand method as shown in Figure 2 22 Figure 2 22 Entering Data on the Keypad Single hand Method Two hand Method ...

Page 72: ... modes of operation listed below Activate each mode by pressing the Scan button Decode Mode In this mode the MC55 attempts to locate and decode enabled bar codes within its field of view The imager remains in this mode as long as you hold the scan button or until it decodes a bar code Pick List Mode This mode allows you to selectively decode a bar code when more than one bar code is in the MC55 s ...

Page 73: ...y and scanning device optics Scanning within range brings quick and constant decodes scanning too close or too far away prevents decodes Move the scanner closer and further away to find the right working range for the bar codes being scanned Angle Scanning angle is important for promoting quick decodes When laser beams reflect directly back into the scanner from the bar code this specular reflecti...

Page 74: ...is in process then lights green and a beep sounds by default to indicate the bar code was decoded successfully Figure 2 24 Linear Scanner Aiming Pattern Imager Scanning 1 Ensure that a scan enabled application is loaded on the MC55 2 Aim the scan window at the bar code Figure 2 25 Imager Scanning Incorrect Correct SE4400 MC5574 only SE4500 MC5590 and MC55A0 only SE4400 MC5574 only ...

Page 75: ...e LED lights red to indicate that scanning is in process then lights green and a beep sounds by default to indicate the bar code was decoded successfully Note that when the MC55 is in Pick List Mode the imager does not decode the bar code until the crosshair or aiming dot touches the bar code Figure 2 26 Imager Aiming Pattern Bar Code Centered Figure 2 27 Imager Aiming Pattern Bar Code Not Centere...

Page 76: ...pairing with the MC55 If required enter PIN 12345 Refer to the RS507 Hands free Imager Product Reference Guide for more information Digital Camera Scanning 1 Ensure that a scan enabled application is loaded on the MC55 2 Aim the camera lens on the back of the MC55 at a bar code 3 Press and hold the scan button A preview window appears on the display window with a red aiming reticle in the center T...

Page 77: ...urces that may occur on the 802 11b g 2 4 GHz band due to wireless interference When using a Bluetooth headset with the MC55 and VoWLAN it is required to use the Bluetooth Headset profile instead of Hands free profile Use the buttons on the MC55 to answer and end calls See Chapter 5 Using Bluetooth for information on setting up a Bluetooth Headset Profile Taking Photos To take a photo 1 Tap Start ...

Page 78: ...de to video The available recording time displays on the screen 4 Press the Enter key to begin recording Recording stops when you press the Enter button again Viewing Photos and Videos To view photos and video clips 1 Tap Start Programs Pictures Videos icon 2 Tap the picture or video clip to view NOTE By default the time limit for recording videos is set to 30 seconds ...

Page 79: ...2 42 MC55 User Guide ...

Page 80: ...that the application is compatible with the MC55 Refer to the application s user guide for application installation and setup information MC55 GPS Setup The GPS enabled MC55 uses Microsoft Windows Mobile 6 5 X so the operating system automatically manages access to the GPS receiver to allow multiple programs to simultaneously access GPS data By default the MC55 has the following Settings 1 Tap Sta...

Page 81: ...may be affected if the vehicle has thermal glass windows and windshields which can block the MC55 from receiving a GPS signal from satellites To improve GPS signal strength place the MC55 where there is a clear view of the sky A direct line of sight is required between the MC55 and the GPS satellites to access information from the satellites Assisted GPS GPS can be used in stand alone or Assisted ...

Page 82: ...Navigation 3 3 ordinarily have to download from the GPS satellites With the aGPS data GPS receivers can operate faster and more reliably Refer to the EMDK Help file for information on setting up SUPL on the MC55 ...

Page 83: ...3 4 MC55 User Guide ...

Page 84: ...rowse the Web and read e mail Connect to the Internet or work network over General Packet Radio Service GPRS using Cellular Line or using the modem specified by the mobile operator For more information or to customize the MC55 phone by changing phone settings see the MC55 Integrator Guide Accessing the Phone Keypad Access the keypad regardless of the program in use Applications on the MC55 can be ...

Page 85: ...include Wireless Manager which provides a simple method of enabling and disabling the phone To open Wireless Manager tap the Connectivity icon Figure 4 2 Opening Wireless Manager Select Wireless Manager The Wireless Manager window appears To toggle on or off the phone tap blue Phone bar To configure settings for a connection tap Menu Phone Settings NOTE On devices with Windows Mobile 6 5 3 see Sta...

Page 86: ... headset for audio communication when using an audio enabled application See Chapter 5 Using Bluetooth for information on connecting a Bluetooth headset to the MC55 Set the MC55 s volume appropriately before putting the headset on When a Bluetooth headset is connected the speakerphone is muted It is recommended for phone conversations to use the Bluetooth Hands free profile instead of the Headset ...

Page 87: ...n in the Title bar Move the slider up or down to adjust the volume Making a Call With the MC55 you can make a call from the phone contacts speed dial and call history Using the Phone To make a call using the phone keypad Phone Volume Slider NOTE Adjust the conversation phone volume during a call Adjusting the volume while not in a call affects the ring and notification sound levels NOTE You can ma...

Page 88: ... create an Outlook contact 1 Tap Start Contacts 2 Tap New 3 If the Phone is on the Select Contact Type window displays Select Outlook Contact NOTE Alternatively use the green and red phone keys on the MC55 keypad to dial green and end red calls If you tap a wrong number tap Delete key to erase each subsequent digit of a number To erase the entire number tap and hold the Delete key NOTE To make a c...

Page 89: ... the category in the text box and tap ok 10 Tap ok 11 To add notes tap the Notes tab and enter text draw or create a recording 12 When finished tap ok to return to the contact list Editing an Outlook Contact To make changes to a contact 1 Tap Start Contacts 2 Tap the contact in the contact list to open it 3 Tap Menu Edit and make the changes 4 Tap ok Deleting a Contact To delete a contact 1 Tap St...

Page 90: ...ct list Using Call History To make a call using Call History 1 Tap Start Phone or press the green phone key on the MC55 s keypad 2 From the Phone keypad tap Call History Figure 4 9 Call History 3 Tap the phone icon next to the number to begin dialing and return to the phone keypad NOTE When entering a contact phone number that contains a star character followed by a plus character save the contact...

Page 91: ...rams one or more emergency phone numbers such as 911 or 999 that you can call under any circumstances even when your phone is locked or the SIM card is not inserted Your service provider can program additional emergency numbers into your SIM card However your SIM card must be inserted in your phone in order to use the numbers stored on it See your service provider for additional information When t...

Page 92: ...r a waiting call tap Answer or press the Send key to place the current call on hold and answer the incoming call To put a call on hold to call another number or answer an incoming call tap Hold To move from one call to another tap Swap Smart Dialing Smart Dialing makes it easy to dial a phone number When you start entering numbers or characters Smart Dialing automatically searches and sorts the co...

Page 93: ...ms John and Parks Celine Figure 4 12 Finding a Contact To make a call or send a text message using Smart Dialing 1 Begin entering the first few numbers or characters 2 In the Smart Dialing panel use the up and down arrows on the keypad to navigate to the desired contact or phone number 3 When the correct contact is selected press TALK to make a voice call 4 To send a text message to the selected c...

Page 94: ...on about creating notes see the Windows On Device Help To access a note created during a call 1 Tap Start Phone or press the green phone key on the MC55 s keypad 2 From the Phone keypad tap Call History 3 Tap and hold the number or the Note icon for the phone call entry containing the note Figure 4 14 Call History Notes Menu 4 Tap View Note Mute Icon Note icon ...

Page 95: ...mber exists in Contacts Adding a Speed Dial Entry To add a speed dial entry from the phone keypad 1 Ensure the contact and phone number are in the Contacts list 2 Tap Start Phone or press the green phone key on the MC55 s keypad 3 Tap Speed Dial Menu New Figure 4 16 Contacts 4 Tap the desired contact name and number in the list NOTE Also access notes directly from the Notes application by tapping ...

Page 96: ...an available location to assign as the new speed dial entry The first speed dial location is reserved for voice mail 6 Tap ok to add the contact to the speed dial list Figure 4 18 Speed Dial Contact List 7 Tap ok to exit the Speed Dial Contact List To add a speed dial entry from the Contacts window 1 Tap Start Contacts ...

Page 97: ...20 Speed Dial Contact Location 4 Tap the up down arrows to select an available location to assign as the new speed dial entry The first speed dial location is reserved for voice mail 5 Tap ok Editing a Speed Dial Entry 1 Tap Start Phone or press the green phone key on the MC55 s keypad 2 Tap Speed Dial ...

Page 98: ...een phone key on the MC55 s keypad 2 Tap Speed Dial 3 Tap and hold the contact name Figure 4 22 Speed Dial Delete Menu 4 Tap Delete 5 Tap Yes to confirm permanently deleting the speed dial entry NOTE Editing names and phone numbers in Speed Dial does not alter contact information in Contacts Start Contacts NOTE Deleting names and phone numbers in Speed Dial does not delete the contact information ...

Page 99: ... phone key on the MC55 s keypad to display the Phone keypad 2 From the Phone keypad tap Call History 3 Tap Menu Filter to show the menu Figure 4 23 Call History All Calls Show Menu 4 Select a view type from the menu to display only missed calls outgoing calls incoming calls or calls listed alphabetically by caller name 5 Tap ok to exit the Call History window Resetting the Recent Calls Counter 1 T...

Page 100: ...s Figure 4 25 Call History Call Timers 5 Tap Reset The All Calls counter cannot be reset 6 Tap ok to exit the Call Timers window Deleting Call History Items by Call Date 1 Tap Start Phone or press the green phone key on the MC55 s keypad to display the Phone keypad 2 From the Phone keypad tap Call History 3 Tap Menu Call Timers ...

Page 101: ...ems 5 Tap ok to exit the Call Timers window Deleting All Call History Items 1 Tap Start Phone or press the green phone key on the MC55 s keypad to display the Phone keypad 2 From the Phone keypad tap Call History 3 Tap Menu Figure 4 27 Call History Tools Menu 4 Select Delete all calls Figure 4 28 Call History Delete All Dialog 5 Tap Yes 6 Tap ok to exit the Call History window ...

Page 102: ...ry Menu Use the Call History menu to dial voice mail access the Activation Wizard save to contacts view a note delete a listing send an SMS and make a call 1 Tap Start Phone or press the green phone key on the MC55 s keypad to display the Phone keypad 2 From the Phone keypad tap Call History 3 Tap and hold an item in the list Figure 4 30 Call History Menu 4 Select an applicable item from the menu ...

Page 103: ...tart Phone or press the green phone key on the MC55 s keypad to display the Phone keypad 2 Enter the first phone number and press Talk When the call connects Hold appears on the keypad Figure 4 31 Call Swapping Hold 3 Tap Hold on to place the first number on hold 4 Enter the second number and tap Talk Figure 4 32 Call Conferencing Conferencing 5 Tap Swap to move from one call to the other 6 Tap En...

Page 104: ... the second phone number and tap Talk 5 After the call is answered tap Menu Conference to place the calls in conference mode Figure 4 34 Creating a Conference Call 6 Tap Hold to place the conference on hold 7 Enter another phone number and tap Talk 8 After the call is answered tap Menu Conference to place all the calls in conference mode 9 Repeat steps 6 through 8 for up to six phone numbers NOTE ...

Page 105: ...ed in a central short message center then forwarded to the destination mobile device If the recipient is not available the message is stored and can be sent later Viewing Text Messages To view a text message You can view a text message whether the phone is on or off When the phone is on you can view a text message from its notification callout Tap the text message notification icon on the navigati...

Page 106: ... box gives you the option to call the sender or save dismiss or delete the message Figure 4 37 New Text Message Options When the phone function is off you can still view received text message in Messaging 1 Tap Start Messaging Text Messages or on the Today screen tap Text Messages Figure 4 38 Text Messaging on Today Screen The Text Messages window appears Figure 4 39 Messaging Window Tap Text Mess...

Page 107: ... Send Sending a Text Message To create a text message 1 On the Phone screen select a contact name that you want to send a message to 2 Tap Menu Send Text Message Figure 4 41 Phone Screen Contact List 3 Compose your message Tap to reply the message NOTE If the phone is turned off and you tried to call the sender send a reply or forward the message you are prompted to turn the phone function on ...

Page 108: ...gure 4 43 Message Options Window 4 Tap Send when you ve finished the message If the phone is turned on your text message is sent If it s off you are prompted to turn on the phone If you do so the message is sent otherwise when you tap ok the message is saved in the Drafts folder and sent when the phone is turned on If you are out of coverage area the message is saved in the Drafts folder and sent ...

Page 109: ...formation 7 Tap the connectivity icon or at the top of the screen Figure 4 44 Connectivity Dialog Box 8 Tap Settings 9 Tap Connections icon 10 Tap Managing existing connections 11 Tap and hold on the data connection until a menu appears Figure 4 45 Data Connection 12 Select Connect NOTE Refer to the MC55 Integrator Guide for information on configuring a data connection ...

Page 110: ...Internet or launch an applicable application Ending a Data Connection To cancel a data connection in progress tap Cancel in the Connecting dialog window To end an established data connection 1 Tap or to display the Connectivity dialog box Figure 4 47 Connectivity Dialog Box NOTE Place emergency calls at any time without entering a PIN or a SIM card NOTE If the connection is not established the use...

Page 111: ...Guide 2 Tap Disconnect NOTE Tapping Disconnect during an active data transfer e g downloading a web page automatically reconnects the connection You cannot disconnect the connection until the data transfer is complete ...

Page 112: ...to the Enterprise Mobility Developer Kit EMDK Help Adaptive Frequency Hopping Adaptive Frequency Hopping AFH is a method of avoiding fixed frequency interferers and can be used with Bluetooth voice All devices in the piconet Bluetooth network must be AFH capable in order for AFH to work There is no AFH when connecting and discovering devices Avoid making Bluetooth connections and discoveries durin...

Page 113: ...th devices is based upon a challenge response transaction Bluetooth allows for a PIN number or passkey that is used to create other 128 bit keys used for security and encryption The encryption key is derived from the link key used to authenticate the pairing devices Also worthy of note is the limited range and fast frequency hopping of the Bluetooth radios that makes long distance eavesdropping di...

Page 114: ...tack and the Microsoft Bluetooth stack Table 5 2 list the COM ports available for the StoneStreet One Bluetooth stack and the Microsoft Bluetooth stack Table 5 1 Bluetooth Services Microsoft Bluetooth Stack StoneStreet One Bluetooth Stack OBEX Object Push Services File Transfer Services Hands Free Audio Gateway Services Dial Up Networking Services Serial Port Services OBEX Object Push Services Per...

Page 115: ...her Bluetooth devices cannot see or connect to the MC55 Turn on the Bluetooth radio to exchange information with other Bluetooth devices within range Communicate only with Bluetooth radios in close proximity Disabling Bluetooth To disable Bluetooth tap Bluetooth icon Disable Bluetooth The Bluetooth icon changes to indicate that Bluetooth is disabled Figure 5 2 Disable Bluetooth NOTE If there is an...

Page 116: ...lect View Wizard Mode or View Explorer Mode Wizard Mode Wizard Mode provides a simple process for discovering and connecting to Bluetooth devices Wizard Mode shows the devices and services in a simple Favorites view created by following the step by step wizard Explorer Mode The Explorer Mode window is easy to navigate and provides greater control to users familiar with Bluetooth The menu bar provi...

Page 117: ...area 1 Ensure that Bluetooth is enabled on both devices 2 Ensure that the Bluetooth device to discover is in discoverable and connectable modes 3 Ensure that the require profile is enabled on the MC55 See Profiles Tab on page 5 35 for more information 4 Ensure that the two devices are within 30 feet 10 meters of one another 5 Tap the Bluetooth icon and select Show BTExplorer The BTExplorer window ...

Page 118: ...o 8 BTExplorer searches for Bluetooth devices in the area Figure 5 6 Discover Devices Dialog Box The discovered devices display in the Select Remote Device window NOTE If a device discovery action has not been previously performed a device discovery is automatically initiated If a device discovery has previously been performed the device discovery process is skipped and the previously found list o...

Page 119: ...igure 5 8 Device Services 10 Select a service from the list and press Next The Connection Favorite Options window appears Figure 5 9 Connection Favorite Options Window 11 In the Favorite Name text box enter a name for this service that will appear in the Favorite window NOTE If the MC55 discovers a service but the service is not supported the service icon is grayed out ...

Page 120: ...a Networking Services IrMC Services A2DP AVRCP See the following sections for information on these services File Transfer Services To transfer files between the MC55 and another Bluetooth enabled device 1 Ensure that OBEX File Transfer profile is enabled on the MC55 See Profiles Tab on page 5 35 for more information NOTE Some devices might not require a PIN This depends upon the device s authentic...

Page 121: ...ear Figure 5 11 File Transfer Window 7 Double tap the file to copy The Save Remote File window appears Figure 5 12 Save Remote File Window 8 Tap and hold on the file A pop up menu appears 9 Select the action to perform New create a new file or folder on the remote device Delete delete the selected file on the remote device Get File copy the file from the remote device to the MC55 Put File copy a f...

Page 122: ...Tap Open The file copies from the MC55 to the remote device Connecting to the Internet Using an Access Point This section explains how to access a Bluetooth enabled LAN access point AP for a network connection Use Internet Explorer to connect to a server 1 Ensure the MC55 is discoverable and connectable See Device Info Tab on page 5 24 2 Ensure that the Personal Area Networking profile is enabled ...

Page 123: ...ice 6 Tap OK The Edit Local Services window appears Figure 5 13 Edit Local Service Window 7 In the Local COM Port drop down list select DUN1 for GSM configurations 8 Tap OK twice 9 On the PC or laptop set up Bluetooth according to the manufacturer s instructions 10 On the PC or laptop Bluetooth software search for the MC55 and select the Dial up Networking service 11 Using dial up software on the ...

Page 124: ... Information Fetch Contact Information or Send a Picture Sending a Contact To send a contact to another device 1 Tap and hold on OBEX Object Push and select Connect The OBEX Object Push window appears Figure 5 14 OBEX Object Push Window 2 In the Action drop down list select Send Contact Information 3 Tap The Select Contact Entry window appears NOTE If favorite connections have already been created...

Page 125: ...ntact dialog appears 7 Tap Ok Swapping Contacts To swap contacts with another device 1 Tap and hold on OBEX Object Push and select Connect The OBEX Object Push window appears Figure 5 16 OBEX Object Push Window 2 In the Action drop down list select Swap Contact Information 3 Tap The Select Contact Entry window appears NOTE Prior to swapping contacts a default contact must be set up before attempti...

Page 126: ... Ok Fetching a Contact To fetch a contact from another device 1 Tap and hold on OBEX Object Push and select Connect The OBEX Object Push window appears Figure 5 18 OBEX Object Push Window 2 In the Action drop down list select Fetch Contact information 3 Tap OK The contact on the other device is copied NOTE Prior to sending and receiving contacts a default contact must be set up before attempting t...

Page 127: ... Window 4 Navigate to the picture to send to the other device 5 Tap Open 6 Tap OK to send the picture to the other device and display a confirmation dialog box on the other device to accept the picture A Send Picture dialog appears 7 Tap Ok Headset Services To connect to a Bluetooth headset NOTE Newer Bluetooth headsets are device dependant and remember the last device they connected to If problem...

Page 128: ...e is enabled on the MC55 See Profiles Tab on page 5 35 for more information 3 Use the Connection Wizard to search for a Bluetooth hands free headset 4 Select the hand free device and tap Next 5 Select the Hands free service name and select Connect The MC55 connects to the headset Refer to the headset user manual for instructions on communicating with a Bluetooth device 6 During an active connectio...

Page 129: ...on Favorite Options window appears 3 In the Local COM Port drop down list select a COM port 4 Tap Finish ActiveSync Using Serial Port Services Use the wireless Bluetooth serial port connection for ActiveSync just as you would a physical serial cable connection You must configure the application that will use the connection to the correct serial port Figure 5 22 ActiveSync Connection Settings Windo...

Page 130: ... in the Favorite window and select Disconnect from the pop up window Personal Area Network Services Connect two or more Bluetooth devices to share files collaborate or play multi player games To establish a Personal Area Network connection 1 Ensure that the Personal Area Networking profile is enabled on the MC55 See Profiles Tab on page 5 35 for more information 2 Use the Connection Wizard to sear...

Page 131: ...in the pop up menu A2DP AVRCP Services A2DP AVRCP is used to connect to a high quality stereo headset 1 Ensure the MC55 is connectable required when automatic re connect is initiated See Device Info Tab on page 5 24 2 Ensure that the remote Bluetooth device is in discoverable mode See the devices user manual for instructions 3 Ensure that the A2DP AVRCP profile is enabled on the MC55 See Profiles ...

Page 132: ...sure that the HID Client profile is enabled on the MC55 See Profiles Tab on page 5 35 for more information 4 Tap Menu New Connection 5 Select Explore Services on Remote Device from the drop down list 6 Tap Next 7 Select the device and tap Next 8 Select the service and tap Next 9 The Connection Favorite Options window appears 10 Tap Next 11 Tap Connect The MC55 connects to the HID device Bonding wi...

Page 133: ...mote Device window appears Figure 5 24 Select Remote Device Window 5 Select a device from the list and tap Next The PIN Code Request window appears Figure 5 25 Connection Favorite Options Window 6 In the PIN Code field enter the PIN code 7 Tap OK The Pairing Status window displays NOTE Devices discovered previously are listed to save time To start a new device discovery tap and hold on the list ar...

Page 134: ...Key in the pop up menu 4 A confirmation dialog appears Tap Yes Accepting a Bond When a remote device wants to bond with the MC55 enter a PIN when requested to grant permission 1 Ensure that the MC55 is set to discoverable and connectable See Bluetooth Settings on page 5 24 When prompted to bond with the remote device the PIN Code Request window appears Figure 5 27 PIN Code Request Window 2 In the ...

Page 135: ...ure the MC55 s Bluetooth connection modes Figure 5 28 BTExplorer Settings Device Info Tab Services Tab Use the Services tab to add or delete Bluetooth services Table 5 3 Device Info Tab Data Item Description Device Name Displays the name of the MC55 Discoverable Mode Select whether or not the MC55 is discoverable by other Bluetooth devices Connectable Mode Select whether or not the MC55 is connect...

Page 136: ...l Service Window 2 In the list select a service to add 3 Tap OK The Edit Local Service window displays for the selected service 4 Select the appropriate information and then tap OK See the following sections for information on the available services Dial Up Networking Service Dial up Networking allows other Bluetooth devices to access a dial up modem ...

Page 137: ...ettings File Transfer Information Table 5 4 Dial up Networking Information Data Item Description Service Name Displays the name of the service Service Security Select the type of security from the drop down list Options are None Authenticate or Authenticate Encrypt Local COM Port Select the COM port Local Baud Rate Select the communication baud rate Local Port Options Select the port option ...

Page 138: ...me of the service Service Security Select the type of security from the drop down list Options are None Authenticate or Authenticate Encrypt Root Directory Select the directory that other Bluetooth devices can access File Permissions Select the file permissions for the selected directory Check the appropriate box to grant read access write access and delete access Table 5 6 Hands Free Audio Gatewa...

Page 139: ... BTExplorer Settings Headset Audio Gateway IrMC Synchronization Service The IrMC Synchronization service used to synchronize PIM contacts between a remote device and the MC55 Figure 5 35 BTExplorer Settings IrMC Synchronization Table 5 7 Headset Audio Gateway Data Item Description Service Name Lists the name of the audio service ...

Page 140: ...vice Security Select the type of security from the drop down list Options are None Authenticate or Authenticate Encrypt Phonebook Select the Phonebook checkbox to allow synchronization with the MC55 s contacts Select Read Write Create and or Delete to allow phonebook permissions Table 5 9 OBEX Exchange Information Data Item Description Service Name Displays the name of the service Service Security...

Page 141: ...M ports Figure 5 38 BTExplorer Settings Serial Port Services Table 5 10 Personal Area Networking Data Item Description Service Name Displays the name of the service Service Security Select the type of security from the drop down list Options are None Authenticate or Authenticate Encrypt Support Group Ad Hoc Networking Select to enable Ad Hoc networking ...

Page 142: ...ort Services Data Item Description Service Name Displays the name of the service Service Security Select the type of security from the drop down list Options are None Authenticate or Authenticate Encrypt Local COM Port Select the COM port Local Baud Rate Select the communication baud rate Local Port Options Select the port option Table 5 12 Advanced Audio Distribution Data Item Description Service...

Page 143: ...n local Services that are set to Authenticate or Authenticate Encryption You can set authentication on local Services under the Services tab To adjust the security settings for an individual service select the Services tab first then select the individual service then Properties Figure 5 41 BTExplorer Settings Security Tab Table 5 13 Audio Video Remote Control Data Item Description Service Name Li...

Page 144: ...It is recommended not to use this automatic PIN code feature See Security on page 5 2 for more information PIN Code Enter the PIN code Encrypt Link On All Outgoing Connections Select to enable or disable encryption on all outgoing connections to other Bluetooth devices Table 5 15 Discovery Tab Data Item Description Inquiry Length Sets the amount of time the MC55 takes to discover Bluetooth devices...

Page 145: ...bilities Provides support for devices such as mice joysticks keyboards Figure 5 44 BTExplorer Settings HID Tab Table 5 16 Virtual COM Port Tab Data Item Description COM5 Bluetooth Enable or disable COM Port 5 COM9 Bluetooth Enable or disable COM Port 9 COM11 Bluetooth Enable or disable COM Port 11 COM21 Bluetooth Enable or disable COM Port 21 COM22 Bluetooth Enable or disable COM Port 22 COM23 Blu...

Page 146: ...ed 2 Tap Select All to select all profiles or tap Deselect All to deselect all profiles 3 Tap Apply to activate the profiles and then Close to exit the application Table 5 17 HID Tab Data Item Description Enable Key Repeat Enables key repeat functionality Delay To increase key repeat delay drag the Delay slider to the right To decrease key repeat delay drag the Delay slider to the left Rate To inc...

Page 147: ... System Parameters Tab Data item Description Page Timeout Sets the amount of time the MC55 searches for a device before moving on the next device Link Supervision Timeout Sets the amount of time that the MC55 will wait for a device to come back into range after it has gone out of range If the device does not come back into range by the set time the MC55 drops the connection ...

Page 148: ...etooth bar or Tap Start Setting Connections Bluetooth icon Mode tab Figure 5 48 Bluetooth Mode Tab 2 Check the Turn On Bluetooth checkbox Table 5 19 Miscellaneous tab Data Item Description Highlight Connections Select the connection type to highlight when connected In the Wizard Mode the only options are Favorites or None In the Explorer Mode the options are None Tree View Only List View Only or T...

Page 149: ... exchange information automatically when you turn the Bluetooth radio on See Bonding with Discovered Device s on page 5 21 for more information To find Bluetooth devices in the area 1 Ensure that Bluetooth is enabled on both devices 2 Ensure that the Bluetooth device to discover is in discoverable and connectable modes 3 Ensure that the two devices are within 30 feet 10 meters of one another 4 Tap...

Page 150: ...lect a Bluetooth Device 7 Tap Next The Enter Passcode window appears Figure 5 52 Enter Passcode 8 Enter the Passcode on the other device The device is added to the Bluetooth list NOTE If Smart pairing is configured and the device is requesting one of the pre defined PINs the Enter Passcode window does not appear ...

Page 151: ...he services you want to use and tap Finish The services on the new devices have to be selected or else the pairing won t include those services even though the devices are paired If services are not selected you will be continually reprompted for the passcode from the device 12 The device appears in the list on the main window After the passcodes have been accepted on both sides you have a trusted...

Page 152: ...lename until the pop up menu appears Figure 5 54 File Explorer Window 6 Select Beam File The MC55 searches for Bluetooth devices in the area 7 Tap Tap to send next to the Bluetooth device to send the file to The MC55 communicates with the device and send the file When completed Tap to send changes to Done Figure 5 55 Beam File Window To transfer a contact between the MC55 and another Bluetooth ena...

Page 153: ... 4 In the PC Connection list select Bluetooth PAN 5 In the Network Connection list select the connection type Select the network connection that the device should use to connect to the Internet 6 Tap Connect 7 On the computer or laptop setup a Bluetooth PAN with your device a Select Start Control Panel Network Connections b Under Personal Area Network select Bluetooth Network Connection c Right cl...

Page 154: ...Use the wireless Bluetooth serial port connection as you would a physical serial cable connection Configure the application that will use the connection to the correct serial port To establish a serial port connection NOTE Newer Bluetooth headsets are device dependant and remember the last device they connected to If problems occur while connecting to the headset place the headset in discovery mod...

Page 155: ...on that will use the connection to the correct serial port To set up a Bluetooth ActiveSync connection Before setting up a Bluetooth ActiveSync connection configure the Bluetooth function of your device 1 Ensure that Bluetooth is enabled and discoverable on both devices 2 Ensure that the two devices are within 30 feet 10 meters of one another 3 On the computer click Start Settings Control Panel 4 ...

Page 156: ...ng device initiates the connection option then click OK Note the number of the COM port that was added 8 Click OK 9 Click Start All Programs Microsoft ActiveSync 10 Click File Connection Settings Figure 5 59 ActiveSync Connection Settings 11 On the Allow connections to one of the following drop down list select the COM port with the number you noted earlier 12 On the MC55 tap Start Programs Active...

Page 157: ...ronize contacts between a remote device and the MC55 To establish an PBAP synchronization 1 Ensure that Bluetooth is enabled and discoverable on both devices 2 Ensure that the two devices are within 30 feet 10 meters of one another 3 Tap Start Settings Connection tab Bluetooth icon Devices tab 4 Tap Add New Device The MC55 searches for a Bluetooth device such as a Car Kit 5 Select a device from th...

Page 158: ...ure mounting of the MC55 in a vehicle and charges the MC55 Vehicle Holder Provides an alternative mounting for the MC55 in a vehicle Requires the Auto Charge cable for charging the MC55 battery Four Slot Battery Charger Charges standard and high capacity batteries Auto Charge Cable Plugs into a vehicle cigarette lighter to charge the MC55 while on the road USB Charging Cable Provides power to the ...

Page 159: ...5 4 VDC power for operating the MC55 Synchronizes information between the MC55 and a host computer Refer to the MC55 Integrator Guide for information on setting up a partnership between the MC55 and a host computer Charges the MC55 s battery Charges a spare battery Charging the MC55 Battery Connect the cradle to power Insert the MC55 into the slot to begin charging Figure 6 1 MC55 Battery Charging...

Page 160: ...n page 1 8 for charging status indications The spare battery charging LED on the cradle indicates the status of the spare battery charging in the cradle See Table 6 1 for charging status indications The 2400 mAh battery fully charges in less than four hours and the 3600 mAh battery fully charges in less than six hours Charging Temperature Charge batteries in temperatures from 0 C to 40 C 32 F to 1...

Page 161: ... with other country telephone networks it must be configured using an application on the MC55 Download the Cradle Modem Country Configurator Application Software for MC55xx package from the Motorola Support Central web site http www motorola com enterprisemobility support Following the instructions with the software package to install the application on the MC55 The application includes country se...

Page 162: ... spare battery Ethernet Modem LED Blink whenever Ethernet or modem connectivity is established Speed LED green Indicates that the transfer rate is 100 Mbps When it is not lit it indicates that the transfer rate is 10 Mbps Power Supply Ethernet Port Power Port AC Line Cord USB Port Phone Port Ethernet Hub Modem USB Ethernet Ethernet Modem LED SpareBattery Charging LED Speed LED Link LED ...

Page 163: ...e MC55 into the cradle To test the connection tap Start Programs Internet Explorer Enter a web address Modem Connection Place the Connection switch on the bottom of the cradle to the Modem position Place the MC55 into the cradle The MC55 dials the phone number and connects to the web site NOTE The CRD5500 1000XR does not support hot swapping between operational modes After moving the switch into a...

Page 164: ...tery charging in the MC55 See Table 1 2 on page 1 8 for charging status indications The 2400 mAh battery fully charges in less than four hours and the 3600 mAh battery fully charges in less than six hours Charging Temperature Charge batteries in temperatures from 0 C to 40 C 32 F to 104 F Charging is intelligently controlled by the MC55 To accomplish this for small periods of time the MC55 or acce...

Page 165: ...y Charging Indicators The MC55 s charge LED shows the status of the battery charging in the MC55 See Table 1 2 on page 1 8 for charging status indications The2400 mAh battery fully charges in less than four hours and the 3600 mAh battery fully charges in less than six hours Charging Temperature Charge batteries in temperatures from 0 C to 40 C 32 F to 104 F Charging is intelligently controlled by ...

Page 166: ...the MC55 Battery Insert the MC55 into the vehicle cradle to begin charging A click indicates that the MC55 button release locking mechanism is enabled and the MC55 is locked in place Figure 6 8 MC55 Battery Charging Removing the MC55 To remove the MC55 hold back the release lever on the cradle and pull the MC55 up and out of the cradle CAUTION Ensure the MC55 is fully inserted in the cradle Lack o...

Page 167: ...s and the 3600 mAh battery fully charges in less than six hours Charging Temperature Charge batteries in temperatures from 0 C to 40 C 32 F to 104 F Charging is intelligently controlled by the MC55 To accomplish this for small periods of time the MC55 alternately enables and disables battery charging to keep the battery at acceptable temperatures The MC55 indicates when charging is disabled due to...

Page 168: ...ery fully charges in less than four hours and the 3600 mAh battery fully charges in less than six hours Charging Temperature Charge batteries in temperatures from 0 C to 40 C 32 F to 104 F Charging is intelligently controlled by the MC55 To accomplish this for small periods of time the charger alternately enables and disables battery charging to keep the battery at acceptable temperatures The char...

Page 169: ...rola approved power supply Auto Charge cable Provide the MC55 with operating and charging power when used with the Motorola approved power supply Battery Charging and Operating Power The communication charge cables can charge the MC55 battery and supply operating power To charge the MC55 battery 1 Connect the communication charge cable power input connector to the Motorola approved power source 2 ...

Page 170: ...ours and the 3600 mAh standard battery charges in less than six hours See Table 1 2 on page 1 8 for charging status indications 4 When charging is complete push the two locking tab down and remove the cable from the MC55 LED Charge Indications The amber Charge LED on the MC55 indicates battery charging status See Table 1 2 on page 1 8 for charging status indications Locking Tab ...

Page 171: ...d Do not mount the vehicle holder near the driver seat air bag deployment area Do not place the MC55 on top of the dashboard or anywhere without securing it in the vehicle holder Do not mount the vehicle holder near the passenger seat air bag deployment area Install the vehicle holder on the surface of your vehicle that is reasonably flat and free of dirt and oil Device Mounting Precautions Some c...

Page 172: ...ing surface with a glass cleaner and a clean cotton cloth Install the vehicle mount on the windshield or other flat car surface using the supplied mounting disc Assembly 1 Insert the vehicle holder s cradle plate to the holes on the back of the cradle 2 Push the cradle down until both parts are engaged Windshield Installation 1 Fix the suction cup mount to the selected area with the suction lever ...

Page 173: ...een lights up orange during charging Flat Surface Installation 1 Remove the plastic sheet on the bottom of the mounting disc 2 Place the disc sticky side down on a clean flat surface Figure 6 15 Mounting Disc 3 Fix the suction cup mount to the disc with the suction lever facing up 4 Flip the lever down to create a vacuum between the suction cup and the disc 5 Make sure that the suction bond is str...

Page 174: ...face 7 Connect the auto charger cable to the MC55 and slide the two locking tabs up to secure the cable cup to the MC55 8 Connect the other end to the cigarette lighter socket The LED indicator on the right side of the touch screen lights up orange during charging ...

Page 175: ...6 18 MC55 User Guide ...

Page 176: ...the surface of the MC55 screen Motorola recommends using a screen protector p n KT 67525 01R The touch sensitive screen of the MC55 is glass Do not to drop the MC55 or subject it to strong impact Protect the MC55 from temperature extremes Do not leave it on the dashboard of a car on a hot day and keep it away from heat sources Do not store or use the MC55 in any location that is dusty damp or wet ...

Page 177: ...rner using a thin plastic card such as a credit card then carefully lift it off the display Figure 7 1 Removing the Screen Protector Battery Safety Guidelines The area in which the units are charged should be clear of debris and combustible materials or chemicals Particular care should be taken where the device is charged in a non commercial environment Follow battery usage storage and charging gu...

Page 178: ...xpose to water or other liquids or expose to fire explosion or other hazard Do not leave or store the equipment in or near areas that might get very hot such as in a parked vehicle or near a radiator or other heat source Do not place battery into a microwave oven or dryer Battery usage by children should be supervised Please follow local regulations to properly dispose of used re chargeable batter...

Page 179: ...hthalates or before hands are washed to remove contaminant residue after gloves are removed If products containing any of the harmful ingredients listed above are used prior to handling the MC55 such as hand sanitizer that contain ethanolamine hands must be completely dry before handling the MC55 to prevent damage to the plastics Materials Required Alcohol wipes Lens tissue Cotton tipped applicato...

Page 180: ...e side of the connector to the other Do not let any cotton residue on the connector 4 All sides of the connector should also be rubbed with the cotton tipped applicator 5 Spray compressed air in the connector area by pointing the tube nozzle about inch away from the surface CAUTION do not point nozzle at yourself and others ensure the nozzle or tube is pointed away from your face 6 Ensure that the...

Page 181: ...oes not operate perform a warm boot then a cold boot See Resetting the MC55 on page 2 14 MC55 removed from cradle while battery was charging Insert MC55 in cradle The 3600 mAh battery fully charges in less than six hours Extreme battery temperature Battery does not charge if ambient temperature is below 0 C 32 F or above 40 C 104 F Cannot see characters on display MC55 not powered on Press the Pow...

Page 182: ...ey Backspace key or tap Start Settings System tab Screen icon Align Screen button The system is not responding Warm boot the system See Resetting the MC55 on page 2 14 A message appears stating that the MC55 memory is full Too many files stored on the MC55 Delete unused memos and records If necessary save these records on the host computer or use an SD card for additional memory Too many applicati...

Page 183: ...fore the MC55 low battery condition notification Note If the scanner is still not reading symbols contact the distributor or Motorola Table 7 1 Troubleshooting the MC55 Continued Problem Cause Solution Table 7 2 Troubleshooting Bluetooth Connection Problem Cause Solution MC55 cannot find any Bluetooth devices nearby Too far from other Bluetooth devices Move closer to the other Bluetooth device s w...

Page 184: ...lly charges in less than six hours Battery is faulty Verify that other batteries charge properly If so replace the faulty battery The MC55 is not fully seated in the cradle Remove and re insert the MC55 into the cradle ensuring it is firmly seated Extreme battery temperature Battery does not charge if ambient temperature is below 0 C 32 F or above 40 C 104 F Spare battery is not charging Battery n...

Page 185: ...correct cable configuration Ensure the correct cable Ethernet is used with the cradle Communication software improperly configured Perform setup as described in the MC55 Integrator Guide MC55 ActiveSync disabled or not configured to accept network connection On the MC55 tap Start ActiveSync Tools Options Options button Then uncheck the Enable PC sync using this connection check box Host ActiveSync...

Page 186: ...net Cradle Continued Symptom Cause Solution Table 7 5 Troubleshooting the Vehicle Cradle Symptom Possible Cause Action MC55 battery charging LED does not light up Cradle is not receiving power Ensure the power input cable is securely connected to the cradle s power port MC55 battery is not recharging MC55 was removed from the cradle too soon Replace the MC55 in the cradle The 2400 mAh battery full...

Page 187: ...ng the Cables Symptom Possible Cause Action MC55 battery is not charging MC55 was disconnected from AC power too soon Connect the power cable correctly Confirm main battery is charging under Start Settings System Power The 3600 mAh battery fully charges in less than six hours Battery is faulty Verify that other batteries charge properly If so replace the faulty battery The MC55 is not fully attach...

Page 188: ...wer too soon Ensure MSR is receiving power Ensure MC55 is attached correctly Confirm main battery is charging under Start Settings System Power The 3600 mAh battery fully charges in less than six hours Battery is faulty Verify that other batteries charge properly If so replace the faulty battery The MC55 is not fully attached to the MSR Detach and re attach the MSR to the MC55 ensuring it is firml...

Page 189: ...7 14 MC55 User Guide ...

Page 190: ...istics Dimensions MC5574 3600 mAh battery Height 15 2 cm 6 0 in Width 7 7 cm 3 03 in Depth 2 7 cm 1 10 in MC5590 2400 mAh battery Height 14 7 cm 5 78 in Width 7 7 cm 3 03 in Depth 2 6 cm 1 06 in MC5590 MC55A0 3600 mAh battery Height 14 7 cm 5 78 in Width 7 7 cm 3 03 in Depth 2 6 cm 1 10 in Weight MC5574 359 g 12 5 oz with 3600 mAh battery MC5590 315 g 11 1 oz with 2400 mAh battery 338 g 11 9 oz wi...

Page 191: ...le alert Keypad Options MC5574 MC5590 MC55A0 26 key numeric 44 key QWERTY 44 key AZERTY 44 key QWERTZ PIM MC55A0 HC Numeric and 44 key QWERTY Audio Speaker receiver microphone software support for full duplex capability Bluetooth stereo Performance Characteristics CPU MC5574 MC5590 XScale Bulverde PXA270 processor at 520 MHz MC55A0 Marvell PXA 320 processor at 806 MHz Operating System MC5574 Micro...

Page 192: ...C5590 MC55A0 Tri mode IEEE 802 11a b g Data Rates Supported 1 2 5 5 6 9 11 12 18 24 36 48 and 54 Mbps Operating Channels MC5574 Chan 1 13 2412 2472 MHz Chan 14 2484 MHz Japan only actual operating channels frequencies depend on regulatory rules and certification agency MC5590 MC55A0 Chan 34 165 5040 5825 MHz Chan 1 13 2412 2472 MHz Chan 14 2484 MHz Japan only actual operating channels frequencies ...

Page 193: ...74 and MC5590 only Optical Resolution 0 005 in minimum element width Roll 30 from vertical Pitch Angle 65 from normal Skew Tolerance 60 from normal Ambient Light Sunlight 8 000 ft candles 86 112 Lux Artificial Light 450 ft candles 4 844 Lux Shock 2 000 5 G Scan Rate 50 6 scans sec bidirectional Scan Angle 46 5 typical Laser Power 1 0 mW nominal Linear 1D Scanner SE960 Specifications MC55A0 only Op...

Page 194: ...650 nm 5 nm Illumination Element LED 635 nm 20 nm 2D Imager Engine SE4500 SR Specifications MC5590 and MC55A0 only Field of View Horizontal 39 6 Vertical 25 7 Optical Resolution 752 H x 480 V pixels gray scale Roll 360 Pitch Angle 60 from normal Skew Tolerance 60 from normal Ambient Light 9 000 ft candles 96 900 Lux Shock 2 000 5 G Aiming Element VLD 655 nm 10 nm Illumination Element LED 625 nm 5 ...

Page 195: ...iew Horizontal 39 2 Vertical 25 4 Optical Resolution 752 H x 480 V pixels gray scale Roll 360 Pitch Angle 60 from normal Skew Tolerance 60 from normal Ambient Light 9 000 ft candles 96 900 Lux Shock 2 000 5 G Aiming Element VLD 655 nm 10 nm Illumination Element LED 625 nm 5 nm LEDs 2x Camera Specifications Resolution MC5574 MC5590 2 Mega pixel with flash and auto focus MC55A0 3 Mega pixel with fla...

Page 196: ... Micro PDF 417 QR Code Data Matrix Maxi Code US Postnet US Planet UK 4 state Australian 4 state Canadian 4 state Japanese 4 state Dutch Kix Chinese 2 of 5 USPS 4 state US4CB Aztec microQR GS1 DataBar GS1 DataBar Truncated GS1 DataBar Limited GS1 DataBar Stacked GS1 DataBar Expanded GS1 DataBar Expanded Stacked GS1 DataBar Stacked Omni Camera Decode Capability Code 39 Code 128 Code 93 Codabar Code ...

Page 197: ...F Storage Temperature 40 C to 70 C 40 F to 158 F Charging Temperature 0 C to 40 C 32 F to 104 F Humidity 5 to 95 non condensing Drop 76 2 cm 30 0 in drops to vinyl tiled concrete at room temperature Electrostatic Discharge ESD 15 kV air 8 kV contact Table A 4 Single Slot Ethernet Modem USB Cradle Technical Specifications Feature Description Dimensions Height 7 1 cm 2 80 in Width 11 0 cm 4 33 in De...

Page 198: ...escription Dimensions Height 4 7 cm 1 85 in Width 15 5 cm 6 10 in Depth 21 0 cm 8 27 in Weight 384 g 13 55 oz Input Voltage 12 VDC Power Consumption 30 watts Operating Temperature 0 C to 40 C 32 F to 104 F Storage Temperature 40 C to 70 C 40 F to 158 F Charging Temperature 0 C to 40 C 32 F to 104 F Humidity 5 to 95 non condensing Drop 76 2 cm 30 0 in drops to vinyl tiled concrete at room temperatu...

Page 199: ...A 6 Four Slot Charge Only Cradle Technical Specifications Continued Feature Description Table A 7 Four Slot Ethernet Cradle Technical Specifications Feature Description Dimensions Height 13 7 cm 5 39 in Width 46 8 cm 18 43 in Depth 9 9 cm 3 90 in Weight 1115 g 39 33 oz Power 12 VDC Operating Temperature 0 C to 50 C 32 F to 122 F Storage Temperature 40 C to 70 C 40 F to 158 F Charging Temperature 0...

Page 200: ...fered Track Reading Capabilities Tracks 1 and 3 210 bpi Track 2 75 and 210 bpi autodetect Operating Temperature 32 to 122 F 10 to 50 C Storage Temperature 40 to 158 F 40 to 70 C Humidity 5 to 95 non condensing Drop 4 ft 1 22 m drops to concrete Electrostatic Discharge ESD 15 kV air 8 kV contact Table A 9 Vehicle Cradle Technical Specifications Feature Description Dimensions Height 10 4 cm 4 09 in ...

Page 201: ... C 14 F to 122 F Storage Temperature 40 C to 70 C 40 F to 158 F Humidity 10 to 95 non condensing Electrostatic Discharge ESD 15 kV air 8 kV contact Table A 11 Charge Only Cable Technical Specifications Feature Description Length 28 0 cm 11 00 in Operating Temperature 10 C to 50 C 14 F to 122 F Storage Temperature 40 C to 70 C 40 F to 158 F Humidity 10 to 95 non condensing Electrostatic Discharge E...

Page 202: ...act Table A 13 DEX Cable Technical Specifications Feature Description Length 111 76 cm 44 0 in Operating Temperature 10 C to 50 C 14 F to 122 F Storage Temperature 40 C to 70 C 40 F to 158 F Humidity 10 to 95 non condensing Electrostatic Discharge ESD 15 kV air 8 kV contact Table A 12 Auto Charge Cable Technical Specifications Continued Feature Description ...

Page 203: ...A 14 MC55 User Guide ...

Page 204: ... very little or no user intervention Features The VQM software Improves the voice transmission quality without using additional battery power Turns on the AEC for VoWiFi calls automatically without user intervention Prioritizes the outgoing audio IP packets Provides user selectable audio modes speakerphone and handset with a single tap of the VQM icon A VQM icon in the title bar of the device indi...

Page 205: ... a call The table below lists the current audio mode and the subsequent audio mode after tapping the VQM icon If the audio mode is set to speakerphone and the user taps the VQM icon the audio mode changes to handset Table B 1 VQM Icons Icon Description Speakerphone with Acoustic Echo Cancellation Speakerphone without Acoustic Echo Cancellation Handset with Acoustic Echo Cancellation device is in h...

Page 206: ...ent types of traffic voice packets are given the same priority as any other traffic and therefore may be subject to delays WiFi Multi media WMM is a solution to this problem WMM is a specification that supports prioritizing traffic and higher priority packets can be given preferential treatment To make use of WMM the devices that generate traffic must mark their packets as high or normal priority ...

Page 207: ...use the device consumes more power when the AEC is on Turn the Acoustic Echo Canceller AEC on only when there is an ongoing call VQM follows the second of the two approaches mentioned above VQM automatically turns on the Acoustic Echo Canceller AEC when the mobile device is in a VoWiFi call When the call is terminated VQM turns the AEC off Note that the AEC is turned on for speakerphone and handse...

Page 208: ...ngs Finger Scrolling Windows Mobile 6 5 adds finger scrolling capabilities to the display Finger scrolling can be used to scroll up and down web pages documents and lists such as the contacts list file list message list calendar appointments list and more When finger scrolling swipe or flick your finger on the screen To scroll down swipe your finger upward on the screen To scroll up swipe your fin...

Page 209: ...hat is under it and provides additional information Figure C 1 Windows Mobile Home Screen Touch and hold the screen with your finger and move the Home screen up and down As the application names move under the Information Status bar information relevant to that application appear in the bar Figure C 2 Moving Today Screen You can also touch and hold the Information Status bar and move it up and dow...

Page 210: ...tion Status Bar Figure C 4 Information Bar Example To customize the Home screen tap Settings Today On the horizontal scroll use Appearance to customize the background and the Items to change the display format Application Icon Application Information ...

Page 211: ...igure C 5 Classic Today Screen To change to the classic view tap Settings Home Items Figure C 6 Home Screen Settings Deselect the Windows Default checkbox and select any of the other checkboxes Tap The task bar at the bottom of the screen can contain the task tray icons listed in Table C 1 Tile Bar Status Bar Today Screen Task Tray ...

Page 212: ... stack is enabled Bluetooth Disabled The Bluetooth Disabled icon appears in the task tray and indicates that the Bluetooth radio is off Displays only if the StoneStreet One Bluetooth stack is enabled Bluetooth Communication The Bluetooth Communication icon appears in the task tray and indicates that the mobile computer is communicating with another Bluetooth device Displays only if the StoneStreet...

Page 213: ...tive Connection is not active Synchronization is occurring Wi Fi available Wi Fi in use HSDPA available GSM only 3G available GSM only GPRS available GSM only EGPRS available GSM only 1xRTT available CDMA only EVDO Rev 0 available CDMA only EVDO Rev A available CDMA only Dormant State no data transmission during a 1x or EVDO connection CDMA only Roaming WAN Call missed Dialing while no SIM card is...

Page 214: ... connecting GSM only EGPRS in use GSM only EVDO connecting CDMA only EVDO in use CDMA only SIM Card not installed GSM only Audio All sounds are on All sounds are off Vibrate is on Battery Battery is charging Battery has a full charge Battery has a high charge Battery has a medium charge Battery has a low charge Battery has a very low charge Table C 2 Status Bar Icons Continued Icon Description Ico...

Page 215: ... view more program and folder icons You can move often used program and folder icons anywhere on the Start screen for easy access Press and hold the icon that you want to move Drag the icon to a new location and release Table C 4 lists the default icons available on the Start screen Table C 3 Task Tray Icons Icon Name Description Magnify Enlarges the screen Connectivity Displays the Connectivity d...

Page 216: ...ocale Alarms can also be set at specified days and times of a week Pictures Videos View and manage pictures animated GIFs and video files Messenger Use this mobile version of Windows Live Messenger Windows Media Play back audio and video files Microsoft My Phone Synchronizes the MC55 s contacts calendar tasks text messages music photos videos and documents with a Microsoft My Phone account Marketp...

Page 217: ...ts data and other information on the MC55 Refer to the Microsoft Applications for Windows Mobile 6 User Guide for more information Help Access on line Help topics BT Information Display information about the Bluetooth radio and generate a Bluetooth address bar code Wireless Companion Open the Wireless Companion folder BTScanner CtlPanel Set com port to use with a Bluetooth scanner AirBEAM Client A...

Page 218: ...d on them Requires the purchase of an MSP client license per device Display_BD_ Address Displays a bar code that contains the Bluetooth address for the device Table C 5 Setting Applications Icon Name Description Icon Name Description Clock Alarms Set the device clock to the date and time of your locale Alarms can also be set at specified days and times of a week Lock Set a password for the MC55 Ho...

Page 219: ... Microsoft Applications for Windows Mobile 6 User Guide for more information Wi Fi Setup wireless network connection and customize settings USB to PC Enables or disables the enhanced network connectivity Wireless Manager Enables or disables the MC55 s wireless radios and customizes Wi Fi Bluetooth and Phone settings Personal Folder Buttons Assign a program to a button Phone Configure the phone Own...

Page 220: ...location status and memory card information and stop currently running programs Regional Settings Set the regional configuration to use including the format for displaying numbers currency date and time on the MC55 Phone Info View phone information Remove Programs Remove programs that you installed on the MC55 Screen Change the screen orientation re calibrate the screen and change the screen text ...

Page 221: ...ff radio button to turn the volume on or off Battery Icons The Main Battery icon appears in the Title Bar when the Today screen is visible The icon indicates the battery power level Figure C 11 Battery Icon on the Title Bar Connectivity Icon The Connectivity icon indicates the communication status of the terminal when it s connecting to the internet or host computer NOTE Use can also adjust the sy...

Page 222: ...tionality This is helpful when the MC55 is turned on and you want to prevent accidental key presses To lock the device tap Locking without PIN or Password When the MC55 is locked the Lock screen appears Figure C 13 Lock Screen On an MC5574 drag to either the right or left side of the screen On an MC5590 tap Unlock and then tap Unlock again NOTE You can make emergency calls even when the MC55 is lo...

Page 223: ...or left side of the screen Enter the PIN and then tap to unlock and display the Home screen tap to unlock and display the Contacts window tap to unlock and display the Messaging window Figure C 15 Simple PIN Password Window On the MC5590 enter the PIN and then tap Unlock Locking with Strong Password When the MC55 is locked the Lock screen appears MC5574 MC5590 MC55A0 ...

Page 224: ......

Page 225: ...oint the RS507 to the bar code The RS507 reads the bar code and begins pairing with the MC55 If required enter PIN 12345 6 Launch a scanning enabled application 7 Point the RS507 at a bar code to read the bar code data Refer to the RS507 Hands free Imager Product Reference Guide for more information Assisted GPS GPS can be used in stand alone or Assisted GPS A GPS modes A Stand alone GPS receiver ...

Page 226: ...ss is not required when generating the server IP address from the IMSI or when using the Motorola server 6 Enter the SUPL Server port number in the Port field The port number is not required when using the Motorola server 7 Select Secure Connection to enable the TLS connection between the MC55 and the server This option is not available when using the Motorola server 8 User ID type is to choose wh...

Page 227: ... SUPL session is not established when the GPS port is opened Tap the Factory Reset button to perform a factory reset on the GPS chip UI Settings Use the UI Settings application to change the grid view in the Start screen and to control Zooming in Internet Explorer Start Screen Settings To change the grid view of the Start screen 1 Tap Start Settings UI Settings 2 Tap the Start Screen Settings tab ...

Page 228: ...Windows Mobile 6 5 C 21 1 Tap Start Settings System UI Settings 2 Tap the IE Zoom Mapping tab Figure C 21 IE Zoom Mapping Tab 3 Select Off 4 Tap OK 5 Tap OK to turn off mapping ...

Page 229: ...C 22 MC55 User Guide ...

Page 230: ...nd spaces which represents numeric or alphanumeric data in machine readable form The general format of a bar code symbol consists of a leading margin start character data or message character check character if any stop character and trailing margin Within this framework each recognizable symbology uses its own unique format See Symbology Bit Binary digit One bit is the basic unit of binary inform...

Page 231: ...tion mark or communications control contained in a message Codabar A discrete self checking code with a character set consisting of digits 0 to 9 and six additional characters and Code 128 A high density symbology which allows the controller to encode all 128 ASCII characters without adding extra symbol elements Code 3 of 9 Code 39 A versatile and widely used alphanumeric bar code symbology with a...

Page 232: ...ces are insignificant Only numeric characters 0 to 9 and START STOP characters may be encoded E EAN European Article Number This European International version of the UPC provides its own coding format and symbology standards Element dimensions are specified metrically EAN is used primarily in retail EMDK Enterprise Mobility Developer s Kit ESD Electro Static Discharge F File Transfer Protocol FTP...

Page 233: ...aces Only numeric 0 to 9 and START STOP characters may be encoded Internet Protocol Address See IP I O Ports The connection between two devices defined by common physical characteristics signal characteristics and signal meanings Types of interfaces include RS 232 and USB IP Internet Protocol The IP part of the TCP IP communications protocol IP implements the network layer layer 3 of the protocol ...

Page 234: ...e electrical charges causing them to reflect light outside according to their bias They use little electricity and react relatively quickly They require external light to reflect their information to the user M MC Mobile Computer MDN Mobile Directory Number The directory listing telephone number that is dialed generally using POTS to reach a mobile unit The MDN is usually associated with a MIN in ...

Page 235: ... of keys QWERTZ A standard keyboard commonly used on German keyboards QWERTZ refers to the arrangement of keys on the top row of keys R RAM Random Access Memory Data in RAM can be accessed in random order and quickly written and read RF Radio Frequency ROM Read Only Memory Data stored in ROM cannot be changed or removed Router A device that connects networks and supports the required protocols for...

Page 236: ...k characters Symbol Aspect Ratio The ratio of symbol height to symbol width Symbol Height The distance between the outside edges of the quiet zones of the first row and the last row Symbol Length Length of symbol measured from the beginning of the quiet zone margin adjacent to the start character to the end of the quiet zone margin adjacent to a stop character Symbology The structural rules and co...

Page 237: ...File Transfer Protocol See TFTP U UDP User Datagram Protocol A protocol within the IP protocol suite that is used in place of TCP when a reliable delivery is not required For example UDP is used for real time audio and video traffic where lost packets are simply ignored because there is no time to retransmit If UDP is used and a reliable delivery is required packet sequence checking and error noti...

Page 238: ...unting kit cradle 1 4 Acoustic Echo Cancellation B 2 action button 2 33 ActiveSync C 10 icon 2 4 C 5 adaptive frequency hopping 5 1 adjusting volume 2 10 AFH 5 1 AirBEAM C 10 Alpha numeric keypad 2 22 alpha numeric keypad key descriptions 2 23 answering a call 4 8 assisted GPS 3 2 C 18 auto charge cable 1 3 6 1 6 12 AZERTY 2 22 B bar codes one dimensional 2 35 two dimensional 2 35 battery charging...

Page 239: ... 6 8 four slot spare battery charger 6 11 single slot USB cradle 6 3 vehicle cradle 6 10 charging temperature 1 9 6 3 cleaning 7 1 clock alarms C 11 cold boot 2 14 5 4 command bar 2 3 icons 2 3 C 5 C 8 communication 6 12 communication charge cables 6 12 battery charging 6 12 LED indicators 6 13 conference call 4 21 configuration xiv connectivity icon 2 2 Contacts C 9 contacts C 9 creating a contac...

Page 240: ...appointment 2 3 voice mail 2 2 wireless applications C 5 wireless status 2 3 C 5 imager See data capture imaging imager See data capture imaging imagersample imaging 2 35 2 36 information service xviii installing battery 1 7 internet disconnecting GPRS 4 27 via GPRS 4 26 Internet Explorer Mobile C 9 internet sharing C 10 K key descriptions alpha numeric keypad 2 23 numeric keypad 2 18 2 30 keypads...

Page 241: ...reset 2 14 hard 2 14 5 4 soft 2 14 5 4 resume 5 4 rigid holster 1 3 6 1 S scan button 2 33 scanning button 2 33 imaging 2 35 See data capture 2 35 screen calibration 1 9 screen protector 1 4 SD 6 2 SDK See EMDK 1 4 secure digital card 6 2 security Bluetooth 5 2 service information xviii settings about C 12 buttons C 12 certificates C 12 connections C 12 customer feedback C 12 encryption C 13 error...

Page 242: ...1 time and appointment icon 2 3 Time To First Fix C 18 Today screen 2 1 troubleshooting 7 6 U unpacking 1 2 up and down button 2 33 USB charge cable 6 12 USB Charging Cable 6 1 USB charging cable 1 3 USB client charge cable 6 12 USB cradle 1 3 using Bluetooth headset 4 3 using stylus 2 33 V vehicle cradle 1 3 6 1 6 9 charging indicators 6 10 Vehicle Holder 6 1 vehicle holder 1 3 accessories vehicl...

Page 243: ...Index 6 MC55 User Guide ...

Page 244: ......

Page 245: ...27 9626 http www motorola com enterprisemobility MOTOROLA MOTO MOTOROLA SOLUTIONS and the Stylized M Logo are trademarks or registered trademarks of Motorola Trademark Holdings LLC and are used under license All other trademarks are the property of their respective owners 2010 Motorola Inc All rights reserved ...

Reviews: