background image

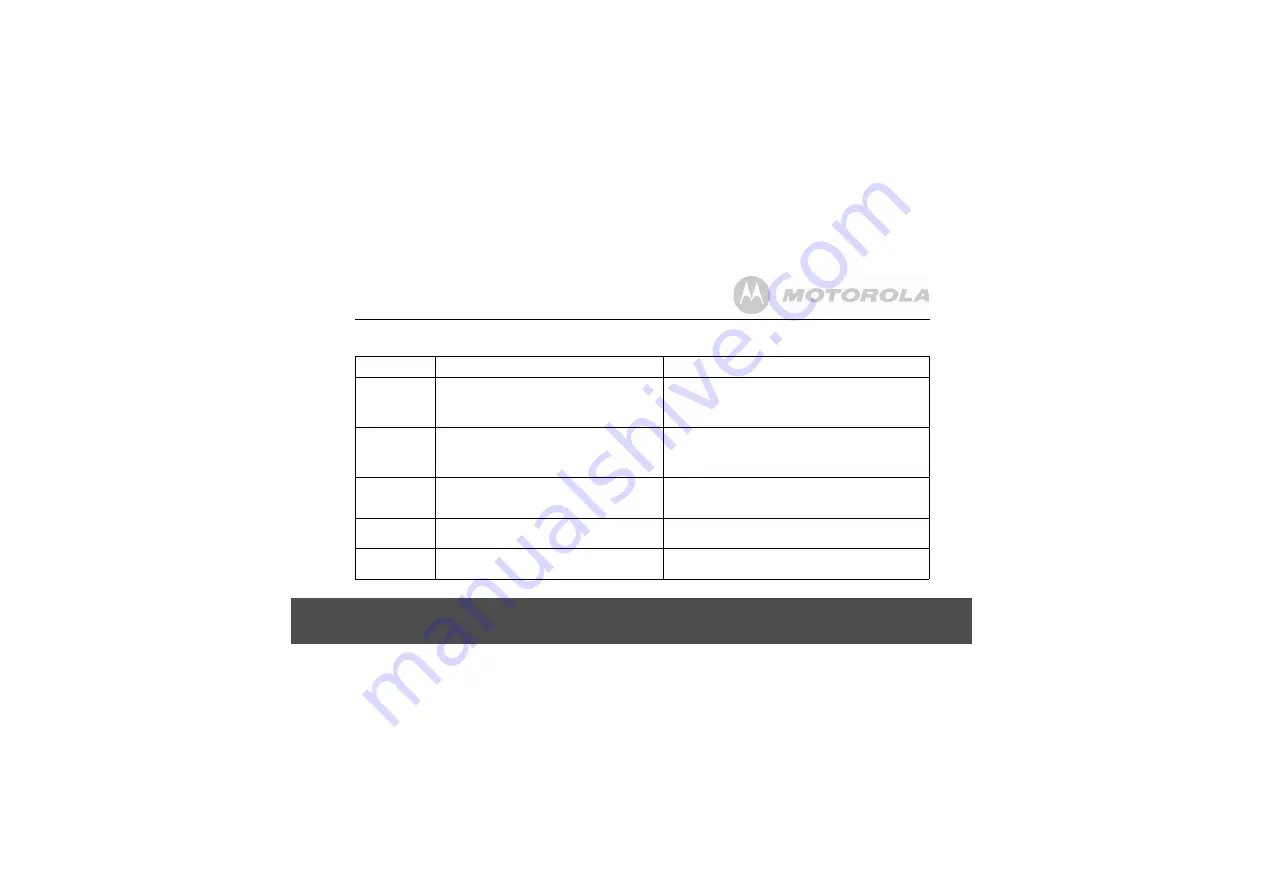
Using the touchscreen

17

2. Using the touchscreen

Action

Function

Operations

Tap

Select onscreen items such as application and 

settings icons

Select onscreen buttons

Type using the onscreen keyboard

Gently tap an item on the screen to select the item that 

you wish to activate.

Tap and hold

Open the available options for an item, for 

example, tap and hold a contact or a link on a 

web page. Think of this as using the right-click 

button on a mouse.

Tap an item on the screen and hold in place for 2-3 

seconds.

Drag

Move items on the screen or shift the view on 

the screen. 

Apply light pressure against an item on the screen then, 

without raising your finger, move it across the screen 

until you have reached the target position.

Slide

Quickly move vertically or horizontally across 

the screen.

Flick

Quickly browse a list of items in a vertical 

direction.

Flick is similar to slide, except that flick involves swiping 

the screen in lighter and quicker strokes.

Summary of Contents for MBP2000PU

Page 1: ...User s Guide MBP2000PU Android Home Phone Warning Use only the power adapter battery pack and telephone line cord provided in the box ...

Page 2: ...lications Check Stock Prices and Stock Information Check current weather and weather forecast Read News with RssFeed Check Calendar and Agenda Set alarm Perform simple Calculation Welcome to your new Motorola Android Home Phone Please retain your original dated sales receipt for your records For warranty service of your Motorola product you will need to provide a copy of your dated sales receipt t...

Page 3: ...t everything Handset Base Li ion Rechargeable Battery Pack Handset Back Cover Power Adapter Telephone Line Cord Micro USB cable User s Guide Quick Start Guide This User s Guide provides you with all the information you need to get the most from your phone Before you make your first call or surf the Internet you will need to set up your phone Follow the simple instructions in Getting Started on the...

Page 4: ...Add words to User dictionary 18 3 6 Accept or Reject Dictionary Suggestions 19 3 7 Edit text 19 4 Set up your Motorola MBP2000PU with Welcome Wizard 19 4 1 Display 20 4 2 Sound settings 20 4 2 1 Phone ringtone 20 4 2 2 Volume 20 4 3 Wi Fi settings 20 4 4 Date time settings 21 4 4 1 Set time zone 21 4 4 2 Set time 21 4 4 3 Set time format 21 4 4 4 Select date format 21 5 Set date and time 22 5 0 1 ...

Page 5: ...r home screen 29 7 1 6 Remove an item from your home screen 29 7 1 7 Add Folders to your home screen 29 7 1 8 To rename a folder 30 7 1 9 Add items to the folders on your home screen 30 7 2 Sound Settings 30 7 2 1 Set silent mode 30 7 2 2 Set volume 30 7 2 3 Set Phone ringtone 31 7 2 4 Set Intercom ringtone 31 7 2 5 Set Paging ringtone 31 7 2 6 Set default notification ringtone 31 7 2 7 Enable or ...

Page 6: ...call from Call Log 37 10 4 Clear call log 37 10 5 Make an external call from Contacts list 37 10 6 Make an external call from Favorites 37 10 7 Answer a call in earpiece mode 38 10 8 Answer a Call in Speakerphone mode 38 10 9 Reject a call 38 10 10 End a Call 38 10 11 Adjust volume level during a Call 38 10 12 Mute the microphone during a call 38 10 13 Caller Identity Delivery CID 38 10 14 Caller ...

Page 7: ...ntacts list 47 12 11 Link Picture to a Contact 47 12 11 1 Take photo 47 12 11 2 Select from Gallery 48 12 11 3 Change picture of a Contact 48 12 11 4 Remove picture of a Contact 48 12 12 Call a contact from contacts list 49 13 Internet Function 49 13 1 Register your Motorola MBP2000PU to a Wi Fi Network 49 13 2 Set Number of Wi Fi Network Channels 50 13 3 Select Wi Fi Sleep Policy 51 13 4 Check Mo...

Page 8: ... Compose and send email messages 57 15 7 Read messages 58 15 8 Open an attached file 58 15 9 Check for new messages 59 15 10 Reply to an email message 59 15 11 Delete an email message 59 15 12 Forward an email message 59 15 13 Mark message as unread 60 15 14 Delete an email account 60 16 TuneIn Radio 60 16 1 Open TuneIn Radio 61 16 2 Listen to a Radio Broadcast 61 16 3 Search Station by Name 61 16...

Page 9: ... View photos 67 20 6 Record video 68 20 7 Video options 68 20 8 Play videos 69 21 Music 69 21 1 Listen to Music on your Motorola MBP2000PU 69 21 1 1 Using earphones 69 21 1 2 Using the speaker on the base station 69 21 2 Open Music application 70 21 3 Music Library 70 21 4 Search for a song 70 21 5 Party Shuffle all songs 70 21 6 Turn party shuffle off 71 21 7 Create playlists 71 21 8 Add songs to...

Page 10: ...ettings 77 24 6 Add new event 77 24 7 View dismiss or snooze a reminder 78 25 Performing Calculations 78 25 1 Open Calculator 78 25 2 Perform Calculations 78 26 Downloading and Reading eBooks 79 26 1 Downloading and Reading eBooks 79 26 2 Open Aldiko 79 26 3 Start reading 79 26 4 Buy Books 80 26 5 Download Free Books 80 26 6 Add eBooks from your SD card into your Library 80 27 ES FILE EXPLORER 81 ...

Page 11: ... an application 84 28 3 Search by Top Apps 84 28 4 Search by Latest Apps 84 28 5 Search by Local Apps 85 28 6 Search for Apps manually 85 29 Install apps 86 30 Connect your handset to a computer 87 31 ES Task Manager 88 31 1 Open ES Task Manager 88 32 Settings 88 33 Advanced Features 89 33 1 Firmware Upgrade with SD card 89 33 2 Factory data reset 90 34 Help 91 35 General information 93 ...

Page 12: ...Never insert objects of any kind into the product vents as that may result in fire or electric shock 6 Unplug this product from the electrical outlet before cleaning Do not use liquid cleaners or aerosol cleaners Use a damp cloth for cleaning 7 Do not disassemble this product If service or repair work is required contact the customer service helpline found in this User s Guide 8 Do not overload wa...

Page 13: ...insulated telephone wires or terminals unless the telephone line has been disconnected at the network interface Use caution when installing or modifying telephone lines Handset Range The Android Home Phone has a range of up to 300 meters for telephone calls when there is clear line of sight between the base and handset Any obstruction between the base and handset will reduce the range significantl...

Page 14: ...to prolong battery life The charge capacity of rechargeable batteries will reduce with time as they wear out giving the handset lesser talk standby time Eventually they will need to be replaced After charging your handset for the first time subsequent charging time will be about 6 hours a day Batteries and handset may become warm during charging This is normal Setting up IMPORTANT The base must be...

Page 15: ... station 2 Plug the other end into a power outlet and telephone wall jack IMPORTANT Use only the supplied power adapter 1 2 Installing and charging the handset battery pack 1 Hold the phone with both hands and the front panel facing down Gently press the back cover with your thumbs and then slide it down until it disengages from the phone 2 Remove the back cover completely ...

Page 16: ...the handset on the base station to charge for at least 6 hours When the handset is fully charged is displayed Note If the Red Charging LED did not light up you need to re align the phone to get a good charging contact with the base station IMPORTANT Use only the rechargeable battery pack supplied with the product 1 3 Insert and Mount memory card Your Motorola MBP2000PU supports micro SD cards You ...

Page 17: ...otorola MBP2000PU Press and hold L on the side panel of the handset until the LCD screen starts to display the Motorola logo It takes about 1 minute for the phone to boot up The home screen is displayed The Home screen provides access to all the features on your MBP2000PU It displays application icons widgets shortcuts and other features You can also customize the Home screen with different wallpa...

Page 18: ... on a web page Think of this as using the right click button on a mouse Tap an item on the screen and hold in place for 2 3 seconds Drag Move items on the screen or shift the view on the screen Apply light pressure against an item on the screen then without raising your finger move it across the screen until you have reached the target position Slide Quickly move vertically or horizontally across ...

Page 19: ...numbers each letter or number will appear above the key you have pressed 3 2 Switch between input modes Tap ABC lower case upper case 123 number or ALT symbols on the onscreen keyboard to switch between different input modes 3 3 Change keyboard language 1 From the home screen press H 2 Tap Settings Language keyboard Select language 3 Scroll to your preferred keyboard language and tap to select 3 4...

Page 20: ...s menu to add or remove words 3 7 Edit text Tap and hold on the word you have typed to activate Edit text options and tap to select an option 4 Set up your Motorola MBP2000PU with Welcome Wizard When you first power up the phone or after doing a factory data reset see Factory data reset page 90 the Welcome Wizard will help you set up and personalize your phone such as language date time Wi Fi sett...

Page 21: ...d with Wi Fi settings 4 3 Wi Fi settings 1 Tap Wi Fi settings 2 Tap Turn on Wi Fi 3 Under Network notification tap to enable Notify me when an open network is available If enabled appears next to the option The screen displays a list of available Wi Fi networks 4 Tap to select the network you want to connect If the network is secured you will be prompted to enter password If you cannot find your f...

Page 22: ...hour and minutes 3 Tap to select AM or PM Note This option is not available if Use 24 hour format is activated See Set time format on page 21 for details 4 Tap Set to confirm 4 4 3 Set time format Tap Use 24 hour format to enable it Tap again to disable 24 hour format is activated when appears next to the option 4 4 4 Select date format 1 Tap to select your preferred date format You can configure ...

Page 23: ... and Minutes 3 Tap AM PM to select AM morning or PM afternoon Tip This option is not available if 24 hour format is activated see Select Date Format on page 22 4 Tap Set to confirm time setting 5 0 3 Select Time Zone 1 Press H and then tap Settings Date time 2 Tap Select time zone 3 Scroll to your location and tap to select 5 0 4 Select Time Format 1 Press H and then tap Settings Date time 2 Tap U...

Page 24: ...he homescreen Open google search for searching on your phone or the web In other applications Open a search box for searching within the application VOLUME UP DOWN key On the homescreen Press to increase decrease ringtone volume press and hold to increase decrease ringtone volume quickly When a call is in progress Press to increase decrease volume during a call In other applications Press to incre...

Page 25: ...n the handset When the handset is in operation press and hold for 2 seconds to activate Phone options menu and power off the phone During operation press once to lock and unlock the handset 10 E Earphone Jack Plug in a 3 5mm headset for listening to music 11 Charge and Audio Output Contacts 12 S Micro SD card slot 13 Handset Speaker 14 U Micro USB port For handset charging internal storage and Mic...

Page 26: ...less connection is on Telephone connection signal strength Alarm Clock is set New email received Earphone is connected Speaker is on Earphone is connected Silent mode is activated Missed call Call in progress Call on hold New answer machine message received Song is playing 6 3 Notifications panel When the status bar displays a Status icon tap and hold the status bar and slide downward to open the ...

Page 27: ...me press 6 6 Extended Home Screen The extended home screen lets you add more shortcuts and widgets on your Motorola MBP2000PU so that you can access the widgets and applications conveniently from the home screen Slide horizontally across the screen to go to the left or right side of the extended Home screen Small dots at the bottom left or right of the screen indicate which screen you are viewing ...

Page 28: ... select Pattern PIN or Password 4 Follow the onscreen instructions to set up screen lock Note If you set up screen lock with a pattern PIN or password you need to draw the pattern or enter the PIN or password each time you unlock the screen See Wake up the phone on page 26 6 8 2 Disable screen unlock security 1 Press H 2 Tap Settings Security Set up screen lock 3 Tap to select None 6 9 Screen Rota...

Page 29: ...home screen press H 2 Tap Wallpaper 3 Tap to select Gallery Live wallpapers or Wallpapers Tip If you select Live wallpapers or Wallpapers simply tap to select a wallpaper from the list and tap Set wallpaper 4 If you select Gallery tap to select your desired picture An image position box will appear at the center of the picture To resize the picture tap and hold the edge of the box and drag inward ...

Page 30: ... the screen to drag the item onto another Home screen 3 Release the item when it is correctly placed 7 1 5 Add apps to your home screen 1 Tap to open the launcher and view all your applications 2 Tap and hold an application icon until it turns bigger The application icon will be placed on the home screen Note You can also add a shortcut or widget by pressing H from the homescreen and then tap Add ...

Page 31: ... hold the item until it turns bigger 2 Drag the item to the folder in which you wish to place it 7 2 Sound Settings 7 2 1 Set silent mode This option enables you to mute all sounds except media and alarms 1 From the home screen press H 2 Tap Settings Sound Silent mode appears next to the option to indicate that silent mode is activated To turn silent mode off tap Silent mode option again 7 2 2 Set...

Page 32: ...s played 4 Tap OK to confirm 7 2 5 Set Paging ringtone This option enables you to set the default incoming paging ringtone on your Motorola MBP2000PU 1 From the home screen press H 2 Tap Settings Sound Paging ringtone 3 Tap to select a ringtone from the list The ringtone is played 4 Tap OK to confirm 7 2 6 Set default notification ringtone This option enables you to set the default notification ri...

Page 33: ...ettings Sound Screen lock sounds appears next to the option to indicate that screen lock sound is enabled 3 To disable tap Screen lock sounds again 8 DECT Settings 8 1 Handset Settings Handset settings allows you to view and modify the settings of your handset 8 1 1 RegisteringyourMBP2000PUtothebasestation Your Motorola MBP2000PU handset has been pre registered to the Base station by factory defau...

Page 34: ...Settings Handset Settings Registration 5 Tap to select the base number and tap Register Motorola MBP2000PU will start to search for the base station 6 Tap on Enter Pin box to launch the onscreen keyboard 7 Enter the PIN code of the base station and tap Register If successful Success is displayed Note If the PIN of the base station is set as 0000 default Motorola MBP2000PU will register to the base...

Page 35: ... Code 5 Enter the new pin code using the onscreen keyboard and tap Modify 8 2 2 Deregister Handset 1 On your Motorola MBP2000PU press H 2 Tap Settings Dect Settings Base Settings 3 Enter the PIN code and tap Authenticate Note The default PIN code is 0000 4 Tap Deregister Handset 5 Tap to select a handset and tap Deregister 8 2 3 Reset Base Settings to Default 1 On your Motorola MBP2000PU press H 2...

Page 36: ...lt PIN code is 0000 4 Tap Flash Duration 5 Tap to select Short Normal or Long 9 Voicemail 9 1 Set Voicemail Number 1 On your Motorola MBP2000PU press H 2 Tap Settings Call Settings Voicemail settings 3 Enter the voicemail number and tap OK 9 2 Listen to Voicemail You can access your voicemail through your Motorola MBP2000PU handset 1 From the home screen press C 2 Tap Phone to access the phone tab...

Page 37: ...press C 2 Tap Phone tab to access the dial pad 3 Enter the phone number 4 Tap to dial the number 5 Press D to hang up Tip If you enter a wrong number tap to delete the number one by one Tap and hold to erase the entire number 10 2 1 In call options During a call press H to access the following options Show dialpad Displays dialpad End call End the current call Mute Mute the call Speaker Switch to ...

Page 38: ...and other information of your contacts on the phone The person you want to call must have the telephone number stored in the Contacts list see Add an entry to Contacts list on page 44 for more information on how to add contacts to the Contacts list 1 From the home screen press C 2 Tap Contacts tab 3 Select the contact in the contact list 4 Tap to dial the number 5 Press D to hang up 10 6 Make an e...

Page 39: ...g a call press or to increase or decrease volume 10 12 Mute the microphone during a call During a call press H then tap Mute 10 13 Caller Identity Delivery CID Caller Identity Delivery CID feature lets you see who is calling on the line It also lets you know who called you in your absence If you have subscribed to Caller ID and provided the identity of the caller is not withheld the number of the ...

Page 40: ... enable callers to leave you a message when you are not available to answer the call Callers will be prompted to leave a message or call back later if a call is not answered after a preset number of rings Each message can be up to 2 minutes The total recording time available for all messages including voice prompts is about 15 minutes The Digital Answer Machine can work through remote connection t...

Page 41: ...messages on the Digital Answer Machine 1 In the Digital Answer Machine screen press H 2 Tap TAM Setting Number of Rings 3 Choose the number of times you would like the phone to ring or select Toll Saver 4 If you do not wish to make any changes to the current setting simply tap Cancel to exit 11 4 Set Remote Pin Set a remote pin code for your Motorola MBP2000PU to improve the security of your perso...

Page 42: ...ap 4 To delete all old recorded messages tap DELETE ALL There will be a voice and message notification once all the old messages have been deleted 11 7 Memo Recording You can record a memo that can be played back later This is useful when you wish to leave a message for other users of the Motorola MBP2000PU Tap to go to previous message Tap to play message The answer machine will play all the new ...

Page 43: ...nalized outgoing message for this greeting 11 8 1 Select OGM Option You can set the Digital Answer Machine to greet unanswered calls with either an Answer Record OGM or Answer Only OGM With Answer Record OGM callers will be asked to leave a message after the prompt However with Answer Only OGM callers will be asked to call back and no message will be recorded 1 Tap AnswerMachine 2 Press H and tap ...

Page 44: ...ting Play OGM 3 Choose to play the personalized message for Answer Record or Answer Only 4 Tap Delete OGM to delete the personalized outgoing message Note Default OGM cannot be deleted 11 9 Remote Operation You can access your answer machine remotely from any touchtone telephone This allows you to listen to your messages even when you are away from your phone To begin remote access dial your telep...

Page 45: ...or a contact in Contacts list 1 From the home screen press C and tap Contacts tab 2 Press H and tap Search 3 Enter the name of the contact in the Search contacts box and tap Done 4 Press B to return to the previous menu level 12 3 Add an entry to Contacts list 1 From the home screen press C and tap Contacts tab 2 Press H and tap New contact 5 Delete current message 6 Go to next message 7 Turn On A...

Page 46: ...label to switch between Work Other or Custom Tip To add an input field tap To close an input field tap Press B to hide the onscreen keyboard 6 Tap More to add more information about the contact such as IM Notes Website Internet call 7 Tap Done when finished The new contact will be stored in your Contacts list 12 4 Assign Ringtone to a Contact 1 From the home screen press C and tap Contacts tab 2 T...

Page 47: ...act will be forwarded directly to voicemail 4 To cancel forwarding tap Options Incoming calls again 12 7 Add a Contact as Favorite 1 From the home screen press C and tap Contacts tab 2 Tap and hold a contact from the contacts list A list of options appear on the screen 3 Tap Add to favorites The contact is saved to your favorites list 12 8 Edit a Contact in Contacts list 1 From the home screen pre...

Page 48: ...2 11 Link Picture to a Contact You can link a picture to your contact so that you can see the picture of the contact when you search for the contact from the Contacts list or when the contact calls you You can either take a photo or select it from Gallery 12 11 1 Take photo 1 From the home screen press C and tap Contacts tab 2 Tap to select a contact from the contacts list 3 Press H and then tap E...

Page 49: ... inside the box then drag it to the desired position 6 Tap Save to link the picture to the contact 7 Tap Done to save or Revert to cancel 12 11 3 Change picture of a Contact 1 From the home screen press C and tap Contacts tab 2 Tap to select a contact from the contacts list 3 Press H and tap Edit contact 4 Tap on the contact icon and then tap Change icon 5 Follow steps 5 to 7 of sections 12 11 1 T...

Page 50: ...to a Wi Fi network that is connected to the Internet For Wi Fi networks that are not secured with a PIN code you can easily connect to them and access the Internet freely However for Wi Fi networks that are secured with wireless password key you need to have the wireless password key to access the Internet 13 1 Register your Motorola MBP2000PU to a Wi Fi Network 1 Press H 2 Tap to select Settings ...

Page 51: ...atus bar of your home screen You can now use the Internet function Note The connection speed is dependent on the capability of the Wi Fi network Once you have joined a Wi Fi network manually the Motorola MBP2000PU will automatically connect to it whenever the network is in range If more than one previously used network is in range the Motorola MBP2000PU will join the one last used If you encounter...

Page 52: ...when plugged in or Never 13 4 Check Motorola MBP2000PU MAC Address For secured Wi Fi network with MAC address filtering you will need to include the MAC address of your Motorola MBP2000PU into the filter list before a connection can be established To check the MAC address of your Motorola MBP2000PU 1 Press H 2 Tap to select Settings Wireless networks Wi Fi settings 3 Press H and tap Advanced 13 5 ...

Page 53: ... 3 Enter the home page address in the Set home page input box and tap OK 14 3 Open a web page In the Browser window enter the web address in the address bar and tap Go Note As you enter the address matching web page addresses will appear on the screen Tap to select an address to go directly to the web page or continue to enter the complete web page address and tap Go 14 4 Automatic screen rotation...

Page 54: ... a webpage 1 When viewing a webpage press H and tap More Find on page 2 Enter the text in the input box using the onscreen keyboard and tap Next Matching texts are highlighted on the screen 3 Tap or to go to the previous or next matching text 4 Tap x to close the search box 14 10 Selecting links in web pages 14 10 1 Web page links 1 Tap to go to the link directly or tap and hold the link A pop up ...

Page 55: ...m unknown sources To protect your phone and personal data download applications only from trusted sources such as Android Market 14 12 View your downloads In the Browser window press H and then select More Downloads 14 13 Manage bookmarks You can store as many bookmarks as you want on your phone 14 13 1 To bookmark a web page 1 In the Browser window go to the web page you want to book mark 2 Press...

Page 56: ...N A WI FI NETWORK THAT IS CONNECTED TO THE INTERNET BEFORE YOU CAN SETUP SEND AND RECEIVE EMAILS SEE PAGE 49 ON HOW TO JOIN A WI FI NETWORK IT IS IMPORTANT TO SET THE CORRECT DATE AND TIME INFORMATION BEFORE YOU SET UP YOUR FIRST EMAIL ACCOUNT AND START TO ACCESS YOUR EMAILS The Mail application lets you send and receive emails and it works with most popular email systems such as Google mail Hotma...

Page 57: ...vailable Authentication Yes 5 Tap OK The email application will check your incoming and outgoing server settings It might take a few minutes 6 Enter the Account name optional and tap Done 7 Enter Your name optional to be displayed on outgoing messages and then tap Done The email application will start to load your messages It might take a few minutes for the messages to load completely 15 3 Set up...

Page 58: ... and tap Account settings to modify the following settings 15 6 Compose and send email messages You can send an email message to anyone who has an email address You can send the message to one person or to a group of people 1 Tap Email 2 Tap to select an email account from the Accounts window 3 Press H and tap Compose 4 Enter the message recipient s email address in To field Tip If you are sending...

Page 59: ... of your email account 15 7 Read messages 1 Tap Email 2 In the Accounts window tap on the folder icon next to the email account you want to access The available mailboxes are displayed 3 Tap to select the folder you want to view The messages are displayed 4 Tap to select the message you want to view 5 Tap or at the top of the message window to go to the previous or next message 15 8 Open an attach...

Page 60: ... next to the email account you want to access The available folders are displayed 3 Tap to select the folder you want to check The messages are displayed 4 Tap to select the message you want to delete 5 Tap Delete to delete the message 15 12 Forward an email message 1 Tap Email 2 In the Accounts window tap on the folder icon next to the email account you want to access The available folders are di...

Page 61: ...n box appears 3 Tap Remove Account and OK to delete the email account 16 TuneIn Radio YOU MUST JOIN A WI FI NETWORK THAT IS CONNECTED TO THE INTERNET BEFORE YOU CAN LISTEN TO RADIO BROADCASTS FROM THE INTERNET SEE PAGE 49 ON HOW TO JOIN A WI FI NETWORK TuneIn Radio is an audio service transmitted via the Internet With this application you can listen live to your favorite radio stations and program...

Page 62: ...ure tap The station is added to presets and you can access it by tapping My Presets tab Tap or at the bottom of the screen to stop or resume playback Press or to increase to decrease volume Press B to return to the previous menu Press H tap Exit and select OK to stop and exit 16 3 Search Station by Name 1 Tap TuneIn Radio The screen displays a list of options for you to search for a radio station ...

Page 63: ...he selected language 4 Tap to select an option or station and listen to the station broadcast 17 RssFeed YOU MUST JOIN A WI FI NETWORK THAT IS CONNECTED TO THE INTERNET BEFORE YOU CAN RECEIVE AND READ RSSFEED SEE PAGE 49 ON HOW TO JOIN A WI FI NETWORK RSS Feed is a web feed used to publish frequently updated works such as blog entries news headlines and audio You can subscribe to timely updates fr...

Page 64: ...t In the RssFeed window tap Settings and select a category for the Widget 17 4 Adding an RSS Feed into a Category Follow the steps below to search and save the real Feed path into the Category of your choice 1 In the RssFeed window tap to select a Category from the list 2 Tap Search Feed 3 Enter the key words to search for relevant Rss Feeds on the web for example News Sports etc tap Done and then...

Page 65: ...efault To get updated stock prices in your portfolio list tap Refresh 18 2 Add a stock to the Portfolio list 1 In the Stock window tap to select Portfolio List 2 Tap on the input box to launch the onscreen keyboard 3 Enter the name of the stock you wish to add and tap Add A list of query results appears 4 Tap to select the stock you wish to add 18 3 Delete a stock from the portfolio list Tap x nex...

Page 66: ...YOU CAN CHECK WEATHER SEE PAGE 49 ON HOW TO JOIN A WI FI NETWORK The Weather application lets you view the current weather as well as the weather forecast for the next four days of the week You can display the weather conditions in your current location and the weather in up to ten cities 19 1 Open Weather Application Tap Weather The Current weather list is opened by default To get updated weather...

Page 67: ...e unit will change only when you tap Refresh 19 5 Delete a city In Weather window tap x next to the city to delete it 20 Take photos and record videos Note To get clear photographs wipe the lens clean with a soft dry cloth before you take photo 20 1 Open Camera Tap Camera 20 2 Switch between camera and camcorder mode Drag slider to camera or camcorder icon to switch mode 20 3 Take picture Tap A th...

Page 68: ...thumbnail to view it in full screen Tap Delete to delete the photo Tap Share to send the photo via email Tap More for other photo options such as rotate crop set as wallpaper etc Press B to return to viewfinder Drag slider to select zoom factor from 1x to 4x Shows thumbnail of last photo Tap to take photo Drag up to switch to camcorder Tap to select white balance Auto Incandescent Daylight Fluores...

Page 69: ... ES Video Player or Movies to play it Tap Delete to delete the video Tap Share to send the video via email Tap More for other video options Press B to return to viewfinder 20 7 Video options Tap to select video quality High Low MMS YouTube Select Low if sending the video via MMS High if storing the video on an SD card Tap to select white balance Auto Incandescent Daylight Fluorsecent Cloudy Select...

Page 70: ...fore you launch the music application See Insert and Mount memory card on page 15 21 1 Listen to Music on your Motorola MBP2000PU 21 1 1 Using earphones You can insert earphones not included into the Motorola MBP2000PU earphone jack to listen to music 21 1 2 Using the speaker on the base station You can also listen to music using the speaker on the base station of your Motorola MBP2000PU Place the...

Page 71: ...s H and tap Library To return to the playback window from the Music Library tap Now playing or the green playback button 21 4 Search for a song 1 Press 2 Enter the song name and tap Go A list of songs related to the song name is displayed Tap to select and playback the song Tip Press B to hide keyboard 21 5 Party Shuffle all songs Press H and tap Party shuffle Tap to select songs from the list Tap...

Page 72: ... music library tap Playlists 2 Tap and hold the playlist that you wish to play A pop up options menu appears 3 Tap Play 21 10 Add songs to a playlist 1 From the main music library tap to select a category from which you wish to add songs to a playlist Tip Go to Songs category to show all the available songs 2 Tap and hold the song you wish to add to playlist A pop up options menu appears 3 Tap Add...

Page 73: ...s ringtone You can use songs as your phone ringtone 1 From the main music library tap to select a category from which you wish to use song as ringtone Tip Go to Songs category to show all the available songs 2 Tap and hold the song you wish to use as ringtone A pop up options menu appears 3 Tap Use as phone ringtone The song is set as phone ringtone Note To learn how to set phone ringtone see Set ...

Page 74: ...hose you have taken with Camera and those you have downloaded from the web or other locations 22 1 Open Gallery Tap Gallery If you have stored your files in folders on the memory card the Gallery application will display these folders as separate albums Note Depending on the number of pictures stored on the memory card it may take a while for the application to load the pictures on the screen 22 2...

Page 75: ... Swipe left or right to view the previous or next picture in the album Tap to zoom in or zoom out Tap Slideshow to view the pictures in the album as a slideshow Tap More to access more options such as Crop Rotate etc 23 Clock 23 1 Open Clock Tap Clock 23 2 Set an alarm 1 Tap Clock 2 Tap 3 Tap Add alarm 4 Tap or or the hour and minute fields to set the alarm time 5 Tap to select AM or PM Note This ...

Page 76: ...Tap Clock 2 Tap A list of alarm settings is displayed 3 Tap on the alarm icon to deactivate an alarm setting The alarm icon is not underlined in green 23 5 Activate alarm in silent mode 4 You can set your alarm clock to sound an alarm even when the phone is in silent mode 1 Tap Clock 2 Tap 3 Press H and tap Settings 4 Tap Alarm in silent mode appears next to the option To disable alarm in silent m...

Page 77: ...p Agenda 24 3 Go to Today s date In any Calendar view press H and tap Today 24 4 Change Calendar view You can display the Calendar in daily weekly monthly or agenda view To change Calendar view press H then tap Day Week Agenda or Month Snooze duration Select from 10 minutes 15 minutes 20 minutes 25 minutes and 30 minutes Volume and Camera Set the desired behavior of the buttons when pressed during...

Page 78: ...vent tap From to set date and then select All day check box 5 Enter Event location and description 6 If you have more than one calendar tap the down arrow on the right of L Calendar to select the Calendar where you want to save the event 7 Enter email addresses of Guests 8 Select the frequency of event recurrence in Repetition and then select the event reminder time in Reminders Note To add anothe...

Page 79: ...ss all event reminders 5 Press B to keep the reminders pending in the notifications area of the status bar 25 Performing Calculations You can use the Calculator to perform simple and advanced arithmetical calculations 25 1 Open Calculator Tap Calculator 25 2 Perform Calculations 1 Tap on the numbers and mathematical operators to perform simple calculations 2 Press H and tap Advanced panel to acces...

Page 80: ...st read positions for all opened books 26 3 Start reading Tap to select a book from the bookshelf to start reading You can scroll through the pages by swiping your finger left to go to the next page and swiping right to go to the previous page You can also simply tap on the right side of the page to move forward and the left side to move back Alternatively you can use the volume keys on your devic...

Page 81: ...load Free Books To browse an eBook store select Store from the home screen of Aldiko 1 Tap to select your desired category 2 Tap to select a book and tap Download Your MBP2000PU begins to download the book in the background Once the download is complete it will appear as New content in your Aldiko library 26 6 Add eBooks from your SD card into your Library 1 Tap and then select SD card 2 Scroll th...

Page 82: ...lders Tap to go to the previous directory or folder For more information on the short cut keys tap for help 27 2 Open file as 1 Tap and hold the file you wish to open A pop up menu appears 2 Tap Open As and select Text Audio Video or Image 27 3 Select all files in a directory 1 Go to the directory that you want to select all files 2 Press H tap Operations Select All 27 4 Create a new folder 1 In t...

Page 83: ...e A pop up menu appears 2 Tap Cut 3 Go to the folder or directory that you wish to place the file 4 Press H and tap Operations Paste to paste the file into the new location 27 8 Delete a file 1 Tap and hold the file you wish to delete A pop up menu appears 2 Tap Delete and tap OK to delete the file 27 9 Compress a file 1 Tap and hold the file you wish to compress A pop up menu appears 2 Tap Compre...

Page 84: ... A WI FI NETWORK THAT IS CONNECTED TO THE INTERNET BEFORE YOU CAN DISCOVER AND DOWNLOAD APPLICATIONS FROM THE INTERNET SEE PAGE 49 ON HOW TO JOIN A WI FI NETWORK SlideME Application Manager is an Android client that facilitates the discovery and download of Android applications to your phone The catalog within the SlideMe Application Manager contains both free and paid applications 28 1 Open Slide...

Page 85: ... to install the application on your phone 6 You may be prompted to enable Unknown sources in Settings Applications see Downloading web applications on page 54 for details 28 3 Search by Top Apps 1 Tap SlideME Market The screen displays a list of categories 2 Press H and tap Top Apps The screen displays a list of top apps Press H and tap Sort to sort the list by alphabetical order rating price etc ...

Page 86: ...ocal Apps The screen displays a list of the local apps Press H and tap Sort to sort the list by alphabetical order rating price etc 3 Tap to select an application 4 Tap Download Install OK to download the application Downloading starts 5 Once the downloading is completed tap Install to install the application on your phone 6 You may be prompted to enable Unknown sources in Settings Applications se...

Page 87: ...an install the Apps usually in apk format into your MBP2000PU with a Micro SD Card 1 Copy the Apps files into a Micro SD card 2 Insert the Micro SD card into the card slot of the handset 3 Run ES File Explorer 4 Select the Apps inside the SD card and double click to run the Installation Note You may be prompted to enable Unknown sources in Settings Applications Tap Unknown sources to enable downlo...

Page 88: ... end of the Micro USB cable to the handset and the other end to the USB port on your computer A pop up window appears on the screen If the window did not appear drag down the status bar and then tap USB Connected 2 Tap Turn on USB Storage After a few seconds USB storage in use appears 3 On My Computer windows a new device NANDStorage is displayed This is the internal Phone memory You can store dat...

Page 89: ...l to clear all current tasks 32 Settings From the home screen press Hand then tap Settings You canmodifythedifferentsettingsofyourMotorolaMBP2000PU Wireless networksConfigure your phone s wireless connections such as Wi Fi Call settings Set up voicemail Dect Settings View and configure base station and handset settings Sound Set the phone and notification ring tones silent mode etc Display Set scr...

Page 90: ...bsite www binatonetelecom com when it is available Firmware Upgrade can only be done via a memory card Internet Firmware Upgrade may be possible in the future Get the firmware files from Binatone and save these files into a memory card make sure that the files are not Accounts sync Select background data auto sync and add sync accounts Privacy Factory data reset Storage Check the available storage...

Page 91: ...procedure may take up to 3 5 minutes IMPORTANT Do not remove the battery of your Motorola MBP2000PU while performing the Firmware Upgrade 5 After Firmware upgrade the phone will power down automatically 6 Press and hold L to power up the phone again 33 2 Factory data reset This erases all data from the phone s memory and sets it back to original factory settings Make sure you have backed up any im...

Page 92: ... access the web Check the wireless signal indicator in the status bar at the top of the screen If there is no signal you are not connected I cannot make or receive calls Your Motorola MBP2000PU may not be registered to a base station Check if the telephone cord and power adaptor are connected properly The display freezes or does not respond Turn the Motorola MBP2000PU off and turn it on again is n...

Page 93: ...network that is connected to the Internet For information about joining a Wi Fi network see page 49 Interference Noise interference on your radio or television Your base may be too close Move it as far away as possible There is no dial tone Your Motorola MBP2000PU may not be registered to a base station There is no ring tone The ring tone is deactivated see page 31 Increase the volume Caller ID do...

Page 94: ...d The product exhibits a distinct change in performance Installation Guidelines 1 Read all instructions and save them for future reference 2 Follow all warnings and instructions marked on the product 3 Do not install this product near a bath tub sink or shower 4 Operate this phone using only the power source that is indicated on the marking label If you are unsure of the power supply to your home ...

Page 95: ... not burn disassemble mutilate or puncture the battery The battery contains toxic materials that could be released resulting in injury CAUTION There is a risk of explosion if you replace the battery with an incorrect battery type Use only the battery pack that came with your phone or an authorized replacement recommended by the manufacturer Keep battery packs out of the reach of children Remove ba...

Page 96: ... What will BINATONE do BINATONE or its authorized distributor at its option and within a commercially reasonable time will at no charge repair or replace any Products or Accessories that does not conform to this Warranty We may use functionally equivalent reconditioned refurbished pre owned or new Products Accessories or parts What Other Limitations Are There ANY IMPLIED WARRANTIES INCLUDING WITHO...

Page 97: ... OR INABILITY TO USE THE PRODUCTS OR ACCESSORIES TO THE FULL EXTENT THESE DAMAGES MAY BE DISCLAIMED BY LAW Some jurisdictions do not allow the limitation or exclusion of incidental or consequential damages or limitation on the length of an implied warranty so the above limitations or exclusions may not apply to you This Warranty gives you specific legal rights and you may also have other rights th...

Page 98: ...lt of MOTOROLA or BINATONE are excluded from coverage Use of Non Motorola branded Products and Accessories Defects or damage that result from the use of Non Motorola branded or certified Products or Accessories or other peripheral equipment are excluded from coverage Unauthorized Service or Modification Defects or damages resulting from service testing adjustment installation maintenance alteratio...

Page 99: ... the Product or Accessory b the original proof of purchase receipt which includes the date place and seller of the Product c if a warranty card was included in your box a completed warranty card showing the serial number of the Product d a written description of the problem and most importantly e your address and telephone number These terms and conditions constitute the complete warranty agreemen...

Page 100: ... and meets FCC RF exposure guidelines when used with an accessory that contains no metal and that positions the handset a minimum of 0m from the body Use of other accessories may not ensure compliance with FCC RF exposure guidelines Changes or modifications to this equipment not expressly approved by the party responsible for compliance could void the user s authority to operate the equipment This...

Page 101: ... label on the back or bottom of this equipment contains among other things a product identifier in the format US AAAEQ TXXXX This identifier must be provided to your local telephone company upon request The plug and jack used to connect this equipment to premises wiring and the telephone network must comply with applicable Part 68 rules and technical requirements adopted by ACTA A compliant teleph...

Page 102: ...using harm to the telephone network the telephone company may temporarily discontinue your telephone service The telephone company is required to notify you before interrupting service If advance notice is not practical you will be notified as soon as possible You will be given the opportunity to correct the problem and the telephone company is required to inform you of your right to file a compla...

Page 103: ...that the Industry Canada technical specifications were met The Ringer Equivalence Number REN for this terminal equipment is 0 0 The REN is an indication of the maximum number of devices allowed to be connected to a telephone interface The termination on an interface may consist of any combination of devices subject only to the requirement that the sum of the RENs of all the devices does not exceed...

Page 104: ...0VAC 60Hz 0 3A Output 1 5 8VDC 600mA 0º WiFi in US 2412 000 2462 000MHz Output 2 5 8VDC 1000mA 2 Handset USB Adaptor Input 100 240VAC 50 60Hz 0 3A Output 5VDC 1000mA 3 7V 910mAh Li ion Rechargeable Battery Pack Motorola BQ50 Screen Size 3 2 Backlight LED Panel Resolution 400 x 240 Supported Memory Card Type Micro SD Micro USB Port Included Headphone 3 5mm jack Handset Speaker Stereo System with 2p...

Page 105: ... for this product MOTOROLA and the Stylized M Logo are trademarks or registered trademarks of Motorola Trademark Holdings LLC and are used under license All other trademarks are the property of their respective owners 2011 Motorola Mobility Inc All rights reserved Version 1 0 Printed in China ...

Reviews: