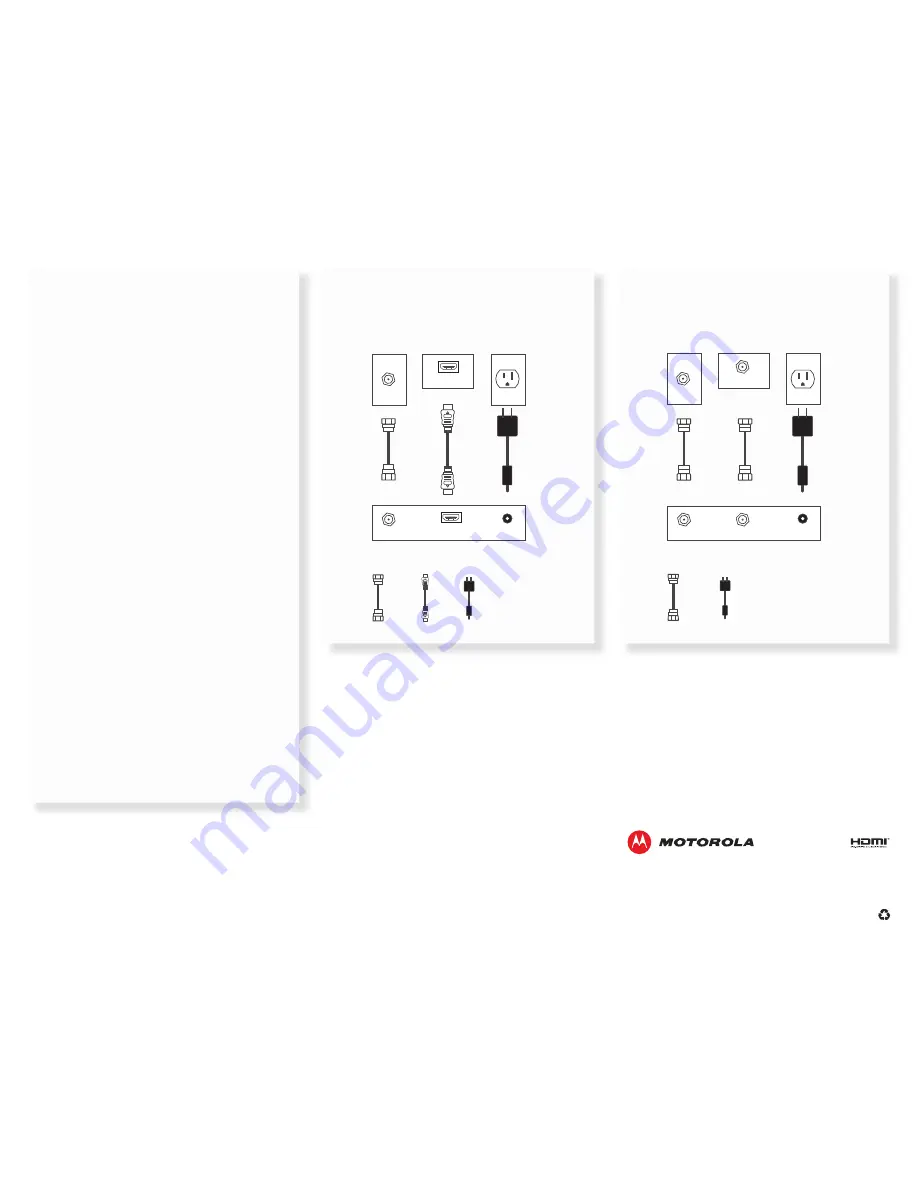
HDTV
HDMI
Coax cable
Power cord
HD-DTA100u
HDTV
Electrical Outlet
Cable Outlet
Cable In
+5V DC In
1
2
3
HDMI
HDMI
MOTOROLA and the Stylized M Logo are trademarks or registered trademarks of Motorola Trademark Holdings, LLC. HDMI,
the HDMI logo, and High‑Definition Multimedia Interface are trademarks or registered trademarks of HDMI Licensing, LLC
in the United States and/or other countries. All other product or service names are the property of their respective owners.
No part of this publication may be reproduced in any form or by any means or used to make any derivative work (such as
translation, transformation, or adaptation) without written permission from Motorola Mobility, LLC.
©2012 Motorola Mobility, LLC. All rights reserved.
589976‑001‑a 09/12
SDTV
Coax cable
HD-DTA100u
SDTV
Electrical Outlet
Cable Outlet
Cable In/
RF In
To TV
Cable In
+5V DC In
1
2
3
Power cord
Setting Up Your HD-DTA100u and
RF4CE Remote Control
IMPORTANT! Read the enclosed Safety Instructions
before you begin.
1. Connect your cable service.
Connect the coaxial cable from your wall outlet to the
Cable In
port on the HD‑DTA100u.
2. Connect your TV.
If you have a high‑definition TV, use the
HDMI
connector.
If you have a standard‑definition TV, use the
To TV
connector.
3. Plug in the HD-DTA100u.
Connect the power cord to the HD‑DTA100u, then plug it
into an unswitched electrical outlet.
4. Turn on the TV and select the input.
If you have an HDTV, use the remote control for your
TV to select the HDMI port you used to connect the
HD‑DTA100u.
If you have an SDTV, tune your TV to Channel 3 and
set the switch on the back of the HD‑DTA100u to
CH 3. If your screen remains black, switch your TV and
HD‑DTA100u to CH 4.
5. Put the batteries in the HD-DTA100u remote
control.
6. Program the RF4CE remote control.
Point the remote control at the HD‑DTA100u. Press and
hold the SETUP button until the LED on the remote
control blinks twice, then press the Menu button. The
LED will blink continuously until the remote control is
paired. Follow the pairing instructions on the screen.
(Pairing instructions are also printed on the back of the
remote control.
)


