Motorola FOCUS89 User Manual Download Page 17

17

ENGLISH

Getting started - Connecting Devices

• 

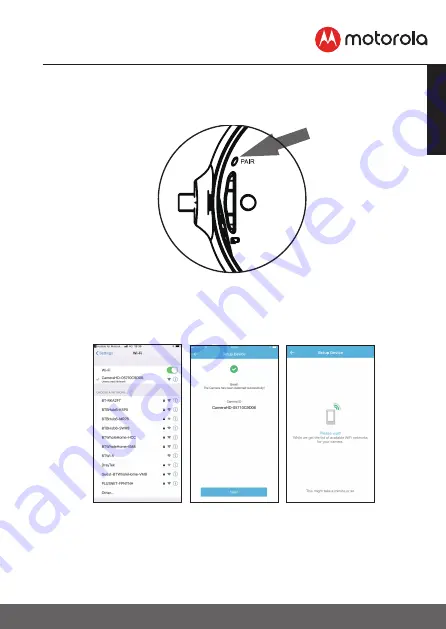
To pair the camera -  Press and hold the PAIR button on the back of the 

Camera for 8 seconds. You will then hear a beep tone, followed by a voice 
prompt indicating that the Camera is ready for pairing.

Pair the device

•  Go to Settings > Wi-Fi menu on your iPhone®/iPad®. (Picture i5)
•  Select your Camera from the list of networks. (Picture i6)
• 

Return to the Hubble app to resume setup and press Next  (Picture i7)

•  Your device will detect available networks (Picture i8)


i6                                   i7                                 i8 

Summary of Contents for FOCUS89

Page 1: ...UIDE Wi Fi Home Video Camera The features described in this user s guide are subject to modifications without prior notice MODELS FOCUS89 FOCUS89 2 FOCUS89 3 FOCUS89 4 FOCUS89 W FOCUS89 W2 FOCUS89 W3 FOCUS89 W4 ...

Page 2: ...riginal dated sales receipt for your records For warranty service of your Motorola product you will need to provide a copy of your dated sales receipt to confirm warranty status Registration is not required for warranty coverage For product related questions please call US and Canada 1 888 331 3383 Email support motorolastore com This User s Guide has all the information you need to make the most ...

Page 3: ...ce with this product Keep the Wi Fi Camera Unit away from these types of products or turn them off if they appear to be causing interference Always ensure that you have a good Wi Fi connection available 4 5 2 1 3 7 8 9 6 1 Light Sensor for night mode detection 2 Power Status indicator 3 Microphone 4 Camera Lens 5 Infrared LEDs for night vision 6 Speaker 7 Micro USB socket 8 PAIR Button 9 SD Card s...

Page 4: ...oid device 9 3 2 4 Add the Camera to your account 10 3 3 User Account and Camera Setup on iPhone iPad 14 3 3 1 Power ON and Connect the Camera 14 3 3 2 Download Hubble for Motorola Monitors App 14 3 3 3 Run Hubble for Motorola Monitors App on iPhone iPad 14 3 3 4 Add the Camera to your account 15 4 Camera Functions 19 4 1 Connecting the Camera Unit to power 19 4 2 Overview of the Features on Hubbl...

Page 5: ...r use extension cords with AC Adapters Only use the AC Adapters provided As with any electrical device supervision of your pet s usage should be exercised until your pet is acclimated to the product If your pet is prone to chewing we strongly recommend you keep this and all other electrical devices out of its reach Wi Fi CAMERA UNIT SET UP USE Place the Wi Fi Camera Unit on a flat surface such as ...

Page 6: ...le adult supervision Keep this User Guide for future reference Do not place the Wi Fi Camera Unit or cords in the cot or within reach of the baby the unit should be at least 1 metre away Keep the cords out of reach of children Do not cover the Wi Fi Camera Unit with a towel or blanket Test the Wi Fi Camera Unit and all its functions so that you are familiar with it prior to use Do not use the Wi F...

Page 7: ...efox 18 0 Adobe Flash Player 15 0 Android System Version 4 4 2 or above iPhone iPad iOS Version 9 0 or above High Speed Wi Fi Internet At least 0 6 Mbps upload bandwidth per camera you can test your internet speed on this site http www speedtest net If using a MicroSD Card it can be up to 32MB and must be speed class 4 or above for best video quality ...

Page 8: ...you want to connect Make sure the password of the router is available for entering during the in app setup process Status of LED Indication Pair Setup state LED cycles from Blue to Purple to Red Unconnected state LED is Red and Flashing Connected state LED is Blue and always on Live Streaming LED is Blue and Flashing Readyfor connection state LED is Red and Flashing Note You can only setup via a c...

Page 9: ...d LED Flashes after the Camera has finished booting 3 2 2 Download Hubble for Motorola Monitors App Go to Google Play Store to search for Hubble for Motorola Monitors Download Hubble for Motorola Monitors App from Google Play Store and install it on your Android device 3 2 3 Run Hubble for Motorola Monitors App on Android device Ensure that your Android device is connected to your Wi Fi router Run...

Page 10: ...ng Devices Note If you already have a Hubble App account please select Already have an Account to go to the next step A1 3 2 4 Add the Camera to your account Tap on the lower right corner of the screen to add camera Picture A2 A2 ...

Page 11: ...ices The following setup instructions will appear on the screen Pictures A3 A3 Plug in and switch on the camera and wait for a couple of minutes for it to warm up The following setup instructions will appear on the screen Picture A4 A4a A4 A4a ...

Page 12: ...hen hear a beep tone followed by a voice prompt indicating that the Camera is ready for pairing Pair the device Tap DETECT CAMERA The App will automatically search foryour Camera select your Camera from the list of networks as shown in the pictures A6 below Pictures A5 A6 A7 The LED on the camera will cycle from Red to Blue to Purple A5 A6 A7 ...

Page 13: ...nter your password and then tap Connect Pictures A8 A9 A10 A8 A9 A10 It will take a few minutes for the Camera to connect to the Wi Fi network before showing the connection status Pictures A11 If connection fails please tap Retry and repeat the steps starting from 3 2 4 A11 ...

Page 14: ... s Blue LED is lit after the Camera has finished booting 3 3 2 Download Hubble for Motorola Monitors App Go to App Store to search for Hubble for Motorola Monitors Download Hubble for Motorola Monitors App and install it on your iPhone iPad 3 3 3 Run Hubble for Motorola Monitors App on iPhone iPad Ensure that your iPhone iPad is connected to your Wi Fi Router Run the Hubble for Motorola Monitors A...

Page 15: ... Devices Note If you already have a Hubble App account please select Already have an Account to go to the next step Picture i1 i1 3 3 4 Add the Camera to your account Tap on the lower right corner of the screen to add camera Picture i2 i2 ...

Page 16: ...e following setup instructions will appear on the screen Pictures i3 i3a i3 i3a Plug in and switch on the camera and wait for a couple of minutes for it to warm up The following setup instructions will appear on the screen Picture i4 i5 i4 i5 ...

Page 17: ... hear a beep tone followed by a voice prompt indicating that the Camera is ready for pairing Pair the device Go to Settings Wi Fi menu on your iPhone iPad Picture i5 Select your Camera from the list of networks Picture i6 Return to the Hubble app to resume setup and press Next Picture i7 Your device will detect available networks Picture i8 i6 i7 i8 ...

Page 18: ... i9 Enter your Wi Fi password and tap OK Picture i10 i9 i10 It will take a few minutes for the Camera Unit to connect to the Wi Fi network before showing the connection status Select what your camera will be used for Picture i11 Give your camera a name Picture i12 i11 i12 ...

Page 19: ...Overview of the Features on Hubble App Event History Tap Event History to access the video record list that is triggered by Motion or Sound detection Delete Events Tap to delete selected event s Photo Video Take a photo or record a video from your Camera Tap the Video icon to activate Video function Tap and hold the red button to start recording and release to stop Tap the Camera icon to switch to...

Page 20: ...wo way communication Tap to activate the function Press the round button once to speak through the Camera Unit Toggle the button again to listen to the audio feedback from the Camera Unit Speaker Tap to toggle speaker on or off Setting You can change the Camera settings by tapping on the Settings icon Add Camera Enter Add Camera procedures ...

Page 21: ...hen click Login if you have already created an account Click on the Camera list paired in your account via Android device or iPhone iPad and the Camera view will appear on screen You can easily stay connected with your favorite people places and pets with live video streaming On the website you can change the Settings by following the Menu instructions ...

Page 22: ...mera by unplugging the power supply from the electrical socket 2 Press and hold the PAIR button then plug the powers supply back into the electrical socket 3 Release the PAIR button when you hear a confirmation beep and wait for the Camera Unit to complete an internal reset procedure The Red LED will begin to flash when the Camera Unit is reset successfully 4 You can add your Camera again by follo...

Page 23: ...tings If necessary reconnect your Wi Fi Ensure the Wi Fi Camera Unit is switched ON Wait a few minutes to connect to the Wi Fi system Ifyou forget your password If you do not remember your password tap Forgot password and submit your e mail address A new password will be sent to your e mail address immediately Troubleshooting forWi Fi Internet Viewing Category Problem Description Error Solution Ac...

Page 24: ...accessing your camera This could be due to lack of internet connection Please wait and try again later 1 Please try again in a few minutes This could be because of any issue with your internet connection 2 If the problem remains please restart your Camera to check if this fixes the problem 3 Please restart your Wireless Router Viewing Camera When I am in remote mode the video stops after 5 minutes...

Page 25: ... 6 of this guide General What are the supported browsers for accessing from my PC Mac We recommend using Google Chrome 24 or above However the following browsers are also supported Internet Explorer 9 0 or above for PC Safari 6 0 or above for Mac or Firefox 18 0 or above both PC or Mac General What is the significance of LED The LED indicates the following status LED flashing Red Your Camera is bo...

Page 26: ...d voice prompt Ready for pairing When the Camera LED is off this indicates that it is in setup mode Now restart the setup from your smartphone again Connectivity Issues Even though I am accessing my Camera from the same Wi Fi network I still find my Camera is shown as remote I can only access it for 5 minutes at a time Please check your wireless router settings For example for Buffalo brand router...

Page 27: ...do not hear any sound when I am accessing a remote Camera You can tap on the speaker icon in the video stream screen to hear audio By default the audio is not ON when you are accessing a remote Camera General What is the meaning of Local Camera and Remote Camera When you are accessing your Camera from the same wireless network Home in which it is configured it is a Local Camera When you are access...

Page 28: ...connect and this results in lost sound and choppy video You will need to turn off the Auto Lock function of your device to ensure continuous video audio streaming Features How many users can access the Camera at one time If you are accessing in Local Mode two users are supported after two users all streaming will go through the remote server This allows for unlimited user access to a single Camera...

Page 29: ...s Warranty is your exclusive warranty and is not transferable THIS WARRANTY GIVES YOU SPECIFIC LEGAL RIGHTS AND YOU MAY HAVE OTHER RIGHTS THATVARY BY STATE PROVINCE OR COUNTRY FOR CONSUMERS WHO ARE COVERED BY CONSUMER PROTECTION LAWS OR REGULATIONS IN THEIR COUNTRY OF PURCHASE OR IF DIFFERENT THEIR COUNTRY OF RESIDENCE THE BENEFITS CONFERRED BYTHIS LIMITED WARRANTYARE IN ADDITION TO ALL RIGHTS AND...

Page 30: ... ARISING OUT OF OR IN CONNECTION WITH THE ABILITY OR INABILITYTO USE THE PRODUCTS OR ACCESSORIES TO THE FULL EXTENTTHESE DAMAGES MAY BE DISCLAIMED BY LAW Some jurisdictions do not allow the limitation or exclusion of incidental or consequential damages or limitation on the length of an implied warranty so the above limitations or exclusions may not apply to you This Warranty gives you specific leg...

Page 31: ...oducts and Accessories Defects or damage that result from the use of Non Motorola branded or certified Products or Accessories or other peripheral equipment are excluded from coverage Unauthorized Service or Modification Defects or damages resulting from service testing adjustment installation maintenance alteration or modification in any way by someone other than MOTOROLA BINATONE or its authoriz...

Page 32: ...r of the Product c if a warranty card was included in your box a completed warranty card showing the serial number of the Product d a written description of the problem and most importantly e your address and telephone number These terms and conditions constitute the complete warranty agreement between you and BINATONE regarding the Products or Accessories purchased by you and supersede any prior ...

Page 33: ...t the interference by one or more of the following measures Reorient or relocate the receiving antenna Increase the separation between the equipment and receiver Connect the equipment into an outlet on a circuit different from that to which the receiver is connected Consult the dealer or an experienced radio TV technician for help This device complies with Part 15 of the FCC rules Operation is sub...

Page 34: ...n number only signifies that the Industry Canada technical specifications were met This product meets the applicable Industry Canada technical specifications Le présent appareil est conforme aux CNR d Industrie Canada applicables aux appareils radio exempts de licence L exploitation est autorisée aux deux conditions suivantes 1 l appareil ne doit pas produire de brouillage et 2 l utilisateur de l ...

Page 35: ...802 11 b g n Image sensor Colour CMOS 1M Pixels Lens f 2 80mm F 2 5 IR LED 8 pcs Power Adapter Zhong Shan Xiao Lan Hui Yang Electric Appliance Factory HS06 050100US Input 100 240V 50 60Hz 0 15A Output 5V 1000mA Maximum RF Output Power 17 98dBm Memory card Micro SD type up to 32GB Class 4 or above ...

Page 36: ...ark of Apple Inc Google Play Android and Chrome are trademarks of Google Inc Wi Fi is a trademark of the Wi Fi Alliance Internet Explorer and Windows are trademarks of the Microsoft group of companies Firefox is a registered trademark of the Mozilla Foundation Adobe and Flash are either registered trademarks or trademarks of Adobe Systems Incorporated Java is a registered trademark of Oracle and o...

Reviews: