A-2
Diagnostics
DCT2500 Installation Manual
Using Diagnostics
To operate the set-top, use the Motorola universal remote control.
To access and navigate the
diagnostic mode:
1
Press
POWER
on the remote control to turn on the set-top.
2
Wait five seconds and then press
POWER
again to turn off the set-top.
3
To enable diagnostic mode, press
SELECT
/
OK
on the remote control within two seconds after
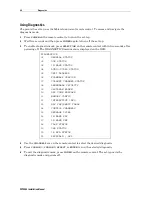
powering off. The DIAGNOSTICS main menu is displayed on the OSD:
DIAGNOSTICS
01 GENERAL
STATUS
02 OOB
STATUS
03
IN BAND STATUS
04 AUDIO/VIDEO
STATUS
05 UNIT
ADDRESS
06 FIRMWARE
VERSION
07
CURRENT CHANNEL STATUS
08 RENEWABLE
SECURITY
09 UPSTREAM
MODEM
10
APP CODE MODULES
11 MEMORY
CONFIG
12 INTERACTIVE
INFO
13
MAC FREQUENCY TABLE
14 CONTROL
CHANNELS
15 MESSAGE
TYPES
16
IN BAND PAT
17
IN BAND PMT
18 TASK
STATUS
19 USB
STATUS
20
IB MCA STATUS
21
KEYBOARD / LED
4
Use the
CHANNEL
keys on the remote control to select the desired diagnostic.
5
Press
CURSOR
<
,
CURSOR
>
,
SELECT
, or
ENTER
to run the selected diagnostic.
6
To exit the diagnostic mode, press
POWER
on the remote control. The set-top exits the
diagnostic mode and powers off.

