background image

APX

TM

 6500 O5 

45 

Index 

Global Positioning System (GPS) Enabled 

The Outdoor Location Feature (Using GPS) 

Deleting a Single Saved Waypoint 

While in the current location display: 

Press the 

Menu Select 

button directly below 

OPTN

2                

to 

WAYPOINTS

Press the 

Menu Select 

button directly below 

SEL

4                

to desired waypoints. 

Press the 

Menu Select 

button directly below 

OPTN

   OR 

   Press the 

Menu Select 

button directly below 

DEL

 and    

   then skip to step 7. 

6                

to 

DELETE

The display shows <

WAYPOINT NAME>  

  CONFIRM DEL?. 

Press the 

Menu Select 

button directly below 

YES

 to    

   delete. 

   The display shows 

<WAYPOINT NAME> 

   DELETED

Press the 

Menu Select 

button directly below 

NO

 to  

   return to previous Waypoint screen. 

   OR 

   Press       or the 

PTT 

button (if preprogrammed) to exit  

   this menu. 

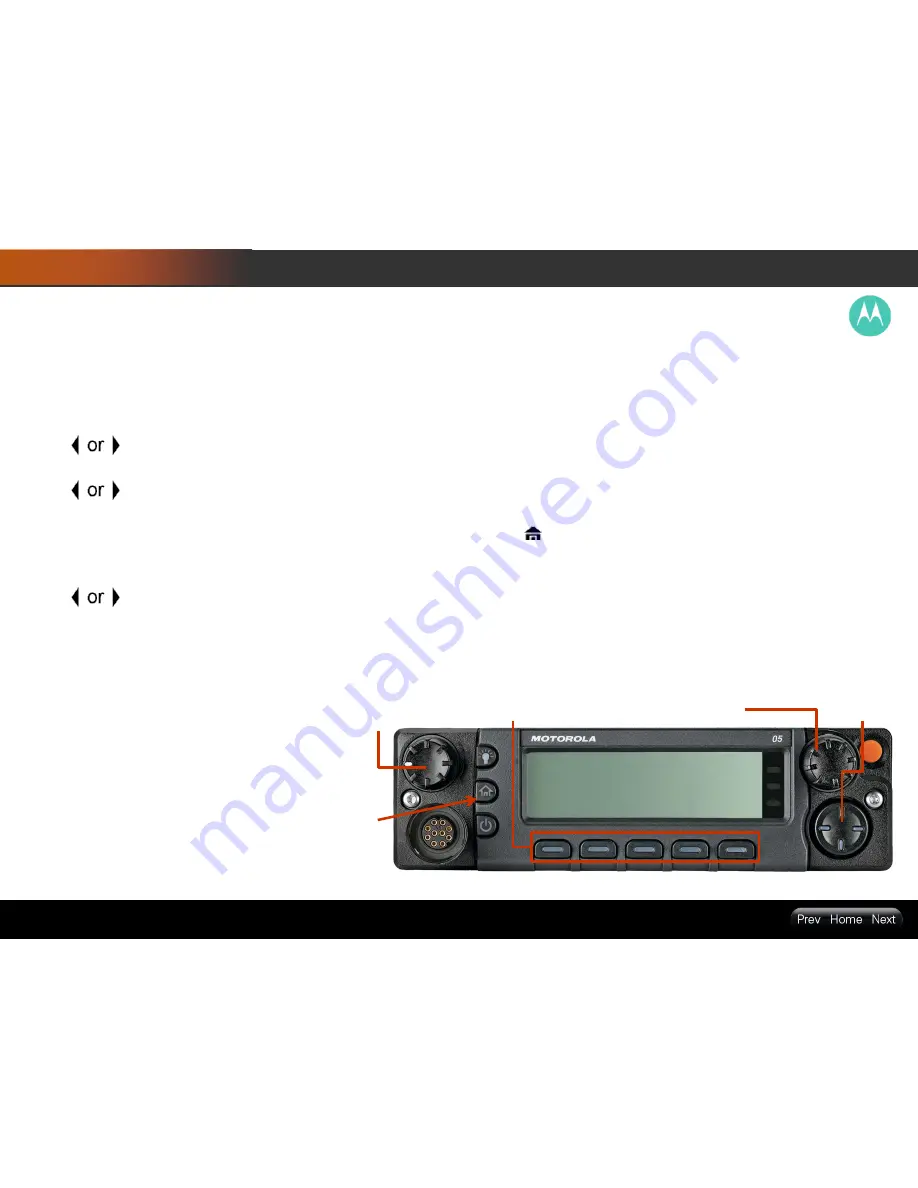
Navigation 

Button 

Navigation Button 

Home 

Button 

Channel Knob 

Menu Select Button 

Summary of Contents for APX650005

Page 1: ... Select image from Photo Library Insert and resize image to fill up this white area Send image to back APX Two Way Radios Bucks County APX TM 6500 O5 Control Head APX6500 05 ...

Page 2: ... ROM or DVD drive Display Super VGA 800 600 or higher resolution monitor Operating system Microsoft Windows Vista Microsoft Windows XP Microsoft Windows 2000 with Service Pack 3 SP3 Other Microsoft Office PowerPoint 2003 or above Adobe Flash Player 9 0 or above Adobe Flash Player is required to run demos in this module Please download and install Adobe Flash Player from http get adobe com flashpla...

Page 3: ... S A Phone Number 1 800 927 2744 Hereby declares that the product Model Name APX 6500 O5 conforms to the following regulations FCC Part 15 subpart B section 15 107 a 15 107 d and section 15 109 a Class B Digital Device As a personal computer peripheral this device complies with Part 15 of the FCC Rules Operation is subject to the following two conditions 1 This device may not cause harmful interfe...

Page 4: ...harmful interference to radio communications However there is no guarantee that interference will not occur in a particular installation If this equipment does cause harmful interference to radio or television reception which can be determined by turning the equipment off and on the user is encouraged to try to correct the interference by one or more of the following measures Reorient or relocate ...

Page 5: ...l or otherwise any license under the copyrights patents or patent applications of Motorola except for the normal non exclusive license to use that arises by operation of law in the sale of a product Documentation Copyrights No duplication or distribution of this document or any portion thereof shall take place without the express written permission of Motorola No part of this manual may be reprodu...

Page 6: ... instructions in the Product Safety and RF Exposure booklet enclosed with your radio Motorola Publication part number 6881095C98 to ensure compliance with RF energy exposure limits For a list of Motorola approved antennas batteries and other accessories visit the following website http www motorola com governmentandenterprise Before using this product read the operating instructions for safe usage...

Page 7: ...hout the text in this tutorial you will notice the use of WARNING Caution and Note These notations are used to emphasize that safety hazards exist and the care that must be taken or observed Note An operational procedure practice or condition etc which is essential to emphasize Getting Started An operational procedure practice or condition etc which may result in injury or death if not carefully o...

Page 8: ...button or Buttons and keys are shown in bold print or as an icon PHONE Menu entries are shown similar to the way they appear on the radio s display This means Press the right side of the 4 way Navigation button The following special notations identify certain items ...

Page 9: ...APXTM 6500 O5 9 Index Home ...

Page 10: ... 6500 O5 10 Index Radio Parts and Controls Volume Knob Menu Select Button Indicators Terminal for Microphone Dim Button Home Button Power On Off Button Channel Knob Emergency Navigation Button LED Indicators ...

Page 11: ...APXTM 6500 O5 11 Index Fleetmap Z1 Z2 Z3 Z4 Z5 Z6 C1 C2 C3 C4 C5 C6 C7 C8 C9 C10 C11 C12 C13 C14 C15 C16 Fleetmap ...

Page 12: ...level Note Pressing the Power On Off Button before the LED lights up will be ignored If FAIL appears in the display the radio will not function until the condition has been corrected If ERROR appears some non critical data has been changed If CH MISMATCH appears means that either the Control Head has been connected to an incompatible transceiver or vice versa If your radio does not power up contac...

Page 13: ...her maintenance statuses 2 The display shows UPDATE DONE PLEASE RESET upon completion OR The display shows UPDATE FAILED PLEASE RESET when it fails to update 3 Press the Power On Off Button to reset The radio runs the usual power up operation if the software update are complete OR The radio runs the Maintenance Mode if the update is not complete and repeat step 1 Note If SW INCOMPLETE appears use ...

Page 14: ...5 14 Index Preparing Your Radio for Use Adjusting the Volume Volume Knob To increase the volume rotate the Volume Knob clockwise to increase the volume To decrease the volume rotate the Volume Knob counterclockwise ...

Page 15: ...able Buttons Mode Select Button Programs the current zone and channel to a Mode Select button with a long press on the Mode Select button After the buttons are programmed you can return to the preprogrammed zone and channel with a short press on the programmed Mode Select button Emergency Button Menu Select Button ...

Page 16: ...e individual feature sections in this manual for further details on saving user edited radio settings or information The button also can revert to home channel Check with your dealer or system administrator for more information Data Feature Button Use this button to access data related features such as the Text Messaging Service TMS feature screen 4 Way Navigation Button Use this button to scroll ...

Page 17: ...el L Radio is set at Low power H Radio is set at High power Priority One Channel Scan Blinking dot Radio detects activity on channel designated as Priority One Steady dot Radio detects activity on channel designated as Priority Two Scan Radio is scanning a scan list AES Secure Operation On AES Secure operation Off Clear operation Blinking Receiving an encrypted voice call Location Signal On Locati...

Page 18: ...Off The feature is disabled Voice muting of the affiliated trunking talkgroup or selected conventional channel is deactivated Vote Scan Enabled The vote scan feature is enabled Secure Operation On Secure operation Off Clear operation Blinking Receiving an encrypted voice call Data Activity Data activity is present View Program Mode Radio is in the view or program mode On steady View mode Blinking ...

Page 19: ...s receiving a secured transmission Solid green Radio is powering up or is on a non priority channel while in the Scan List Programming mode Blinking green Radio is receiving an individual or telephone call or is on a Priority Two channel while in the Scan List Programming mode Rapidly blinking green Radio is on a Priority One channel while in the Scan List Programming mode The LED indicator shows ...

Page 20: ...programmed by a qualified radio technician Backlight and Bar Color Notification When Orange Emergency Alerts The radio initiates an emergency alarm or call The radio receives an emergency alarm or call Red Critical Alerts The radio is out of range The radio enters failsoft mode The radio is unable to establish a full connection with the system Green Call Alerts The radio receives a private call Th...

Page 21: ...annels Note Your radio must be preprogrammed to allow you to use these features 1 Or for ZONE UP ZONE DOWN on Navigation Button General Radio Operation Selecting a Zone Navigation Button Navigation Button Home Button Channel Knob Menu Select Button ...

Page 22: ...his feature If you select a channel that is not within the preprogrammed band the radio indicates that it is on an unsupported frequency with both audio and visual warnings Rotate the Channel knob until the display shows the desired channel General Radio Operation Selecting a Radio Channel Navigation Button Navigation Button Home Button Channel Knob Menu Select Button ...

Page 23: ... zone you can proceed to receive and respond to calls You see solid red while the radio is transmitting and solid yellow when the radio is receiving a transmission conventional mode only There is no LED indication when the radio receives a transmission in trunking mode If the radio is receiving a secure transmission the LED blinks yellow ...

Page 24: ...ome screen depending on how your radio is preprogrammed 1 ASTRO Conventional Only The LED lights up solid yellow The display shows the talkgroup alias or ID and the caller alias or ID OR Trunking Only The display shows the caller alias or ID 2 Hold the microphone vertically 1 to 2 inches 2 5 to 5 0 cm from your mouth 3 Press the PTT button to respond to the call The LED lights up solid red 4 Relea...

Page 25: ...around operation allows you to bypass the repeater and connect directly to another radio The transmit and receive frequencies are the same Press the preprogrammed Repeater Direct switch to toggle between talkaround and repeater modes 1 to DIR 2 Press the Menu Select button directly below DIR 3 The display shows REPEATER MODE if the radio is currently in Repeater mode Navigation Button Navigation B...

Page 26: ...elect button directly below RPGM to send reprogram request to the dispatcher 3 The display shows REPROGRAM RQST and PLEASE WAIT 4 If you hear five beeps the dispatcher has acknowledged the reprogram request The display shows ACK RECEIVED and the radio returns to the Home screen OR If the dispatcher does not acknowledge the reprogram request within six seconds a low pitched alert tone sounds and th...

Page 27: ... List 1 to SCNL 2 Press the Menu Select button directly below SCNL 3 to view the members on the list 4 Press the to exit the current display and return to the Home screen Navigation Button Navigation Button Home Button Channel Knob Menu Select Button ...

Page 28: ...ectly below SEL to add and or change the priority of the currently displayed channel in the scan list OR Press the Menu Select button directly below DEL to delete the currently displayed channel from the scan list OR Press the Menu Select button directly below RCL to view the next member of the scan list 5 to select more channels to be added or deleted OR Use the keypad to go directly to additiona...

Page 29: ...yed channel to the scan list OR Press the button or press the Menu Select button directly below SEL one or more times to change the scan list status icon of the currently displayed channel 5 to select more list members whose scan status you want to change OR Use the keypad to go directly to that scan list member OR Use the Channel Knob to select another scan list member 6 Press to exit scan list p...

Page 30: ... icon indicates that the current channel is in the scan list as a non priority channel The LED lights up solid green OR A Priority Two Channel Scan icon indicates that the current channel is in the scan list as the Priority Two channel The LED blinks green OR A Priority One Channel Scan icon indicates that the current channel is in the scan list as the Priority One channel The LED rapidly blinks g...

Page 31: ...splay shows SCAN OFF if scan is disabled Press the Menu Select button directly below SCAN to enable scan OR The display shows SCAN ON and the scan status icon if scan is enabled Press the Menu Select button directly below SCAN to disable scan 4 The radio returns to the Home screen Navigation Button Navigation Button Home Button Channel Knob Menu Select Button ...

Page 32: ...annel To make a Call Alert page or Private Conversation call while scanning press either the Menu Select button directly below PAGE or CALL The call is entered on the selected channel and scanning is halted until the call is exited by pressing or pressing the Menu Select button below either PAGE or CALL Navigation Button Navigation Button Home Button Channel Knob Menu Select Button ...

Page 33: ...rily remove the unwanted channel from the scan list This capability does not apply to priority channels or the designated transmit channel 1 When the radio is locked onto the channel to be deleted to NUIS 2 Press the Menu Select button directly below NUIS 3 Press the Menu Select button directly below DELETE Navigation Button Home Button Menu Select Button ...

Page 34: ...ing a Nuisance Channel To restore the deleted nuisance channel do one of the following Turn scan off then on OR Change modes OR Turn off the radio and then turn it back on Nuisance mode delete can be disabled by the system administrator ...

Page 35: ...rogrammed Emergency button A tone sounds and the display alternates EMERGENCY and the home display 2 A dispatcher acknowledgment ACK RECEIVED display follows AND Trunking Only A high pitched tone indicates that the alarm has been received by the trunked system s central controller 3 The radio automatically returns to normal operation No further action is required Power On Off Button Emergency Butt...

Page 36: ...emergency call alarm feature 2 The display alternates EMERGENCY and the home display 3 A high pitched tone sounds indicating that the alarm has been received by the trunked system s central controller A dispatcher acknowledgment four high pitched tones follows accompanied by an ACK RECEIVED display 4 Hold the microphone vertically 1 to 2 inches 2 0 to 2 5 cm from your mouth 5 Press and hold the PT...

Page 37: ...nd the display shows NO ACKNOWLEDGE If you press the emergency button then change to a mode that has no emergency capability the display shows NO EMERGENCY and a continuous low pitched tone sounds until a valid emergency mode is selected or until the emergency is cancelled When an emergency is active changing to another mode where emergency is enabled trunked or conventional causes an emergency al...

Page 38: ...PS The display shows PREVIOUS LOC LATITUDE 5 Press the Menu Select button directly below RFSH to obtain a new location fix 6 The top line temporarily displays PLEASE WAIT while the new location is being determined While the new location is being determined the location signal can be a solid or blinking icon 7 Once the location coordinates are fixed the display shows the current latitude Toggle to ...

Page 39: ...y shows PREVIOUS LOC LATITUDE 3 to check the longitude time and date of the last successful location fix 4 Press the Menu Select button directly below OPTN 5 to TURN OFF GPS if preprogrammed 6 Press the Menu Select button directly below SEL to turn off the GPS The display shows LOCATION OFF 7 Press the Menu Select button directly below EXIT to exit the feature and return to the main screen OR Pres...

Page 40: ...e space to the left Press to move one space to the right Press the Menu Select button below DEL to delete any unwanted characters Press to add a space Press to toggle between mixed case mode uppercase mode and lowercase mode Press to toggle between numeric and letter mode 4 Press the Menu Select button directly below OK once you are done The display shows SAVED AS WAYPOINT NAME OR Press the Menu S...

Page 41: ...directly below SEL 4 to desired waypoint 5 Press the Menu Select button directly below OPTN The display shows VIEW 6 Press the Menu Select button directly below SEL 7 again to view longitude time and date the waypoint was detected 8 Press the Menu Select button directly below BACK to return to previous Waypoint screen OR Press or the PTT button if preprogrammed to exit this menu Navigation Button ...

Page 42: ... blinking cursor appears in the Edit Name screen Use the keypad to edit the alias Press to move one space to the left Press to move one space to the right Press the Menu Select button below DEL to delete any unwanted characters Press to add a space Press to toggle between mixed case mode uppercase mode and lowercase mode Press to toggle between numeric and letter mode 8 Press the Menu Select butto...

Page 43: ...ber coordinates Press to move back to the previous number coordinates Press to change the North N South S East E or West W direction Press the Menu Select button below EDIT to change the number coordinates 7 A blinking cursor appears in the Edit Location screen Press to move one space to the left Press to move one space to the right Press the Menu Select button below Del to delete any unwanted cha...

Page 44: ...ows HOME UPDATED and the radio returns to the Waypoints main screen OR The display shows DESTINATION UPDATED and the radio returns to the Waypoints main screen 11 Press the Menu Select button directly below CNCL to return to the Waypoints main screen OR Press or the PTT button if preprogrammed to exit this menu Navigation Button Home Button Menu Select Button ...

Page 45: ...5 Press the Menu Select button directly below OPTN OR Press the Menu Select button directly below DEL and then skip to step 7 6 to DELETE 7 The display shows WAYPOINT NAME CONFIRM DEL 8 Press the Menu Select button directly below YES to delete The display shows WAYPOINT NAME DELETED 9 Press the Menu Select button directly below NO to return to previous Waypoint screen OR Press or the PTT button if...

Page 46: ...directly below SEL 6 to desired waypoints 7 Press the Menu Select button directly below OPTN 8 to DELETE ALL The display shows ALL SAVED WAYP CONFIRM DEL 9 Press the Menu Select button directly below YES to delete The display shows ALL SAVED WAYP DELETED 10 Press the Menu Select button directly below BACK to return to previous Waypoint screen OR Press or the PTT button if preprogrammed to exit thi...

Page 47: ... HERE and press the Menu Select button directly below SEL 3 to the required waypoint and press the Menu Select button directly below SEL 4 The display shows the distance and bearing from the current to the selected coordinates 5 Press the Menu Select button directly below BACK to return to the previous Waypoint screen OR Press or the PTT button if preprogrammed to exit this menu Navigation Button ...

Page 48: ...eping tone every nine seconds radio unquenched until the trunking system returns to normal operation To continue in Failsoft to communicate with other talkgroups refer to the following procedure 1 Rotate the Channel Knob to change to a different repeater frequency 2 Press the PTT button to talk and release the button to listen When the trunking system returns to normal operation your radio automat...

Page 49: ...f the system it can no longer lock onto a control channel 1 A low pitched tone sounds AND OR The display shows the currently selected zone channel combination and OUT OF RANGE 2 Your radio remains in this out of range condition until It locks onto a control channel OR It locks onto a failsoft channel OR It is turned off ...

Page 50: ...can also maintain a minimum backlight level on the radio s display Note The backlight setting also affects the Menu Select buttons the Menu Navigation buttons and the keypad backlighting accordingly Press the button to toggle the backlight off or on OR Press any key of the keypad the Menu Select or Menu Navigation buttons or any programmable radio controls or buttons to turn the backlight on Navig...

Page 51: ...e disabled entirely for each radio mode by a qualified radio technician Note You will hear a brief low pitched warning tone four seconds before the transmission times out 1 Hold down the PTT button longer than the preprogrammed time You hear a short low pitched warning tone the transmission is cut off and the LEDs goes out until you release the PTT button 2 Release the PTT button The LEDs relight ...

Page 52: ...3 to RADIO INFO and press the Menu Select button directly below SEL 4 The display shows the Information screen 5 to scroll through the various information OR Press the Menu Select button directly below BACK to return to previous screen OR Press to exit and return to the home display Navigation Button Navigation Button Home Button Channel Knob Menu Select Button ...

Page 53: ...or for more information Press the preprogrammed Info button and proceed to Step 3 OR 1 to INFO 2 Press the Menu Select button directly below INFO 3 to IP INFO and press the Menu Select button directly below SEL 4 to scroll through the various information OR Press the Menu Select button directly below BACK to return to previous screen OR Press to exit and return to the Home display Navigation Butto...

Page 54: ...or for more information Press the preprogrammed Info button and proceed to Step 3 OR 1 to INFO 2 Press the Menu Select button directly below INFO 3 to IP INFO and press the Menu Select button directly below SEL 4 to scroll through the various information OR Press the Menu Select button directly below BACK to return to previous screen OR Press to exit and return to the Home display Navigation Butto...

Page 55: ...ly selected channel 1 to INFO 2 Press the Menu Select button directly below INFO 3 to CONTROL MAP and press the Menu Select button directly below SEL 4 to scroll through the various information OR Press the Menu Select button directly below BACK to return to previous screen OR Press to exit and return to the Home display Navigation Button Home Button Menu Select Button ...

Page 56: ...to edit the current Soft ID OR Press the Menu Select button directly below BACK to return to the previous screen 6 A blinking cursor appears in the EDIT SOFT ID screen Use the keypad to edit the text Press to move one space to the left Press to move one space to the right Press the Menu Select button below DEL to delete any unwanted characters Press to add a space Press to toggle between mixed cas...

Reviews: