


How to Keep Your Dishwasher in Shape
It is recommend that you run a wash cycle with the
dishwasher empty and then remove the plug from the
socket, turn off the water supply and leave the door of
the appliance slightly open. This will help the door
seals to ast longer and prevent odours from forming
within the appliance.
If the appliance must be moved, try to keep it in the
vertical position. If absolutely necessary, it can be
positioned on its back.
One of the factors that cause odors to form in the
dishwasher is food that remains trapped in the seals.
Periodic cleaning with a damp sponge will prevent this
from occurring.
8.Installation instruction
8.Installation instruction
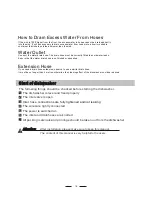
After every wash, turn off the water supply to the
appliance and leave the door slightly open so that
moisture and odors are not trapped inside.
Before cleaning or performing maintenance, always
remove the plug from the socket.
To clean the exterior and rubber parts of the dishwasher,
do not use solvents or abrasive cleaning products.
Only use a cloth with warm soapy water.
To remove spots or stains from the surface of the
interior, use a cloth dampened with water with a little
vinegar, or a cleaning product made specifically for
dishwashers.
After Every Wash
Remove the Plug
No Solvents or Abrasive Cleaning
Moving the Appliance
Seals
When it is not in need for a long time
15
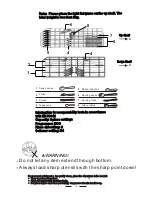
The installation of the pipes
and electrical equipments
should be done by professionals.
Warning
Electrical Shock Hazard
Disconnect electrical power
before installing dishwasher.
Failure to do so can result in
death or electrical shock.
Attention:
The installation position of dishwasher should be near the existing inlet and drain
hoses and power cord.
One side of the cabinet sink should be chosen to facilitate the connection of drain
hoses of the dishwasher.
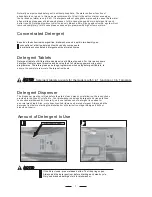
Installation preparation
Installation preparation
Cleaning the Spray Arms
Open
Open
It is necessary to clean the spray arms regularly for hard
water chemicals will clog the spray arm jets and bearings.
To remove the lower spray arm, pull out the spray arm upward.
To remove the upper spray arm, hold the nut, rotate the arm
clockwise to remove it.
Wash the arms in soapy and warm water and use a soft brush to
clean the jets. Replace them after rinsing them thoroughly.