


Set temperature
During working status, press
“ / “,the display shows ” 23 “ as default. Press ” / “ to set
desired temperature (temperature range 10-49
℃
), press
“ “ to confirm the setting.
For example
:
The current ambient temperature is 15
℃
, when set temperature to 25
℃
, the display shows as below:
If cancel the temperature setting, press the " " key to work in the low or high heating position. At the same
time, the digital tube displays "--", and the "
℃
" indicator goes out.
Set weekly program (ONLY by remote control)
After complete setting of current TIME/DAY, below is the steps to set weekly program:
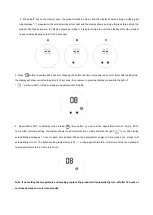
1)
Press ”
“, the product enters into working status.
2)
Press “
“, the display shows ”P“, it enters into weekly program setting: See below image A
3) Press
”
“, the display shows d1~d7, set to working day(Monday-Sunday: d1~d7). Such as set Monday:,
See below image B
4)
Press”
“, the display shows P1~P6 (for each day, it can be set maximum 6 time periods). Such as setting
P1: See below image C
5)
Press
”
“,the display shows 00”as default. Press”
“ continuously to set the turn-on time. Such as set
the turn-on time 7:00am (Memo: the setting time 0
0
-24 for choice): See below image D
6)
Press” “,the display shows the pervious step turn-on time by default. Press”
“ continuously to set the
turn-off time. Such as set the shutdown time at 13:00pm (See below image E). Note: turn-off time later than
turn-on time, when turn-on time same as turn-off time, the unit remains in standby mode.
7) Repeat steps
3
-
6
above,
and
you can set the whole weekly program
for e
ach day
accordingly.
8)
After above setting, press “
“ choose the unit turn-on day of the week, then press “
“ to choose the
turn-on time of the day,
then Press ”
/ “ to set desired temperature (temperature range 10-49
℃
),press
”
to confirm the setting.
9) To cancel the weekly function, press the "
"
and t
he light "P" will go off. The weekly program is off. The
product will revert to the previous function working status.
Note:
-After the above setting are completed and P program is working, press
” /
“ to check the setting time of
each day and time periods.
- The turn-on time periods 00~24hours, cannot set to minutes.
-The
“TIME/OFF” cannot be less than “TIME/ON”.
-When the
“TIME/ON” is the same as “TIME/OFF”, the time period enter into standby mode.
Note: If main switch off, power cut off, or plug out, it needs reset. You can press
to check and set the Time /
Day.