10
1.3.
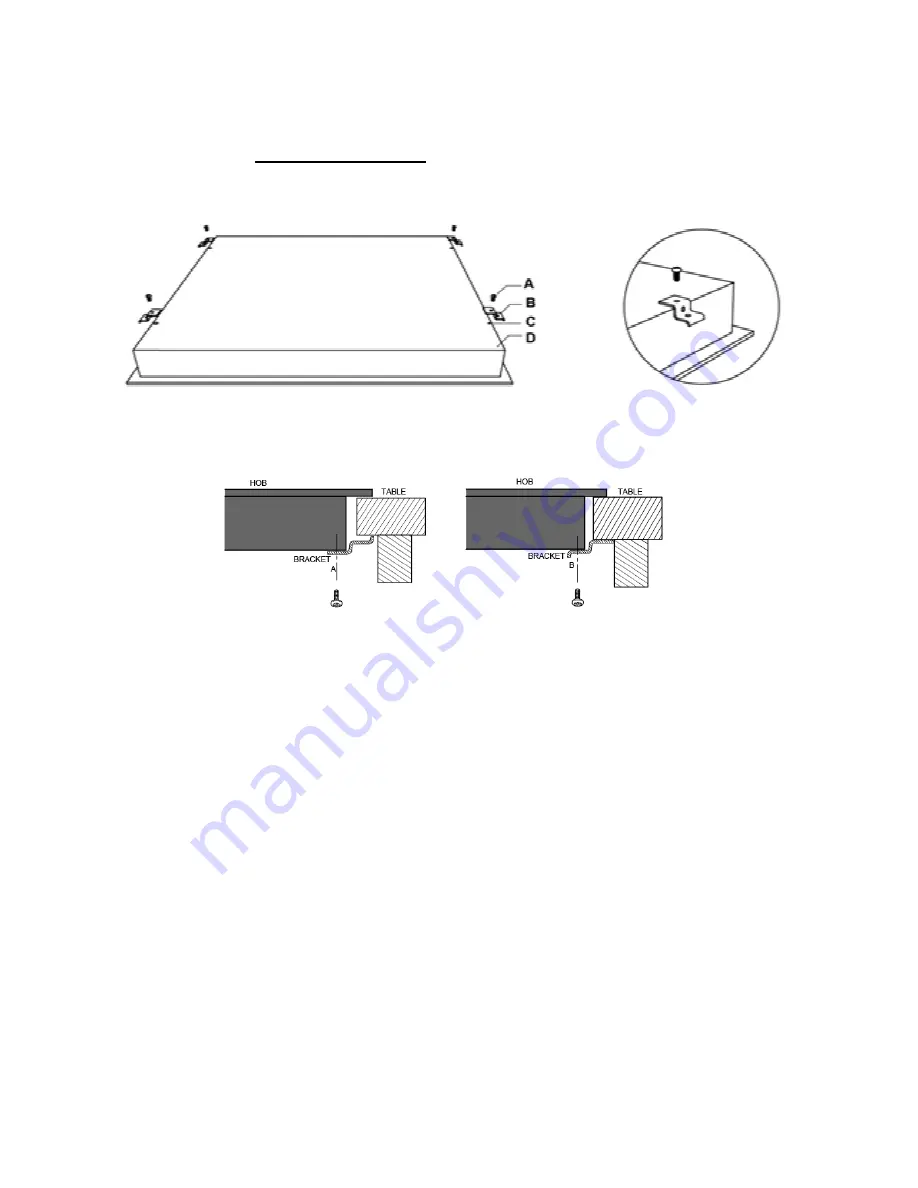
Fixing Brackets
-
Fix the brackets as shown below:
a) Screw b) Bracket c) Screw Hole d) Base of hotplate
Page 1: ...re attempting to install or use this appliance It is advisable to keep these instructions in a safe place for future reference N B Should your appliance require attention our service agents will not b...
Page 2: ...place for future reference Included is some important safety information in addition to guidelines and recommendations that will enable you to take full advantage of all the functions available This...
Page 3: ...Call out where a fault cannot be found with the appliance Cost of Call out for work covering routine maintenance such as but not exclusively cleaning of filters or defrosting Cost of Call out for wor...
Page 4: ...4 Description Of The Appliance a MON CT251 1 1200W Cook Zone 2 1800W Cook Zone 3 Function Controls 4 Ceramic Glass Plate 1 2 3 4...
Page 5: ...5 b MON CT451 1 1200W Cook Zones 2 1800W Cook Zones 3 Function Controls 4 Ceramic Glass Plate 1 2 4 3 1 2...
Page 6: ...6 c MON CT785 1 1200W Cook Zones 2 1800W Cook Zones 3 2200 1000W Cook Zone 4 Function Controls 5 Ceramic Glass Plate 2 1 2 4 3 1 5...
Page 7: ...7 CONTENTS Section 1 Installation Section 2 Safety Advice Section 3 Operating the Appliance Section 4 Maintenance...
Page 8: ...t regulations Your installer will connect the power cable in accordance with the current regulations To install this appliance please proceed as follows 1 1 Work Surface Cut Out Cut out the work top a...
Page 9: ...9 A B C D E F 268 4 0 mm 500 4 0 mm 50mm mini 50mm mini 50mm mini 50mm mini 1 1 2 MON CT451 MON CT785 1 2 Space to Rear or Side Wall A 760mm B 50mm min C 20mm min D Air Gap Intake E Air Exit 5mm...
Page 10: ...10 1 3 Fixing Brackets Fix the brackets as shown below a Screw b Bracket c Screw Hole d Base of hotplate...
Page 11: ...rd wired into a suitable fused spur see diagrams below for fuse ratings adjacent to the appliance housing The product must be installed by a Qualified Electrician Please note that a switchable spur sh...
Page 12: ...important that you use only metal pans specifically designed and or approved for use on Ceramic Hobs Never allow melamine or plastic containers to come in contact with the heat zones If using an adapt...
Page 13: ...ON CT251 1 Cook Zone Selection Controls 2 Timer Control 3 Power Timer Regulation Controls 4 Child Lock Control 5 On Off Control 3 1 2 MON CT451 1 Cook Zone Selection Controls 2 Power Timer Regulation...
Page 14: ...elamine or plastic containers to come in contact with the heat zones 3 2 2 Setting the Zone Temperature For models CT251 CT451 press the required heat zone and then use the or to increase or decrease...
Page 15: ...operate for the selected time and automatically turn off at the end of the period An audible signal will also be heard at the end of the time period If you need to cancel prior to the end of the set...
Page 16: ...e set and the appliance will not operate To unlock the Child Lock simply press and hold the Child Lock control again until the display is removed 3 2 5 Hot Surface Warning Indicator Please note a hot...
Page 17: ...use a specialist vitro ceramic glass cleaner available from all good supermarkets Do not use other abrasive cleaners and or wire wool etc as this may scratch the surface of the hob 4 2 What to do if s...
Page 18: ...return it with a stamp affixed or Alternatively you can Register online at www repairtechuk com SERVICE HELP LINE Should your appliance develop a fault please call the Repairtech Service Helpline on 0...
Page 19: ...this appliance may not be treated as household waste Instead it shall be handed over to the applicable collection point for the recycling of electrical and electronic equipment Disposal must be carrie...