


1
Safety and Care Advice
Important -
Please read this instructions fully before starting assembly
•
Assembly time: approx. 40 mins.
•
Retain these instructions for future reference.
•
For outdoors use only – do not use indoors. Do not use below ground level and confined spaces.
•
For use with LPG bottled gas only. A regulator of 37mbar must be used for propane.
•
Do not use within 1m of any flammable structure or surface.
•
LP gas cylinders should not be placed directly underneath the barbecue.
•
LP gas cylinders must not be stored or used in the horizontal position. A leak would be very serious
and liquid could enter the gas line.
•
When igniting barbecue open its hood before lighting.
•
Do not move the barbecue while alight.
•
This barbecue must not be left unattended when lit.
•
The hood handle can become very hot. Grip only the centre of the handle. Use of a cooking glove is
advised.
•
Use caution when opening the hood, as hot steam inside is released upon opening.
•
Parts of this barbecue become very hot – care must be taken when children, elderly people, and ani-
mals are present.
•
Always turn off the gas bottle when the barbecue is not in use.
•
Never cover a barbecue until it has completely cooled.
•
Never use the barbecue with the side shelf in the down position.
•
Leak test annually, and whenever the gas bottle is removed or replaced.
•
Do not store flammable materials near this barbecue.
•
Do not use aerosols near this barbecue.
•
Failure to follow the manual’s instructions could result in serious injury or damage.
•
If you have any queries regarding these instructions, contact your local dealer.
This barbecue can use only propane LPG bottled gas. Propane bottles will supply gas all year round,
even on cold winter days. A spanner may be required to change gas bottles. The bottle should never be
stood on the trolley base and placed directly under the barbecue. Gas bottles should never be stored or
used laid on their side. Never store gas bottles indoors.
YOU MUST HAVE THE PROPER REGULATOR AND BOTTLE IN ORDER FOR THE BARBECUE TO
OPERATE SAFELY AND EFFICIENTLY. USE OF AN INCORRECT OR FAULTY REGULATOR IS
DANGEROUS AND WILL INVALIDATE ANY WARRANTY. Please consult your local gas dealer for the
most suitable gas bottles.
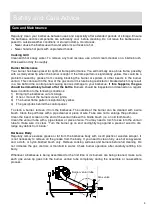
Installation
Selecting a Location
This barbecue is for outdoor use only and should be placed in a well-ventilated area. Take care to en-
sure that it is not placed UNDER any combustible surface. The sides of the barbecue should NEVER be
closer than 1 metre from any combustible surface. Keep this barbecue away from any flammable materi-
als!
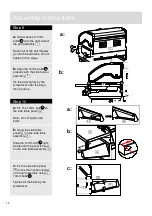
Precautions
Do not obstruct any ventilation openings in the barbecue body. Should you need to change the gas bot-
tle, confirm that the barbecue is switched off, and that there are no sources of ignition (cigarettes, open
flame, sparks, etc.) near before proceeding. Inspect the gas hose to ensure it is free of any twisting
Gas and Regulator