

10. Wait for the printer to warm up and initialize. When
it is ready, it will show
Printer ready at the bottom of
the LCD display. Press the knob to activate the menu
system. Rotate the knob until the Position entry is
highlighted, then press the knob to select it. Rotate the
knob again until Z. Pos. Fast is displayed, then press the
knob to select it. Turn the knob clockwise to raise the
extruder so that you can easily access the plate. Once
you can easily access the plate, depress the O side of
the power switch to turn the printer OFF.
11. One by one, squeeze each corner of the plate and
tighten the wingnut to compress the spring and reduce
the distance between plates to the minimum. Next,
wipe the top of the plate with a clean, lint-free cloth to
ensure no dust particles or other objects are on the
plate. Peel the backing from one of the sheets of
platform tape and carefully apply it to the top of the
plate, taking care to ensure that no air bubbles exist.
12. Depress the I side of the power switch to turn the
printer ON. Once the printer is ready, press the knob to
open the menu system. Rotate the knob to highlight the
Position entry, then press the knob to select it. Rotate
the knob to highlight the Home All entry, then press the
knob to select it. Once the extruder has reached the
home position, press the O side of the power switch to
turn the printer OFF.
13. With the printer powered OFF, physically move the
extruder to one of the corners of the platform. Slowly
loosen the wingnut on that corner to raise the platform
until it almost touches the nozzle. The proper distance is
achieved when you can slide a single sheet of paper
between the nozzle and the platform.
14. Move the extruder to each other corner and repeat
the process. Move the extruder to the center of the
plate and test the gap with a sheet of paper. Test the
gap distance at various points around the plate and
adjust the wingnuts on each corner as necessary to
create the proper gap and level the plate. Keep
adjusting and testing until the proper gap is present at
all points.
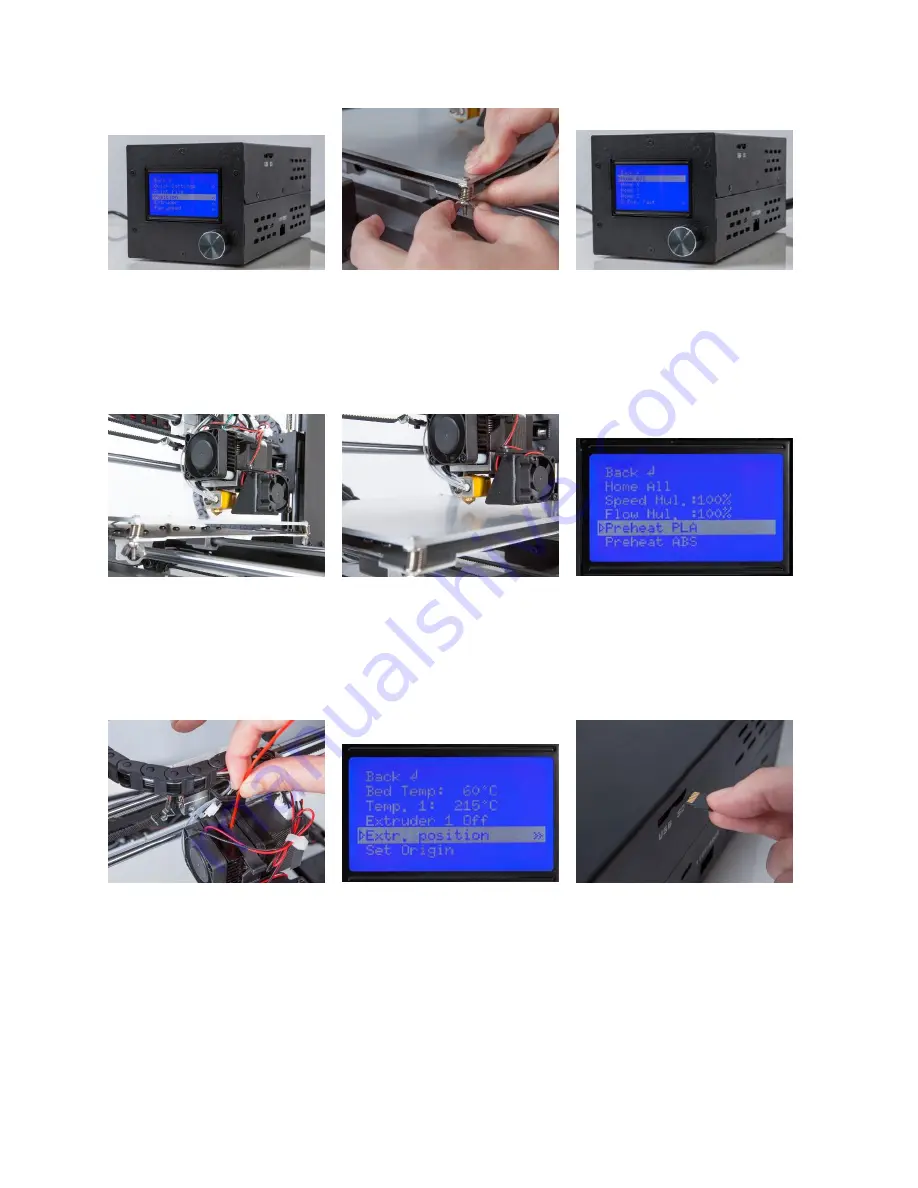
15. Depress the I side of the power switch to turn the
printer ON. Once it has initialized and is ready, press the
knob to open the menu system. Raise the extruder by
following the instructions in step 10 above. Rotate the
knob to highlight the Quick Settings entry, then press
the knob to select it. Rotate the knob again to highlight
the Preheat PLA entry, then press the knob to select it.
Note that the screen will not change immediately, but
will return to the home screen and display
Preheat PLA
at the bottom after about 15-30 seconds.
16. Check the temperatures of the extruder and plate on
the LCD display. When the temperatures reach to within
a few degrees of the targets, you are ready to insert
filament. (Note that the display will still show
Preheat
PLA, even after the temperatures have reached the
target values.) Carefully insert the included filament
sample into the hole on the extruder, as shown.
17. While holding the filament in place with one hand,
press the knob on the Power Supply to activate the
menu system. Turn the knob to highlight the Extruder
entry, then press the knob to select it. Turn the knob
again to highlight the Extr. Position entry, then press the
knob to select it. Push gently downward on the filament
while turning the knob clockwise. You will feel the
filament being pulled into the extruder. Continue until a
few inches of filament material extrudes out of the
nozzle. Carefully clean the extruded filament material
off the plate and nozzle.
18. Insert the included MicroSD card into the slot on the
side of the Power Supply. Press the knob to open the
menu system. Rotate the knob to highlight the SD Card
entry, then press the knob to select it. Rotate the knob
to highlight the Mount Card entry, then press the knob
to select it. Rotate the knob to the Print file entry, then
press the knob to select it. Finally rotate the knob to
select one of the sample 3D model files, then press the
knob to start printing.
To obtain the full manual, please visit
www.monoprice.com, type 13860 into the search field,
then download the pdf manual from the product page.


