background image

H

ARDWARE 

S

ETUP 

P

ROCESS


Follow these steps to quickly install your new

 USB 3.0 Dock

ing Station.

1.

Ensure that the Docking Station is NOT connected to your computer. Do not 

connect it until instructed to do so.

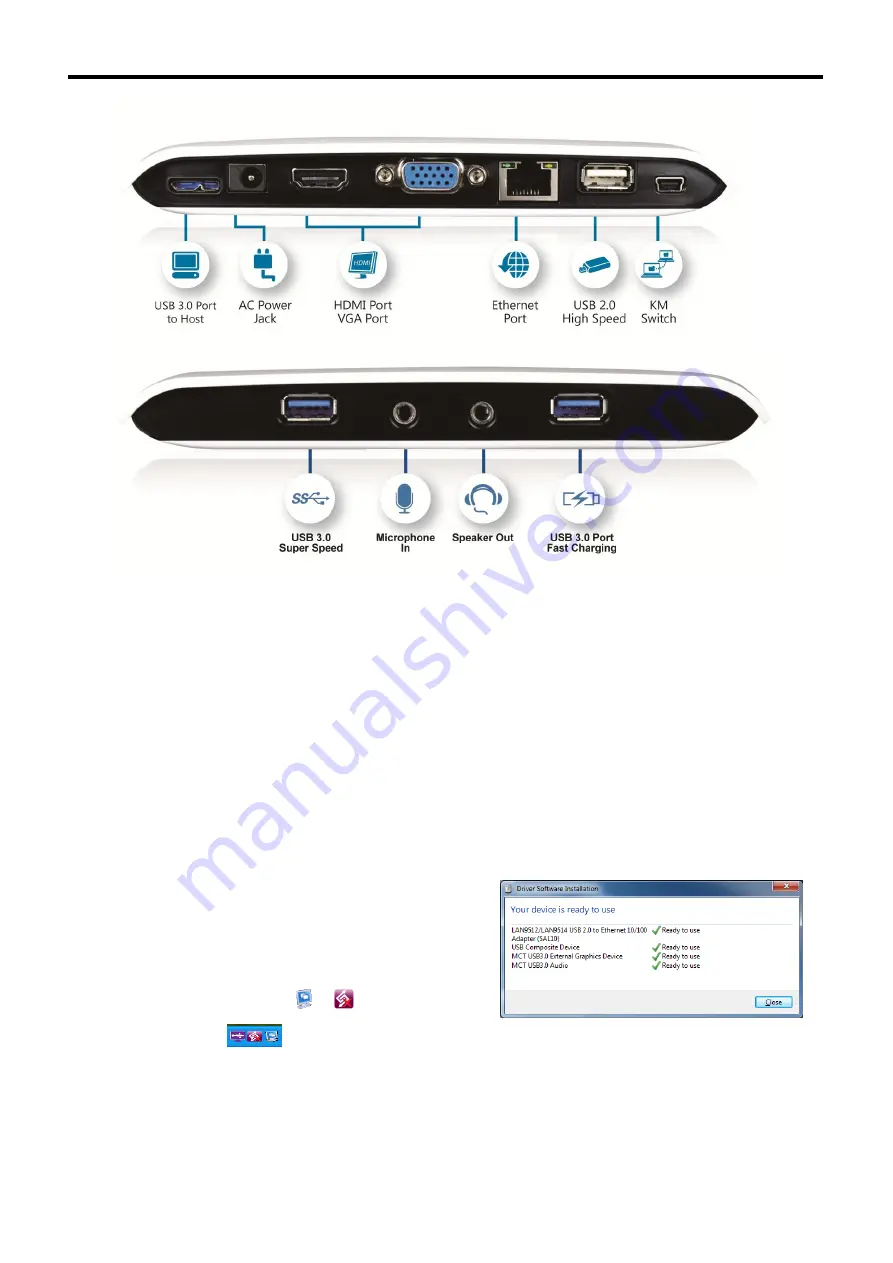
2. Insert the driver CD and follow the instructions to install the device driver.
3. Connect the 2

nd

 display device (monitor/projector) to the VGA or HDMI connector of


USB  3.0  Video  Dock  and  switch  it  on.  Then,  plug  the  power  adapter  (4A/5V) 

in

to 

the


USB 3.0 Dock

ing Station

.

4. After system reboot, 

plug the

 USB 3.0 micro-B 

cable in

to 

the Docking Station


and 

plug 

the 

other end in

to the USB

port o

n

 your computer (host PC).  The device

driver will be configured automatically.
After driver configuration, the USB 3.0 

Docking Station 

is ready to use.

5.

  under the 

hidden icons” on Windows 7/8, and the icons on the lower 

You will see two icons


“Show
right toolbar

on Windows XP.     

If

 the extended display 

is blank

 or 

duplicate 

of your main 

screen, right


click the 

desktop of your system, 

select

 ”Screen


resolution” 

from the menu i

n Windows 7/8 or 

“Properties” 

i

n Windows XP 

and

 select “Extend these


displays” on 

Display 

Propert

ies

”.

USB 3.0 DOCKING STATION

Summary of Contents for 11501

Page 1: ......

Page 2: ... 15 USB TO ETHERNET 15 USB TO AUDIO 15 ACCESS USB 3 0 DISPLAY DEVICE UTILITY 15 DISPLAY ID Smart Display Device ID Detection 15 DISPLAY RESOLUTION Fast Access to Display Resolution Setting 15 DISPLAY ROTATION 16 DISPLAY MODES 16 IDENTIFY MONITORS 17 MULTI DISPLAY CONTROL PANEL 17 DISPLAY SETTINGS 18 FIXED POSITION 18 K KM M S SW WI IT TC CH H 19 FUNCTION LIST 19 GETTING STARTED MAC 19 GETTING STAR...

Page 3: ......

Page 4: ...g Station 4 After system reboot plug the USB 3 0 micro B cable into the Docking Station and plug the other end into the USB port on your computer host PC The device driver will be configured automatically After driver configuration the USB 3 0 Docking Station is ready to use 5 under the hidden icons on Windows 7 8 and the icons on the lower You will see two icons Show right toolbar on Windows XP I...

Page 5: ...0 16 32 bits 4 3 1400 x 1050 16 32 bits 5 4 1280 x 1024 16 32 bits 4 3 1280 x 960 16 32 bits 4 3 1152 x 864 16 32 bits 4 3 1024 x 768 16 32 bits 4 3 800 x 600 16 32 bits Monitor refresh frequency 60 Hz Resolution 1152 x 864 is 75Hz N NO OT TE ES S Do not connect the Docking Station to a USB hub Connect directly to the USB port on your motherboard or expansion card A System reboot is required for t...

Page 6: ...indows Vista 7 8 operating system Please make sure the USB 3 0 Docking Station is unplugged from your PC or Notebook before you run the setup program Step 1 Insert the included CD into the CD ROM drive the setup program should launch automatically If the setup program does not begin automatically click Start Run and enter D setup exe where D is the path of your CD ROM drive and then click OK Step ...

Page 7: ... 3 0 Docking Station and switch it on Connect the AC power adapter to USB 3 0 Docking Station and plug it into an AC power outlet Plug the USB 3 0 Docking Station into an available USB 3 0 port on your computer The device driver software setup will begin automatically After the driver is configured you click Show hidden icons and see two icons on the taskbar The extended display will be shown on t...

Page 8: ...ver installation Right click Computer Properties Device Manager Connect the USB 3 0 Docking Station then double click Network adapter Sound video and game controllers and Universal Serial Bus controllers Begin verification by making sure the highlighted devices were added to the system USB 3 0 DOCKING STATION ...

Page 9: ...tings Control Panel Program and Features Select Installer for USB Graphics Device LAN 12 x x xxxx 0185 driver version number item Click Uninstall button Step 2 Click OK to continue Step 3 Select Yes I want to restart my computer now and click Finish to reboot After reboot the driver un installation will be complete USB 3 0 DOCKING STATION ...

Page 10: ...unning the Windows XP operating system Please make sure the USB 3 0 Docking Station is unplugged from your computer before executing the setup program Step 1 Insert the included CD into the CD ROM drive the setup program should launch automatically If the setup program does not begin automatically click Start Run and enter D setup exe where D is the path of your CD ROM drive and then click OK Step...

Page 11: ... the VGA or HDMI connector on the Docking Station and switch it on b Plug the USB 3 0 Docking Station into an available USB port on your computer The device driver will be configured automatically When the Hardware Installation Wizard dialog appears please select No not this time and click Next to continue Click Continue Anyway when the Microsoft Software warning dialogue box appears Then click Fi...

Page 12: ...on Click My computer Properties Hardware Device Manager Connect the USB 3 0 Docking Station then double click Display adapters Network adapter Sound video and game controllers and Universal Serial Bus controllers Begin verification by making sure highlighted devices were added to the system USB 3 0 DOCKING STATION ...

Page 13: ...13 USB 3 0 DOCKING STATION ...

Page 14: ...Panel Add or Remove Programs Select Installer for USB Graphics Device LAN 12 x x xxxx 0185 driver version number item Click Remove button Step 2 Unplug the USB 3 0 Docking Station and click OK to continue Step 3 Select Yes I want to restart my computer now and click Finish to reboot After reboot the driver un installation will be complete USB 3 0 DOCKING STATION ...

Page 15: ... DISPLAY DEVICE UTILITY Make sure the USB 3 0 Docking Station is attached to the computer You should see these icons under the Shown hidden icons on Windows 7 or these icons on the lower right toolbar on Windows XP Right click the icon to access the various functions of the Docking Station DISPLAY ID Smart Display Device ID Detection The USB 3 0 Docking Station supports VESA defined DDC EDID The u...

Page 16: ...rimary display mirroring the display The screen resolution setting of the second display will be the same as the main screen s resolution PRIMARY DISPLAY MODE This feature allows you to set the display connected to the docking station as the primary display The display connected directly to your computer will then function as the extended or mirrored display Please be advised that some display uti...

Page 17: ...per right corner of all attached display devices MULTI DISPLAY CONTROL PANEL A series of hotkeys allows you to quickly move the active window or cursor to the desired display The default hotkeys can be found in the Hotkey List of Multi Display Control Panel For example Ctrl 2 means to move the window to the Display 2 USB 3 0 DOCKING STATION ...

Page 18: ...reen resolution a or go to START Control Panel Appearance and Personalization Adjust screen resolution b Then select Extend these displays on the Display Properties You also can press key and tap P to select the display modes in Windows 7 8 FIXED POSITION It will retain the last setting of the display location after the computer is restarted USB 3 0 DOCKING STATION ...

Page 19: ...yboard sharing Yes Yes Yes Clipboard Sharing Text Share Yes X X Picture Share Yes X X Data Transfer Drag and Drop Yes X X GETTING STARTED MAC Follow the steps below to start the application 1 Connect to the Mac computer Plug the included USB 2 0 mini B cable into the Docking Station Plug the other end into a USB port on the second computer 2 When you initially connect the Docking Station to a Mac ...

Page 20: ...20 USB 3 0 DOCKING STATION ...

Page 21: ...21 Tips You can change the setting Go to System Preferences Keyboard change the keyboard Type USB 3 0 DOCKING STATION ...

Page 22: ...llow the steps below to start the application 1 Connect to the 2nd Windows computer Plug the included USB 2 0 mini B cable into the Docking Station Plug the other end into a USB port on the second computer 2 The device will either automatically start the USB Magic Switch software installation on both computers or an AutoPlay option window may appear If the Autoplay window appears click the Run SKL...

Page 23: ...nnected to the USB cable to start Go to My Computer and double click the USB Magic Switch icon the application If the User Account Control window appears click Yes to continue When the USB Magic Switch is connected properly you will see a pop up balloon that shows The connection has been made USB 3 0 DOCKING STATION ...

Page 24: ... Switch the Keyboard to another computer Use the keyboard of the first computer to type on the second computer Note Please use a Mouse and Keyboard set because the Keyboard Switch function always follows the mouse cursor of the same computer Icon When the keyboard mouse is being controlled by the other computer Clipboard Sharing o Copy the selected content text or pictures on the 1st computer and ...

Page 25: ...ngs on your computer operating system For example 1 Copy from Mac to Windows Press the Command C keys on the Mac and press Control V keys to paste the content onto the Windows PC 2 Copy from Windows to MAC Press the CTRL C keys on the Windows PC and press Command V keys to paste the content onto the Mac Magic Bridge You can see the file system of the other computer in Magic Bridge To click the ico...

Page 26: ...low the steps below 1 Connect the USB Magic Switch to the USB connection kit 2 Connect the USB connection kit to the iPad 3 Press Alt S on the computer to switch the Keyboard to the iPad 4 Touch the screen on the iPad to the location you want to start 5 Now you are ready to type on the iPad SETTING INSTRUCTIONS Utility Icon function To begin setup please click the USB Magic Switch Utility Icon USB...

Page 27: ...unctions the icon will be shown Preferences For detailed function settings please refer to Preference setup section Your settings will be saved when you restart your computer Check New Update Online Update Check for and update the latest version of software for Wormhole 1 Please make sure your network is available and Do Not unplug the Magic Switch during the driver update 2 Remove the Wormhole ca...

Page 28: ...ing o Use Mouse to Move Off the Edge of Screen To switch the control of Keyboard and Mouse from one computer to another simply move the mouse off the edge of the screen o Use Mouse Middle Button Click the middle button of the mouse to switch the keyboard and mouse from one computer to another o Hotkey You can setup the hotkey to activate the control switching The default hotkey is Alt S USB 3 0 DO...

Page 29: ...ge when you start up the device o Resident This Application Choose to automatically setup every time when the device is plugged in o Enable Access for System Hotkey this option is for Mac OS X only Choose this setting to activate the Hotkey function o Double Click the System Tray Icon to Turn Sharing On Off Temporarily Enable disable the clipboard sharing and Keyboard and Mouse control on the bott...

Page 30: ...er to the extended desktop A Check that you have moved the Media Player window completely over to the second screen Also make sure to enable the Aero mode in Windows 7 8 Q Why does my mouse not move past the right side of the screen as it should on the extended desktop A Check the display settings and make sure that your display numbered 2 is on the right side of display numbered 1 You can rearran...

Page 31: ... port and or computer Unplug all other USB devices from the system Try connecting the USB cable of the Docking Station directly to the computer instead of through a hub Reset refresh resynchronize your monitor Media Playback During video playback on all platforms please do not change the display mode position or arrangement of the video player window such as dragging the video player window betwee...

Page 32: ...c http sourceforge net projects guliverkli Others Some graphics card i e Intel prevent other secondary graphics chipsets from being set as the primary card As the result of this primary mode might not work or the display may be disabled If you have problems during the boot up process start your computer in Safe Mode and uninstall the driver Hold the CTRL key until the Windows startup menu appears ...

Page 33: ... IEC 61000 4 11 2004 C Tick This equipment is in compliance with the requirements of the following regulations AS NZS CISPR22 2009 Class B VCCI The energy emitted by this equipment was passed both Radiated and Conducted Emissions Class B ITE limits Disclaimer Information in this document is subject to change without notice The manufacturer does not make any representations or warranties implied or...

Reviews: