background image

Design Guide

5

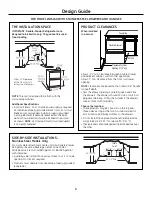
THE INSTALLATION SPACE

IMPORTANT: Double-Drawer Refrigerators are
designed to be built-in only. They cannot be used
free-standing.

NOTE:

The drawers should be flush with the surrounding

cabinets.

Additional Specifications

• A 120 volt 60Hz., 15 or 20 amp power supply is required.

An individual properly grounded branch circuit or circuit
breaker is recommended. Install a properly grounded
3-prong electrical receptacle recessed into the back
wall as shown. Electrical must be located on rear wall
as shown.

NOTE:

GFCI (ground fault circuit interrupter)

is not recommended.

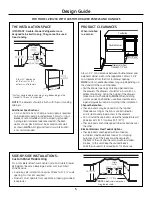
PRODUCT CLEARANCES

When installed
in a corner:

Allow 2-1⁄2" min. clearance between Double-Drawer and
adjacent cabinet, wall or other appliances. Allow 23-1⁄8"
min. clearance from the front for drawer opening.

NOTE:

Custom handle clearances may vary depending on

the standoff of the custom handles.

• Test the drawer openings. Carefully open and close

the drawers. The drawers should not rub or catch on
adjacent cabinetry. Notify the installer if the drawers
make contact with cabinetry.

NOTE:

When installing

custom panels and handles, use above clearances as
a general guide but adjust according to the installation.

Choose the location:

• These products may be closed in on the top and

three sides as long as the front is unobstructed for
air circulation and proper access to the drawers.

• Do not install these products where the temperature will

go below 55°F (13°C) or above 90°F (32°C).

• These products are not designed to be stacked one over

the other.

Black or Stainless Steel Toekick Options

• These products are shipped with two toekicks,

a stainless steel and a black toekick. For shipping
purposes, one of the toekicks will be secured to
the back of the unit and the second will be installed,
in place, on the unit. Keep the unused toekick,
and other unused or removed parts, for future use.

Allow 22" clearance
at the front for full
extension of drawers.

FOR MODEL ZIDI240 WITH CUSTOM DRAWER PANELS AND HANDLES

Clearance for Door

Opening 2-1/2" min.

Countertop

Double-Drawer

23-1/8" min.

*Custom handle clearances may vary, depending on the

standoff of the custom handles.

SIDE-BY-SIDE INSTALLATIONS –

Custom Panel Models Only

For a complete refreshment center, install a Double-Drawer
Refrigerator beside a Beverage Center or Wine Chiller/
Wine Reserve.

• A side-by-side installation requires at least a 47-1/2" wide

opening. No trim kits required.

• Products must operate from separate, properly grounded

receptacles.

34-1/2"-35"

24"

47-1/2" Min.

1-1/2"

9"

10-1/2"

9"

10-1/2"

14"

15"

Locate

Outlet

*NOTE:

Additional clearances

may be required.

Summary of Contents for ZIDI240

Page 1: ...Design Guide with Installation Instructions Double Drawer Built In Refrigerator ZIDI240 ZIDS240 monogram com ...

Page 2: ... sont conçus pour être encastrés uniquement Ils ne peuvent pas être séparés Il ne faut utiliser cet appareil que pour l usage pour lequel il a été construit Il faut réparer ou remplacer immédiatement tout cordon d alimentation électrique effiloché ou endommagé Débrancher le bar ou le réfrigérateur a vin avant le nettoyage ou toute intervention Les réparations doivent être faites par un technicien ...

Page 3: ...roduct into Cutout 8 Step 6 Set Temperature Controls 8 Important Information ZIDI240 MODEL ONLY PARTS REQUIRED Custom handles Overlay panels Spacer panels Backer panels Screws PARTS SUPPLIED Drawer side trims Optional black or stainless steel toekick TOOLS REQUIRED Adjustable wrench Carpenter s glue ZIDI240 model only Screwdriver ZIDI240 model only CARING FOR YOUR STAINLESS STEEL Before installati...

Page 4: ...wers The drawers should not rub or catch on adjacent cabinetry Notify the installer if the drawers make contact with cabinetry Choose the location These products may be closed in on the top and three sides as long as the front is unobstructed for air circulation and proper access to the drawers Do not install these products where the temperature will go below 55 F 13 C or above 90 F 32 C These pro...

Page 5: ...Choose the location These products may be closed in on the top and three sides as long as the front is unobstructed for air circulation and proper access to the drawers Do not install these products where the temperature will go below 55 F 13 C or above 90 F 32 C These products are not designed to be stacked one over the other Black or Stainless Steel Toekick Options These products are shipped wit...

Page 6: ...Backer 23 3 16 14 11 16 0 10 Spacer 22 1 2 14 3 16 3 4 Overlay 23 5 8 15 1 16 6 STEP 1 REMOVE PACKAGING Remove corner blocks and foam drawer stops Remove all packing material tape and protective plastic coverings CAUTION Small objects are a choke hazard for children Remove and discard any parts not used ATTENTION Les petits objets peuvent étrangler les enfants Il faut jeter toutes les piéces qui n...

Page 7: ...and raise or lower the leveling legs Measure floor to countertop height inside the opening Adjust leveling legs until the product is approximately 1 8 less than countertop height INSTALLATION TIP Measure floor to underside of countertop inside the opening If the room floor is higher than the floor inside the opening adjust the rear leveling legs to approximately 1 8 less than the opening height Sc...

Page 8: ...o entangle power cord Check again to be sure the unit is level Adjust the leveling legs until the unit is resting firmly against the bottom of the counter to prevent rocking or movement during operation If alignment with adjacent cabinetry is an issue use a shim to secure the unit against the underside of the countertop STEP 4 CONNECT POWER Connect power cord plug to a properly grounded receptacle...

Reviews: