background image

Creating a Calibration Certificate

Creating a sensor calibration certificate will mask the calibration tab from those who should 

not have permissions to adjust these settings. Permissions for self-certifying a calibration 

must be enabled in user permissions. 

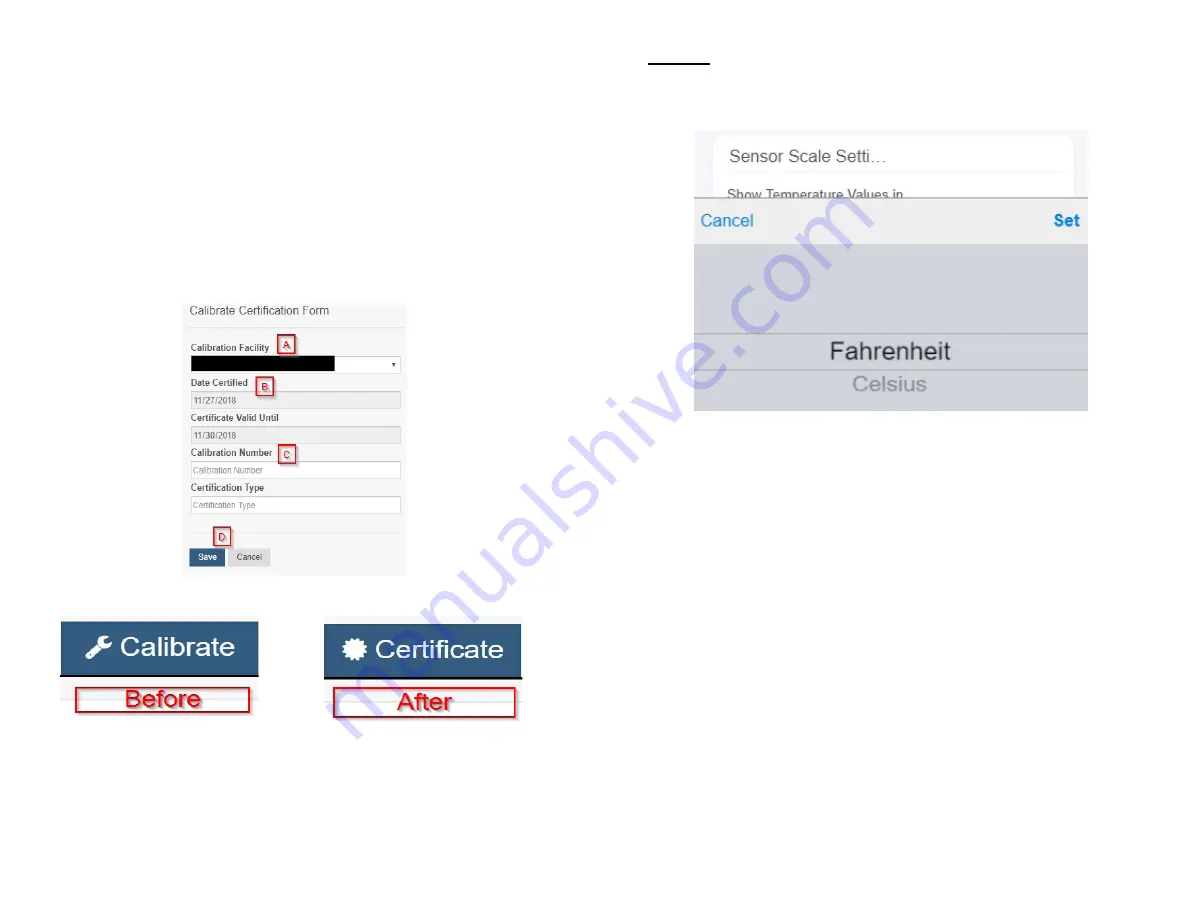
 Directly below the calibrate button is the selection to "Create Calibration Certificate.

A. 

The 

Calibration Facility Field 

will be filled. Select the drop-down menu to change your 

facility. 

B. 

The date for "

Certificate Valid Until

" must be set one day in the future after the date 

contained in the "Date Certified" field. 

C. 

"

Calibration Number

" and "Calibration Type" are unique values to your certificate. 

D.

 Choose the "

Save

" button before moving on. 

When the new certificate is accepted, the Calibration tab will change to a Certificate tab. 

You will still be able to edit the certificate by choosing the Certificate Tab and navigating 

down to "Edit Calibration Certificate."                                                                                                  

The tab will revert back to "Calibrate" after the period for the certificate ends.

PAGE  12

Scale View

H

2

S sensor settings are influenced by temperature, the scale option will be available in the 

tab bar. To change the temperature unit of measurement from Fahrenheit to Celsius or vice 

versa, select the Scale tab.

Choose the text box to trigger a pop-up window allowing you to change the scale. Select 

the scale you prefer and push “Set.”

Press the “Save” button to complete your adjustment. 

PAGE  13

Summary of Contents for ALTA H2S

Page 1: ...by ALTA Wireless H2 S Sensor User Guide...

Page 2: ...of 1 200 feet through 12 walls Frequency Hopping Spread Spectrum FHSS Interference immunity Power management for longer battery life 12 years on AA batteries Encrypt RF Security Diffie Hellman Key Ex...

Page 3: ...generate a unique symmetric key between each pair of devices Sensors and gateways use this link specific key to process packet level data with hardware accelerated 128 bit AES encryption which minimi...

Page 4: ...are powered by AA batteries Monnit encourages customers to recycle all old batteries When you are finished adding the sensor to your account the next step is to insert the battery The type of battery...

Page 5: ...cale Change the scale of readings for your sensor Details View The Details View will be the first page you see upon selecting which sensor you would like to modify Directly under the tab bar is an ove...

Page 6: ...ed below Gateway ID The Identifier of the gateway that relayed the data from the sensor Alert Sent Boolean indicating if this reading triggered a notification to be sent from the system Signal Strengt...

Page 7: ...selecting the Save button Note Be sure to select the Save button anytime you make a change to any of the sensor parameters All changes made to the sensor settings will be downloaded to the sensor on t...

Page 8: ...ation Type are unique values to your certificate D Choose the Save button before moving on When the new certificate is accepted the Calibration tab will change to a Certificate tab You will still be a...

Page 9: ...onnit reserves the right to repair or replace Products at its own and complete dis cretion Customer must obtain from Monnit a Return Material Authorization Number RMA prior to returning any Products t...

Page 10: ...tions this radio transmitter may only operate using an anten na of a type and maximum or lesser gain approved for the transmitter by Industry Canada To reduce potential radio interference to other use...

Page 11: ...lly the instruction for its use Do not insert or remove the SIM when the product is in power saving mode Every device has to be equipped with a proper antenna with specific characteristics The antenna...

Reviews: