monitoraudio.com
3
Initial Set Up
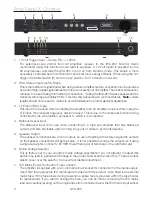
The optimal control settings will depend entirely on your system configuration, room environment
and personal tastes. However, for initial trials set the controls as follows:
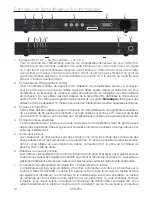
Volume Control
Should be set to approximately 10 o’clock.
Frequency Control
Should be set to the approximate frequency depending on
main speakers when using the L & R Line Level Inputs.
EQ
Should be set to Movies when connecting to an AV receiver
or Music when connecting to a stereo amplifier.
Cabinet
Should be set depending on whether or not you are using the
Monitor Audio back box or not.
Phase Control
Should be set to zero degrees.
Mode Switch
Should be set to ‘on’.
12v Trigger (optional)
Do not connect at this stage.
Input
Connections from the amplifier can be made at this stage
before the power is connected to the subwoofer. Refer to
items 2, 3 & 4 on page 4.
Never connect or disconnect the RCA input/ output leads with the amplifier switched on.
Set Up
Once the input cables are connected and the controls are set in accordance with the initial set-up
procedure above, the amplifier can be connected to the mains power supply and switched on at
the mains power switch.
Do not play any music or movies at this stage as the auto set up of the AV amp (if using one) will
need to be run. If your amp has an auto set up procedure, run this now ensuring the IWA-250 is
turned on. If you do not have an auto set up or are using a stereo amp connected to the left and
right inputs, set the crossover in accordance with your main speakers.
When the auto set up is complete, check that the subwoofer settings on the AV amp are correct.
The crossover frequency should be roughly 80Hz (although this may vary depending on the other
speakers within the system) and the level should be no more/ less than +/- 3dB. If not we would
suggest adjusting accordingly.
Now play a variety of music/ film excerpts that you are familiar with and adjust the level of the
amplifier to a point where it integrates with the rest of the system and to where you are happy. The
volume of the amp can then be adjusted to an average listening level once you are sure everything
is working correctly to double check your sub woofer level settings.
Experiment with the EQ switch as well to get the perfect sound for your environment and tastes.
ENGLISH
Summary of Contents for IWA-250
Page 1: ...o w n e r s m a n u a l IWB 10 IWS 10 IWA 250 m o n i t o r a u d i o c o u k...
Page 2: ......
Page 10: ...m a n u e l u t i l i s a t e u r IWB 10 IWS 10 IWA 250...
Page 18: ...m a n u a l e u t e n t e IWB 10 IWS 10 IWA 250...
Page 26: ...Bedienungsanleitung IWB 10 IWS 10 IWA 250...
Page 34: ...Manual del usuario IWB 10 IWS 10 IWA 250...
Page 42: ...manual do utilizador IWB 10 IWS 10 IWA 250...
Page 50: ...gebruikershandleiding IWB 10 IWS 10 IWA 250...
Page 58: ...IWB 10 IWS 10 IWA 250...
Page 59: ...IWA 250 57 57 58 58 58 59 59 60 62 63 63 monitoraudio com 57...
Page 60: ...IWA 250 58...
Page 61: ...12 4 2 3 4 IWA 250 80 3 monitoraudio com 59...
Page 63: ...8 IWA 250 9 10 35 2 30 3 40 11 12 W 12 0 13 15 12 IWA 250 15 14 2 15 monitoraudio com 61...
Page 65: ...LED LED 12 12 12 LED IWA 250 IWA 250 monitoraudio com 63...
Page 66: ...IWA 250 64 IWB 10 IWS 10 IWA 250...
Page 67: ...monitoraudio com 65 IWA 250 Monitor Audio 65 65 66 66 66 67 67 68 70 71 71...
Page 68: ...IWA 250 66...
Page 74: ......
Page 75: ......

