background image

24

58D6056

CSDV Series Direct Vent Gas Stove

CHECKING GAS pRESSURE and ELECTRICAL INSTALLATION

1.  Check gas type. The gas supply must be the same as 

stated on the appliance’s rating decal. If the gas supply 
is different from the fireplace, 

STOp!

 Do not install the 

appliance. Contact your dealer immediately.

2.  To ease installation, a 30" (mm) flex line with manual 

shut-off valve has been provided with on this appli-
ance. Install and attach 1/2" gas line onto shut-off 
valve. 

3.  After completing gas line connection, purge air from 

gas line and test all gas joints from the gas meter 
to the fireplace for leaks. Use a solution of 50/40 
water and soap or a gas sniffer. 

4.  To adjust flame height, turn HI/LO knob to HI to get 

maximum pressure to burner. Turn HI/LO knob to 
LO to get minimum pressure. 

5.  To  check  gas  pressures  at  valve,  turn  captured 

screw counter clockwise 2 or 3 turns and then place 
tubing to pressure gauge over test point. Turn unit 
to high. 

Figure 34. 

After taking pressure reading, 

be sure and turn captured screw clockwise firmly 
to reseal. Do not over torque. Check test points for 
gas leaks.

FP1979
Millivolt gas valve

FP1979

Figure 34 - 
Gas Pressure Check at Gas Valve 

Pressure 
Test “IN”

Pressure 
Test “OUT”

HI/LO Knob

Pilot Adjustment Screw 

W

ARNING

Do  not  use  open  flame  to  check  for  gas 
leaks.

ELECTRICAL WIRING

This stove will work without any electrical supply. Electricity 
is only needed to operate blower.

NOTE:

 If installed in mobile home, fireplace must be bolted 

securely to floor. 

W

ARNING

Electrical  connections  should  only 
be  performed  by  a  qualified,  licensed 
electrician. main power must be off when 
connecting to main electrical power supply 
or  performing  service. All  wiring  shall  be 
in compliance with all local, city and state 
codes. The appliance, when installed, must 
be  electrically  grounded  in  accordance 
with local codes or in the absence of local 
codes,  with  the  National  Electrical  Code 
ANSI/NFpA 70 (latest edition) and Canadian 
Electrical Code, CSA C22.1.

CAUTION

Label all wires before disconnecting when 
servicing controls. Wiring errors can cause 
improper and dangerous operation.

Verify proper operation after servicing.

Summary of Contents for CSDV20DLP

Page 1: ...ice agency or the gas supplier This appliance is only for use with the type of gas indicated on the rating plate This appliance is not convertible for use with other gases unless a certified kit is used Thisappliancemaybeinstalledinanaftermarket permanently located manufactured home where not prohibited by local codes Aftermarket Completion of sale not for purpose of resale from the manufacturer D...

Page 2: ...Wool Placement 26 Congratulations You have purchased a state of the art gas appliance featuring the Lex Fire Burn System available exclusively on MHSC gas appliances The Lex Fire Burn System sets a new standard for flame appearance through innovative log design burner technology and ember placement Each element affecting combustion and flame appearance was carefully scrutinized and strategically b...

Page 3: ...door must be properly seated and sealed If this unit is not properly installed by a qualified service person with glass door prop erly seated and sealed combustion leakage can occur CARBON MONOXIDE POISONING Early signs of carbon monoxide poisoning are similar to the flu with headaches dizziness and or nausea If you have these signs the stove may not have been installed properly Get fresh air at o...

Page 4: ...on to arrange for replacement of the unit 19 Do not operate stove if any log is broken 20 Do not use a blower insert heat exchanger insert or other accessory not approved for use with this stove 21 Do not operate the stove with glass door removed cracked or broken 22 Massachusetts only refer to Page 46 for further infor mation Code Approval Direct Vent type appliances draw all combustion air from ...

Page 5: ...ron Stove Controls Hi Lo Knob On Off Switch Optional Blower Ignitor Box Located Under Right Front Leg FP2724 HIGH ELEVATIONS Input ratings are shown in BTU per hour and are certi fied without deration for elevations up to 4 500 feet 1 370 m above sea level For elevations above 4 500 feet 1 370 m in USA installations must be in accordance with the current ANSI Z223 1 NFPA 54 and or local codes havi...

Page 6: ...rect Vent Gas Stove Stove dimensions A B C 586056 CSDV dims Ref CSDV20 CSDV30 CSDV40 A 20M 530 mm 26Z x 673 mm 29Z x 749 mm B 23Z x 597 mm 28Z x 724 mm 30Z x 775 mm C 18C v 476 mm 21 533 mm 22 559 mm Figure 2 Stove Dimensions ...

Page 7: ... the stove where it can be accessed by a gas supply line Locate the stove in a large and open room that is centrally located in the house This will optimize heat circulation and comfort The flow of combustion and ventilation air must not be obstructed Minimum clearances to combustibles side wall ceiling woodwork and windows must be maintained Page 9 Figure 4 This stove may be installed along a wal...

Page 8: ...dth and depth of the appliance A E Minimum D Minimum to Either Side Wall ST1128 sidewall clearance Ceiling Mantel Side Wall Side Wall ST1128 Front View B C F Minimum 36 914 mm in Front St1129 mantel clearances Ceiling Side View ST1129 G G ST1130 corner clearance Corner Installation ST1130 F Minimum D Minimum to Either Side Wall ST1131 sidewall clearance Wall Installation ST1131 Mantel Clearance fr...

Page 9: ...learances Figure 5 Alcove Clearances ST1132 Alcove Minimum Dimensions Height from Hearth Width Depth Model A B C CSDV20 52 1321 mm 30 762 mm 36 914 mm CSDV30 64 1626 mm 35 889 mm 36 914 mm CSDV40 64 1626 mm 35 889 mm 36 914 mm NOTE Maintain minimum side and back clearances when placing stove in alcove ...

Page 10: ...it off pallet Lift unit up high enough to clear upright supports unit is sitting on NOTE You will need at least two 2 strong people to lift unit off of pallet REMOVE UNIT FROM CRATE ON OFF LOGS ST1133 remove straps Straps Plastic Bag Pallet ST1133 Figure 6 Remove Straps and Plastic from Unit PIL OT OF F REM OT E CO NT RO L L O G S ST1134 remove front Hearth Door Ashlip Control Door ST1134 Figure 7...

Page 11: ...d safety glasses for protection Use extreme caution when using ladders or when on rooftops Be aware of electrical wiring locations in walls and ceilings The following actions will void the warranty on your venting system Installation of any damaged venting component Unauthorized modification of the venting system Installation of any component part not manufactured or approved by MHSC Installation ...

Page 12: ...uired You may use a chase with a vent termination with exposed pipe on the exterior of the house Refer to Installing Vent System in a Chase below It is very important that the venting system maintain its balance between the combustion air intake and the flue gas exhaust Certain limitations apply to vent configurations and must be strictly followed INSTALLING A VENT SYSTEM IN AN OUTSIDE CHASE A cha...

Page 13: ... above the meter regulator assembly 5 m above the meter regulator assy I Clearance to service regulator vent outlet 3 91 cm 3 91 cm J Clearance to nonmechanical air supply inlet 6 15 cm for appliances 10 000 6 15 cm for appliances to building or the combustion air inlet to any BTU h 3kW 12 30 cm for 10 000 BTU h 3kW 9 other appliances appliances 10 000 BTU h 3kW and 23 cm for appliances 10 000 100...

Page 14: ...ve space spaces open only on one side and with an overhang is permitted with the dimensions specified for vinyl or non vinyl siding and soffits 1 There must be a 3 914 mm minimum between termination caps 2 All mechanical air intakes within 10 1 m of a termination cap must be a minimum of 3 914 mm below the termination cap 3 All gravity air intakes within 3 914 mm of a termination cap must be a min...

Page 15: ...uarter turn until the sections are fully locked Figure 16 FP1953 rigid pipe Female Locking Lugs Male Slots FP1953 NOTE Horizontal runs of vent pipe must be supported every three 3 feet 914 mm Use wall straps for this purpose Figure 16 Rigid Vent Pipe Connections 3 Attach vent pipe assembly to the stove Set stove in front of its permanent location to insure minimum clear ances Mark the wall for a 9...

Page 16: ...oward the wall and insert the vent pipe into the hori zontal termination The pipe overlap should be a mini mum of 1Z v 32 mm Apply silicone to the outer pipe connection Fasten all vent connections with screws provided 7 Slide the wall thimble against the interior wall surface and attach with screws Figure 20 FP1957 install firestop Interior Wall Surface Decorative Wall Thimble Horizontal Vent Pipe...

Page 17: ...384 mm 20 95Z v 98C v 102Z v 6 m 2419 mm 2508 mm 2597 mm NOTE Add 1 4 rise per 12 horizontal length of pipe NOTE This configuration is for use with corner installation also H1 H V ST1140 Horiz term 2 elbows Figure 22 Horizontal Termination Configuration for Rigid Venting Using Two 2 90 Elbows Table 3 Horizontal Venting with Two 2 90 Elbows Maximum Horizontal Vertical Minimum H H1 CSDV20 V CSDV30 V...

Page 18: ...enting system consider an offset Refer to Figure 24 to avoid cutting load bearing mem bers NOTE Pay special attention to these installation instructions for required clearances air space to combustibles when passing through ceilings walls roofs enclosures attic rafters etc Do not pack air spaces with insulation Also note maximum vertical rise of the venting system and any maximum horizontal offset...

Page 19: ...me the opening as shown in on Page 16 Figure 17 4 Connect a section of pipe and extend up through the hole NOTE If an offset is needed to avoid obstructions you must support the vent pipe every three 3 feet Use wall straps for this purpose Page 18 Figure 24 Whenever possible use 45 elbows instead of 90 elbows The 45 elbow offers less restriction to the flow of the flue gases and intake air 5 Place...

Page 20: ...ion Page 19 and above Venting installation ST1141 cath clg box Cathedral Ceiling Support Box 2 Minimum Below Finished Ceiling Cut Hole 1 8 Larger than Support Box when Projected onto Roofline ST1142 Figure 27 Cathedral Ceiling Support Box Installation ST1143 Cath clg install Apply Non hardening Mastic Under all Edges of Support Box Before Nailing ST1143 Figure 28 Installed Cathedral Ceiling Suppor...

Page 21: ...E Install restrictor into 4 collar of stove or first vent section as shown Figure 31 Vertical Rigid Venting Configuration with No Horizontal Run ST1147 Vertical Venting V 40 12 m Maximum SIMPSON DURAVENT GS 4 X 6B BLACK PIPE Number Description 902B 6B x 48 Pipe 903B 6B x 36 Pipe 904B 6B x 24 Pipe 906B 6B x 12 Pipe 907b 6B x 9 Pipe 908B 6B x 6 Pipe 911B 6B Adjustable 11 14B Pipe 940 Wall Thimble 94...

Page 22: ...t provided A CSA design certified equipment shutoff valve with 1 8 NPT tap is an acceptable alternative to test gauge con nection Purchase the CSA design certified equipment shutoff valve from your dealer For propane LP connections only the installer must supply an external regulator The external regulator will reduce incoming gas pressure You must reduce incoming gas pressure to between 11 and 13...

Page 23: ...lves We recommend that you install a sediment trap drip leg in supply line as shown in Figure 33 Locate sediment trap drip leg where it is within reach for cleaning Install in piping system between fuel supply and burner system Locate sediment trap drip leg where trapped matter is not likely to freeze Asediment trap traps moisture and contaminants This keeps them from going into the burner system ...

Page 24: ...g pressure reading be sure and turn captured screw clockwise firmly to reseal Do not over torque Check test points for gas leaks FP1979 Millivolt gas valve FP1979 Figure 34 Gas Pressure Check at Gas Valve Pressure Test IN Pressure Test OUT HI LO Knob Pilot Adjustment Screw WARNING Do not use open flame to check for gas leaks Electrical Wiring This stove will work without any electrical supply Elec...

Page 25: ... on the wall Figure 35 Do not extend beyond the wall switch wire length provided NOTE Extended lengths of wire may cause the fireplace not to function properly Longer length of wire is permitted if the wire is made out of larger gauge diameter wire Always check with local code Figure 35 Wiring Diagram for Wall Switch ELECTRICAL INSTALLATION ON OFF OPTIONAL REMOTE WALL SWITCH PILOT HI LO ON OFF TH ...

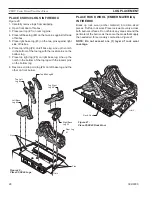
Page 26: ...36 1 Carefully remove logs from wrapping 2 Open front door of firebox 3 Place rear log 1 on rear log pin 4 Place left base log 2 on the two pins against left side of firebox 5 Place right base log 3 on the two pins against right side of firebox PILO T OFF RE MOT E CO NT RO L LG813 Left Base Log 2 Right Base Log 3 Rear Log 1 Pins Pins LG813 Figure 36 Place CSDV20 Logs on Base Place rock wool ember ...

Page 27: ...CO NTR OL LG815 CSDV30 logs Top Left Log 4 Top Right Log 5 Right Base Log 3 Rear Log 1 Left Base Log 2 Pins Pins LG816 Figure 38 Place CSDV30 Logs place logs and rock wool ember material in firebox Break up rock wool ember material into dime sized pieces Fluff up rock wool Place rock wool evenly across the front of the burner surface Do not block any areas around the perimeter of the burner as the...

Page 28: ...h the locator pins on the bottom log 8 Rest one end top mid log 6 on left base log and the other on front burner PIL OT OF F RE MOT E CO NT RO L LG818 CSDV40 Logs Top Mid Log 6 Top Left Log 4 Left Base Log 2 Top Right Log 5 Right Base Log 33 Rear Log 1 Pins Pins LG818 Figure 40 Place CSDV40 Logs PLACE ROCK WOOL EMBER MATERIAL IN FIREBOX Break up rock wool ember material into dime sized pieces Fluf...

Page 29: ...neighbor s phone Follow the gas supplier s instructions If you cannot reach your gas supplier call the fire department C Use only your hand to push in or turn the gas control knob Never use tools If the knob will not push in or turn by hand don t try to repair it Call a qualified service technician Force or attempted repair may result in a fire or explosion D Do not use this appliance if any part ...

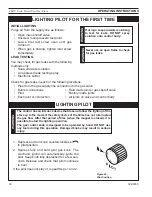
Page 30: ... connections Field made joints gas shutoff valve Pilot Factory made joints Each joint or connection All joints on valve and control body 1 Depress and turn knob counterclockwise to pilot position 2 Depress fully and hold pilot gas knob The electronic ignitor will automatically ignite the pilot Keep knob fully depressed for a few sec onds Release and check that pilot continues to burn If the pilot ...

Page 31: ...in burner Figure 43 Lighting the burner Depress and turn the knob counterclockwise to the ON position Figure 44 It will take less than four 4 seconds for the burner to ignite Pilot position Depress and turn knob to pilot position to keep burner off while maintain ing the pilot light Figure 45 Depress and turn knob clockwise to OFF position Figure 46 to turn off gas Figure 45 Pilot Position Lightin...

Page 32: ...igh altitude as follows To increase air mixture pull down the adjustment rod located beneath the stove This opens the shutter more and will stop sooting Figure 47 To decrease air mixture push up the adjustment rod located beneath the stove This closes the shutter Flames will be more yellow Figure 48 ST1150 air shutter closed Air Shutter Adjustment Rod ST1149 Figure 47 Push Adjustment Rod Up to Clo...

Page 33: ...ge the glass surface PILOT AND BURNER FLAMES Visually check pilot and burner flames periodically Refer to Figure 49 for typical pilot flame Refer to Figure 50 for typical burner flame FIREBOX CLEANING 1 Carefully remove log set and embers from combustion chamber 2 Vacuum burner compartment thoroughly 3 Vacuum any dust off logs 4 Remove any lint from main burner and pilot 5 Carefully replace log se...

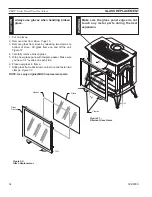
Page 34: ...ing two clamps on bottom of stove Lift glass frame up and off the unit Figure 51 4 Carefully remove broken glass 5 Wrap new glass pane with tadpole gasket Make sure you have 1 4 overlap on each side 6 Place new glass in frame 7 Slide glass frame back down onto stove and fasten two clamps Figure 52 NOTE Use only original MHSC replacement parts ST1151 replace glass Glass Frame Gasket Glass ST1152 Fi...

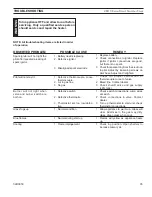
Page 35: ...fective thermopile 3 Thermostat set too low defec tive 1 Normal condition 1 Normal during start up 1 Flame impingement REMEDY 1 Replace battery 2 Check connections to ignitor Replace ignitor if ignitor connections are good but there is no spark 3 Check for spark arcing from the electrode to pilot Adjust by loosening screws on pilot base Adjust and retighten 1 Check for proper connection of thermoc...

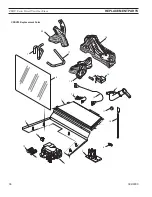
Page 36: ...36 58D6056 CSDV Series Direct Vent Gas Stove REPLACEMENT PARTS 18 19 20 17 3 4 13 12 15 16 5 2 8 9 1 6 10 14 11 7 586056 CSDV20 parts CSDV20 Replacement Parts ...

Page 37: ...7 12 Knob Extension Hi Lo 1 43D0095 43D0095 13 Knob Extension ON OFF 1 43D0094 43D0094 14 Ignitor Battery Module 1 45D0077 45D0077 15 Ignitor Wire Harness 1 45D0500 45D0500 16 ON OFF Wire Harness 1 45D0501 45D0501 17 Burner Tube 1 58D0271 58D0271 18 Rear Logs 1 58D1931 58D1931 19 Right Bottom Logs 1 58D1933 58D1933 20 Left Bottom Log 1 58D1932 58D1932 21 Vertical Restrictor not shown 1 45D0551 45D...

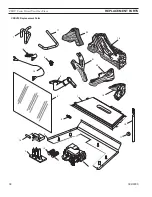
Page 38: ...38 58D6056 CSDV Series Direct Vent Gas Stove REPLACEMENT PARTS 18 19 20 21 22 17 3 4 13 12 16 5 11 2 15 1 14 6 10 8 7 9 586056 CSDV30 parts CSDV30 Replacement Parts ...

Page 39: ...D0094 43D0094 14 Ignitor Battery Module 1 45D0077 45D0077 15 Ignitor Wire Harness 1 45D0500 45D0500 16 ON OFF Wire Harness 1 45D0501 45D0501 17 Burner Tube 1 58D0164 58D0164 18 Rear Log 1 58D1941 58D1941 19 Right Bottom Log 1 58D1943 58D1943 20 Right Top Log 1 58D1945 58D1945 21 Left Top Log 1 58D1944 58D1944 22 Left Bottom Log 1 58D1942 58D1942 23 Vertical Restrictor not shown 1 45D0551 45D0551 2...

Page 40: ...40 58D6056 CSDV Series Direct Vent Gas Stove REPLACEMENT PARTS 22 23 16 24 25 26 28 4 5 14 13 7 6 2 3 2 17 20 18 19 8 11 15 9 10 12 21 586056 CSDV40 parts CSDV40 Replacement Parts ...

Page 41: ...77 45D0077 16 Ignitor Wire Harness 1 45D0500 45D0500 17 ON OFF Wire Harness 1 45D0501 45D0501 18 Rear Burner Tube 1 58D0366 58D0366 19 5 16 Brass Tee 1 43D0181 43D0181 20 Front Burner Tube 1 58D0364 58D0364 21 Valve Tube 1 58D0365 58D0365 22 Rear Log 1 58D1921 58D1921 23 Right Bottom Log 1 58D1923 58D1923 24 Right Top Log 1 58D1925 58D1925 25 Left Top Log 1 58D1924 58D1924 26 Left Bottom Log 1 58D...

Page 42: ...o comply with the above requirements provided however that during said thirty 30 day period a battery operated carbon monoxide detector with an alarm shall be installed Massachusetts Residents Only Please read and follow these special requirements 2 Approved Carbon Monoxide Detectors Each carbon monoxide detector as required in accordance with the above provisions shall comply with NFPA 720 and be...

Page 43: ...r neglect installation damage damage from unauthorized service incidental or consequential damage or negative pressure caused by mechanical systems such as furnaces fans clothes dryers etc Terms This warranty shall be void if the appliance is not installed by qualified installer in accordance with the installation instructions provided with the appliance and state and local codes The warranty shal...

Page 44: ...MHSC 149 Cleveland Drive Paris Kentucky 40361 www mhsc com ...

Reviews: