Monacor TXA-1020 Instruction Manual Download Page 10

10

English

4  Setting  Up / Transporting

Place the unit as desired or mount it onto a PA 
speaker stand via the stand sleeve on its lower 
side .

For transporting, the unit is provided with a 

telescopic handle . Push down the unlock but-
ton at the lower side of the handle and extract /  
retract the handle as desired .

5  Power Supply

5.1 Mains  operation / 

Recharging the batteries

To operate the unit via the mains and /or to re-
charge the internal batteries, connect the mains 
cable provided to the mains jack (19) and to a 
mains  socket  (230 V / 50 Hz) .

When the unit is connected to the mains, 

the batteries will be automatically recharged: 
During the recharge, the LED indicators for the 
battery status (4) will light up continuously one 
after the other . It is not necessary to switch 
on the unit for recharging; however, it can be  
operated during the recharging process . Once 
the recharging process has been completed, the 
LED “FULL” will light up continuously .
After operation or after recharging the batter-
ies, disconnect the unit from the mains to avoid 
unnecessary power consumption .

5.2 Battery operation

During battery operation, the respective LED (4) 
will indicate the charging state of the recharge-
able batteries:

80 – 100 %  charged
less than 80 % charged
less than 50 % charged
less than 20 % charged

Important: 

To prevent damage to the batteries due 

to deep discharge and to prevent a reduction of their 
lifetime, please observe the following notes: 
–  Always fully recharge the batteries prior to initial 

operation and after longer storage .

–  When the LED “20 %” starts flashing, the batteries 

are almost discharged and should be recharged as 
soon as possible .

–  Fully recharge the batteries prior to longer storage 

and at least every two months during storage .

6  Audio Connections

Switch off the unit prior to making any con-
nection .

6.1 Inputs

Two microphones can be connected: via an XLR 
plug or a 6 .3 mm plug, to the jack MIC 1 (18) 
or, via a 6 .3 mm plug, to the jack MIC 2 (17) .

Audio units with line signal level (e . g . 

CD / MP3 player, mixer, tape deck, tuner) can be 
connected to the RCA jacks LINE IN (13) and the 
3 .5 mm jack AUX IN (15) . It is possible to connect 
both mono units and stereo units; in case of a 
stereo input signal, the left channel and the right 
channel are combined to a mono signal .

6.2 Outputs

Additional audio units such as a recorder or an-
other active speaker system can be connected 
to the outputs LINE OUT and AUX OUT (14) . 
At both outputs, the mixed signal of the audio 
sources will be available, unaffected by the tone 
controls (6) and the control MASTER (11) . At 
each output jack – the two RCA jacks and the 
3 .5 mm jack – a mono signal is available .

7  Operation

CAUTION

Never adjust the active speaker 
system to a very high volume . 
Permanent high volumes may 
damage your hearing!

Your ear will get accustomed to high volumes 
which do not seem to be that high any more 
after some time . Therefore, do not further in-
crease a high volume after getting used to it .

1) Prior to switching on the unit, set the control 

MASTER (11) to “MIN” .

2) To switch the unit on and off, use the POWER 

switch (5) . The switch will be illuminated 
when the unit is switched on . The battery 
status indicators (4) will indicate the charging 
status of the rechargeable batteries .

To prevent damage to the batteries by 

deep discharge during battery operation, a 
discharge protection will automatically switch 
off the unit when required . However, due to 
self-discharge of the batteries, a deep dis-
charge may also occur when the unit is not 
operated for a longer period of time . There-
fore, always observe the box “Important” in 
chapter 5 .2 .

3) Switch on the audio sources that are to be 

audible and then adjust their volume with the 
corresponding controls / buttons (see below); 
use the control MASTER (11) to adjust the 
overall volume for the active speaker system .
Volume adjustment of the audio sources:


– for the two receiver units of the 2-channel 

receiver module, use the corresponding 
volume control (2), CH .A or CH .B

operation: see chapter 7.1


– for model TXA-1020USB: 


for the integrated audio player, use the vol-
ume buttons at the player or on the remote 
control

operation: see chapter 3.1


– for a unit connected to the input AUX IN 

(15) and the Bluetooth receiver, use the vol-
ume control (8) of the operating panel AUX

operation of the Bluetooth receiver:  


see chapter 7.2

Note:

 The control will determine the volume of 

the mixed signal of both sources when they are 
used at the same time .


– for a unit connected to the input LINE IN 

(13), use the volume control (7) of the op-
erating panel LINE


– for a microphone connected, use the vol-

ume control (10 or 9) above the corre-
sponding input

Switch unused sources off or set their volume 
to minimum .

4) Use the high-frequency control TREBLE and 

the low-frequency control BASS (6) to adjust 
the tone of the active speaker system .

5) Use the button VOICE PRIORITY (12) to 

activate the microphone priority function . 
When the button is pressed (LED beneath 
the button illuminated), the volume of the 
music currently played will be substantially 
reduced while announcements via a micro-
phone connected or a wireless microphone 
are being made . To deactivate the function, 
disengage the button again .

Note:

 The function will also have an effect on the 

output signal of the jacks LINE OUT and AUX OUT 
(14) as well as on the output signal of the trans-
mitter module .

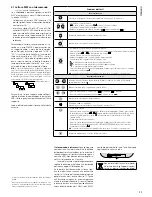
7.1 Operating the receiver module

Using the 2-channel receiver module and two 
appropriate transmitters (e . g . pocket transmitter 
TXA-800HSE, wireless microphone TXA-800HT), 
two transmission paths can be established .
1) The receiver units A and B of the module pro-

vide a control (2), CH .A and CH .B respectively, 
to adjust the volume and to switch them on 
and off . To switch a receiver unit on, advance 
the corresponding control from the position 
“OFF” . The left half of the display (1) applies 
to receiver unit A, the right half applies to 
receiver unit B . When a receiver unit has been 
switched on, the corresponding half of the 
display will indicate the transmission chan-
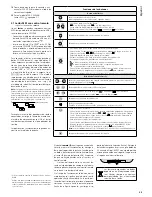
nel . To indicate the radio frequency, press 
an arrow button (

 for unit A, 

 for unit B) . 

The previous indication will reappear after 
2 seconds .

2) Use the buttons (3) of the module to 

set the 

transmission channels

, either manually or 

by means of an automatic scan . Leave the 
corresponding transmitters switched off for 
the time being . 

Channel scan:


Keep the buttons 

 and 

 simultaneously 

pressed for approx . 1 second until 


appears on the display . The scan will start: 
The receiver units will be set to free channels 
without mutual interference . If no free chan-
nels are found, the channels set will be kept .

Manual channel selection:


If 

both

 receiver units A and B are switched on:

1 . Keep the button SET pressed until the 

channel indication for receiver unit A starts 
flashing on the display .

2 . Select the channel for receiver unit A with 

the button 

 or 

 and then confirm with 

the button SET .

3 . The channel indication for receiver unit B 

starts flashing on the display . Select the 
channel for receiver unit B with the but-
ton 

 or 

 and then confirm with the 

button SET .

If only 

one

 receiver unit A or B is switched on: 

Keep the button SET pressed until the channel 
indication starts flashing on the display . Select 
the channel with the button 

 or 

 and then 

confirm with the button SET .

If a channel is not confirmed within 

10 seconds with the button SET, the setting 

Summary of Contents for TXA-1020

Page 1: ...INSTRUCTION MANUAL MODE D EMPLOI ISTRUZIONI PER L USO GEBRUIKSAANWIJZING MANUAL DE INSTRUCCIONES INSTRUKCJA OBSŁUGI SIKKERHEDSOPLYSNINGER SÄKERHETSFÖRESKRIFTER TURVALLISUUDESTA Transportables High Power Verstärkersystem Portable High Power Amplifier System TXA 1020 Bestell Nr Order No 17 4590 TXA 1020USB Bestell Nr Order No 17 4600 ...

Page 2: ... FOR SPECIALISTS ELECTRONICS FOR SPECIALISTS ELECTRONICS FOR SPECIALISTS Deutsch Seite 4 English Page 8 Français Page 12 Italiano Pagina 16 Nederlands Pagina 20 Español Página 24 Polski Strona 28 Dansk Sida 32 Svenska Sidan 32 Suomi Sivulta 33 ...

Page 3: ...3 230 V 50 Hz 1 2 2 3 4 5 6 7 8 5 9 10 11 12 13 14 15 14 16 17 18 19 TXA 1020USB 20 ...

Page 4: ... Fall zur Repa ratur in eine Fachwerkstatt Ziehen Sie den Netzstecker nie am Kabel aus der Steckdose fassen Sie immer am Stecker an Verwenden Sie zum Reinigen nur ein trocke nes weiches Tuch niemals Chemikalien oder Wasser Wird das Gerät zweckentfremdet nicht rich tig angeschlossen falsch bedient oder nicht fachgerecht repariert kann keine Garantie für das Gerät und keine Haftung für daraus result...

Page 5: ...elle vom Typ CR 2025 mit dem Pluspol nach oben in den Halter legen Den Halter wieder hineinschieben Batterien dürfen nicht in den Hausmüll geworfen werden Geben Sie sie zur umweltgerechten Entsorgung nur in den Sondermüll z B Sammelbehälter im Einzelhandel Funktionen der Tasten Tasten am Player Ein und Ausschalten des Players Taste ca 1 Sekunde gedrückt halten im Stopp und Pausenmodus Sprung zum n...

Page 6: ...utstärke mit den entsprechenden Reglern Tasten einstellen siehe unten mit dem Regler MASTER 11 die Gesamtlautstärke für die Aktivbox einstellen Lautstärkeeinstellung der Tonquellen für die zwei Empfangseinheiten des 2 Ka nal Empfangsmoduls den jeweiligen Laut stärkeregler 2 CH A oder CH B verwenden Bedienung siehe Kapitel 7 1 bei Modell TXA 1020USB für den eingebauten Audioplayer die Laut stärke T...

Page 7: ...e Betätigung einer Taste auch automatisch ver lassen Durchgeführte Einstellungen werden auch in diesem Fall gespeichert 7 2 Bluetooth Empfänger bedienen Über den Bluetooth Empfänger kann eine Funk verbindung zu einer Bluetooth Tonquelle z B Smartphone Tablet PC MP3 Player hergestellt werden um Audiodaten über das Verstärkersys tem abzuspielen Hinweis Die Bluetooth Quelle muss nach dem A2DP Protoko...

Page 8: ...e mains plug from the socket always seize the plug For cleaning only use a dry soft cloth never use water or chemicals No guarantee claims for the unit and no liability for any resulting personal damage or material damage will be accepted if the unit is used for other purposes than originally intended if it is not correctly connected or operated or if it is not repaired in an expert way If the uni...

Page 9: ...ected folder will be started during replay to select the replay mode The following replay modes are available all titles of the folder continuously repeated all titles of the sound carrier continuously repeated current title continuously repeated Press the button repeatedly until the symbol for the replay mode desired starts flashing and then press the button to confirm Note The player will exit t...

Page 10: ... in chapter 5 2 3 Switch on the audio sources that are to be audible and then adjust their volume with the corresponding controls buttons see below use the control MASTER 11 to adjust the overall volume for the active speaker system Volume adjustment of the audio sources for the two receiver units of the 2 channel receiver module use the corresponding volume control 2 CH A or CH B operation see ch...

Page 11: ...e Note The setting modes will be automatically exited after 5 seconds if no button is pressed Any settings made will be saved 7 2 Operating the Bluetooth receiver The Bluetooth receiver can be used to establish a wireless connection to a Bluetooth audio source e g smartphone tablet PC MP3 player which allows the amplifier system to replay audio data Note The Bluetooth source must be compatible wit...

Page 12: ...s par un technicien spécialisé Ne débranchez jamais l appareil en tirant sur le cordon secteur tenez le toujours par la fiche Pour le nettoyage utilisez uniquement un chiffon sec et doux en aucun cas de produits chimiques ou d eau Nous déclinons toute responsabilité en cas de dommages matériels ou corporels consécutifs si l appareil est utilisé dans un but autre que celui pour lequel il a été conç...

Page 13: ... du titre en cours Appuyez sur la touche jusqu à ce que le symbole pour le mode de lecture voulu clignote et appuyez sur la touche pour confirmer Conseil si aucune touche n est activée pendant 5 secondes vous quittez ce mode Touches sur la télécommande Sélection de titre dans le dossier saisissez le numéro que le titre a dans le dossier et appuyez sur la touche Diminution VOL ou augmentation VOL d...

Page 14: ...urces audio à écouter et réglez le volume souhaité avec les réglages touches correspondants voir ci dessous avec le ré glage MASTER 11 réglez le volume général pour l enceinte active Réglage de volume pour les sources audio pour les deux unités de réception du module de réception 2 canaux utilisez le ré glage de volume correspondant 2 CH A ou CH B utilisation voir chapitre 7 1 sur le modèle TXA 10...

Page 15: ...e du squelch appuyez sur la touche SET Conseil les modes de réglages sont automatiquement quittés si aucune touche n est activée en l espace de 5 secondes Les réglages ef fectués sont dans ce cas aussi mémorisés 7 2 Utilisation du récepteur Bluetooth Via le récepteur Bluetooth vous pouvez créer une liaison radio vers une source audio Blue tooth par exemple smartphone tablette PC lecteur MP3 pour l...

Page 16: ...empre ad un of ficina competente Staccare il cavo rete afferrando la spina senza tirare il cavo Per la pulizia usare solo un panno morbido asciutto non impiegare in nessun caso pro dotti chimici o acqua Nel caso d uso improprio di collegamenti sbagliati d impiego scorretto o di riparazione non a regola d arte dell apparecchio non si assume nessuna responsabilità per eventuali danni consequenziali ...

Page 17: ...e di tutti i titoli del supporto audio ripetizione senza fine del titolo attuale Premere il tasto tante volte finché lampeggia il simbolo per il modo richiesto e quindi confermare con il tasto N B Se nel modo di scelta non si preme nessun tasto entro 5 secondi si esce da modo Tasti sul telecomando Scelta del titolo all interno di una cartella Digitare il numero del titolo nella cartella e quindi p...

Page 18: ...e e im postare il loro volume con i relativi regola tori tasti vedi in basso con il regolatore MASTER 11 impostare il volume globale della cassa attiva Impostazione del volume delle fonti audio per le due unità ricevitore del modulo rice vitore a 2 canali usare il relativo regolatore 2 CH A o CH B funzionamento vedi Capitolo 7 1 nel modello TXA 1020USB per il lettore audio integrato usare i tasti ...

Page 19: ...ono memorizzate anche in questo caso 7 2 Funzionamento del ricevitore Bluetooth Tramite il ricevitore Bluetooth è possibile creare una connessione wireless con una fonte audio Bluetooth p es smartphone tablet PC lettore MP3 per riprodurre dati audio tramite il sistema d amplificazione N B La fonte Bluetooth deve funzionare secon do il protocollo A2DP Advanced Audio Distribution Profile Altrimenti ...

Page 20: ... functioneert Het apparaat moet in elk geval worden her steld door een gekwalificeerd vakman Trek de stekker nooit met het snoer uit het stopcontact maar met de stekker zelf Verwijder het stof enkel met een droge doek Gebruik zeker geen chemicaliën of water In geval van ongeoorloofd of verkeerd ge bruik verkeerde aansluiting foutieve bedie ning of van herstelling door een nietgekwa lificeerd perso...

Page 21: ...ijder de lege batterij en plaats een nieuwe batterij knoopcel van 3V type CR2025 met de positieve pool naar boven in de houder Schuif de houder er weer in Batterijen mogen niet via het huisvuil worden verwijderd Verwijder ze uit sluitend als KGA bijv de inzamelbox in de detailhandel Functies van de toetsen Toetsen op de speler In en uitschakelen van de speler toets ca 1 seconde ingedrukt houden in...

Page 22: ...j absoluut op de tekst in het kader Be langrijk in hoofdstuk 5 2 3 Schakel de geluidsbronnen die u wilt horen en stel het gewenste geluidsvolume in met de respectieve regelaars toetsen zie hier onder met de regelaar MASTER 11 stelt u het totale geluidsvolume voor de actieve luidspreker in Regeling van het geluidsbronvolume voor de twee ontvangers van het tweeka naalse ontvangstmodule gebruikt u de...

Page 23: ...ing De instelmodi worden na 5 seconden zonder drukken op een toets ook automatisch ver laten Doorgevoerde instellingen worden ook in dit geval opgeslagen 7 2 De Bluetooth ontvanger bedienen Via de Bluetooth ontvanger kan een radio verbinding met een Bluetooth geluidsbron bijv smartphone tablet pc mp3 speler tot stand worden gebracht om audiobestanden via het versterkersysteem af te spelen Opmerkin...

Page 24: ...uier circunstancia No tire nunca del cable de corriente para desconectarlo del enchufe tire siempre del conector Utilice sólo un paño suave y seco para la lim pieza no utilice nunca ni agua ni productos químicos No podrá reclamarse garantía o responsabi lidad alguna por cualquier daño personal o material resultante si se utiliza el aparato para fines diferentes a los originalmente concebi dos si n...

Page 25: ...s las pistas del portador de sonido se repiten continuamente la pista actual se repite continuamente Pulse el botón repetidamente hasta que el símbolo para el modo de reproducción deseado empiece a parpadear y luego pulse el botón para confirmar Nota El lector saldrá del modo de selección después de 5 segundos si no se pulsa ningún botón Botones del control remoto Para seleccionar una pista en una...

Page 26: ...o Así pues preste atención siempre al recuadro Importante del apartado 5 2 3 Conecte las fuentes de audio que se tienen que escuchar y luego ajuste su volumen con los controles botones correspondientes ver a continuación utilice el control MASTER 11 para ajustar el volumen general del recinto activo Ajuste de volumen de las fuentes de audio Para las dos unidades de recepción del mó dulo de recepci...

Page 27: ...e umbral más alto Pulse el botón SET para salir del modo de ajuste squelch Nota Se sale de los modos de ajuste automáticamente después de 5 segundos si no se pulsa ningún botón Se guardará cualquier ajuste realizado 7 2 Funcionamiento del receptor Bluetooth El receptor Bluetooth se puede utilizar para esta blecer una conexión inalámbrica con una fuente de audio Bluetooth p ej smartphone tableta le...

Page 28: ...zdka sieciowego ciągnąc za kabel zasilania należy zawsze chwytać za wtyczkę Do czyszczenia używać suchej miękkiej ście reczki nie używać wody ani środków che micznych Producent ani dostawca nie ponoszą odpo wiedzialności za wynikłe szkody uszkodzenie sprzętu lub obrażenia użytkownika jeśli urzą dzenie było używane niezgodnie z ich prze znaczeniem nieprawidłowo zamontowane podłączone lub obsługiwan...

Page 29: ...z nośnika ciągłe odtwarzanie wybranego utworu Wcisnąć przycisk kilka razy aż symbol żądanego trybu zacznie migać następnie wci snąć przycisk aby zatwierdzić Uwaga Wybór trybu możliwy jest w ciągu 5 sekund Przyciski na pilocie sterującym Do wyboru utworu z danego folderu wpisać numer utworu w folderze i zatwierdzić przyciskiem Do zmniejszania VOL lub zwiększania VOL głośności wcisnąć na krótko wybó...

Page 30: ...nastąpić także samoczynnie w przypadku dłu giej przerwy w użytkowaniu Należy zapoznać się z uwagami w rozdz 5 2 3 Włączyć wybrane źródła audio następnie zmiksować ich sygnały przy pomocy odpo wiednich regulatorów głośności przycisków patrz poniżej następnie za pomocą regula tora MASTER 11 ustawić głośność całkowitą Regulacja głośności źródeł audio dla 2 kanałowego odbiornika wykorzystać regulatory...

Page 31: ...e w ciągu 5 sekund po ostatnim wciśnięciu przycisku Wszystkie dokonane ustawienia zostają zapisane 7 2 Odbiornik Bluetooth Odbiornik Bluetooth pozwala na bezprzewo dowe połączenie ze źródłem sygnału wyposa żonym w nadajnik Bluetooth np smartfonem tabletem PC odtwarzaczem MP3 i odtwarzanie plików audio znajdujących się w ich pamięci Uwaga Nadajnik Bluetooth podłączanego urządzenia musi być kompatyb...

Page 32: ...Et permanent højt lydniveau kan skade menneskers hørelse Det menneskelige øre vænner sig til et højt lydniveau og efter nogen tid opfattes dette lydniveau ikke som højt Undlad derfor at øge volumen efter tilvænning Hvis enheden skal tages ud af drift for bestandigt skal de afleveres på en genbrugsstation for at undgå skader på miljøet Ge akt på säkerhetsinformationen innan enhe ten tas i bruk Skul...

Page 33: ...n saattanut aiheuttaa vaurion 3 laitteessa esiintyy toimintahäiriöitä Kaikissa näissä tapauksissa laite tulee toimit taa valtuutettuun huoltoliikkeeseen Älä koskaan irrota virtajohtoa pistorasias ta johdosta vetämällä TXA 1020USB Jos kauko ohjainta ei käytetä pidempään aikaan irrota patteri varmuuden vuoksi jotta kauko ohjain ei vaurioituisi mikäli patteri sattuisi vuotamaan Käytöstä poistettavat ...

Page 34: ...MONACOR INTERNATIONAL GmbH Co KG Zum Falsch 36 28307 Bremen Germany Copyright by MONACOR INTERNATIONAL All rights reserved A 1682 99 03 06 2018 ...

Reviews: