AT2080 Air Crimp Tool Head
Doc No: ATS-640052500
Release Date: 01-20-03
UNCONTROLLED COPY
Page 3 of 7
Revision: C
Revision Date: 06-23-21
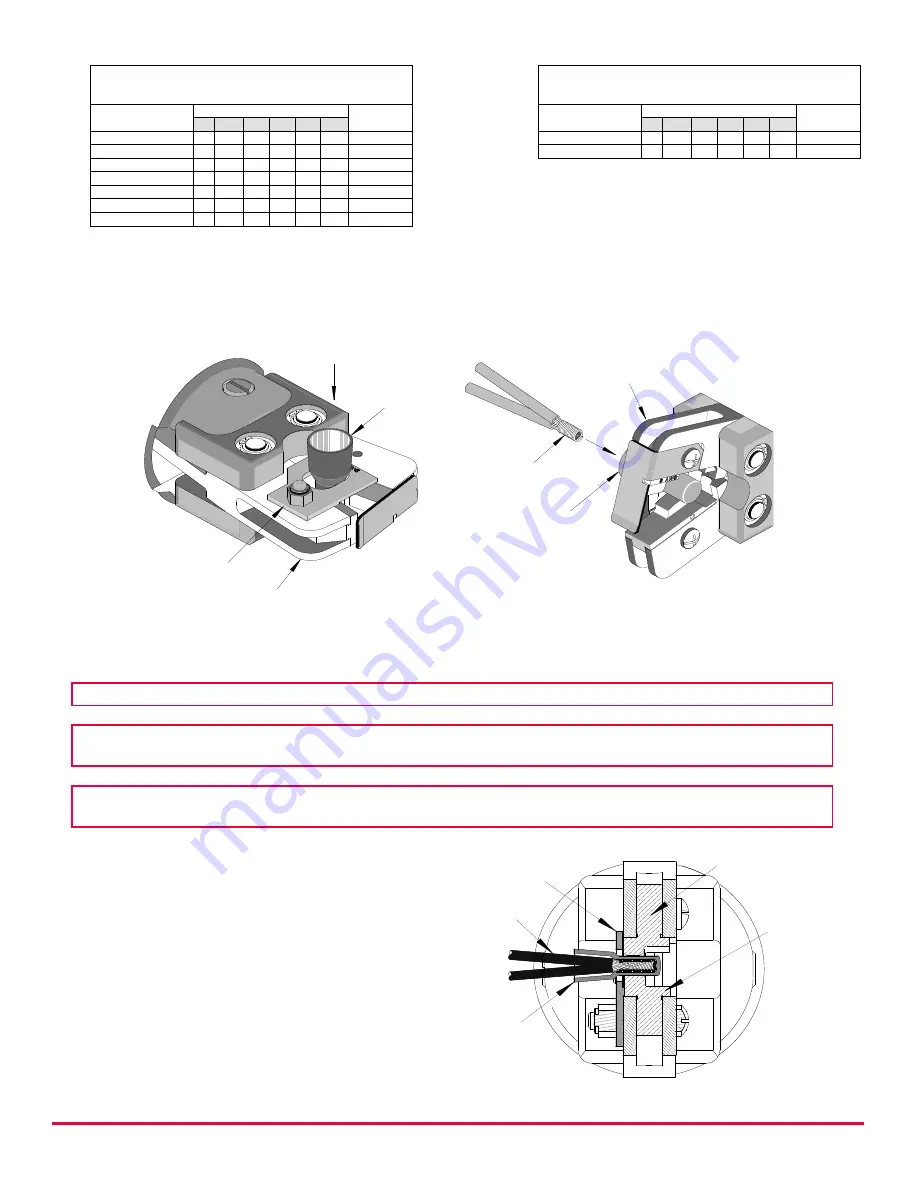
JAWS SLIGHTLY
CLOSED
CONNECTOR
Figure 2
PRE-TWISTED
WIRE
CONNECTOR
LOCATOR
JAWS OPEN
Figure 1
DROP IN
THIS SIDE
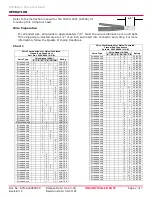
Wire Combinations for Nylon-Insulated
Closed-End Connectors
Part No. 191600024 (NC-8)
Wire Type
Wire Gauge (AWG)
Rating
8 10 12 14 16 18
Stranded only
1
7
UL & CSA
Stranded only
1
6
UL & CSA
Stranded only
1
5
UL & CSA
Stranded only
12 UL & CSA
Stranded only
11 UL & CSA
Stranded only
10 UL & CSA
Stranded only
9
UL & CSA
Wire Combinations for Nylon-Insulated
Closed-End Connectors
Part No. 191600024 (NC-8)
Wire Type
Wire Gauge (AWG)
Rating
8 10 12 14 16 18
Stranded only
8
UL & CSA
Stranded only
7
UL & CSA
**Rated 300 Volts. All others 600 Volts.
Crimping Terminals
1.
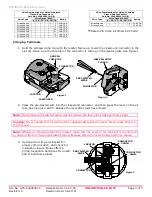
Hold the airhead crimp tool with the locator facing up. Insert the closed-end connector in the
slot (8). Make sure the shoulder of the connector is resting on the locator plate. See Figure 1.
2.
Place the pre-twisted wire into the closed-end connector, and then press the lever on the air
tool. See Figures 2 and 3. Release the lever after jaws have closed.
Note: The tamper-proof ratchet action will not release the tool until it has been fully closed.
Caution: Never operate this tool without the supplied safety shield in place. Never place fingers in
the tool nest.
Note: Whenever crimping without the locator, make sure the seam of the terminal is oriented up
or down in the tool if using unbrazed product because this will provide higher pull force values.
3.
Remove the crimp and inspect for
proper crimp location, and check for
insulation closure. Molex offers a
Crimp Inspection Handbook for closed
barrel industrial product.
Figure 3
LOCATOR
PRE-TWISTED
WIRE
CONDUCTOR
PUNCH
CONDUCTOR
ANVIL
CONNECTOR


