


Quality Crimp Handbook
Order No 63800-0029
Release Date:09-04-03
UNCONTROLLED COPY
Page 17 of 24
Revision: B
Revision Date: 10-07-05
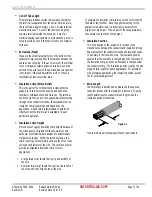
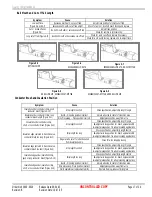
Bell Mouth and Cut-off Tab Length
Symptom
Cause
Solution
Excessive bell mouth, no cut-off tab
Adjust track position for small cut-off tab
Low pull force
(Figure 9-6 and 9-7)
Excessive bell mouth, cut-off tab alright
Check for worn or incorrect punch tooling and replace
Adjust track position
Cut or nicked strands
(Figure 9-8)
No bell mouth and/or excessive cut-off tab
Check for camber in terminal strip
Check for worn cut-off and replace if necessary
Long cut-off tab (Figure 9-9) Good bell mouth and excessive cut-off tab
Check for worn punch tooling, replace, and re-adjust track
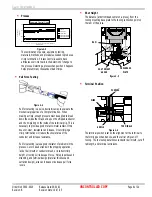
Conductor Brush and Insulation Position
Symptom
Cause
Solution
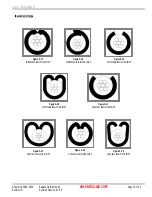
Insulation under conductor crimp, good
conductor brush (Figure 9-10)
Strip length too short
Check specification, adjust strip length longer
Bench - Wire stop position incorrect
Adjust wire stop to center of transition area
Insulation under conductor crimp, long
conductor brush length (Figure 9-11)
Wire Processing – Press position incorrect
Adjust press position away from wire
Check specification, adjust strip length longer
Insulation under conductor crimp,
short or no conductor brush (Figure 9-12)
Strip length too short
Re-adjust wire stop position for bench applications OR
re-adjust press position for wire processing applications
Check specification, adjust strip length shorter
Strip length too long
Re-adjust wire stop position for bench applications OR
re-adjust press position for wire processing applications
Insulation edge centered in transition area,
conductor brush too long (Figure 9-13)
Irregular wire cut-off or strands pulled
from insulation bundle
Check for worn stripping tooling
Check specification, adjust strip length longer
Insulation edge centered in transition area,
conductor brush too short (Figure 9-14)
Strip length too short
Re-adjust wire stop position for bench applications OR
re-adjust press position for wire processing applications
Check specification, adjust strip length shorter
Insulation edge under insulation crimp,
good or long conductor brush (Figure 9-15)
Strip length too long
Re-adjust wire stop position for bench applications OR
re-adjust press position for wire processing applications
Bench - Wire stop position incorrect
Adjust wire stop to center of transition area
Wire processing - Press position incorrect
Adjust press position away from wire
Insulation edge under insulation crimp,
short or no conductor brush (Figure 9-16)
Verify operators wire placement ability
Operate training, reduce crimping rate
Figure 9-5
OPTIMAL CRIMP
Figure 9-6
EXCESSIVE BELL MOUTH
Figure 9-7
EXCESSIVE BELL MOUTH, NO CUT-OFF TAB
Figure 9-8
NO BELL MOUTH, EXCESSIVE CUT-OFF TAB
Figure 9-9
EXCESSIVE CUT-OFF TAB, GOOD BELL MOUTH


