background image

冲刷直管、排污直管插入对应管孔内。

Insert the flushing straight pipe and the sewage 

straight pipe into the corresponding pipe hole.

以墙面为基准,在管上划线做标记线。

Take the wall as the reference, draw a line on the tube 

to make a marking line.
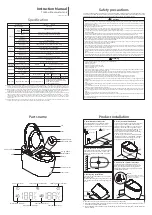
将马桶盖与陶瓷分离。

Separate the smart toilet lid from the ceramic.

将冲刷直管、排污直管插入陶瓷对应孔内,以陶瓷端面
为基准,在管上划线做标记。

Insert the flushing straight pipe and the sewage straight 

pipe into the ceramic corresponding In the hole, mark 

the tube on the ceramic end face as a reference line.

Install the Wall Mount Intelligent Toilet

三. 安装挂墙式智能坐便器   

Summary of Contents for SW8001A

Page 1: ...w moen cn Moen HELPFUL TOOLS For safety and ease of replacement Moen rec ommends the use of these helpful tools Image is for reference only Style varies by model Record Purchased Model Number Save ins...

Page 2: ...x1 N x1 O x1 P x1 Panel accessories Enclosure accessories Pipe fittings A Panel x1 B Connecting rod x2 C Push lever x2 A x1 B x2 C x2 D Installation box x1 E Installation box cover x1 F Wall foot com...

Page 3: ...omfirm whether the contents of the package are complete If there is any missing please contact our customer center in time Image is for reference only style varies by model Please read carefully the f...

Page 4: ...r the project is completed FFLO Ground row Wall row 110 Inner diameter 110 Inner diameter min50 min50 min65 max115 min320 min320 min180 max300 Adapter pipe construction diagram Sealing ring O ring sea...

Page 5: ...he entire product align it with the sewage pipe and insert it and apply glue again Debug and pre tighten the installation distance of wall feet and feet 1 Use a circle ruler to confirm that the 1 mete...

Page 6: ...oard or composite board and finally pave it with tiles Wall thickness minimum 20mm and maximum 90mm Use screws to lock the embedded box on the water tank 5mm 20mm 90mm 20 90mm 5mm 5mm note The gap bet...

Page 7: ...to cut the mounting box above the tile surface bend the excess part and discard it Install the panel bracket Insert the connecting rod into the mounting hole of the panel bracket and align it with th...

Page 8: ...e correct size into the guide hole of the panel bracket and align it with the threaded hole inside the water tank and turn it clockwise by 90 to lock it Fasten the panel on the panel bracket and confi...

Page 9: ...the reference draw a line on the tube to make a marking line Separate the smart toilet lid from the ceramic Insert the flushing straight pipe and the sewage straight pipe into the ceramic correspondin...

Page 10: ...pipe The mouths of the flushing straight pipes and the sewage straight pipes are guided obliquely Hang the protective ceramic liner on the screw Pre assemble the flushing straight pipe and the sewage...

Page 11: ...Apply lubricant to the nozzle Twist to adjust the exposed length of the toilet screw d 20mm d toilet installation method please refer to the wall mounted toilet installation instructions...

Page 12: ...clockwise to discharge the sewage in the pipeline When the drained water is clear and free of foreign matter close the wrench counterclockwise put the filter element back and turn the wrench clockwise...

Page 13: ...t damp cloth Note When cleaning and maintaining plastic parts please use diluted kitchen cleaner neutral do not use corrosive cleaners or solvents such as toilet bowl cleaner residential cleaner Gasol...

Page 14: ...oat Turn on the water inlet switch Follow the instructions to clean the filter Inlet valve does not stop water Cleaning to remove dirt Not working Drain valve failure Drain valve failure Ask a profess...

Page 15: ......

Page 16: ...ction except for otherwise stipulated by law Cosmetic damages scratches dents etc and malfunction or defects caused by abuse or improper maintenance is not covered by this warranty Although the warran...

Reviews: