background image

3

  Undercounter Installation

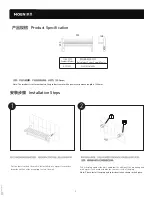
产品规格

产 品 型 号

ACC2501

额定输入电源/功率

220V/50Hz/45W

注意:产品为明装款,产品自带电源线,长度为 1200mm。

Product Specification

Product Model

Rated Input Power Supply/Power

Note: The product is surface mounted, the product comes with a power cord whose length is 1200mm.

  Installation Steps

安装步骤

2

1

将毛巾架放到准备安装的墙面,用铅笔或记号笔在墙上画出安装脚轮廓。

Put the towel rack on the wall to be installed, use a pencil or marker 

draw the outline of the mounting  feet on the wall.

堵头

Take the plug against the wall, and draw the outline of the mounting hole 

with a pencil or a marker inside the contour circle of the plug. 

Note: Please install the plug hole in dislocation as shown in the figure.

取安装堵头靠墙,在堵头轮廓圈内用铅笔或记号笔画出安装孔轮廓。

注意:请将堵头的孔位如图错位安装。

Plug

250

593

128

Summary of Contents for Eva ACC2501

Page 1: ...说明书以备将来参考 电热毛巾架 安装说明书 如需安装支持 配件丢失等 请联系MOEN 中国 400 630 8866 www moen cn PLEASE CONTACT MOEN FIRST For Installation Help Missing or Replacement Parts China 400 630 8866 www moen cn 推荐工具 为了安全和让安装和替换变得容易 Moen建议 您使用以下工具 HELPFUL TOOLS For safety and ease of replacement Moen rec ommends the use of these helpful tools 手枪钻 φ8玻璃钻头 φ8 Glass Drill 卷尺 Tape Measure Pencil or Marker Pen 铅笔或记号笔 2 十字螺丝刀 2 Phillips...

Page 2: ...lity should use this product under the supervi sion of someone The location of the power socket should be protected from water immersion and splashing Basic precautions should be followed when using electrical products including a There is a risk of electric shock all lines must be connected by a licensed electrician b There is a risk of electric shock The power must be turned off during cleaning ...

Page 3: ...00mm Installation Steps 安装步骤 2 1 将毛巾架放到准备安装的墙面 用铅笔或记号笔在墙上画出安装脚轮廓 Put the towel rack on the wall to be installed use a pencil or marker draw the outline of the mounting feet on the wall 堵头 Take the plug against the wall and draw the outline of the mounting hole with a pencil or a marker inside the contour circle of the plug Note Please install the plug hole in dislocation as shown in the figure 取安装...

Page 4: ...ll Note Please install the plug hole in dislocation as shown in the figure 将内六角扳手跟套筒组合使用 用不锈钢膨胀螺钉将底座上紧并固定在墙 上 注意 请将堵头的孔位如图错位安装 紧定螺钉 Set Screw 将产品主体套入堵头 使用紧定螺丝将产品安装在堵头上 并上紧 Put the main body of the product into the plug use a set screw to install the product on the plug and tighten it 安装完成 确认产品已经安装牢固 电源线正确连接后 方可通电使用 产品 After installation ensure that the product is installed firmly and the power cor...

Page 5: ...et button Power indicator Test button Undercounter Installation 控制面板操作 开关指示灯 总开关 定时指示灯 定时开关 电源开关 按下电源开关 开关指示灯亮 毛 巾架进入常开加热模式 定时开关 开关为循环切换模式 4h 2h循环选 择 切换至4h模式时 4h定时指示灯亮 产品加 热4小时后 电源自动关闭 加热停止 切换至2h 模式时 2h定时指示灯亮 产品加热2h后 电源 自动关闭 加热停止 开关具有温控功能 温控范围45 55 可防止 温度过高导致烫伤 Panel Operation Instructions Switch indicator Master switch Timing indicator Timing switch Power switch Press the power switch the switch ...

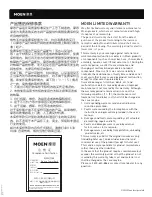
Page 6: ...ulated by law Cosmetic damages scratches dents etc and malfunction or defects caused by abuse or improper maintenance is not covered by this warranty Although the warranty period remains valid in case of the following conditions 1 5 the maintenance cost material cost and labor cost shall still be charged as the case may be 1 Corresponding warranty card and valid invoice cannot be presented 2 Fault...

Reviews: