background image

MOD-5804 QUEEN BED

Customer Service 908-368-1025︱www.modway.com


Page  5  of  5 

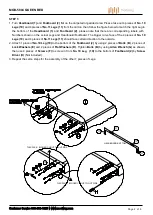
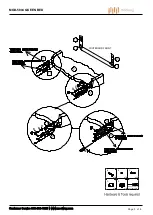
STEP 4: 

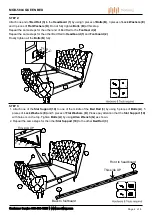
STEP 5:

  C

  x 10


  x 10


  E


  x 10


  D

  G

  x 1

3

4

2

1

3

6

8

8

7

7

1

2

3

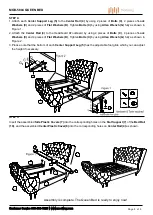
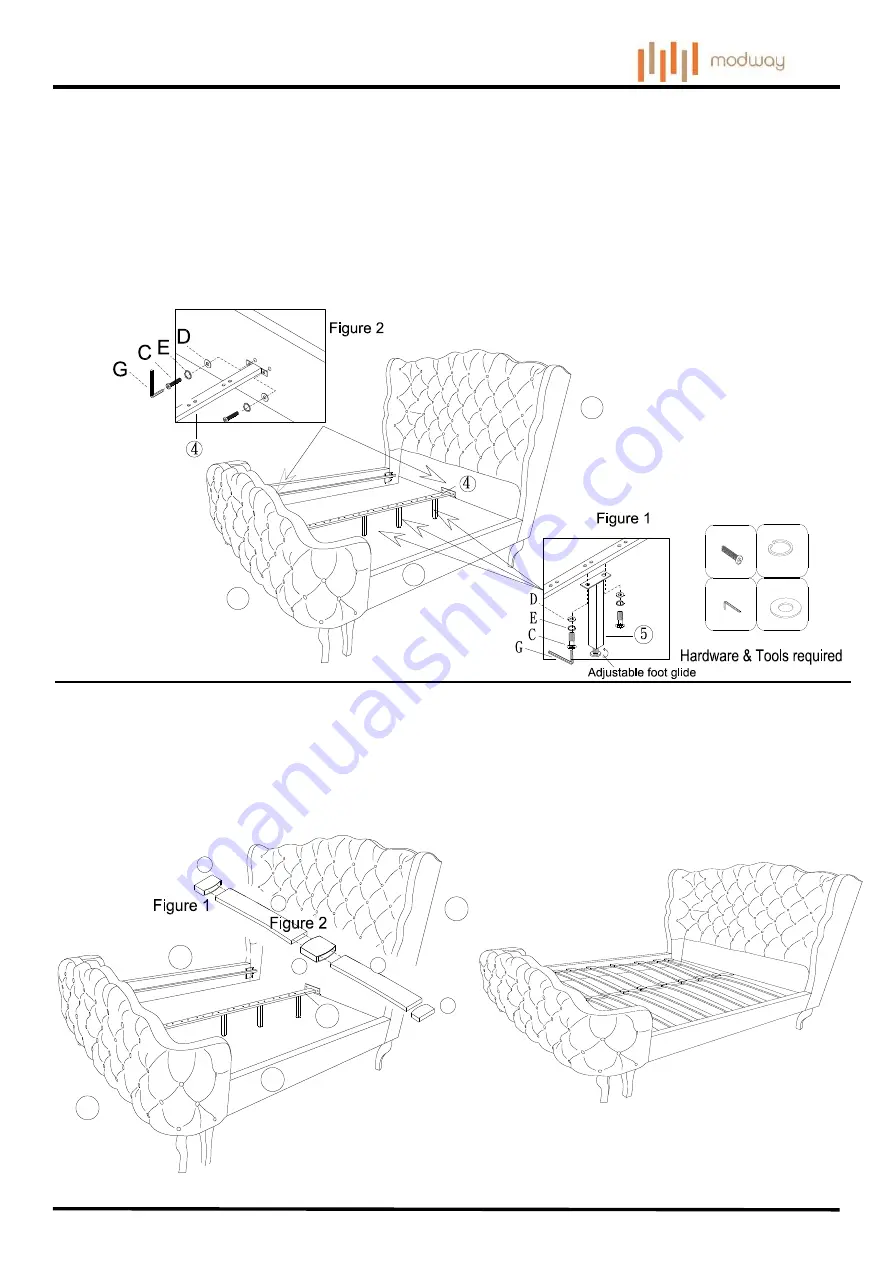
Insert the assembled 

Side Plastic Covers (7)

 into the corresponding holes on the 

Slat Support (7)

 of the 

Bed Rail 

(10)

, and the assembled

 Center Plastic Cover(6)

 into the corresponding holes on 

Center Rail (4)

 as shown.   


Assembly is complete. The Queen Bed is ready to enjoy now!


1. Attach each 

Center Support Leg (5)

 to the 

Center Rail (4)

 by using 2 pieces of 

Bolts (C)

,


2 pieces of 

Lock 

Washers (E)

 and 2 pieces of 

Flat Washers (D)

. Tighten

 Bolts (C)

 by using 

Allen Wrench (G)

 fully as shown in 

Figure 1.   

2.  Attach  the 

Center  Rail  (4)

  to  the  Headboard  &Footboard  by  using  4  pieces  of 

Bolts  (C)

,  4  pieces  of 

Lock 

Washers (E)

 and 4 pieces of 

Flat Washers (D)

. Tighten 

Bolts (C)

 by using 

Allen Wrench (G)

 fully as shown in 

Figure 2.   

3. Please note that the bottom of each 

Center Support Leg (5)

 has the adjustable foot glide which you can adjust 

the height if necessary. 


Summary of Contents for MOD-5804

Page 1: ... instruction until you have checked all the components and hardware and the furniture is fully assembled Please ensure that the packaging is disposed of in a safe and environmentally friendly way 5 Assemble all components loosely until advised to tighten Depending on use it may be necessary to tighten the components from time to time so please save the tools that have been provided 6 Please keep a...

Page 2: ...board 2 please note that there are corresponding labels with Numbers shown on the actual Legs and Headboard Footboard The bigger curve face of the 4 pieces of No 10 Legs 10 and 4 pieces of No 11 Legs 11 should face certain direction to the outside 2 Attach 1 piece of No 10 Leg 10 to the bottom of the Footboard 2 by using 2 pieces of Bolts B 2 pieces of Lock Washers E and 2 pieces of Flat Washers D...

Page 3: ... 5804 QUEEN BED Customer Service 908 368 1025 www modway com Page 3 of 5 B x 16 x 16 E x 16 D G x 1 x 32 F Phillips Head Screwdriver NOT INCLUDED BE B E D 10 11 11 2 11 11 10 10 10 10 10 10 FOOTBOARD FRONT ...

Page 4: ...hten Bolts B at this step Repeat the same steps for the other end of Bed Rail to the Footboard 2 Repeat the same steps for the other Bed Rail to Headboard 1 and Footboard 2 Finally tighten all the Bolts B fully 1 Attach one of the Slat Support 10 to one of the middle of the Bed Rail 3 by using 5 pieces of Bolts A 5 pieces of Lock Washers E and 5 pieces of Flat Washers D Please pay attention that t...

Page 5: ...een Bed is ready to enjoy now 1 Attach each Center Support Leg 5 to the Center Rail 4 by using 2 pieces of Bolts C 2 pieces of Lock Washers E and 2 pieces of Flat Washers D Tighten Bolts C by using Allen Wrench G fully as shown in Figure 1 2 Attach the Center Rail 4 to the Headboard Footboard by using 4 pieces of Bolts C 4 pieces of Lock Washers E and 4 pieces of Flat Washers D Tighten Bolts C by ...

Reviews: