modway EEI-5552-CHE-WHI Assembly Instructions Manual Download Page 13

12

11

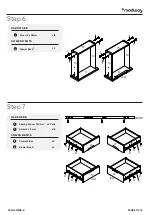
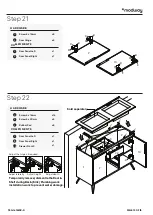
The drawer(s) can be removed, if ever required. 

Locate the spring clip on both sides on the drawer glide.
At the same time, press the clips and pull the drawer out. 

To reinsert, simply align the 2 sides of the drawer glides
and slide in until fully inserted.

PAGE 13 OF 15

Step 23

780−167MDD−0

12

Spring clip

Summary of Contents for EEI-5552-CHE-WHI

Page 1: ...PAGE 1 OF 15 780 167MD1 0 V1 05 20 21 ASSEMBLY INSTRUCTIONS EEI 5552 Questions Contact us 609 256 9000 cs modway com www modway com...

Page 2: ...l Silicone Adhesive or Caulk Drywall Anchors and Screws Other Wall Mounting Hardware Door Hinge Corner Bracket Screw 4 x 20mm Screw 4 x 30mm Screw 9 x 50mm Metal Leg Rubber Pad Phillips x1 x1 x2 x3 x1...

Page 3: ...m Bottom Panel Back Panel 2 Support Panel 1 Drawer Side R Drawer Front 1 Front Support Drawer Side L Back Panel 1 Back Support 2 Right Side Panel HARDWARE HARDWARE COMPONENTS COMPONENTS 4 13 6 25 2 3...

Page 4: ...Lock 12 Center Panel 1 Drawer Front 2 Center Panel 2 Drawer Front 1 HARDWARE HARDWARE COMPONENTS COMPONENTS 21 11 7 12 S R Q Step 3 Step 4 780 167MD4 0 FRONT Spring clip x3 Drawer Panel COMPONENTS 16...

Page 5: ...2mm R x3 Pairs x3 x3 x3 Screw 9 x 38mm Bearing Runner 350mm Drawer Back 1 Drawer Side R Drawer Side L HARDWARE HARDWARE COMPONENTS COMPONENTS 13 15 14 L S FRONT 13 14 15 15 13 14 11 12 X2 L L L L L L...

Page 6: ...Panel 1 5 Cam Lock 15 HARDWARE COMPONENTS C x2 x1 Center Panel 2 21 x1 Center Panel 1 17 x1 Cam Lock 15 Support Panel 2 HARDWARE COMPONENTS 23 C PAGE 6 OF 15 Step 8 Step 9 780 167MD6 0 21 23 17 21 5...

Page 7: ...nel 1 6 x1 Screw 9 x 50mm Back Support 2 HARDWARE COMPONENTS 25 M x8 x1 Bottom Panel 3 x1 Screw 9 x 50mm Back Support 1 HARDWARE COMPONENTS 24 M PAGE 7 OF 15 Step 10 Step 11 780 167MD7 0 M 21 17 3 24...

Page 8: ...ide Panel 1 x1 Cam Lock 15 HARDWARE COMPONENTS 7 C x5 x1 Back Panel 1 6 x1 Support Panel 1 5 x1 Front Support 4 x1 Bottom Panel 3 x1 Right Side Panel 2 x1 Cam Lock 15 Back Panel 2 HARDWARE COMPONENTS...

Page 9: ...Center Panel 1 17 x1 Front Support 4 x1 Right Side Panel 2 x1 Left Side Panel 1 Screw 4 x 14mm HARDWARE COMPONENTS D x1 Metal Leg N x4 Metal Leg H x20 Screw 4 x 20mm HARDWARE G PAGE 9 OF 15 Step 14 S...

Page 10: ...Screw 4 x 14mm HARDWARE COMPONENTS D x1 Shelf Panel 1 8 x1 Shelf Panel 2 COMPONENTS 20 x8 x1 Shelf Panel 2 20 x2 Base Panel 2 19 x2 Base Panel 1 18 x1 Shelf Panel 1 8 Screw 9 x 38mm HARDWARE COMPONENT...

Page 11: ...NOTE Mounting hardware and tools are not included We suggest professional installation Hole 6mm PAGE 11 OF 15 Step 19 Step 20 780 167MDB 0...

Page 12: ...oor Panel Right 10 x1 Door Panel Left 9 Screw 4 x 14mm HARDWARE COMPONENTS D Step 21 Step 22 780 167MDC 0 9 10 Adjust laterally Adjust the hinges if required Adjust depth Adjust height 9 D D D D D D D...

Page 13: ...cate the spring clip on both sides on the drawer glide At the same time press the clips and pull the drawer out To reinsert simply align the 2 sides of the drawer glides and slide in until fully inser...

Page 14: ...te Your sink basin comes complete with a silver over ow ring If you d like to remove this over ow ring you can do so by hand Missing parts or hardware Need assistance Contact us before returning your...

Page 15: ...ot contract grade Clean using a non abrasive cloth and a mild cleaner Never use harsh chemicals as they could damage the nish or integrity of the item CONNECT WITH US Tag us modway_furniture and modwa...

Reviews: