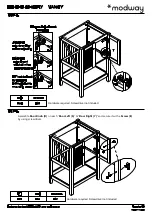
Insert the
Shelf Pin (H)
to the pre-drilled holes.
Insert
Adjustable Shelf (11)
above the
.
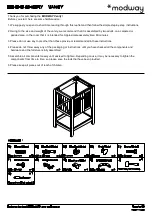
Page 1: ...at it is intended for Approximate assembly time 60 minutes 3 Please do not use any tools other than those provide or recommended in these instructions 4 Please do not throw away any of the packaging or instructions until you have checked all the components and hardware and the furniture is fully assembled 5 Assemble all components loosely until advised to tighten Depending on use it may be necessa...
Page 2: ......
Page 3: ...lly insert the Wood Dowels A at the designated holes on the relevant parts Use Philips screwdriver to insert the Cambolt B carefully at the designated holes on the relevant parts Please ensure the Cambolt is inserted and secured at the correct pre drilled holes Power tool not recommended ...
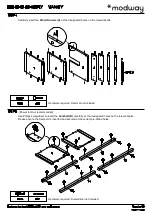
Page 4: ...or Left 6 and Door Right 7 on each sides and secure it with 2 pieces of Screws F for each hinges Properly insert the Camlock C in the pre drilled hole then align it to the assembled Cambolt B to secure both Back Panel 1 4 and Back Panel 2 5 to the Vertical Panel 3 14 and Vertical Panel 4 15 This assembly namely Back Frame Assembly ...
Page 5: ...Bottom Panel 3 Wooden Dowels to the pre drilled hole 5 3 Once aligned push the Bottom Panel 3 in and align the Camlocks C to the Cambolt B to secure the Bottom Panel 3 to the Side Panel Left 1 6 1 Lay flat the Side Panel Right 2 which already assembled with 8 pieces of Wood Dowel A and 2 pieces of Cambolt B Repeat step 5 2 5 3 to secure the Side Panel Right 2 to the Bottom Panel 3 ...
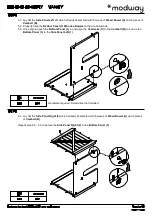
Page 6: ...lock C in the pre drilled hole then align it to the assembled Cambolt B to secure Base Panel 3 10 to the Vertical Panel 3 14 and Vertical Panel 4 15 Properly insert the Camlock C in the pre drilled hole then align it to the assembled Cambolt B to secure both of Side Panel Left 1 and Side Panel Right 2 to the Vertical Panel 3 14 and Vertical Panel 4 15 ...
Page 7: ...sembled Cambolt B to secure both Base Panel 1 8 and Base Panel 2 9 to the Vertical Panel 1 12 and Vertical Panel 2 13 This assembly namely Front Frame Assembly Properly insert the Camlock C in the pre drilled hole then align it to the assembled Cambolt B to secure both of Side Panel Left 1 and Side Panel Right 2 to the Vertical Panel 1 12 and Vertical Panel 2 13 ...
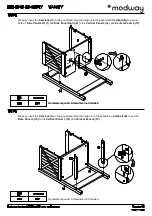
Page 8: ...Insert the Shelf Pin H to the pre drilled holes Insert Adjustable Shelf 11 above the Shelf Pin H ...
Page 9: ...Hardware required Screwdriver not included Hardware required Screwdriver not included Assemble Door Knob D on each Door Left 6 Door Right 7 and secure it with a Screw E by using screwdriver ...
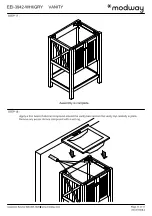
Page 10: ...ovided Please use appropriate fixtures for your wall Hardware required Screwdriver not included Hole Ø6mm Use Screwdriver to secure the Metal Bracket J on each corner of the top portion of the Vanity Cabinet with 4 pieces of Screw F ...
Page 11: ......