background image

English

   15 


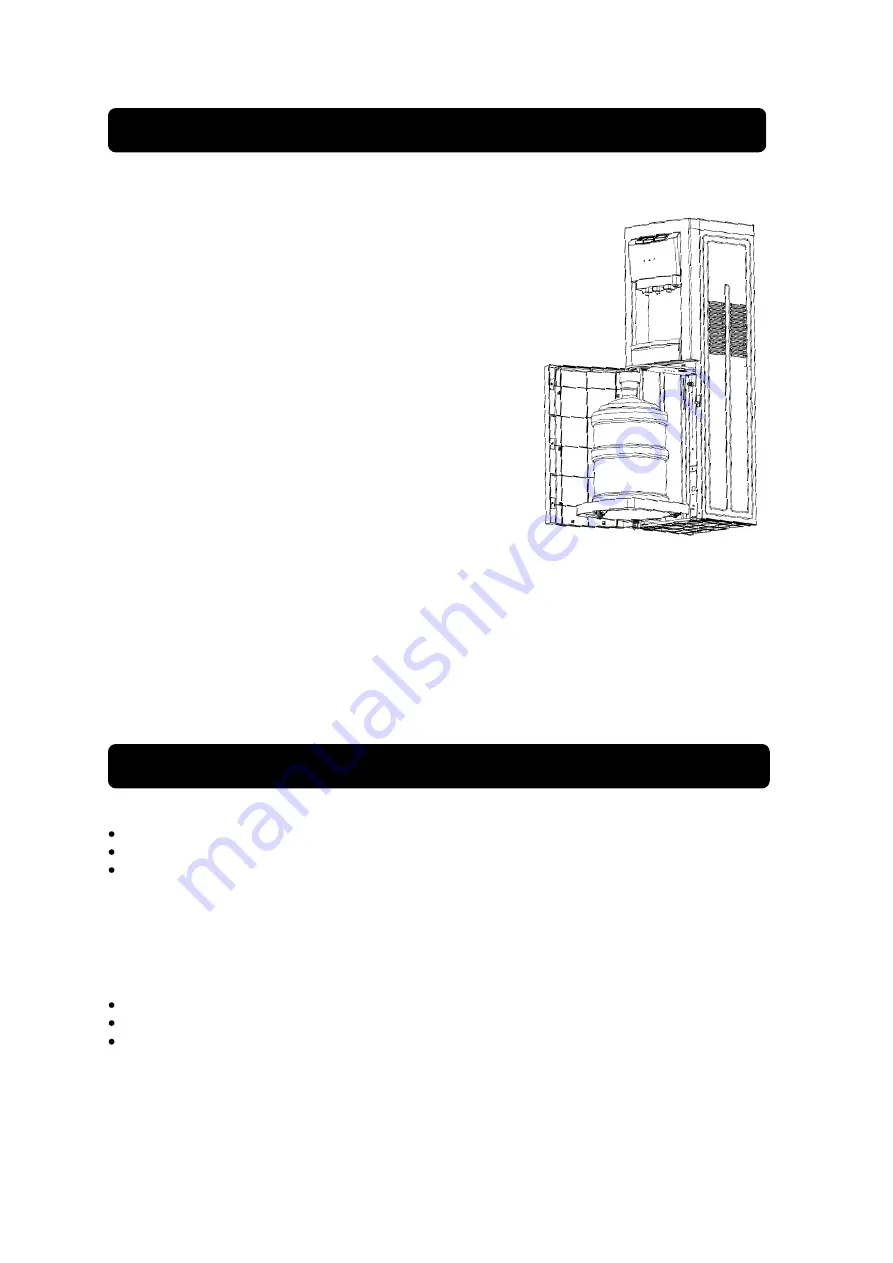
1.  Install  the  dispenser  on  an  even  and  stable  surface. 

Provide a minimum of 20 cm of distance from        the 
wall 
2.  Install water gallon in the tray/rack    

mobile

   gallon. 

3.  Insert the pipe to the gallon and then plug the cover 

to mouth of gallon. 

4.  Push  the  tray/rack  mobile  gallon  into  the 

downloading  bottle  cabinet/storage.  Make  sure  it  is 
installed properly. And close the door.  

5.  Connect the electrical cord to the outlet, and turn on 

the  red  switch  (heater)  located  behind  the  unit. 
Ensure  that  the  socket  /  electric  source  has  a 
grounding  to  prevent  electric  leakage.  and  turn  on 
the switch located behind the unit.  

6.  For  the  first  time  to    use,  the  inside  of  the  unit 

must  be  cleaned.  Press  the  hot  water  and  cold 
water.  Make  sure  the  water  out  of  the  tap  both. 
After  both  the  tap  water  out,  wait  around  20 
minutes,  then  remove  gallons  of  storage  and 
empty the water in the unit by opening the drain 
cover.  Make  sure  the  power  cord  is  unplugged 
from the power source when the discard excess 
water

.


7.  If the gallon is empty, turn off the red switch (heater) 

before replacing it with a new gallon. 

 
Attention   :    

       Do    not   connect the dispenser to the power source or  
       pressing the   red switch (heater)  if ther  is no  water  in     
       tank or no water flows from the hot water tap (red) when  
       the tap is pressed.  


How to use a dispenser with three taps: 


To dispense hot water, push the left button / tap.  


To dispense normal-temperature water, push the central button / tap.  


To dispense cold water, push the right button / tap.  


The unit is equipped with a safety on hot water button to prevent the danger of the reach of children. 
Scroll and press the button to dispense hot water. 


Attention:  


Avoid exposure to hot water hazard. 


Cabinet doors should be closed. 

    Buzzer or alarm will be ringing when the water in gallon is empty and the water shortage indicator  

       will be on.  


Part 2: 

Installation 

Part 3: 

How to Use


Summary of Contents for DD 66 G

Page 1: ...09 16 www modena co id DD Series BUKU PETUNJUK PENGGUNAAN DISPENSER DAN KARTU GARANSI WATER DISPENSER MANUAL AND WARRANTY CARD ...

Page 2: ...n rinci sehingga memudahkan Anda dalam menggunakan dan memanfaatkannya Agar produk dispenser ini dapat berfungsi normal dalam jangka waktu yang panjang kami sangat merekomendasikan agar buku ini tidak saja menjadi pegangan Anda sebagai pembeli namun juga sebagai panduan bagi siapa saja yang menggunakan dan mengoperasikannya sehingga keawetan dan kualitas fungsionalnya lebih tahan lama Buku ini san...

Page 3: ...HLM Kata Pengantar 1 Bagian 1 Nama nama Bagian 3 Bagian 2 Instalasi 5 Bagian 3 Cara Penggunaan 6 Bagian 4 Pemeliharaan 6 Bagian 5 Tindakan Pencegahan 7 Bagian 6 Masalah Solusinya 9 Bagian 7 Spesifikasi 10 NOMOR P 6 INDO2 00301 0212 ...

Page 4: ...1 Lampu indikator air panas 3 Tombol air dingin 12 Lampu indikator air habis 4 Lampu indikator air dingin 13 Pintu kabinet 5 Keran pengeluaran air dingin 14 Sakelar hijau pendingin 6 Keran pengeluaran air normal 15 Sakelar merah pemanas 7 Keran pengeluaran air panas 16 Kabel listrik 8 Wadah untuk menampung air 17 Lubang pembuangan air 9 Pipa galon Bagian 1 Nama nama bagian ...

Page 5: ...penyimpanan dan kosongkan air di dalam unit dengan membuka penutup lubang pembuangan air Pastikan kabel listrik dilepas dari sumber listrik ketika membuang sisa air 7 Bila air di dalam galon sudah habis matikan sakelar merah pemanas sebelum menggantinya dengan yang baru Perhatian Jangan menghubungkan dispenser ini ke sumber arus listrik atau menekan sakelar merah pemanas jika di dalam tangki tidak...

Page 6: ...ngka waktu lama Sementara itu ketika hasil pengeluaran air panas menjadi dingin buka katup pembuangan sampai tidak ada air di dalam dispenser air a Letakkan dispenser di permukaan yang rata Hindari meletakkannya di tempat yang lembab Berikan jarak sedikitnya 20 cm dari dinding Dan jangan meletakkan benda benda yang mudah terbakar di dekat dispenser b Untuk menghindari kerusakan pada mesin jangan m...

Page 7: ...kabel listrik haruslah dilakukan oleh tenaga yang berpengalaman dan sangat mengerti akan kelistrikan Jangan pernah mengganti sendiri kabel listrik dikarenakan akan bisa menyebabkan bahaya yang bisa merugikan diri sendiri dan orang lain Perhatian Produk ini tidak boleh dibuang bersama sampah rumah tangga lainnya Untuk mencegah kemungkinan bahaya terhadap lingkungan atau kesehatan manusia akibat pem...

Page 8: ... Panas Normal Dingin Panas Normal Dingin Panas Normal Ruang bawah Gallon storage Gallon storage Gallon storage Warna Gold G Silver V Black L Output air panas liter jam 3 5 5 5 Output air dingin liter jam 2 2 2 Kapasitas tangki air panas liter 0 8 0 8 0 8 Kapasitas tangki air dingin liter 2 5 2 5 2 5 Suhu panas celcius 90 90 90 Suhu dingin celcius 10 10 10 Kompresor bebas CFC Ya Ya Ya Thermostat pe...

Page 9: ......

Page 10: ...nual to facilitate the users In order for this water dispenser to perform normally for an extended period of time we highly recommend not only the buyer to hold onto this manual but also those who wish to operate the product optimally to maintain its service period and quality This manual is recommended for use by anyone who operates the water dispenser We also provide a customer care service for ...

Page 11: ...ish 12 CONTENTS PAGE Introduction 11 Part 1 Name of Parts 13 Part 2 Installation 15 Part 3 How to Use 16 Part 4 Maintenance 16 Part 5 Precaution Action 17 Part 6 Problem Solution 19 Part 7 Specification 20 ...

Page 12: ...rack mobile gallon 2 Normal water button 11 Hot indicator 3 Cold water button 12 Shortage water indicator 4 Cooling indicator 13 Cabinet door 5 Cold water tap 14 Green switch cooling 6 Normal water tap 15 Red switch heating 7 Hot water tap 16 Cable power 8 Water tray 17 Water drainage 9 Pipe of gallon Part 1 Name of Parts ...

Page 13: ...ons of storage and empty the water in the unit by opening the drain cover Make sure the power cord is unplugged from the power source when the discard excess water 7 If the gallon is empty turn off the red switch heater before replacing it with a new gallon Attention Do not connect the dispenser to the power source or pressing the red switch heater if ther is no water in tank or no water flows fro...

Page 14: ...not use the unit for a long time Meanwhile when the hot water to be cold not hot open the drain valve until there is no water in the unit 1 Install the dispenser on even surface Avoid storing in humid place Provide a minimum of 20 cm of distance from the wall and do not store flammable substances near the dispenser 2 To avoid damage to the machine avoid connecting electrical cord or pressing hot w...

Page 15: ...r MODENA to do the replacement Replacement power cord must be done by experienced personnel and understand about electricity Never replace the power cord itself due to the dangers that could lead to harm themselves and others Attention This product must not be disposed of with other household waste To prevent possible harm to the environment or human health from uncontrolled waste disposal The uni...

Page 16: ... Normal Lower chamber Gallon storage Gallon storage Gallon storage Color Gray G Silver V Black L Hot water output liter hour 3 5 5 5 Cold water output liter hour 2 2 2 Hot water tank capacity liter 0 8 0 8 0 8 Cold water tank capacity liter 2 5 2 5 2 5 High temperature celcius 90 90 90 Cold temperature celcius 10 10 10 Free CFC compressor Yes Yes Yes Regulator of thermostat Yes Yes Yes Water tube ...

Page 17: ......

Reviews: