background image

Mobilex A/S

Grønlandsvej 5
DK-8660 Skanderborg

www.mobilex.dk

Set up description

Check with the list from above if nothing is missing. If you’d discover at that stage that some part is missing 
or damaged, do not continue assembly process. Contact your supplier of the product right away.

Put the rollator with it's wheels on the floor.

Grab both seat tubes and simultaneously push them down until you’ll hear the “click” sound of locking 
mechanism of the frame in open position. Try to pull frame folding strip up to fold the frame. If it is 
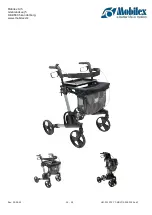
impossible to do, the frame is opened and secured correctly. See the rollaror in “OPEN” status in the figure 
above. 

Always ensure the frame is stable and fixed when the rollator is opened. 

Adjust both push handles to the same height. Usually the correct setting is adjusted if the handles are on the 
level of user's wrists when standing with arms down along the body.

Loosen fixing levers located under the push handles. Then set the handles to required height. Both handles 
should be set to the same height. Tie the fixing knobs on the handle tubes.

Make sure that the fixing levers (2 pieces) are securely locked so that the rollator is stable and parts can not 
move when forced. 

Always test to see that the rollator and attachments are properly and safely locked in place BEFORE using.

Failure to follow these warnings can result in personal injury.

Folding description

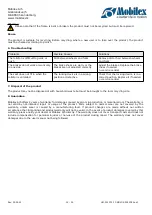
To fold the rollator press down with your right hand frame lock lever located under the right seat tube (see 
picture). At the same time pull the frame folding strip up. The rollator should fold amost automatically. 

You can secure the device in folded position with folded frame hook placed at the rear end of right seat tube. 
Attache loose end of the hook to the left seat tube. Before opening the rollator back you must unattach the 
folded frame hook.

Function description

Adjust the height of the push handles so that when the user’s arm is down along the body, the supports are 
at wrist height.  Adjust the height by releasing the fixing knob located under the handle tube. Then adjust 
handles to your desired height, then tie the fixing knob securely. Repeat the steps for the other support, so 
both are at the same height.

Care should be taken to ensure that ALL adjustments are secured and that castors and moving parts are in 
good working order before using.

To stop the rollator simply pull the brake handles back towards hand grips and hold brake handles in the 
”BACK” position to remain in position. TO MOVE release the brake handles. 

To lock the brakes in ”engaged” position push the brake handles forward until you can hear the ”click” 
sound. To unlock the brakes pull the brake handles back until you can feel them loose.

While using the rollator in a stationary position, the hand brakes MUST always be locked. You should always 
engage the breaks when you don’t plan to move the device. Never leave device without breaks engaged 
when there is someone sitting in it! Never leave device on slopes without breaks engaged!

Transport recommendations 

The   rollator   is   an   easily   foldable   product   convenient   for   transportation.   If   it   is   necessary   to   transport   it,   we  
recommend to fold it as it is written in description above. Rollator should be transported in the way that it is stable 
and there is no risk of sudden and dangerous movements of the transported device.

Rev. 05.04.22

 12 - 24

UM-312075-77-MULTI-05042022.odt

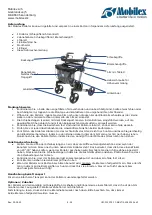
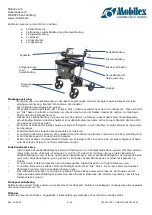
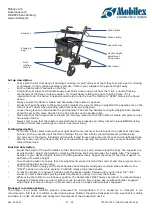
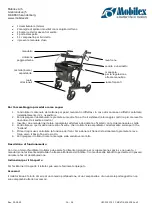
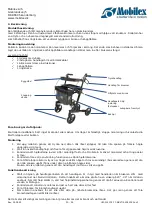
Backrest

Shopping
bag

Front 
rotating

castors

Push handle

Brake handle

Seat with tray

Handle height

adjustment
fixing levers

Rear wheel

Summary of Contents for KUDU 312075

Page 1: ...g Mobilex A S Gr nlandsvej 5 DK 8660 Skanderborg www mobilex dk The handy tray can be mounted on the tear resistant seat Sidewards foldable rollator Comfortable seat back strap for safety Height adjus...

Page 2: ...ontent Indice Inneh llsf rteckning Montage und Gebrauchsanleitung 3 6 DEUTSCH Montage og brugervejledning 7 10 DANSK User Manual 11 14 ENGLISH Manuale d uso e manutenzione 15 18 ITALIANO Montage og br...

Page 3: ...len Bewertung des Gesundheitszustands des potenziellen Benutzers ab Die Wahl des f r ein bestimmtes Krankheitsbild geeigneten orthop dischen Hilfsmittels muss immer mit Hilfe eines Facharztes oder Phy...

Page 4: ...ndem Sie den Handgriff in der Mitte des Sitzes nach oben ziehen Funktionsbeschreibung Stellen Sie die H he der Schiebestangen so ein dass die Griffe auf Handgelenksh he sind wenn der Benutzer mit den...

Page 5: ...rmittel aufspr hen Warnung Wenn das Produkt sehr kalkhaltigem Wasser ausgesetzt wird kann es zu einer Bindung und Ansammlung von Kalk an Radlagern und anderen beweglichen Teilen kommen In diesem Fall...

Page 6: ...pen nicht richtig ein Verriegelungsmechanik nicht richtig eingestellt oder defekt Einstellung der Verriegelungs mechanik kontrollieren oder austauschen Servicecenter 7 Entsorgung des Produktes Das Pro...

Page 7: ...el vurdering af den potentielle brugers sundhedstilstand Valget af ortop disk hj lpemiddel der passer til et givet sygdomsbillede skal altid foretages med hj lp fra en speciall ge eller fysioterapeut...

Page 8: ...d ved at fastg re l s fra venstre side af s dets bagkant til h jre side Skal tages af igen for at folde rollatoren ud igen Funktionsbeskrivelse Juster h jden af skubbeh ndtagene s dan at h ndtagene er...

Page 9: ...es produktet for meget kalkholdigt vand kan en binding og ophobning af kalk p hjullejer og andre bev gelige dele forekomme I dette tilf lde kan produktet reng res med et kalkopl sende middel og dereft...

Page 10: ...r evt sidder noget i vejen eller om noget ikke er fastsp ndt Kontroller eller udskift l semekanismen Hvis dette ikke afhj lper problemet kontaktes forhandleren 7 Bortskaffelse af produktet Dette produ...

Page 11: ...epend on individual evaluation of potential user s health status The choice of orthopedic aid appropriate for a given clinical picture must be always made with the help of a specialist physician or ph...

Page 12: ...frame hook placed at the rear end of right seat tube Attache loose end of the hook to the left seat tube Before opening the rollator back you must unattach the folded frame hook Function description A...

Page 13: ...e life Normally 10 years depending on use Cleaning the wheels It is recommended to clean the wheels in hot water with a mild cleaning agent Lubricate the bearings with oil periodically or when the whe...

Page 14: ...hat the locking device is in a correct position Replace it if needed service centre 7 Disposal of the product The product may not be disposed of with household waste but must be brought to the local r...

Page 15: ...roindicazioni non possono essere collegate a un quadro clinico specifico e dipendono da una valutazione individuale dello stato di salute del potenziale utente La scelta di un dispositivo ortopedico a...

Page 16: ...e ballano 5 Prima di ogni uso controllate la funzione dei freni Per azionare il freno di stazionamento premete le leve freno verso il basso fino allo scatto 6 Per ripiegare il rollator tirate la manig...

Page 17: ...elle ruote Si raccomanda di pulire le ruote in acqua calda con un detergente delicato Lubrificare i cuscinetti con olio periodicamente o quando le ruote iniziano a cigolare Attenzione Se il prodotto e...

Page 18: ...i bloccaggio regolata male o difettosa Controllare o sostituire il sistema di bloccaggio seduta centro d assistenza 7 Smaltimento del prodotto Il prodotto non pu essere smaltito insieme ai rifiuti dom...

Page 19: ...eller h fterna Det r f rbjudet att anv nda produkten f r andra ndam l n de som beskrivs ovan Kontraindikation Rollatorer r inte avsedda f r personer som inte kan uppr tth lla en korrekt kroppsbalans...

Page 20: ...ssande h jd med skruvarna 3 Kontrollera att hjulbultarna axlar sitter ordentligt fast och att rollatorn r s kert monterad och att inga delar r l sa 4 Kontrollera f re varje anv ndning funktionen av b...

Page 21: ...p den nedre delen av ramen Bild p typskylten Kudo 312075 Betydelse av versiktsikonen 5 Underh ll och sk tsel Normal smuts kan tas bort med varmt tv lvatten eller vanliga reng ringsmedel Anv nd endast...

Page 22: ...el ggen r slitna eller bromsarna r d ligt justerade Kontrollera bromsinst llningen ndra m jligen bromsbel gg Service Center L smekanismen kn pper inte i vid uppf llning L smekanism r inte r tt justera...

Page 23: ...sories item nr 312075 77 Harmonized norms used during conformity estimation PN EN ISO 11199 2 2005 EN ISO 14971 2012 EN 1041 2009 In case of unintended incidents or suspected faults failures or defect...

Page 24: ...Mobilex A S Gr nlandsvej 5 DK 8660 Skanderborg www mobilex dk Rev 05 04 22 24 24 UM 312075 77 MULTI 05042022 odt...

Reviews: