background image

4.


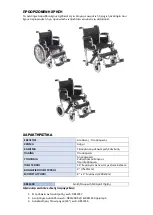
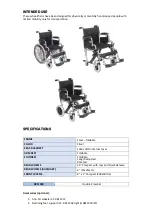
Πίσω τροχός συμπαγής


(12

”) ,  

Γρήγορης Απελευθέρωσης (

QR) 

κωδ.: 0811

309 

5.


Πίσω τροχός


φουσκωτός


(24

”)  

με Ακτίνα 

,

Γρήγορης Απελευθέρωσης (

QR) 

κωδ.: 

0811363


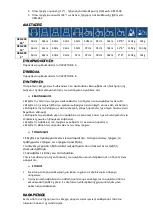
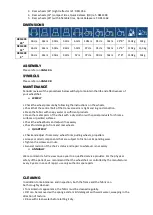
ΔΙΑΣΤΑΣΕΙΣ


ΣΥΝΑΡΜΟΛΟΓΗΣΗ


Παρακαλώ συμβουλευθείτε το ΠΑΡΑΡΤΗΜΑ Α


ΣΥΜΒΟΛΑ


Παρακαλώ συμβουλευθείτε το ΠΑΡΑΡΤΗΜΑ Β


ΣΥΝΤΗΡΗΣΗ


Ο περιοδικός έλεγχος των διαδικασιών που ακολουθούν θα συμβάλει στη διατήρηση της 

ζωής και της αποτελεσματικότητας του αναπηρικού αμαξιδίου σας.


ΕΒΔΟΜΑΔΙΑΙΟΣ


• Ελέγξτε την πίεση των τροχών ακολουθώντας τις οδηγίες που αναγράφονται σε αυτά.


• Ελέγξτε ότι η


κεντρική βίδα του εγκάρσιου βραχίονα είναι σφιχτή και σε καλή κατάσταση.


• Καθαρίστε την ταπετσαρία με σαπουνόνερο ή επαρκή προϊόντα. (με στεγνό πανί αν είναι 

δερμάτινο κάθισμα)


• Καθαρίστε τα μεταλλικά μέρη του αμαξιδίου με ένα στεγνό πανί ή με ειδικά προϊόντα για 

επιφάνειες χρωμίου ή βαμμένες επιφάνειες.


• Ελέγξτε τις ασφάλειες του τροχού και ρυθμίστε τις αν είναι απαραίτητο.


• Ελέγξτε τη φθορά των μπροστινών και των πίσω τροχών.


ΤΡΙΜΗΝΙΑΙΟΣ


• Ελέγξτε και προσαρμόστε εάν είναι απαραίτητο: τα πιρούνια των τροχών, το 

τράβηγμα των τροχών, των τροχών προώθησης.


• Λιπάνετε με γράσο ή λάδια όλα τα εξαρτήματα που υπόκεινται σε τριβή ή 

επικειμένη φθορά.


• Ξανασφίξτε τις βίδες και τα παξιμάδια.


• Γενική αναθεώρηση της κατάστασης του αμαξιδίου και επιδιόρθωση σε οτιδήποτε είναι 

απαραίτητο.


ΕΤΗΣΙΟΣ


Συνιστούμε πλήρη αναθεώρηση μία φορά το χρόνο σε εξειδικευμένο πάροχο


υπηρεσιών.


Για την φυσική ασφάλεια του ασθενή προτείνουμε να ελέγχεται το αμαξίδιο από τον 

κατασκευαστή κάθε 2 χρόνια. Σε περίπτωση επιδιόρθωσης χρησιμοποιήστε μόνο 

αυθεντικά ανταλλακτικά.


ΚΑΘΑΡΙΣΜΟΣ


Εκτός από τη συντήρηση και τον έλεγχο, μπορεί να γίνει γενικός καθαρισμός


τόσο του 

πλαισίου όσο και της ταπετσαρίας.


0811308 

24” 

46cm


46cm


40cm


4

2

cm


6

3

cm


104cm


91cm


50cm


24”8”

  110kg 

19kg 

0811308 

12” 

46cm


46cm


40cm


4

2

cm


59

cm


97

cm


91cm


50cm


12”8”  110kg  15,3kg 

0811308 

3” 

46cm


46cm


40cm


4

2

cm


57

m


97

cm


90

cm


50cm


3”8” 

110kg 

13kg 

Summary of Contents for 0811308

Page 1: ...0811308 REVISION 8 2021 ADAPT USER MANUAL WHEELCHAIR ADAPT...

Page 2: ...0811308 1 0811357 2 0811358 0811359 3 24 0811356 24 A Quick Release I 3 75x25mm 8 x 2 200x50m...

Page 3: ...24 QR 0811363 2 0811308 24 46cm 46cm 40cm 42cm 63cm 104cm 91cm 50cm 24 8 110kg 19kg 0811308 12 46cm 46cm 40cm 42cm 59cm 97cm 91cm 50cm 12 8 110kg 15 3kg 0811308 3 46cm 46cm 40cm 42cm 57m 97cm 90cm 50...

Page 4: ...T Mobiak...

Page 5: ...manual M...

Page 6: ...1 2 3 Risk Class I 745 2017...

Page 7: ...2 30 28210 63222 www mobiakcare com...

Page 8: ...Crossbar Accessories optional 1 Anti tilt wheels ref 0811357 2 Reclining foot support ref 0811358 right 0811359 left FRAME Steel foldable COLOR Silver SEAT BACKREST Fabric With internal cover ARM RES...

Page 9: ...ust if necessary wheel forks pulling wheels propellers Grease or oil all components that are subject to friction or impending wear Tighten the screws and nuts General revision of the chair s status an...

Page 10: ...rom others Be careful during your first course in this wheelchair Meet your wheelchair Make use of your wheelchair on level ground as well as uphill and downhill Do not attempt to reach objects if you...

Page 11: ...nsequences resulting from an incorrect use of this product The manufacturer reserves the right to change the information contained in this document without notice Advise with physician or therapist to...

Page 12: ...eed for 2 years No service or spare part is covered unless it has been inspected by an authorized service or the importer manufacturer of the product The warranty covers factory failures NO damage fro...

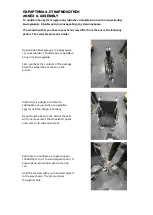
Page 13: ...y process is similar First we check the contents of the package Place the wheelchair as shown in the picture By pushing the bars on the side of the seat with one movement the wheelchair opens and come...

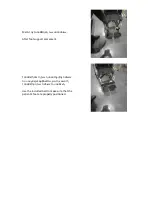
Page 14: ...After foot support placement Use the included belt to make sure that the patient s feet are properly positioned...

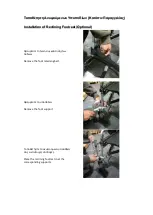
Page 15: ...Installation of Reclining Footrest Optional Remove the foot retaining belt Remove the foot support Place the reclining footrest in at the corresponding supports...

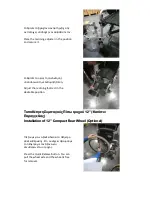
Page 16: ...in the position and secure it Adjust the reclining footrest in the desirable position 12 Installation of 12 Compact Rear Wheel Optional Press the Quick Release button You can pull the wheel axle and...

Page 17: ...hole than the 12 Anti tilt system Upon Request In the case where the wheelchair includes an overturning system remove the cap from the pipes at the bottom of the wheelchair Insert the anti tilt wheels...

Page 18: ...ANNEX B SYMBOLS...
Reviews: