MK MK-Manta I Owner'S Operating Manual Download Page 8

6

MANTA I 

Revision 03/05, Effective Date March 2, 2005

7

MANTA I 

Revision 03/05, Effective Date March 2, 2005

The MK-Manta I Core Drill rig has been equipped with either a 20 Amp/115V 3 

speed motor, a 20 Amp/120V 2 speed motor, or a 15 Amp/115V 2 speed motor. 

The drill should be used on an electrical circuit, separate from other loads, and 

protected by a 30 amp circuit breaker.

The MK-Manta I has been provided with a 20 Amp plug (NEMA 15-20) or a 30 

Amp (NEMA 15-30) locking plug depending on the model.

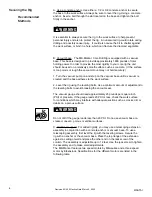
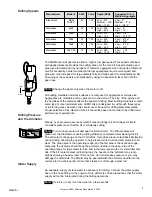
The MK Manta is marked “Grounding Required” and has a three wire cord and 

three prong grounding plug. The plug must be connected to a properly grounded 

outlet (see figure below). If the tool should electrically malfunction or break 

down, grounding provides a low resistance path to carry electricity away from 

the user, reducing the risk of electrical shock.

The grounding prong in the plug is connected through the green wire inside the 

cord to the grounding system in the tool. The green wire in the cord must be the 

only wire connected to the tool’s grounding systems and must never be attached 

to an electrically live terminal.

Your tool must be plugged into an appropriate outlet, properly installed and 

grounded in accordance with all codes and ordinances. The plug and outlet 

should look like those in the figure to the left.

Improperly connecting the grounding wire can result in the risk of electric shock. 

Check with a qualified electrician if you are in doubt as to whether the outlet 

is properly grounded.  Do not modify the plug provided with the tool.  Never 

remove the grounding prong from the plug. Do not use the tool if the cord or 

plug is damaged.  If damaged, have it repaired by an authorized service facility 

before use. If the plug will not fit the outlet, have  a proper outlet installed by a 

qualified electrician. The use of a circuit protected by a ground fault interrupter 

(GFI) is highly recommended.

Use extension cords of the proper cable size, referring to the following chart.

Cord Length 


25 feet   

50 feet   

75 feet

Wire Size (AWG) 

#10 


#8 


#6

Never use an extension cord smaller than shown in the chart. Be sure your 

extension cord is properly wired and in good electrical condition. Always replace 

a damaged extension cord or have it repaired by a qualified electrician before 

using it.

Protect your extension cords form sharp objects, excessive heat and damp or 

wet areas.

Notice:

  Using an extension cord with inadequately sized wire causes a serious 

drop in voltage, resulting in loss of power and possible tool damage.

NEMA L5-20

 125 V, 20 Amp 

Locking Plug and receptacle

Grounding 

blade

Cover of grounded outlet 

box

Extension Cords

Drilling Operations

Electrical Requirements

Grounding

Ý

Ý

NEMA L5-30

 125 V, 30 Amp 

Locking Plug and receptacle

Grounding 

blade

Cover of grounded outlet 

box

Ý

Ý

WARNING

!

WARNING

!

Summary of Contents for MK-Manta I

Page 1: ...Instructions serial number For your one 1 year warranty to be effective complete the warranty card include the serial number and mail it in as soon as possible please record the serial number of your...

Page 2: ...ns Electrical Requirements 7 Grounding 7 Extension Cords 7 Securing the Rig 8 Drilling Speeds 9 Drilling Pressure and the Ammeter 9 Water Supply 9 Carraige Rigidity 10 Shear Pin and Clutch Protection...

Page 3: ...hich it is not recommended Do not alter the tool Keep your work area clean and safe to avoid accidents Maintain a safe zone and keep all visitors at a safe distance from the work area Always insure th...

Page 4: ...re injury or burns Before performing any maintence or service on this equipment always turn the switch off and unplug the drill from the power source to prevent accidental starting Keep hands feet hai...

Page 5: ...th a single masonry anchor The slot also allows more than one hole to be drilled from a single anchor location The base contains four leveling screws to insure accurate hole alignment even on uneven c...

Page 6: ...n good condition before discarding any packing material If there are any missing or damaged parts call our toll free number 1 800 421 5830 for instructions before proceeding with the assembly Contents...

Page 7: ...so that it will stand up loosen the carraige lock knob be sure to hold the carraige and move the carraige down to a position where the end of the motor spindle just touches the ground Step 2 Install...

Page 8: ...operly connecting the grounding wire can result in the risk of electric shock Check with a qualified electrician if you are in doubt as to whether the outlet is properly grounded Do not modify the plu...

Page 9: ...he vacuum base until a vacuum is created and the base adheres to the work surface 2 Level the rig using the leveling bolts Use a minimum amount of adjustment to the leveling bolts to avoid breaking th...

Page 10: ...efficiency and prematurely wearing the bit The ammeter is the gauge on the Control Box It provides pressure feedback information during drilling allowing the operator to help prevent motor overload a...

Page 11: ...not require adjustments However under normal use the clutch may start to slip at low torque If this happens refer to the motors Owner s Manual Bits with permanently attached adapters simply screw dir...

Page 12: ...ly sludgy When cutting metal rebar the water should have a gray metal coloring Notice When drilling into prestressed concrete the bit may cut into the hardened steel cable under tension As the bit cut...

Page 13: ...edures as outlined can prevent serious damage or malfunctioning of the machine and aid in preserving the useful life of core drill bits Before performing any maintenance to the MK Manta I always unplu...

Page 14: ...te block 3 8 deep max Increase water flow rate Clean bit face by drilling in concrete block Reduce RPM Increase bit load Use lower speed increase bit load Adjust guidance on carraige Adjust guidance o...

Page 15: ...epairs based on individual agreement with the manufacturer This warranty is in lieu of all other warranties expressed or implied Warranty Information PROBLEM Bit Stuck Shear Pin Fail WHAT TO DO 1 Try...

Page 16: ...15 MANTA I Revision 03 05 Effective Date March 2 2005 MANTA I COMBO EXPLODED VIEW AND PARTS LIST EXPLODED VIEW...

Page 17: ...16 MANTA I Revision 03 05 Effective Date March 2 2005 MANTA EXPLODED VIEW cont...

Page 18: ...17 MANTA I Revision 03 05 Effective Date March 2 2005 MANTA EXPLODED VIEW cont...

Page 19: ...18 MANTA I Revision 03 05 Effective Date March 2 2005 MANTA EXPLODED VIEW cont...

Page 20: ...53529 AA8 Washer 3 8 Flat 2 150923 AA9 Nut 3 8 16 Hex Nylok 2 152505 AA10 Label Manta Serial Tag not shown 1 157730 AA11 Label Caution Safety not shown 1 155576 AA12 Label MK Adhesive not shown 1 1579...

Page 21: ...ess 1 154715 EB15 RTV Silicon Adhesive Sealant 25 oz n a EB16 Cover Toggle Switch 1 154301 F1 Assembly Column n a F1 Manta Core Drill Column w Gear Rack 1 158425 2 F3 Screw 10 32 X 1 2 Socket Hd Cap 4...

Page 22: ...a LF1 Motor Milwaukee 4090 Shear Pin 15A 120V 1 155976 LJ Assembly Motor Eibenstock EBM 300 3 P 1 N a LJ1 Motor Eibenstock EBM 300 3 P Slip Clutch 20A 120V 1 158754 M Assembly 3 4 Motor Mount Plate Hy...

Page 23: ...department For technical support call 1 800 474 5594 There is a 25 00 minimum order RETURNED MERCHANDISE POLICY Should you need to return any product you have purchased from MK Diamond please observe...

Reviews: