


Technical Documentation
KFG-P 2000
mk North America, Inc.
|
105 Highland Park Drive
|
Bloomfi eld, CT 06002
|
(860) 769-5500
|
www.mknorthamerica.com
©2022
|
Page 20
mk North America, Inc.
|
105 Highland Park Drive
|
Bloomfi eld, CT 06002
|
(860) 769-5500
|
www.mknorthamerica.com
©2022
|
Page 21
8
CONVEYOR MAINTENANCE - BELT REPLACEMENT
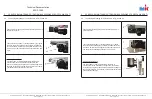
8.1 Idler/Tail 01
23
General Remarks:
• Prior to replacing the belt, the tail assembly must be completely loosened and retracted - instructions for
this are below.
• Any interfering parts must also be removed.
• When using an endless belt replacement belt, at least one side of the conveyor must be free and clear of
stands, rails, and other accessories. This should be on the side opposite to the motor mount.
• Reassemble in reverse order.
• Replacement belts must be tracked and tensioned prior to use (see Section 7).
8
CONVEYOR MAINTENANCE - BELT REPLACEMENT
(CONT.)
8.1
Idler/Tail 01
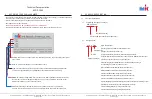
Loosen screws (2) and (3) and push the entire tail assembly
(1) and alignment blocks inward (arrow direction) to loosen
belt. Retighten screws (2) and (3). The belt may now be
replaced, by sliding the old belt off and the new belt on. See
previous section for tensioning and tracking. All new belts
must be tensioned and tracked.
At the bend:
Remove screws (1) and remove the protective guards (2),
pulley (3). Do this at all bends.
2
1
3
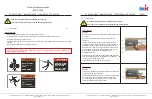
The belt can now be removed. Replace the belt and reassemble in reverse order. Track and tension the belt
as show in Section 7 prior to use. Do not operate conveyor without all guards in place.
All work to be performed by qualifi ed personnel only.
Conveyor power must be disconnected before replacing belt.
All work to be performed by qualifi ed personnel only.
Conveyor power must be disconnected before replacing belt.


