background image

EN-8

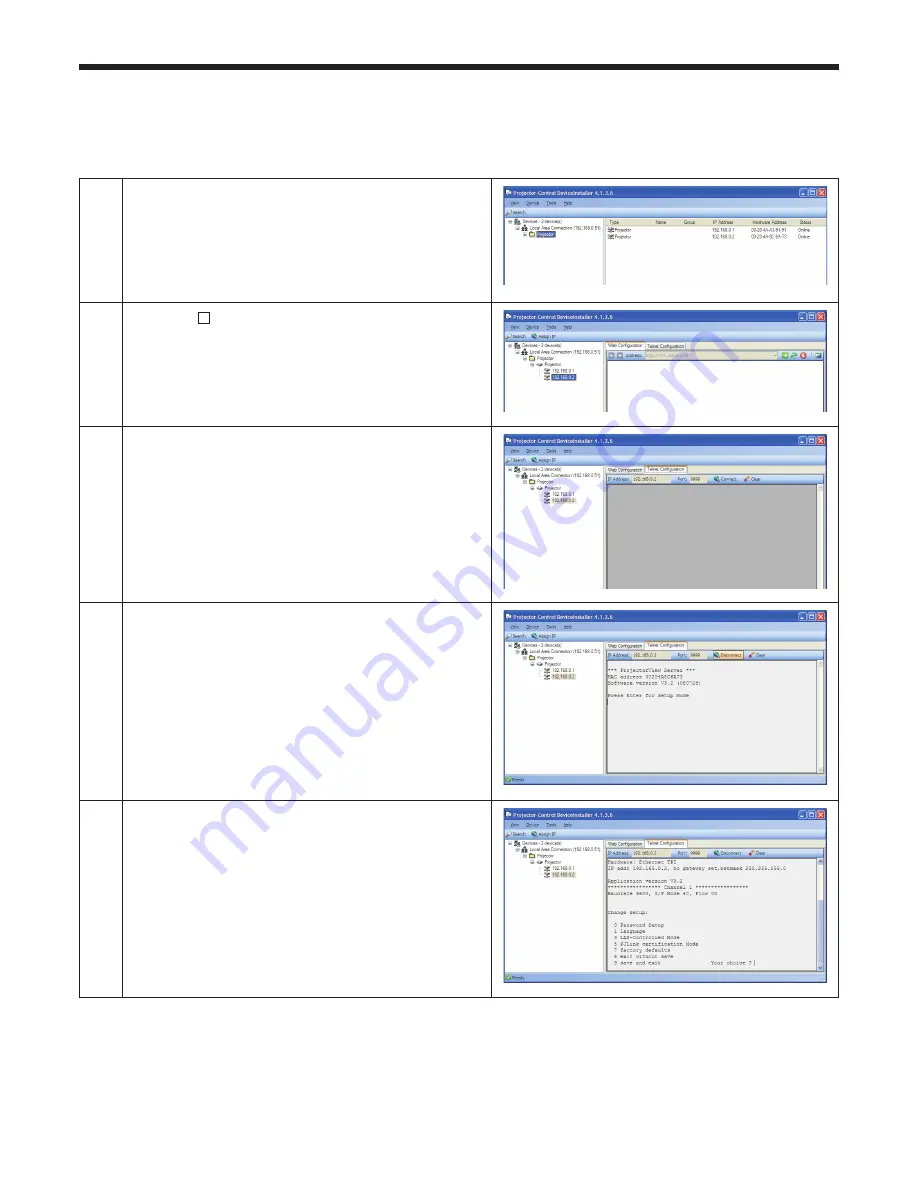
1

Start.the.Projector-Control.Device.Installer.

Select.[Start].-.[All.Programs].-.[Projector].-.[Pro-
jector-Control.Device.Installer].(in.the.case.of.
Windows

®

.XP)..

2

Press.the. + .buttons.on.the.left.pane.to.expand.the.
tree.structure.until.the.IP.address.you.set.appears..
.

3

Click.the.Telnet.Configuration.tab.

4

Select.the.Connect.tab..Press.the.Enter.key.within.5.
seconds.after.the.message.shown.on.the.right.ap-
pears.

When.it.passes.5.seconds.without.any.operation.
on.this.screen,.the.screen.is.shaded.and.no.key.
operation.is.accepted..In.this.case,.click.the.Con-
nect.button.again.to.continue.setting.

5

The.setting.menu.appears..

Telnet setting

Setting.of.password,.display.language,.LAN.control,.and.PJLink™.certification.using.telnet.
This.section.describes.how.to.set.the.password,.display.language.on.the.ProjectorView.screen,.LAN.control,.and.
PJLink™.certification.that.are.necessary.for.the.operation.state.control.tool.(commercially.available).that.uses.the.
projector.operation.control/monitor.tool.ProjectorView.and.the.industry.standard.PJLink™.protocol..

Preparation/SetUp (continued)

Summary of Contents for XD221U-ST

Page 1: ...ing a DHCP server 7 Telnet setting 8 Setting the password Password Setup 9 Setting the display language of ProjectorView language 10 Setting the LAN control LAN Controlled Mode 10 Setting the PJLink certification PJLink certification Mode 11 Save and exit 11 ProjectorView 12 Using the ProjectorView 12 How to start up 12 VIRTUAL REMOTE controller 14 E mail notification function 14 Initial setting 1...

Page 2: ...ramework Version 2 0 3 0 2 When using Windows 2000 or Windows XP 1 Download NET Framework Version 2 0 file named dotnetfx exe from the download center on the Microsoft Web site http www microsoft com downloads When the file is unavailable from the above mentioned URL search for NET Framework using Windows Update and access the download site found 2 Execute the downloaded file named dotnetfx exe 3 ...

Page 3: ...onnection Don t touch the metal parts of the LAN connector and LAN cable because static electricity may be discharged from your body causing damage to the projector STANDBY MODE See User Manual page 20 in INSTALLATION MENU is set to LOW as a factory default When STANDBY MODE is set to LOW LAN connection is not available To enable the LAN connection set the STANDBY MODE to STANDARD Preparation SetU...

Page 4: ...starts The progress of the installation process is dis played as shown on the right 7 When the installation process is completed click Close How to remove Projector Control Device Installer Select Start Control Panel Add or Remove Programs Projector Control Device Installer and click Remove in the case of Windows XP ...

Page 5: ...r being used is selected by the Option setting of the Tool menu 3 Select a projector by clicking the line showing the pro jector and click the Assign IP button Click here 4 The Assign IP Address screen appears Setting the IP address of the projector Before setting the IP address check that the projector has been LAN networked and turn on the main power of the projector When using multiple projecto...

Page 6: ... Next 6 Click Next Check that the options are marked with check marks as shown on the right Keep them un changed for normal use 7 Click Assign 8 Click Finish 9 Click the Search button Check the IP address When using a DHCP server Preparation SetUp continued ...

Page 7: ... Click Assign 8 Click Finish 9 Click the Search button Check the IP address you set Note When using the error alert e mail notification function described later click the Assign IP button and set the subnet mask and default gateway correctly For the values of the subnet mask and default gateway contact your network administrator When not using a DHCP server Preparation SetUp continued ...

Page 8: ...out any operation on this screen the screen is shaded and no key operation is accepted In this case click the Con nect button again to continue setting 5 The setting menu appears Telnet setting Setting of password display language LAN control and PJLink certification using telnet This section describes how to set the password display language on the ProjectorView screen LAN control and PJLink cert...

Page 9: ...tory defaults input the password projectorcontroller and then select 9 save and exit to perform initial ization 3 Input a new password example proj2000 and press the Enter key Note Use single byte alphanumeric characters only 4 Input the new password example proj2000 again and press the Enter key If you input a wrong password an error message appears and the setting menu is displayed again In this...

Page 10: ...rView enter 1 and press the Enter key Default is OFF 0 See pages 12 15 for ProjectorView func tion Setting the LAN control LAN Controlled Mode Preparation SetUp continued 1 Enter 1 and press the Enter key 2 Enter 0 for English or 1 for Japanese Setting the display language of ProjectorView language ...

Page 11: ...al computer Enter the following command and press the Enter key telnet IP address you set 9999 shows a prompt When setting menu appears perform the setting procedure as described above Note Check that the port number 9999 isn t blocked by the firewall Preparation SetUp continued 1 Enter 5 and press the Enter key When you don t use PJLink protocol communi cation skip this item See page 16 for PJLin...

Page 12: ...rowser http IP address you set instead of by clicking the External Browser button When you are using a proxy server don t enable the proxy when accessing this IP address You can open only 1 browser screen from the device installer It is possible to control a projector using 2 computers running ProjectorView However use only 1 computer for Telnet setting ProjectorView Using the ProjectorView This s...

Page 13: ...appears close it by pressing Yes or No button ProjectorView continued Press to display the Setup win dow See page 15 Press to control the projector For the functions of these buttons see the user guide of the projec tor The input source button which is not to be equipped with this model may be displayed Although the button does not function this is not a malfunction Failures in the projector are i...

Page 14: ...actory 5F Serial number This item will not be displayed in this model Operating hours 2146 hours and 43 minutes Lamp hours 5000 hours and 0 minute Installation date 2008 01 01 Last lamp replacement date 2008 01 01 Last maintenance date 2008 01 01 Note In case of a command error e mail notification isn t sent When the LAN control is enabled serial RS 232C commands may not be transmitted You can t c...

Page 15: ...projector Serial number This item will not be displayed in this model SMTP IP address IP address of the SMTP server used for e mail transmission Example 192 168 0 1 E mail address e mail address to receive alert notification e mail Example administrator XXX XXX XXX up to 64 characters E mail host User defined string displayed at the Internet header of e mail message Example user E mail from Sender...

Page 16: ...ut the available inputs The following value is returned 11 12 21 22 NAME Inquiry about the pro jector name The projector name set on the ProjectorView Setup window is returned INF1 Inquiry about the manufacturer name MITSUBISHI is returned INF0 Inquiry about other information No other information is available No parameter is returned CLSS Inquiry about the class information 1 is returned This proj...

Page 17: ...namic Host Configuration Protocol This protocol automatically assigns IP addresses to networked devices Gateway A server or router to communicate across networks subnets that are divided by subnet mask IP address Numerical address to identify networked computers MAC address Abbreviation for Media Access Control address MAC address is a unique ID number assigned to each network adapter based on whi...

Reviews: