background image

10

 - 7

10.2 Z(P).MBRW
 

10

 DEDICATED INSTRUCTIONS

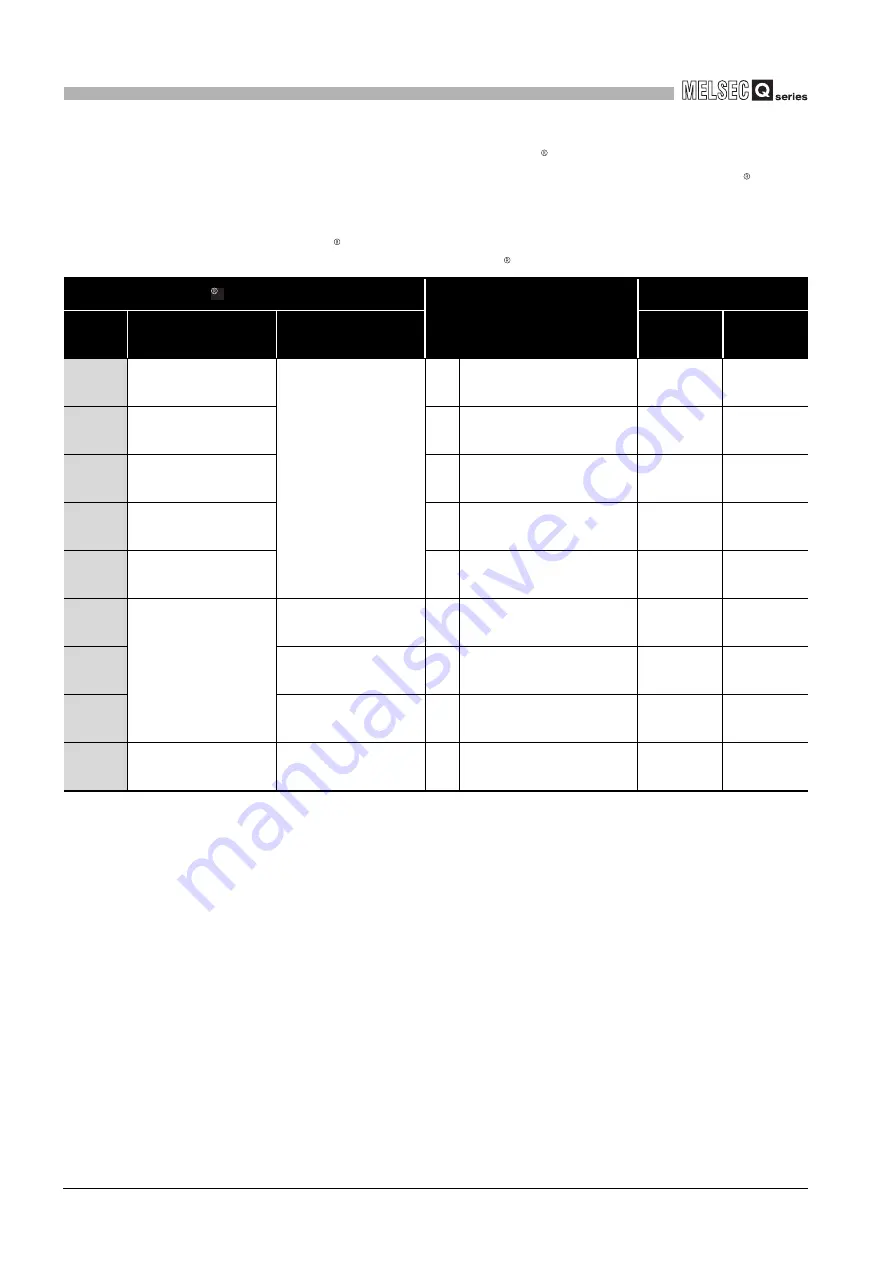
(a) Type specification of the target MODBUS  device

The table below shows the possible combinations in the target MODBUS  device 
type specification ((S1)+8) and the valid ranges of the access points.
Any other combinations are not applicable to the Type specification of the target 
MODBUS  device type ((S1)+8). 

 * 1   Read File Record (FC: 20) and Write File Record (FC: 21) allows access to multiple areas in one 

transmission, however, only one area is accessible in one transmission when using this dedicated 
instruction.

 * 2   In the case of broadcast, only 0001

H

 (Write multiple coils), 0005

H

 (Write multiple registers) and 

0007

H

 (Write file record) can be set. 

 * 3   Simultaneous execution of read and write with a single instruction is allowed only for 0505

H

 (Read/

Write multiple registers).

Table10.6 Possible combinations of target MODBUS

 device type specification

Target MODBUS

 device type specification

Function code

Valid access point range

Setting 

value

Read target

Write target

Read points

Write points

0100

H

Coil

No specification

01

Read coils

1 to 2000 

points

-

0200

H

Input

02

Read discrete inputs

1 to 2000 

points

-

0400

H

Input register

04

Read input registers

1 to 125 

points

-

0500

H

Holding register

03

Read holding registers

1 to 125 

points

-

0700

H

Extended file register

*1

20

Read file record

1 to 124 

points

-

0001

H

*2

No specification

Coil

15

Write multiple coils

-

1 to 1968 

points

0005

H

*2

Holding register

16

Write multiple registers

-

1 to 123 

points

0007

H

*2

Extended file register

*1

21

Write file record

-

1 to 122 

points

0505

H

*3

Holding register

Holding register

23

Read/Write multiple registers

1 to 125 

points

1 to 121 

points

Summary of Contents for QJ71MB91

Page 1: ......

Page 2: ......

Page 3: ...ence program so that the safety of the overall system is always maintained Also before performing other control operations program modifications and operation status modifications status control on the running programmable controller be sure to read the manual carefully and thoroughly confirm the safety Especially in the above mentioned control operations that are performed from an external device...

Page 4: ...d at the bottom of module insert the module fixing tab into the fixing hole in the base unit until it stops Then set the module in position using the fixing hole as a supporting point Incorrect mounting may cause malfunctions failure or a drop of the module Secure the module with screws in an environment of frequent vibrations Be sure to tighten the screws using the specified torque If the screws ...

Page 5: ...cause the module to malfunction due to poor cable connection Wire the module correctly after confirming the type of the connected interface If the cable is connected to a different interface or wired incorrectly it may cause a fire or breakdown Tighten the terminal screws within the range of the specified torque If the terminal screws are loose it may result in a short circuit or malfunction If th...

Page 6: ...ry or fire When using a wireless communication device such as a cellular phone keep a distance of 25cm 9 85 inch or more from the programmable controller in all directions Failure to do so can cause a malfunction Before mounting dismounting the module be sure to shut off all phases of the external power supply used by the system Failure to do so may cause module failure or malfunctions Do not inst...

Page 7: ... Section 2 3 changed to Section 2 4 Mar 2008 SH NA 080578ENG E Modifications Compliance with the EMC and Low Voltage Directives Section 2 1 2 4 4 16 6 3 6 4 1 8 5 8 6 Appendix 3 May 2008 SH NA 080578ENG F Change of a term PLC was changed to programmable controller Modifications About the Generic Terms and Abbreviations Section 2 1 4 16 6 1 6 6 7 3 1 8 2 1 8 3 1 8 3 3 8 4 8 5 8 6 10 2 10 3 11 4 3 A...

Page 8: ...ons 3 1 3 2 RS 232 Interface Specification 3 3 3 2 1 RS 232 connector specification 3 3 3 2 2 RS 232 cable specification 3 5 3 3 RS 422 485 Interface Specification 3 6 3 3 1 RS 422 485 terminal block specification 3 6 3 3 2 RS 422 485 cable specification 3 7 3 3 3 Precautions when transferring data using RS 422 485 line 3 8 3 4 I O Signals for Programmable Controller CPU 3 10 3 4 1 I O signal list...

Page 9: ...message count sub function code 11 4 35 4 11 8 Return bus communication error count sub function code 12 4 36 4 11 9 Return bus exception error count sub function code 13 4 37 4 11 10 Return slave message count sub function code 14 4 38 4 11 11 Return slave no response count sub function code 15 4 39 4 11 12 Return slave NAK count sub function code 16 4 40 4 11 13 Return slave busy count sub funct...

Page 10: ...1 to 7 31 7 1 Parameter Settings and Setting Procedure 7 1 7 2 Automatic Communication Parameter 7 4 7 2 1 Automatic communication parameter details 7 4 7 3 MODBUS R Device Assignment Parameter 7 11 7 3 1 MODBUS R device assignment to the programmable controller CPU device memory 7 13 7 3 2 MODBUS R extended file register assignment to the programmable controller CPU file register 7 23 7 3 3 QJ71M...

Page 11: ... the communication by dedicated instructions MBRW MBREQ on the same channel 9 18 9 3 Program Examples for Use in MELSECNET H Remote I O Network 9 25 9 3 1 Automatic communication parameters 9 25 9 3 2 MODBUS R device assignment parameters 9 37 CHAPTER10 DEDICATED INSTRUCTIONS 10 1 to 10 32 10 1 Dedicated Instruction List and Available Devices 10 1 10 2 Z P MBRW 10 2 10 3 Z P MBREQ 10 14 10 4 ZP UI...

Page 12: ...Appendix 2 A Series Modules App 2 Appendix 2 1 Comparisons in performance specifications App 2 Appendix 2 2 Functional comparisons App 3 Appendix 2 3 Utilization of existing programs App 4 Appendix 3 Processing Time App 7 Appendix 4 External Dimensions App 13 INDEX Index 1 to Index 2 ...

Page 13: ... Voltage Directives compliant into other machinery or equipment refer to Chapter 9 EMC AND LOW VOLTAGE DIRECTIVES of the QCPU User s Manual Hardware Design Maintenance and Inspection The CE mark indicating compliance with the EMC and Low Voltage Directives is printed on the rating plate of the programmable controller 2 For the product No additional measures are necessary for the compliance of this...

Page 14: ...APTER 4 Section 4 1 lists the MODBUS standard functions supporting QJ71MB91 Sections 4 2 to 4 20 list the frame specifications of the MODBUS standard functions supporting QJ71MB91 5 Usable Functions CHAPTER 5 CHAPTER 5 describes the functions of the QJ71MB91 6 Settings and Procedures Necessary for System Operation CHAPTER 6 CHAPTER 6 describes the pre operation settings and procedures 7 Parameter ...

Page 15: ...n 11 3 lists the confirmation of the communication conditions Section 11 4 lists the storage location and details of the error codes Section 11 5 lists the methods to turn off the ERR LED About the notation of the numerical values used in this manual In this manual the numerical values with the suffix H are displayed in hexadecimal values Example 10 Decimal 10H Hexadecimal ...

Page 16: ... with the MODBUS compatible slave device as the master of MODBUS Slave function The function that allows communication with the MODBUS compatible master device as the slave of MODBUS Request message The message used to give a function execution request to the slave In the MODBUS protocol a function execution request is given from the master to the slave A function execution request cannot be given...

Page 17: ...ype sequence compatible with the programmable controller language as is Draw two vertical control buses and describe contacts etc between the buses to perform programming Device memory Memory provided for the programmable controller CPU to record the data handled in sequence program operation Listen only mode Mode detaching the slave station from the circuit Model Product name Quantity QJ71MB91 QJ...

Page 18: ...ead from or written to the slaves at the specified intervals using the QJ71MB91 buffer memory 1 Data can be transferred between the QJ71MB91 buffer memory and programmable controller CPU device memory by making the auto refresh setting with the utility package GX Configurator MB or by accessing any intelligent function module device with a sequence program 1 The MODBUS device is defined as a devic...

Page 19: ... writes MODBUS device data from or to a slave This enables reading slave data to the programmable controller CPU device memory or writing programmable controller CPU data to slaves 2 MBREQ instruction The user determined request message format function code data unit can be issued to the slaves Figure 1 2 Communication using dedicated instruction Z MBRW Command QJ71MB91 Master function 400500 Resp...

Page 20: ...not needed b MODBUS device assignment function Using MODBUS device assignment parameters the MODBUS devices are correlated with the programmable controller CPU device memory This enables direct access from the master to the programmable controller CPU device memory Supporting the MODBUS devices of large capacity the QJ71MB91 allows all device memories of the programmable controller CPU to be assig...

Page 21: ...ator MB GX Configurator MB which is separately available allows easy configuration of the QJ71MB91 It can reduce programing steps for sequence programs and the setting and operating states of each module can be checked easily Therefore GX Configurator MB is recommended to be used for the QJ71MB91 By setting various parameters in GX Configurator MB the QJ71MB91 can communicate without creating sequ...

Page 22: ...e power supply capacity is insufficient change the combination of the modules Applicable N A 1 Limited within the range of I O points for the CPU module 2 Can be installed to any I O slot of a base unit Continued on next page Table2 1 Applicable CPU modules and base units and No of modules Applicable CPU module No of modules 1 Base unit 2 CPU type CPU model Main base unit 1 Extension base unit Pro...

Page 23: ...ng modules and if the power supply capacity is insufficient change the combination of the modules Applicable N A 1 Limited within the range of I O points for the network module 2 Can be installed to any I O slot of a base unit Remark The Basic model QCPU or C Controller module cannot create the MELSECNET H remote I O network Table2 1 Applicable CPU modules and base units and No of modules Continue...

Page 24: ...or later Version 1 05F or later Multiple CPU system Version 8 or later Q02 Q02H Q06H Q12H Q25HCPU Single CPU system Version 4 or later Multiple CPU system Version 6 or later Q02PH Q06PHCPU Single CPU system Version 8 68W or later Multiple CPU system Q12PH Q25PHCPU Single CPU system Version 7 10L or later Multiple CPU system Q12PRH Q25PRHCPU Redundant system Version 8 45X or later Q00UJ Q00U Q01UCP...

Page 25: ... QJ71MB91 Table2 4 Network configuration using QJ71MB91 QJ71MB91 System Configuration Reference Master Slave Line Used Master RS 232 1 1 This section 1 a RS 422 485 This section 1 b RS 232 RS 422 485 This section 1 c RS 485 1 n This section 1 d Slave RS 232 1 1 This section 2 a RS 422 485 This section 2 b RS 232 RS 422 485 This section 2 c RS 485 1 n This section 2 d RS 232 RS 485 with link operat...

Page 26: ...stations 1 n 4 2 5 3 1 6 7 FG FG RS 232 485 RS 422 CH2 RDB RDA SDB SG SDA CH1 QJ71MB91 RUN RD NEU SD NEU RD SD CH1 CH2 ERR R RS 232 QJ71MB91 Master function MODBUS slave device 4 2 5 3 1 6 7 FG FG RS 232 485 RS 422 CH2 RDB RDA SDB SG SDA CH1 QJ71MB91 RUN RD NEU SD NEU RD SD CH1 CH2 ERR R RS 422 485 QJ71MB91 Master function MODBUS slave device 4 2 5 3 1 6 7 FG FG RS 232 485 RS 422 CH2 RDB RDA SDB S...

Page 27: ...n 1 1 with a RS 422 485 line Figure 2 7 Connecting to master stations with RS 232 and RS 422 485 lines Figure 2 8 Connecting to a master station 1 n 4 2 5 3 1 6 7 FG FG RS 232 485 RS 422 CH2 RDB RDA SDB SG SDA CH1 QJ71MB91 RUN RD NEU SD NEU RD SD CH1 CH2 ERR R RS 232 QJ71MB91 Slave function MODBUS master device 4 2 5 3 1 6 7 FG FG RS 232 485 RS 422 CH2 RDB RDA SDB SG SDA CH1 QJ71MB91 RUN RD NEU SD...

Page 28: ...1 Using the RS 232 interface as the slave station and the RS 422 485 interface as the master station 4 2 5 3 1 6 7 FG FG RS 232 485 RS 422 CH2 RDB RDA SDB SG SDA CH1 QJ71MB91 RUN RD NEU SD NEU RD SD CH1 CH2 ERR R R RS 485 RS 232 MODBUS master device QJ71MB91 Slave function MODBUS slave device R MODBUS slave device 4 2 5 3 1 6 7 FG FG RS 232 485 RS 422 CH2 RDB RDA SDB SG SDA CH1 QJ71MB91 RUN RD NEU...

Page 29: ...cation function Section 9 2 1 Section 9 3 1 The MBREQ instruction cannot be used The UINI instruction cannot be used b GX Configurator MB GX Configurator MB cannot be used when accessing the redundant CPU via an intelligent function module on an extension base unit from GX Developer Connect a personal computer with a communication path indicated below Figure 2 12 Communication paths available for ...

Page 30: ...system monitor a Confirming the serial number on the rating plate The rating plate is situated on the side face of the QJ71MB91 b Checking on the front of the module The serial No and function version on the rating plate are also indicated on the front of the module lower part Remark The serial number is displayed on the front of the module from January 2008 production Products manufactured during...

Page 31: ...er 1 Production number display Since the QJ71MB91 does not support the production number display is displayed POINT The serial No displayed in the Product Information List of GX Developer may be different from the one on the rating plate and the front of the module The serial No on the rating plate and the front of the module indicates the management information of the product The serial No in the...

Page 32: ...ONFIGURATION 2 Checking the software versio of GX Configurator MB The software version of GX Configurator MB can be checked GX Developer s Product information screen Operating Procedure GX Developer Help Product information Figure 2 16 Product information Software version ...

Page 33: ...ions Item Specifications Reference Transmission specifications Number of interfaces RS 232 1 channel RS 422 485 1 channel Transmission speed Section 6 6 300 600 1200 2400 4800 9600 14400 19200 28800 38400 57600 115200 bps Communication is available with total transmission speed of two interfaces within 115200bps Transmission distance Overall distance RS 232 Max 15m 49 2 ft RS 422 485 Max 1200m 459...

Page 34: ...e Slave function Automatic response function Function for receive 17 functions CHAPTER 4 MODBUS Device size Coil 64k points Section 7 3 1 Input 64k points Input register 64k points Holding register 64k points Extended file register Max 4086k points No of simultaneously acceptable request messages 1 request per channel Station No 1 to 247 Section 6 6 Number of occupied I O points 32 points 5VDC int...

Page 35: ...ithout connecting Pin 7 and 8 Pin 8 turns off and the CS signal may turn off error code 7403 H 1 Descriptions of control signals The following explains control signals The pin number of the connector is indicated within the brackets a RD signal 2 Signal for receiving data b SD signal 3 Signal for sending data Pin number Signal code Signal name Signal direction QJ71MB91 Target device 1 Use prohibit...

Page 36: ...S 2 ON OFF status of each signal The ON and OFF statuses of a signal are indicated below 3 Interface connector For QJ71MB91 RS 232 interface connector use a 9 pin D sub female screw type connector Use metric screws Output side Input side ON 5V to 15VDC 3V to 15VDC OFF 5V to 15VDC 3V to 15VDC ...

Page 37: ...VIEW 2 SYSTEM CONFIGURATION 3 SPECIFICATIONS 4 MODBUS R STANDARD FUNCTIONS 5 FUNCTION 6 PRE OPERATIONAL PROCEDURES AND SETTINGS 7 PARAMETER SETTING 8 UTILITY PACKAGE GX Configurator MB 3 2 2 RS 232 cable specification The RS 232 cable should be based on RS 232 standards and used within 15m 49 2ft ...

Page 38: ...et device 1 The following explains control signals a SDA SDB signal Signal for QJ71MB91 to send data to a target device b RDA RDB signal Signal for QJ71MB91 to receive data from a target device 2 Terminating resistor Connect the terminating resistor according to Section 6 5 2 Signal code Signal name Signal direction QJ71MB91 Target device SDA Transmission data SDB Transmission data RDA Reception d...

Page 39: ...22 485 cable should meet the following specifications and used within 1200m 4592 4ft 2 When making a 1 n connection When connecting to multiple devices 1 n ensure that the overall distance is within 1200 m 4592 4ft 3 RS 422 485 cable specifications Table3 2 RS 422 485 cable specifications Item Description Cable type Shielded cable Number of pairs 3P Conductor resistance 20 88 0 km or less Insulati...

Page 40: ...get device as shown below Installing a pull up or pull down resistor resistance value approx 4 7 k 1 4 W can prevent the reception of error data POINT Error data will not be received if a pull up or pull down resistor is connected on the target device side Remark The case where any pull up or pull down resistor is not connected on the target device is described below When any station is not perfor...

Page 41: ...a not transmitted c QJ71MB91 transmission start timing transmission process complete timing Transmission start timing After releasing the high impedance status indicated in above a and b and outputting two or more character data during data transmission output the actual data Transmission process complete timing Data transmission time for data of 1 bit or less is required as the H W gate OFF time ...

Page 42: ...OFF to ON or after the programmable controller CPU is reset Continued on next page Table3 3 I O signal list Signal direction QJ71MB91 Programmable controller CPU Signal direction Programmable controller CPU QJ71MB91 Device No Signal name Reference Device No Signal name Reference X0 Module READY 1 ON Accessible OFF Inaccessible Section 11 1 Y0 Use prohibited X1 Use prohibited Y1 X2 Y2 X3 Y3 X4 CH1 ...

Page 43: ...Not requested Section 9 1 2 X9 MODBUS device assignment parameter setting error completed ON Error completed OFF Y9 Use prohibited XA MODBUS device assignment parameter setting existence ON Parameters set OFF No parameters set YA XB Use prohibited YB XC CH2 Automatic communication parameter setting normally completed ON Normally completed OFF Section 5 2 1 9 1 1 YC CH2 Automatic communication para...

Page 44: ...ame Reference X10 Intelligent function module switch setting change status ON Setting being changed OFF Setting not changed Section 10 4 Y10 Use prohibited X11 Use prohibited Y11 X12 Y12 X13 Y13 X14 Y14 X15 Y15 X16 Y16 X17 Y17 X18 Y18 X19 Y19 X1A Y1A X1B CH Common CH1 Error ON Error occurred OFF No error Section 11 2 Y1B CH Common CH1 Error clear request ON Being requested OFF Not requested Sectio...

Page 45: ...Buffer memory list Address Application Name Initial value Read Write 1 Initial setting 2 Reference 0000H to 0001H 0 to 1 System area use prohibited 0002H 2 Status storage area Error code CH1 side error response code storage area 0H R Section 11 4 2 0003H 3 System area use prohibited 0004H 4 CH2 side error response code storage area 0H R Section 11 4 2 0005H 5 System area use prohibited 0006H 6 Det...

Page 46: ...ion 0H R W Section 7 3 5 000FH 15 Allocated error status area 0H R W Section 7 3 4 0010H to 01FFH 16 to 511 System area use prohibited 0200H to 0201H 512 to 513 Automatic communication parameter CH1 Automatic communication parameter 1 Setting parameter existence 0H R W Section 7 2 0202H 514 Target station No 1H R W 0203H 515 Request interval timer value Set time set value 10ms 0H R W 0204H 516 Res...

Page 47: ...le3 4 Buffer memory list Continued Address Application Name Initial value Read Write 1 Initial setting 2 Reference 020CH to 037FH 524 to 895 Automatic communication parameter CH1 Automatic communication parameter 2 to 32 Same as CH1 Automatic communication parameter 1 Section 7 2 0380H to 04FFH 896 to 1279 CH2 Automatic communication parameter 1 to 32 Same as CH1 Automatic communication parameter ...

Page 48: ...tial value Read Write 1 Initial setting 2 Reference 0940H 2368 MODBUS device assignment parameter Input assignment 1 Device code 0H R W Section 7 3 1 0941H 2369 Head device number 0H R W 0942H 2370 Head input number 0H R W 0943H 2371 Assignment points 0H R W 0944H to 097FH 2372 to 2431 Input assignment 2 to 16 Same as input assignment 1 0980H 2432 Input register assignment 1 Device code 0H R W 098...

Page 49: ... Assignment points 0H R W 09C4H to 09FFH 2500 to 2559 Holding register assignment 2 to 16 Same as in holding register assignment 1 0A00H to 0BFFH 2560 to 3071 System area use prohibited 0C00H 3072 Setting status Intelligent function module switch setting status Switch 1 CH1 operation mode setting status Intelligent function module switch status R Section 6 6 11 2 0C01H 3073 Switch 2 CH1 transmissi...

Page 50: ...Reference 0C13H 3091 Operating status Parameter error information MODBUS device assignment parameter error code storage area 0H R Section 11 4 1 0C14H 3092 MODBUS device assignment parameter setting result storage area Error device type 0H R 0C15H 3093 Error assigned group No 0H R 0C16H 3094 CH1 Automatic communication parameter error code storage area 0H R 0C17H 3095 CH1 Automatic communication p...

Page 51: ...ection 11 4 1 0C22H to 0C23H 3106 to 3107 CH2 Automatic communication operation status storage area Parameters 1 to 32 0H R 0C24H to 0C27H 3108 to 3111 System area use prohibited 0C28H to 0C47H 3112 to 3143 CH1 Automatic communication error code storage area Parameters 1 to 32 0H R Section 11 4 1 0C48H to 0C67H 3144 to 3175 CH2 Automatic communication error code storage area Parameters 1 to 32 0H ...

Page 52: ...ddress Application Name Initial value Read Write 1 Initial setting 2 Reference 0CFEH 3326 Operating status Error log Number of errors occurred 0H R Section 11 4 1 0CFFH 3327 Error log write pointer 0H R 0D00H 3328 Error log 1 Detailed error code 0H R 0D01H 3329 Exception code 0H R 0D02H 3330 Function code 0H R 0D03H 3331 CH 0H R 0D04H 3332 Station No 0H R 0D05H to 0D06H 3333 to 3334 System area us...

Page 53: ...Address Application Name Initial value Read Write 1 Initial setting 2 Reference 0F00H 3840 Communication status CH1 Communication status Diagnostic data for Master Slave Bus message count 0H R Section 11 3 0F01H 3841 Bus communication error count 0H R 0F02H 3842 Character overrun error count 0H R 0F03H 3843 Message discard count 0H R 0F04H 3844 Data discard count 0H R 0F05H 3845 Failed transmissio...

Page 54: ...n status Diagnostic data for Master Received exception error count 0H R Section 11 3 0F0FH 3855 No response count 0H R 0F10H 3856 Broadcast count 0H R 0F11H 3857 Received NAK count 0H R 0F12H 3858 Received busy count 0H R 0F13H to 0F1EH 3859 to 3870 System area use prohibited 0F1FH 3871 Communication event log for Slave Communications event log count 0H R Section 4 13 0F20H to 0F3FH 3872 to 3903 C...

Page 55: ...B is enabled or disabled Setting enabled Setting disabled Table3 4 Buffer memory list Continued Address Application Name Initial value Read Write 1 Initial setting 2 Reference 1000H to 1FFFH 4096 to 8191 Automatic communication function buffer CH1 Automatic communication function buffer input area 0H R Section 5 2 1 2000H to 2FFFH 8192 to 12287 CH2 Automatic communication function buffer input are...

Page 56: ...ODBUS standard function support list Function code Sub code Sub function code Function Description Accessible devices per message Broadcast Reference 01 Read coils Reads the status ON OFF of one or more coils 1 to 2000 points Section 4 4 02 Read discrete inputs Reads the status ON OFF of one or more inputs 1 to 2000 points Section 4 5 03 Read holding registers Reads the values of one or more holdi...

Page 57: ... LED status of the QJ71MB91 to the master Section 4 11 3 03 Change ASCII input delimiter Changes the 2nd byte LF 0AH of the end code in the ASCII mode to a specified data Section 4 11 4 04 Force listen only mode Places a slave into the offline mode Used when disconnecting a slave from the network Section 4 11 5 10 Clear counters and diagnostic register Clears counters e g message count Also clears...

Page 58: ...turn IOP overrun error count Reads the IOP overrun error counter value to the master The QJ71MB91 returns to the master the number of times the request message size exceeds the upper limit Same as the Return bus character overrun count Section 4 11 15 20 Clear overrun counter and flag Clears the overrun error counter and flag The QJ71MB91 clears the character overrun error counter value Section 4 ...

Page 59: ...ultiple registers Writes values to multiple holding registers 1 to 123 points Section 4 15 17 Report slave ID Acquires the information of the slave QJ71MB91 mounted station into the master Section 4 16 20 6 Read file record Reads values of one or more extended file registers 1 to 124 points Section 4 17 21 6 Write file record Writes values to one or more extended file registers 1 to 122 points Sec...

Page 60: ...er and slave functions Function code Sub code Sub function code Function Master function Slave function Automatic communication function MBRW instruction MBREQ instruction 1 01 Read coils 02 Read discrete inputs 03 Read holding registers 04 Read input registers 05 Write single coil 06 Write single register 07 Read exception status 08 00 Return query data 01 Restart communications option 02 Return ...

Page 61: ... a MELSECNET H remote I O station This section 3 Table4 2 Standard function support list for the master and slave functions Continued Function code Sub code Sub function code Function Master function Slave function Automatic communication function MBRW instruction MBREQ instruction 1 08 17 Return slave busy count 18 Return bus character overrun count 19 Return IOP overrun error count 20 Clear over...

Page 62: ...me as those shown in 2 2 Accessing the MODBUS device that is not supported by the MELSECNET H remote I O station results in error completion Exception code 04H If the access target is the MELSECNET H remote master station it can be assigned to the control CPU device of the MELSECNET H remote master station Continued on next page Table4 3 MODBUS standard functions available for access to MELSECNET ...

Page 63: ...er station it can be assigned to the control CPU device of the MELSECNET H remote master station Continued on next page Table 4 3 MODBUS standard functions available for access to MELSECNET H remote I O station continued Function code Sub code Sub function code Function Master function Slave function 1 Automatic communication function MBRW instruction MBREQ instruction 08 00 Return query data 01 R...

Page 64: ...ster station POINT When the QJ71MB91 is mounted to a MELSECNET H remote I O station switch the access target using the Access target when mounted to MELSECNET H remote I O station in the buffer memory address 000EH Section 7 3 5 Table 4 3 MODBUS standard functions available for access to MELSECNET H remote I O station continued Function code Sub code Sub function code Function Master function Slav...

Page 65: ...ending a response message Function code When master sends a request message to slave The master specifies the number of the action to be taken by the slave When slave sends a response message to master A requested function code is stored in the case of normal completion The most significant bit turns ON in the case of error completion Data When master sends a request message to slave The informati...

Page 66: ...the frame and the exclusive logical sum XOR of the bits in the above 1 3 Shift the result of 2 by 1 bit to the right 4 If the least significant bit of the above 2 is 1 calculate the exclusive OR XOR from the result in 3 and the generator polynomial A001H If the least significant bit is 0 do not calculate the exclusive OR XOR but shift it by 1 bit to the right 5 Repeat the above steps 3 and 4 until...

Page 67: ...rator polynomial Exclusive OR XOR 0110 0011 1010 1001 0111 0011 0000 0011 1111 1111 0000 1111 1111 1111 0001 1110 0 1 Shift5 Shift6 Generator polynomial Exclusive OR XOR 0100 0010 1010 1000 1001 0100 0000 0100 1111 1111 0000 1111 1111 1111 0001 1110 0 1 Shift7 Shift8 Generator polynomial Exclusive OR XOR 0100 0010 1010 1000 0010 0001 0000 0001 0111 0011 0000 0011 1111 1111 0001 1110 0 1 07H Functi...

Page 68: ...ucting an error check on the target device 1 To calculate the LRC convert the ASCII codes within the error check range into the RTU format binary 2 Add the figures in units of contiguous 8 bits in the frame Excluding carries during addition 3 Change the result of the above 2 to a 2 s complement Reverse the bits and add 01H 4 Convert the result of 3 to an ASCII code Figure 4 3 Frame for CRC calcula...

Page 69: ... coil number H Head coil number L Read points H Read points L 02 01 00 00 00 08 0000 0000 0000 0000 0000 0000 0010 0001 0000 0000 0000 1000 Addition result Bit reversal 1 1 2 s complement 0B F4 F5 0000 1111 1111 1011 0100 1 0101 LRC Error check F5 F 5 Table4 7 LRC calculation procedure when receiving a response message LRC in reception of a response message Station No address field Function code H...

Page 70: ... device number to be stored in the response message is Device number of actually read written device 1 b When the QJ71MB91 receives a broadcast request message Although the processing read write diagnostics etc requested by the request message is performed no response message is sent to the master c When the QJ71MB91 receives a request message in the listen only mode The request message is discard...

Page 71: ...thermore for identification of detailed causes an error code is stored in the QJ71MB91 buffer memory The exception code and error codes can be confirmed by the error log area of the buffer memory address 0CFEH to 0DFFH Section 11 4 3 How to see the request response message formats provided in Section 4 4 to 4 20 a Request Response message format diagram The following shows how to see the request r...

Page 72: ...he master differs depending on whether the slave has normally completed or failed to handle the requested processing read write diagnostics etc The formats for normal and error completions are shown in Section 4 4 to 4 20 Figure 4 8 Conversion example from RTU mode to ASCII mode Data L Data L L L Data L Read points 0 30H 0 30H 3 33H F 46H RTU mode Function code Function code 01H Head coil number 0...

Page 73: ...e following for storage location confirmation methods and detailed contents Section 11 4 Figure 4 9 Read coils Request message Figure 4 10 Read coils Normal response message Figure 4 11 Read coils Exception message Data L L Function code Function code 01H Head coil number 0000H to FFFFH Read points 0001H to 07D0H H H Data b0 b1 b2 b3 b4 b5 b6 b7 Function code Function code 01H Number of read bytes...

Page 74: ...Read discrete inputs Request message Figure 4 13 Read discrete inputs Normal response message Figure 4 14 Read discrete inputs Exception message Data L L Function code Function code 02H Head input number 0000H to FFFFH Read points 0001H to 07D0H H H Data b0 b1 b2 b3 b4 b5 b6 b7 Function code Function code 02H Number of read bytes n Device data 1 Device data n Number of read bytes n Device data 1 t...

Page 75: ...are stored in the buffer memory in the case of error completion Refer to the following for storage location confirmation methods and detailed contents Section 11 4 Figure 4 15 Read holding registers Request message Figure 4 16 Read holding registers Normal response message Figure 4 17 Read holding registers Exception message Data L L Function code Function code 03H Head holding register number 000...

Page 76: ...age location confirmation methods and detailed contents Section 11 4 Figure 4 18 Read input registers Request message Figure 4 19 Read input registers Normal response message Figure 4 20 Read input registers Exception message Data L L Function code Function code 04H Head input register number 0000H to FFFFH Read points 0001H to 007DH H H Data Function code Function code 04H L L Number of read byte...

Page 77: ...aster When completed normally The slave returns the request message received from the master without change When completed with an error 1 Exception and error codes are stored in the buffer memory in the case of error completion Refer to the following for storage location confirmation methods and detailed contents Section 11 4 Figure 4 21 Write single coil Request message Figure 4 22 Write single ...

Page 78: ... without change When completed with an error 1 Exception and error codes are stored in the buffer memory in the case of error completion Refer to the following for storage location confirmation methods and detailed contents Section 11 4 Figure 4 23 Write single register Request Message Figure 4 24 Write single register Exception message Data L L Function code Function code 06H Holding register num...

Page 79: ... Setting error status read device address 000AH to 000BH in the buffer memory are stored in the error information area Section 7 3 4 When completed with an error 2 Exception and error codes are stored in the buffer memory in the case of error completion Refer to the following for storage location confirmation methods and detailed contents Section 11 4 Figure 4 25 Read exception status Request mess...

Page 80: ...format Master Slave 2 Response message format Slave Master When completed normally The slave returns the request message received from the master without change When completed with an error 1 Exception and error codes are stored in the buffer memory in the case of error completion Refer to the following for storage location confirmation methods and detailed contents Section 11 4 Figure 4 28 Return...

Page 81: ...o online mode when it was in the listen only mode The following data are cleared when executing the restart communications option Data being received CH1 2 side error response code storage area in the buffer memory address 0002H 0004H 1 CH1 2 side detailed LED status storage area in the buffer memory address 0006H 0007H 1 Diagnostic counter Section 11 3 The ERR LED OFF 2 Communications event count...

Page 82: ...e mode and no response message will be returned When completed with an error 1 Exception and error codes are stored in the buffer memory in the case of error completion Refer to the following for storage location confirmation methods and detailed contents Section 11 4 Figure 4 30 Restart communications option Request message Figure 4 31 Restart communications option Exception message L Data L Func...

Page 83: ...ailed LED status Section 11 2 Figure 4 32 Return diagnostic register Request message Figure 4 33 Return diagnostic register Normal response message L Data L Function code Function code 08H Sub function code Sub function code 0002H 0000H H H L Data L b0 b1 b2 b3 b4 b5 b6 b7 b8 b9 b10 b11 b12 b13 b14 b15 Unused Fixed to 0 0 0 0 1 0 1 0 1 0 1 0 1 0 0 0 0 1 0 1 0 1 0 1 0 1 0 Function code Function cod...

Page 84: ...pleted with an error 1 Exception and error codes are stored in the buffer memory in the case of error completion Refer to the following for storage location confirmation methods and detailed contents Section 11 4 Figure 4 34 Return diagnostic register Exception message Data Function code Function code 88H Exception code 1 ...

Page 85: ...t message received from the master without change When completed with an error 1 Exception and error codes are stored in the buffer memory in the case of error completion Refer to the following for storage location confirmation methods and detailed contents Section 11 4 POINT This function is used only for 1 1 connections Do not use this function for 1 n connections Figure 4 35 Change part in the ...

Page 86: ...ommunications event log Section 4 13 1 Request message format Master Slave 2 Response message format Slave Master When completed normally No response message is returned because the listen only mode offline status is active When completed with an error 1 Exception and error codes are stored in the buffer memory in the case of error completion Refer to the following for storage location confirmatio...

Page 87: ...SETTINGS 7 PARAMETER SETTING 8 UTILITY PACKAGE GX Configurator MB POINT 1 Whether the QJ71MB91 has been switched to listen only mode or not can be checked in the Communications mode of the buffer memory address 0F0DH 0F4DH 0000H Online mode 0001H Listen only mode 2 The listen only mode can be changed to online mode by either of the following Restart communications option Section 4 11 2 Power OFF O...

Page 88: ...he following counters will be cleared Section 11 3 Bus message count Bus communication error count Exception error count Slave message count Slave no response count Slave NAK count Slave busy count Character overrun error count Communications event count Section 4 12 The following diagnostic resisters will be cleared CH1 2 side detailed LED status storage area of the buffer memory address 0006H 00...

Page 89: ...completed normally The slave returns the request message received from the master without change When completed with an error 1 Exception and error codes are stored in the buffer memory in the case of error completion Refer to the following for storage location confirmation methods and detailed contents Section 11 4 Figure 4 40 Clear counters and diagnostic register Request message Figure 4 41 Cle...

Page 90: ...in the buffer memory in the case of error completion Refer to the following for storage location confirmation methods and detailed contents Section 11 4 Figure 4 42 Return bus message count Request message Figure 4 43 Return bus message count Normal response message Figure 4 44 Return bus message count Exception message L Function code Function code 08H Data L Sub function code Sub function code 0...

Page 91: ...Section 11 3 When completed with an error 2 Exception and error codes are stored in the buffer memory in the case of error completion Refer to the following for storage location confirmation methods and detailed contents Section 11 4 Figure 4 45 Return bus communication error count Request message Figure 4 46 Return bus communication error count Normal response message Figure 4 47 Return bus commu...

Page 92: ... memory in the case of error completion Refer to the following for storage location confirmation methods and detailed contents Section 11 4 Figure 4 48 Return bus exception error count Request message Figure 4 49 Return bus exception error count Normal response message Figure 4 50 Return bus exception error count Exception message L Data L Function code Function code 08H Sub function code Sub func...

Page 93: ...ts count clear methods and precautions Section 11 3 When completed with an error 2 Exception and error codes are stored in the buffer memory in the case of error completion Refer to the following for storage location confirmation methods and detailed contents Section 11 4 Figure 4 51 Return slave message count Request message Figure 4 52 Return slave message count Normal response message Figure 4 ...

Page 94: ...the buffer memory in the case of error completion Refer to the following for storage location confirmation methods and detailed contents Section 11 4 Figure 4 54 Return slave no response count Request message Figure 4 55 Return slave no response count Normal response message Figure 4 56 Return slave no response count Exception message L Data L Function code Function code 08H Sub function code Sub ...

Page 95: ...clear methods and precautions Section 11 3 When completed with an error 2 Exception and error codes are stored in the buffer memory in the case of error completion Refer to the following for storage location confirmation methods and detailed contents Section 11 4 Figure 4 57 Return slave NAK count Request message Figure 4 58 Return slave NAK count Normal response message Figure 4 59 Return slave N...

Page 96: ...des are stored in the buffer memory in the case of error completion Refer to the following for storage location confirmation methods and detailed contents Section 11 4 Figure 4 60 Return slave busy count Request message Figure 4 61 Return slave busy count Normal response message Figure 4 62 Return slave busy count Exception message L Data L Function code Function code 08H Sub function code Sub fun...

Page 97: ...ed with an error 2 Exception and error codes are stored in the buffer memory in the case of error completion Refer to the following for storage location confirmation methods and detailed contents Section 11 4 Remark Refer to the following for the size of request messages Section 4 2 1 Figure 4 63 Return bus character overrun count Request message Figure 4 64 Return bus character overrun count Norm...

Page 98: ...eted with an error 2 Exception and error codes are stored in the buffer memory in the case of error completion Refer to the following for storage location confirmation methods and detailed contents Section 11 4 Figure 4 66 Return IOP overrun error count Request message Figure 4 67 Return IOP overrun error count Normal response message Figure 4 68 Return IP overrun error count Exception message L D...

Page 99: ...lue 1 Request message format Master Slave 2 Response message format Slave Master When completed normally The slave returns the request message received from the master without change When completed with an error 1 Exception and error codes are stored in the buffer memory in the case of error completion Refer to the following for storage location confirmation methods and detailed contents Section 1...

Page 100: ...on Section 4 11 2 Power OFF ON or programmable controller CPU reset POINT The communications event counter counts only when the processing read write diagnostics etc has completed normally The communications event counter does not count in the case of the following The processing has completed with an error When receiving a request message containing a function code that the QJ71MB91 does not supp...

Page 101: ... SETTINGS 7 PARAMETER SETTING 8 UTILITY PACKAGE GX Configurator MB When completed with an error 1 Exception and error codes are stored in the buffer memory in the case of error completion Refer to the following for storage location confirmation methods and detailed contents Section 11 4 Figure 4 73 Get communications event counter Exception message Data Function code Function code 8BH Exception co...

Page 102: ...communications event log This section 2 a 2 b When completed with an error 5 Exception and error codes are stored in the buffer memory in the case of error completion Refer to the following for storage location confirmation methods and detailed contents Section 11 4 Figure 4 74 Get communications event log Request message Figure 4 75 Get communications event log Normal response message Figure 4 76...

Page 103: ...log is deleted and the latest log is stored to Communications event log 0 Communications event logs are stored in the buffer memory at the following timing 1 When receiving a request message The slave QJ71MB91 stores the communications event log before executing the processing of the request message For the relevant communications event 1 is stored Figure 4 77 Communications event log Figure 4 78 ...

Page 104: ...QJ71MB91 stores the communications event log when processing the restart communications option 00H is stored to the communications event log b Clearing the communications event log The communications event can be cleared by either of the following Clear setting of the communications event log with the restart communications option Section 4 11 2 Power OFF ON or programmable controller CPU reset Fi...

Page 105: ... with the number of bits specified as the number of bytes For example when the write points are set to 16 set the number of bytes to 2 bytes 16 bits Figure 4 82 Write multiple coils Request message Data L L b0 b1 b2 b3 b4 b5 b6 b7 Function code Function code 0FH Head coil number 0000H to FFFFH Write points 1 0001H to 07B0H Number of bytes n 1 0001H to 00F6H Device data 1 Device data n Number of by...

Page 106: ... the following for storage location confirmation methods and detailed contents Section 11 4 Figure 4 83 Write multiple coils Normal response message Figure 4 84 Write multiple coils Exception message Data L L Function code Function code 0FH Head coil number The same head coil number value as in the request message is stored Write points The same write points value as in the request message is stor...

Page 107: ...stored in the buffer memory in the case of error completion Refer to the following for storage location confirmation methods and detailed contents Section 11 4 Figure 4 85 Write multiple registers Request message Figure 4 86 Write multiple registers Normal response message Figure 4 87 Write multiple registers Exception message Data L L L L Function code Function code 10H Head holding register numb...

Page 108: ...igure 4 88 Report slave ID Request message Figure 4 89 Report slave ID Normal response message Table4 8 Programmable controller CPU type data returned to Master Module type Programmable controller CPU type data returned to Master Programmable controller CPU Q00JCPU 50H Q00CPU 51H Q01CPU 52H Q02CPU 41H Q02HCPU Q06HCPU 42H Q12HCPU 43H Q25HCPU 44H Function code Function code 11H Data See table below ...

Page 109: ...e4 8 Programmable controller CPU type data returned to Master Continued Module type Programmable controller CPU type data returned to Master Programmable controller CPU Q02PHCPU 41H Q06PHCPU 42H Q12PHCPU 43H Q25PHCPU 44H Q12PRHCPU 4BH Q25PRHCPU 4CH Q00UJCPU 60H Q00UCPU 61H Q01UCPU 62H Q02UCPU 63H Q03UDCPU 68H Q04UDHCPU 69H Q06UDHCPU 6AH Q10UDHCPU 66H Q13UDHCPU 6BH Q20UDHCPU 67H Q26UDHCPU 6CH Q03UD...

Page 110: ...n the frame mode is ASCII mode it is 506 bytes b Read points of each sub request Specify the total points N n1 nm so that the protocol data unit size of the response message will not exceed 253 bytes 3 2 m 2 N 2 253 3 If the above condition is not satisfied the slave returns an exception response 3 When the frame mode is ASCII mode it is 506 bytes Figure 4 91 Read file record Request message Data ...

Page 111: ...of error completion Refer to the following for storage location confirmation methods and detailed contents Section 11 4 Figure 4 92 Read file record Normal response message Figure 4 93 Read file record Exception message Data L L Sub request 1 Data L L Function code Function code 14H Number of response data bytes m x 2 N x 2 Read bytes n1 x 2 1 Reference number 06H Device data 1 Device data n1 Numb...

Page 112: ...l not exceed 253 bytes 2 2 m 7 N 2 253 2 If the above condition is not satisfied the request message is discarded 2 When the frame mode is ASCII mode it is 506 bytes Figure 4 94 Write file record Request message Data L L L Sub request 1 L L Data L L L L L Sub request m Function code Function code 15H Number of bytes m x 7 Reference number 06H Reference number 06H Write head device number 0000H to ...

Page 113: ...d in the buffer memory in the case of error completion Refer to the following for storage location confirmation methods and detailed contents Section 11 4 POINT Even if the slave QJ71MB91 receives this function with the programmable controller CPU file register ZR set as read only for example the storage location of the file register ZR is a Flash card the slave responds normally In this case howe...

Page 114: ...fer memory in the case of error completion Refer to the following for storage location confirmation methods and detailed contents Section 11 4 POINT This function code is used to read the value stored in a specified holding register from the slave process the value with AND OR mask in the master and then write the masked value to the holding register of the slave Therefore if the holding register ...

Page 115: ...es are stored in the buffer memory in the case of error completion Refer to the following for storage location confirmation methods and detailed contents Section 11 4 Figure 4 98 Read Write multiple registers Request message Figure 4 99 Read Write multiple registers Normal response message Figure 4 100 Read Write multiple registers Exception message Data L L L L L L Function code Function code 17H...

Page 116: ...to a MODBUS compatible slave device Section 5 2 1 Communication by dedicated instructions 1 Allows reading writing of MODBUS devices at any timing with a sequence program CHAPTER 10 Slave function Automatic response function 2 Automatically performs the processing corresponding to the function code in the request message received from the master and automatically sends a response message Section 5...

Page 117: ...itself and the send receive functions Hardware test Tests the RAM and ROM of the QJ71MB91 Section 6 4 1 Self loopback test This test checks the send receive function of the QJ71MB91 and communications with the programmable controller CPU Section 6 4 2 Various settings using utility package By using the utility package GX Configurator MB parameters such as automatic communication parameters or MODB...

Page 118: ...vices Figure 5 1 Communication using the automatic communication function 4 2 5 3 1 6 7 FG FG RS 232 485 RS 422 CH2 RDB RDA SDB SG SDA CH1 QJ71MB91 RUN RD NEU SD NEU RD SD CH1 CH2 ERR Read Auto Refresh R R RS 485 Read Read Write Programmable controller CPU Device memory QJ71MB91 Master function Buffer memory R Automatically issues the MODBUS device read write request message to Slave R MODBUS slav...

Page 119: ...imer and response monitoring timer broadcast delay settings Set the automatic communication parameters referring to the following flowchart Symbols a to g in the illustration correspond to sections a to g on subsequent pages Figure 5 2 Automatic communication operation flowchart Error a The Request interval timer times out and then restarts c The Response monitoring timer Broadcast delay starts Tr...

Page 120: ...imer Broadcast delay starts when a request message is sent Section 7 2 1 4 Figure 5 3 Request interval timer operation Figure 5 4 Response monitoring timer Broadcast delay operation Request interval timer times out and then restarts Master QJ71MB91 Request interval timer Receiving response message Request message processing Request message Request message processing Response message Slave Receivin...

Page 121: ...20H to 0C21H 0C22H to 0C23H e Receiving response message from slave When slave processing is complete a response message is received Figure 5 5 Timeout of Broadcast delay Figure 5 6 Reception of response message Slave 1 Slave 2 Slave 3 Broadcast delay Broadcast delay times out Request message Request message Request message processing Request message processing Request message processing Request m...

Page 122: ...utomatic communication operating status storage area turns ON address 0C20H to 0C21H 0C22H to 0C23H g The Response monitoring timer is terminated When the master QJ71MB91 receives a response message the Response monitoring timer is terminated Figure 5 7 Response monitoring timer operation Response monitoring timer Master QJ71MB91 Slave 1 Request message Receiving response message Request message R...

Page 123: ... If Automatic communication parameters 1 to 3 are set Automatic communications are executed in the order 1 2 3 1 2 POINT If no automatic communication parameter is set no automatic communication is executed Section 7 2 1 1 For example if Automatic communication parameter 2 has no setting in the Figure 5 8 automatic communication will be executed in the order 1 3 1 3 Figure 5 8 Automatic communicat...

Page 124: ...binary even if the frame mode is ASCII mode 2 Read write data consistency is secured in units of one word 16 bits Table5 2 Data storage location buffer memory Name Description Buffer memory address Automatic communication function buffer input area Area used for storing data read from the slave CH1 1000H to 1FFFH 4096 to 8191 CH2 2000H to 2FFFH 8192 to 12287 Automatic communication function buffer...

Page 125: ... the addresses in 1 word 16 bits unit 2 Transfer direction of the automatic communication function buffer output area data When sending a request message to a slave the QJ71MB91 creates it by reading data from the automatic communication function buffer output area in descending order of the addresses in units of one word 16 bits Figure 5 9 Transfer direction of the automatic communication functio...

Page 126: ...mmable controller CPU device memory by either of the following methods 1 Refer to the following manual for details on the intelligent function module devices User s Manual Function Explanation Program Fundamentals for the CPU module used Table5 3 Data transfer between automatic communication function buffer areas and programmable controller CPU device memory Transfer method Description Transfer by...

Page 127: ...controller CPU s RUN STOP switch set to RUN The automatic communication will not start if the programmable controller is powered ON from OFF or if the programmable controller CPU is reset with the programmable controller CPU s RUN STOP switch set to STOP If the QJ71MB91 is mounted on a MELSECNET H remote I O station the automatic communication function is activated when the remote I O station rece...

Page 128: ...FF Y4 YC X4 XC X6 XE X5 XD X0 OFF Y6 YE OFF Parameter creation Module READY Automatic communication parameter setting request Automatic communication start request Automatic communication stop request Automatic communication parameter setting normally completed Automatic communication parameter setting error completed Automatic communication operation status Automatic communication parameter creat...

Page 129: ...gent function module switch setting change status X10 is OFF Even if no response is sent from the communication target slave the automatic communication function does not stop until Automatic communication stop request Y6 YE turns on c When Automatic communication stop request Y6 YE is executed while automatic communication is stopped An error error code 7370H will occur if Automatic communication...

Page 130: ... Automatic communication error status X7 XF turns ON Also any erroneous part of the parameters and error details can be identified by the following 1 Acquisition of the automatic communication parameter number for the error Check the automatic communication operation status storage area 0C20H to 0C21H 0C22H to 0C23H in the buffer memory to identify the error Section 11 4 1 5 2 Error code check In ...

Page 131: ... a list of available dedicated instructions Figure 5 11 Communication by dedicated instruction Table5 4 Dedicated instruction list Dedicated instruction Description Reference MBRW Issues a MODBUS device read write request message to a slave Section 10 2 MBREQ With this instruction a request message can be sent to a slave in any given Protocol Data Unit format Section 10 3 Z MBRW Command 400500 MOD...

Page 132: ...4 1 of a request message from the master and returns a response message to the master For device read write or exception status read use the MODBUS device assignment function Section 5 3 2 Figure 5 12 Automatic response function Programmable controller CPU QJ71MB91 Slave function 1 2 3 4 No sequence program required Device memory Receiving request message Function code identification Requested pro...

Page 133: ... CPU to be assigned Section 7 3 1 1 MODBUS device assignment parameter setting Set the MODBUS device assignment parameters to the slave QJ71MB91 The following settings are possible for the MODBUS device assignment parameters a Correlating the MODBUS device to the programmable controller CPU device memory When a message requesting an action such as write coil is received from the master the access ...

Page 134: ...LSECNET H remote I O station the access target can be specified Section 7 3 5 The access target can be selected from the MELSECNET H remote master station and the MELSECNET H remote I O station Figure 5 14 Error status read device and programmable controller CPU device M100 M107 M100 to M107 Device R Programmable controller CPU No sequence program required 01H QJ71MB91 Slave function Error status ...

Page 135: ...nother response message error complete can be sent after a given length of time has elapsed This will prevent the master from waiting for a response message that will not be received 2 Setting the MODBUS device assignment parameters Set the MODBUS device assignment parameters by the utility package GX Configurator MB Section 8 4 2 Setting from a sequence program is also available Section 9 1 2 Fig...

Page 136: ... message received from CH2 is sent to the master from CH2 If a request message addressed to the QJ71MB91 is received the QJ71MB91 will act as a slave The link operation is not performed Figure 5 16 Communication using the link operation function Figure 5 17 Message flow during link operation 4 2 5 3 1 6 7 FG FG RS 232 485 RS 422 CH2 RDB RDA SDB SG SDA CH1 QJ71MB91 RUN RD NEU SD NEU RD SD CH1 CH2 E...

Page 137: ... function a System configuration Connect the MODBUS master device to CH1 RS 232 of the QJ71MB91 While using the link operation function the MODBUS master device cannot be connected to CH2 RS 422 485 b Intelligent function module settings The intelligent function module switch settings for channels 1 and 2 must be identical If not a switch error will be generated Except for MODBUS device assignment...

Page 138: ...de of resin do not drop or give it hard impact 2 Before handling modules touch a grounded metal object to discharge the static electricity from the human body Failure to do so may cause failure or malfunctions of the module 3 Tighten the screws such as module fixing screws within the following ranges 1 The module can be easily fixed onto the base unit using the hook at the top of the module Howeve...

Page 139: ... operational procedures and settings Procedure for operation Confirm the devices to be used and specifications Mount the QJ71MB91 on the base unit Connect GX Developer and programmable controller CPU via a cable Perform the hardware test Perform the self loopback test Set the I O assignment with GX Developer Set the intelligent function module switches with GX Developer Connect the MODBUS master d...

Page 140: ...oller system 3 Use GX Developer to make I O assignment and intelligent function module switch setting Perform QJ71MB91 automatic communication parameter Section 7 2 settings at the GX Configurator MB or the sequence program 4 To update the parameter settings added changed on GX Developer write the parameters to the programmable controller CPU and then reset the programmable controller CPU Figure 6...

Page 141: ...s section provides the names of the QJ71MB91 parts Figure 6 2 QJ71MB91 external diagram Table6 2 Part names and descriptions Name Description 1 Indicator LED Indicator LEDs This section 1 2 CH1 side RS 232 interface RS 232 interface for serial communication with target devices D Sub 9P 3 CH2 side RS 422 485 interface RS 422 485 interface for serial communication with target devices Detachable term...

Page 142: ...F RUN Normal operation Normal Watch dog timer error hardware fault ERR Error indication 1 Error occurred Normal CH1 CH2 NEU Neutral status Master function Request message not transmitted Waiting for response message from slave Slave function Waiting for request message from master Request message being processed SD Transmission status Data being transmitted Data not transmitted RD Reception status...

Page 143: ...rm the hardware test according to the following procedure 2 Hardware test contents The QJ71MB91 performs the following tests once a ROM check Reads ROM data and perform a sum check b RAM check Writes test data in RAM and read the written data to perform the check Figure 6 4 Hardware test procedure Start STOP the programmable controller CPU Disconnect the communication cable connected to the target...

Page 144: ... OFF the station and connect a communication cable to the target device Power ON the station b When completed abnormally If a ROM RAM error occurs check the following and re perform the test The QJ71MB91 power supply module and programmable controller CPU are mounted correctly on the base unit The operating environment of the QJ71MB91 meets the general specifications of the programmable controller...

Page 145: ... Cable wirings for self loopback test Start STOP the programmable controller CPU Disconnect the communication cable connected to the target device Connect a cable for self loopback test 1 Make the communication speed transmission settings Switch 2 4 Set it to the self loopback test mode Switch 1 3 000DH 000EH combination Reset the programmable controller CPU Loopback test execution approx 1 second...

Page 146: ...normally monitor the self loopback test results 0FFFH of the buffer memory and check the error details Figure 6 8 Self loopback test results storage details Table6 4 Error cause and corrective action Buffer memory Cause for corresponding bit ON Corrective action Address Bit position 0FFFH 4095 b0 An error has occurred at programmable controller CPU Remove the error cause in the programmable contro...

Page 147: ...station b When completed abnormally If an error occurs remove the error cause by following the Table6 4 check the following and perform the test again The QJ71MB91 power supply module and programmable controller CPU are mounted correctly on the base unit The operating environment of the QJ71MB91 meets the general specifications of the programmable controller CPU module QCPU User s Manual Hardware ...

Page 148: ...an RS 232 line Refer to the following for the connection cable QJ71MB91 side Section 3 2 1 3 When connecting to the target device with an RS 422 485 line Pay attention to the following when making a connection a Connection cable Refer to the following regarding the RS 422 485 cable Section 3 3 2 b Terminal screws for the terminal block M3 screws are used on the terminal block for the RS 422 485 in...

Page 149: ... Connect the FG terminal on the target device and the QJ71MB91 side using the shield of the connection cable 2 Connect each signal line other than SG with the SG signal line in twisted pair Table6 5 Connection cable s FG signal line and shield Item Connection on the QJ71MB91 side Remarks Connection cable s FG signal Connect to the QJ71MB91 side connector housing Do not short circuit the FG and SG ...

Page 150: ... For other signal wirings on the target device refer to the instruction manual of the target device Figure 6 10 RS 232 cable connection example 1 2 3 4 5 6 7 8 9 RD SD RD SD Signal name SG SG Output for cable disconnection detection Input for cable disconnection detection Pin No Target device Slave or Master Signal name QJ71MB91 CH1 Master or Slave ...

Page 151: ...ection cable to either FG terminal on the connected device If normal data communication is not available due to external noise even with the above mentioned wiring perform the following wiring 1 Make connection between the FGs of both stations with the shield of the connection cable For the target device side follow the instruction manual of the target device 2 Connect the FG of the QJ71MB91 to th...

Page 152: ...minating resistor to be connected to the QJ71MB91 For RS 422 communications connect a 330 1 4W terminating resistor For RS 485 communications connect a 110 1 2W terminating resistor How to distinguish terminating resistors d When data communications are not possible at all If data cannot be exchanged with the target device at all check the polarity of the target device If the polarities of the QJ7...

Page 153: ...6 13 Connection for 1 1 communication Figure 6 14 Connection for 1 n communication 4 wire when host is master Figure 6 15 Connection for 1 n communication 2 wires when host is master Terminating resistor R RDA SG FG SDA Signal name RDA SG FG Target device Slave or Master SDA Terminating resistor R QJ71MB91 CH2 Master or Slave Signal name SDB RDB RDB SDB Terminating resistor R RDA SG FG SDA Termina...

Page 154: ... Connection for 1 n communication 4 wires when host is slave Figure 6 17 Connection for 1 n communication 2 wires when host is slave RDA SG FG SDA R R SDB RDB RDA SG FG SDA SDB RDB RDA SG FG SDA SDB RDB RDA SG FG SDA SDB RDB R R Terminating resistor Terminating resistor Terminating resistor QJ71MB91 QJ71MB91 Terminating resistor Third party slave Third party master QJ71MB91 QJ71MB91 R R RDA SG FG ...

Page 155: ... 4 wires when host is slave Figure 6 19 Connection for link operation setting 1 n communication 2 wires when host is slave R R R R RDA SG FG SDA SDB RDB RDA SG FG SDA SDB RDB RDA SG FG SDA SDB RDB QJ71MB91 SG SD RD SG SD RD Terminating resistor Terminating resistor Terminating resistor QJ71MB91 Terminating resistor RS 232 Link operation setting Output for cable disconnection detection Input for ca...

Page 156: ...name Enter the model name of the module Points Select 32 points Start XY Enter the QJ71MB91 head input output numbers Detailed setting Specify the control CPU of the QJ71MB91 in a multiple CPU system 4 Click the I O assignment settings screen button to display the screen on the left Referring to steps 2 and later in this section make switch settings Entering the values in hexadecimal makes the set...

Page 157: ...unction module switch setting has been made the initial values of each switch are used for operation 3 If using the link operation function set two channels to the same settings Except for MODBUS device assignment parameter starting methods in the transmission speed setting transmission setting switch 2 4 Remark For the operation method of GX Developer refer to the following manual GX Developer Op...

Page 158: ...r function Master function Performs communication as master station Slave function Performs communication as slave station 0000H 0001H Master function Slave function 0001H 0000H Slave function Master function 0001H 0001H Slave function Slave function 0002H 0002H Link operation Slave function 2 Relays data between CH1 and CH2 with the link operation function Section 5 3 3 000DH 000DH Hardware test ...

Page 159: ... with the default parameters is set the module is started with the parameters assigned by default Section 7 3 1 3 When Start with the user set parameters is set the module is started with the MODBUS device assignment parameters set on the sequence program or GX Configurator MB Section 7 3 1 2 When setting parameters using the GX Configurator MB turn the MODBUS device assignment parameter start met...

Page 160: ...ify a value within the range shown below 1 Setting a value outside the range shown in the table results in a switch error Table6 9 Communication speed setting Communication speed Bit position Communication speed Bit position b15 to b8 b15 to b8 300 bps 00H 14400 bps 06H 600 bps 01H 19200 bps 07H 1200 bps 02H 28800 bps 08H 2400 bps 03H 38400 bps 09H 4800 bps 04H 57600 bps 0AH 9600 bps 05H 115200 bp...

Page 161: ... that the module fixing screws and the terminal block mounting screws are tightened securely POINT For the QJ71MB91 maintenance and inspection read the safety precautions provided in the first pages of this manual 6 7 2 When removing or installing the module When removing installing the module read 6 1 Handling Precautions and pay full attention to safety to handle the product correctly The module...

Page 162: ...nel If the automatic communication function is not to be used setting of these parameters are not required b MODBUS device assignment parameter Set the MODBUS device assignment parameters when using the MODBUS device assignment function with the QJ71MB91 operated as a slave Section 7 3 When using the initial values preset to the QJ71MB91 no setting is required for these parameters 2 Parameter sett...

Page 163: ... device assignment R R Create a sequence program for parameter setting of functions to be used Start Set parameters with GX Configurator MB Write parameters to the programmable controller CPU With the RUN STOP switch set to RUN reset the programmable controller CPU SP PARA ERROR occurred in the programmable controller CPU Check the auto refresh parameters the head input output numbers etc To next ...

Page 164: ...s 0C17H 0C19H and modify automatic communication parameters Refer to buffer memory s MODBUS device assignment parameter error code storage area address 0C13H and MODBUS device assignment parameter setting result storage area address 0C14H to 0C15H and modify MODBUS device assignment parameters ERR LED is ON Use automatic communication function The used channel s automatic communication operation s...

Page 165: ...on No 0 Broadcast 1 to 247 Slave station No 1 This section 2 0203H 515 0383H 899 Request interval timer value 0 Upon reception of a reply message from a slave immediately issues the next request message 2 to 65535 The time from when the QJ71MB91 sends a request message until it sends the next request message Set time set value 10 ms 0 This section 3 0204H 516 0384H 900 Response monitoring timer va...

Page 166: ...ess Parameter name Setting range Default Reference CH1 CH2 0207H 519 0387H 903 Automatic communication Parameter 1 Read Setting Target MODBUS device head number 0 to 65535 0 This section 7 0208H 520 0388H 904 Access points 0 to 2000 0 This section 8 0209H 521 0389H 905 Write setting Head buffer memory address 0000H None 3000H to 3FFFH CH1 write data storage area 4000H to 4FFFH CH2 write data stora...

Page 167: ...C23H turns ON 2 An error code is stored in the automatic communication error code storage area in the buffer memory address 0C28H to 0C47H 0C48H to 0C67H Section 11 4 1 POINT 1 The Response monitoring timer value should be smaller than the Request interval timer value If the Response monitoring timer value is larger than the Request interval timer value a request interval timer timeout error error...

Page 168: ...er value If the Broadcast delay value is greater than the Request interval timer value request messages will be sent during at the intervals of the Request interval timer 3 While the Broadcast delay is on request messages cannot be sent with the MBRW and MBREQ instruction When the automatic communication function and the MBRW or MBREQ instruction are used on the same channel set appropriate automa...

Page 169: ...one instruction only when 0505H Read write multiple registers is set 3 Broadcast can be performed with 0001H Write multiple coils and 0005H Write multiple registers only Figure 7 5 Structure for Type specification of the target MODBUS device Table7 2 Type specification of the target MODBUS device Setting value Target MODBUS device type 00H No specification 01H Coil 02H Input 04H Input register 05H...

Page 170: ...hen specifying a value of 32768 8000H or more in a sequence program When specifying a value of 32768 8000H or more in a sequence program set the value in hexadecimal 8 Access points Read Write setting Set the number of points to be written to the MODBUS device and to be read from the MODBUS device The access points vary depending on the type specification of the target MODBUS device Table7 4 Acces...

Page 171: ...ameter Read setting Target MODBUS device type setting Head buffer memory address Target MODBUS device head number Access points 0200H input 1000H 4096 16628 35 Automatic communication parameter Write setting Target MODBUS Device type setting Head buffer Memory address Target MODBUS device head number Access points 0001H coil 3000H 12288 1305 5 to Remaining area is masked with 0 Read to 116629 1166...

Page 172: ...s from the MODBUS compatible master device to the programmable controller CPU device memory Figure 7 6 MODBUS device and programmable controller CPU device D300 D299 400499 D300 400500 D301 400501 Device R R Programmable controller CPU No sequence program required 1234H QJ71MB91 Slave function R MODBUS device assignment parameter Device memory MODBUS device Request message Write 1234H to holding r...

Page 173: ...Latch relay L Special register SD Data register D R MODBUS device Holding register MODBUS device assignment parameter setting example Coil assignment 1 Device code Head device number Head coil number Assignment points M 0090H Coil assignment 2 Device code Head device number Head coil number Assignment points Y 009DH Coil assignment 3 Device code Head device number Head coil number L 0092H Holding ...

Page 174: ...unction Explanation Program Fundamentals for the CPU module used 2 The maximum access points and maximum file number of the extended file register depend on the file register ZR assignment size of the programmable controller CPU User s Manual Function Explanation Program Fundamentals for the CPU module used Remark Refer to the following for assignment of the extended file register and the programm...

Page 175: ...n 3 b Setting parameter list Continued on next page Table7 6 MODBUS device assignment parameter list Address Parameter name Setting range Default Reference 0900H 2304 Coil Coil assignment 1 Device code 0000H Device code not assigned Other than 0000H Device code 0000H This section 2 b 1 to 4 0901H 2305 Head device number 0000H to FFFFH 0902H 2306 Head coil number 0000H to FFFFH 0903H 2307 Assignmen...

Page 176: ...1H 2433 Head device number 0000H to FFFFH 0982H 2434 Head input register number 0000H to FFFFH 0983H 2435 Assignment points 0000H to FFFFH 0984H to 09BFH 2436 to 2495 Input register assignment 2 to 16 Same as in Input register assignment 1 09C0H 2496 Holding register Holding register assignment 1 Device code 0000H Device code not assigned Other than 0000H Device code 0000H 09C1H 2497 Head device n...

Page 177: ...depending on the MODBUS devices Refer to the following table for the device code setting availabilities Continued on next page Table7 7 Device code list Classification Device name Device symbol Device code 5 MODBUS device Coil Input Input Register Holding Register Extension File Register Internal system device Special relay SM 3 0091H Special register SD 3 00A9H Internal user device Input X 3 009C...

Page 178: ... and extended link register W10000 and higher area cannot be allocated as input register or holding register Use file register ZR specification instead For file register ZR specification of extended data register or extended link register refer to the following manual User s Manual Function Explanation Program Fundamentals for the CPU module used Use Read file record FC 20 or Write file record FC ...

Page 179: ...e head number of the MODBUS device of the assignment target QJ71MB91 Use the following expression to find a setting value of the head MODBUS device number Head MODBUS device number Last 5 digits of relevant MODBUS device number 1 Example Set 5139 for the MODBUS device number 105140 The head MODBUS device number must not be duplicated among Assignment 1 to 16 Set unique head MODBUS device numbers T...

Page 180: ...536 8192 X 108192 365536 12288 D 412288 465536 Empty Empty Empty Empty Empty Empty Empty Empty Empty Empty 165536 420481 SD 422528 422529 4096 426624 430721 8192 438912 W 440961 SW 443008 461441 2048 CN 463488 457345 2048 SN 459392 453249 2048 TN 455296 Coil 000001 to 065536 Coil assignment 1 Coil assignment 2 Coil assignment 3 Coil assignment 5 Coil assignment 6 Coil assignment 7 Coil assignment ...

Page 181: ...il assignment 2 0904H to 0907H 2305 to 2311 0090H M 0000H 8192 8192 Coil assignment 3 0908H to 090BH 2312 to 2315 0091H SM 0000H 20480 2048 Coil assignment 4 090CH to 090FH 2316 to 2319 0092H L 0000H 22528 8192 Coil assignment 5 0910H to 0913H 2320 to 2323 00A0H B 0000H 30720 8192 Coil assignment 6 0914H to 0917H 2324 to 2327 0093H F 0000H 38912 2048 Coil assignment 7 0918H to 091BH 2328 to 2331 0...

Page 182: ...2372 to 2431 0000H 0000H 0 0 Input register assignment 1 to 16 0980H to 09BFH 2432 to 2495 0000H 0000H 0 0 Holding register assignment 1 09C0H to 09C3H 2496 to 2499 00A8H D 0000H 0 12288 Holding register assignment 2 09C4H to 09C7H 2500 to 2503 00A9H SD 0000H 20480 2048 Holding register assignment 3 09C8H to 09CBH 2504 to 2507 F000H 5000H 22528 4096 Holding register assignment 4 09CCH to 09CFH 250...

Page 183: ... range varies depending on the programmable controller CPU User s Manual Function Explanation Program Fundamentals for the CPU module used Depending on the programmable controller CPU some of the default assignment parameter range may not be usable In such a case observe either of the following not to access the devices outside the allowable range Set the MODBUS device assignment parameters This s...

Page 184: ...gister ZR size set to the programmable controller CPU on the QJ71MB91 mounted station POINT Even if the slave QJ71MB91 receives Write File Record FC 21 when the programmable controller CPU s file register ZR is read only for example when stored on a Flash card it will issue a normal response In this case however the action for Write File Record is not performed To write to the extended file regist...

Page 185: ...MODBUS devices will not be affected by sequence scans This allows the QJ71MB91 to respond faster to the master 1 To assign the QJ71MB91 buffer memory to the MODBUS device a When using the MODBUS device assignment parameter When setting the MODBUS device assignment parameter set F000H for the device code Section 7 3 1 2 b When using the default assignment parameter Use any of the MODBUS device 4225...

Page 186: ... QJ71MB91 buffer memory value can be stored in the programmable controller CPU device memory Data can be stored by either of the following Automatic refresh setting on GX Configurator MB Section 8 5 Transfer using intelligent function module devices Un G User s Manual Function Explanation Program Fundamentals for the CPU module used Figure 7 10 MODBUS device and buffer memory D300 400499 400500 40...

Page 187: ...esses shown below The 8 points from the specified bit device is regarded as a error status read device Figure 7 11 Relations between error status and error status read device Table7 10 Error status read device specification Address Parameter name Setting range Default 000AH 10 Error status read device specification Device code 0000H Device code not assigned Other than 0000H Device code F000H 000BH...

Page 188: ...ed Section 7 3 5 2 Equivalent to LB of the MELSECNET H remote I O stations 3 When setting with GX Configurator MB input the head device Table7 11 Device codes usable for error status read devices Classification Device name Device symbol Device code 3 Internal system device Special relay SM 1 0091H Internal user device Input X 1 009CH Output Y 1 009DH Internal relay M 1 0090H Latch relay L 0092H An...

Page 189: ...mber of the programmable controller CPU device memory to be assigned to the MODBUS device The upper limit of the setting is the number resulted from each device s upper limit minus 8 points POINT If F000H buffer memory is specified for the device code the error status read buffer memory address 000FH will be the error status read target No other buffer memory can be set In this case make the setti...

Page 190: ...n the QJ71MB91 receives a request message from the master the MELSECNET H remote I O station device is accessed b When the access target is a remote master station 0001H is set When the QJ71MB91 receives a request message from the master a control CPU device of the MELSECNET H remote master station is accessed If the QJ71MB91 is not mounted on the MELSECNET H remote I O station do not make this se...

Page 191: ...e due to an error occurred in the programmable controller CPU 1 CPU response monitoring timer processing a Start of the CPU response monitor timer The QJ71MB91 starts the CPU response monitoring timer when it receives a request message from the master 1 in Figure The CPU response monitoring timer monitors the programmable controller CPU processing until the QJ71MB91 starts sending a response messa...

Page 192: ...lue as specified below POINT When the CPU response monitoring timer value is 0 the QJ71MB91 waits until the programmable controller CPU completes its processing Limitless wait Table7 13 CPU response monitor timer setting Address Parameter name Setting range Default 000DH 13 CPU response monitoring timer value 0 Limitless wait 1 to 2400 CPU response monitoring timer value Set time set value x 500ms...

Page 193: ...parameter The initially set data are registered as programmable controller CPU parameters and are automatically written to the QJ71MB91 when the programmable controller CPU enters RUN status Section 8 4 Auto refresh setting The QJ71MB91 s buffer memory is configured for automatic refresh Automatic communication function buffer input area Automatic communication function buffer output area Automati...

Page 194: ...reen error of Intelligent function module utility Insufficient system resource may cause the screen to be displayed inappropriately while using the Intelligent function module utility If this occurs close the Intelligent function module utility GX Developer program comments etc and other applications and then start GX Developer and Intelligent function module utility again 4 To start the Intellige...

Page 195: ...if multiple intelligent function modules are installed to the MELSECNET H remote I O station configure the settings in GX Configurator so that the number of parameter setting for all the intelligent function modules does not exceed the limit of the MELSECNET H remote I O station Calculate the total number of parameter settings separately for the initial setting and for the auto refresh setting Fig...

Page 196: ...ber of parameter settings in Auto refresh setting Table8 3 Number of parameters that can be set per module Target module Initial setting Auto refresh setting QJ71MB91 3 Fixed 8 Max Figure 8 2 How to count auto refresh settings This one row is counted as one setting Blank rows are not counted Count up all the setting items on this screen and add the total to the number of settings for other intelli...

Page 197: ...on Installation Add in target 1 Add in to GX Developer Version 4 English version or later 2 Computer Windows based personal computer CPU Refer to the next page Operating system and performance required for personal computer Required memory Hard disk space 3 For installation 65MB or more For operation 10MB or more Display 800 600 dots or more resolution 4 Operating system Microsoft Windows 95 Opera...

Page 198: ...puter Operating system Performance required for personal computer CPU Memory Windows 95 Service Pack 1 or higher Pentium 133 MHz or more 32MB or more Windows 98 Pentium 133 MHz or more 32MB or more Windows Me Pentium 150 MHz or more 32MB or more Windows NT Workstation 4 0 Service Pack 3 or higher Pentium 133 MHz or more 32MB or more Windows 2000 Professional Pentium 133 MHz or more 64MB or more Wi...

Page 199: ...kage and their applications are shown in the table below Table8 6 List of control keys used for GX Configurator MB Key Application Cancels the current entry in a cell Closes the window Moves between controls in the window Used in combination with the mouse operation to select multiple cells for test execution Deletes the character where the cursor is positioned When a cell is selected clears all o...

Page 200: ...n a project created with GX Developer b Text files A text file can be created by clicking the button on the initial setting Auto refresh setting or Monitor Test screen The text files can be utilized to create user documents This file can be utilized to create user documents Figure 8 3 Data configuration on GX Configurator MB Figure 8 4 Flow of GX Configurator MB data Project Program Parameter Netw...

Page 201: ...rator MB Steps 1 to 3 in the figure are performed as shown below 1 From GX Developer select Project Open project Save Save as 2 On the intelligent function module selection screen of the utility select Intelligent function module parameter Open parameters Save parameters 3 From GX Developer select Online Read from PLC Write to PLC Intelligent function module parameter Alternatively from the intell...

Page 202: ...5 GX Configurator MB operation overview Initial setting Auto refresh GX Developer screen Tools Intelligent function utility Start Select a target intelligent function module screen Initial setting screen Auto refresh setting screen Enter Start I O No and select Module type and Module model name Section 8 3 3 Section 8 4 Section 8 5 ...

Page 203: ...IFICATIONS 4 MODBUS R STANDARD FUNCTIONS 5 FUNCTION 6 PRE OPERATIONAL PROCEDURES AND SETTINGS 7 PARAMETER SETTING 8 UTILITY PACKAGE GX Configurator MB Figure 8 5 GX Configurator MB operation overview Continued Select monitor test module screen Select the module to be monitored tested Monitor Test screen Online Monitor Test 1 Section 8 6 ...

Page 204: ...vation of other screens Following screens can be displayed from the intelligent function module utility screen a Initial setting screen Start I O No 1 Module type Module model name b Auto refresh setting screen Start I O No 1 Module type Module model name c Select monitor test module screen Online Monitor Test 1 Enter the start I O No in hexadecimal 2 Command buttons Figure 8 6 Intelligent functio...

Page 205: ...le parameters of the project opened by GX Developer are handled Open parameters Reads a parameter file Close parameters Closes the parameter file If any data are modified a dialog asking for file saving will appear Save parameters Saves the parameter file Delete parameters Deletes the parameter file Exit Closes this screen Monitor Test Activates the Select monitor test module screen Read from PLC ...

Page 206: ... after having been saved in a file Set a target programmable controller CPU in GX Developer Online Transfer setup Only use the control CPU for the QJ71MB91 to write the intelligent function module parameters for a multiple CPU system to the programmable controller When the QJ71MB91 is mounted on a MELSECNET H remote I O station Read from PLC and Write to PLC must be performed from GX Developer 3 C...

Page 207: ...s follows Automatic communication parameter MODBUS device assignment parameter Operating procedure Start I O No Module type Module model name Setting Screen Explanation of items 1 Parameter settings Select a button under the Setting value and set parameters on the corresponding screen Automatic communication parameter Section 8 4 1 MODBUS device assignment parameter Section 8 4 2 2 Command buttons...

Page 208: ...ion notifying the status change from STOP to RUN of the remote master station s programmable controller CPU 2 If the initial settings become effective the MODBUS device assignment parameter setting existence XA turns ON Do not write any data to the buffer memory by sequence programs or manipulate Y signals until the MODBUS device assignment parameter setting existence XA turns ON 3 If the initial ...

Page 209: ...UNCTION 6 PRE OPERATIONAL PROCEDURES AND SETTINGS 7 PARAMETER SETTING 8 UTILITY PACKAGE GX Configurator MB 8 4 1 Automatic communication parameter Purpose Set the automatic communication parameters on the Automatic communication parameter screen Operating procedure Initial setting screen Setting Screen Figure 8 8 Automatic communication parameter setting screen Automatic communication ...

Page 210: ... parameter setting screen Setting item Buffer memory address Reference CH1 CH2 Automatic communication parameter 1 Setting parameter existence 0200H to 0201H 512 to 513 0380H to 0381H 896 to 897 Section 7 2 Target station No 0202H 514 0382H 898 Request interval timer value 0203H 515 0383H 899 Response monitoring timer value Broadcast delay value 0204H 516 0384H 900 Type specification of the target...

Page 211: ...ON 6 PRE OPERATIONAL PROCEDURES AND SETTINGS 7 PARAMETER SETTING 8 UTILITY PACKAGE GX Configurator MB 8 4 2 MODBUS R device assignment parameter Purpose Set the MODBUS device assignment parameters on the MODBUS R device assignment parameter screen Operating procedure Initial settings screen Setting Screen Figure 8 9 MODBUS R device assignment parameter setting screen MODBUS R device assignment ...

Page 212: ...ss Reference Coil assignment 1 Device 0900H to 0901H 2304 to 2305 Section 7 3 1 Section 7 3 3 Head coil number 0902H 2306 Assignment points 0903H 2307 Coil assignment 2 to 16 Same as in coil assignment 1 0904H to 093FH 2308 to 2367 Input assignment 1 Device 0940H to 0941H 2368 to 2369 Head input number 0942H 2370 Assignment points 0943H 2371 Input assignment 2 to 16 Same as input assignment 1 0944...

Page 213: ...e master in the case of Read Exception Status FC 07 into Allocated error status area 3 Allocated error status area is valid only when the QJ71MB91 buffer memory is specified as the error status read device assignment target Section 7 3 4 Table8 8 Setting items on the MODBUS R device assignment parameter setting screen Continued Setting item Buffer memory address Reference Error status read device ...

Page 214: ... 1 Display data a Setting items Figure 8 10 Auto refresh setting screen Table8 9 Setting items on the Auto refresh setting screen Setting item Buffer memory address Reference CH1 CH2 Automatic communication function buffer input area 1000H to 1FFFH 4096 to 8191 2000H to 2FFFH 8192 to 12287 Section 5 2 1 Automatic communication function buffer output area 3000H to 3FFFH 12288 to 16383 4000H to 4FFF...

Page 215: ... B set a number that can be divided by 16 points examples X10 Y120 M16 etc Also buffer memory data are stored in a 16 point area starting from the specified device number For example if X10 is entered data are stored in X10 to X1F The devices available for MELSECNET H remote I O modules are X Y M B D and W 2 Command buttons POINT 1 The auto refresh settings are stored in an intelligent function mo...

Page 216: ...setting status automatic communication status error log or communication status Operating procedure Select monitor test module screen Start I O No 1 Module type Module model name 1 Enter the start I O No in hexadecimal The screen can also be started from System monitor of GX Developer Version 6 or later GX Developer Operating Manual Monitor Test Screen Figure 8 11 Monitor Test screen Monitor Test ...

Page 217: ...nitor Test item Buffer memory address Reference CH1 CH2 Operation mode setting status 0C00H 3072 0C02H 3074 Section 6 6 Transmission setting status 0C01H 3073 0C03H 3075 MODBUS R device assignment parameter starting method Data bit Parity bit presence Even odd parity Stop bit Frame mode Online change Transmission speed Station No setting status 0C04H 3076 Module READY Section 11 5 Watch dog timer ...

Page 218: ...written by test operation Displays the current value of the item selected This is used to check the text that cannot be displayed in the current value field However in this utility package all items can be displayed in the display fields Creates a file containing the screen data in text file format Selects whether or not to monitor current values Performs a test on the selected item To select more...

Page 219: ...ANDARD FUNCTIONS 5 FUNCTION 6 PRE OPERATIONAL PROCEDURES AND SETTINGS 7 PARAMETER SETTING 8 UTILITY PACKAGE GX Configurator MB Monitor Test screen Sub screen shift Figure 8 12 Move from the Monitor Test screen to sub screens X Y Monitor test MODBUS R device Automatic communication 1 Section 8 6 2 Section 8 6 1 Section 8 6 3 ...

Page 220: ...8 28 8 6 Monitor Test 8 UTILITY PACKAGE GX Configurator MB Figure 8 12 Move from the Monitor Test screen to sub screens Continued Error log Communication status 1 Section 8 6 4 Section 8 6 5 ...

Page 221: ...R STANDARD FUNCTIONS 5 FUNCTION 6 PRE OPERATIONAL PROCEDURES AND SETTINGS 7 PARAMETER SETTING 8 UTILITY PACKAGE GX Configurator MB 8 6 1 X Y Monitor test Monitor Test Purpose Monitor I O signals and performs tests on output signals Operating procedure Monitor Test screen Monitor Test Screen Figure 8 13 X Y Monitor test screen X Y Monitor test ...

Page 222: ...A MODBUS R device assignment parameter setting existence X0C CH2 Automatic communication parameter setting normally completed Section 9 1 1 X0D CH2 Automatic communication parameter setting error completed X0E CH2 Automatic communication operation status X0F CH2 Automatic communication error status X1B CH common CH1 error Section 11 5 X1C CH2 error X1F Watch dog timer error Table8 12 Setting items...

Page 223: ...us of the MODBUS device assignment parameters Operating procedure Monitor test screen Monitor Screen Monitor Items Figure 8 14 MODBUS R device assignment parameter status screen Table8 13 Setting items on the MODBUS R device assignment parameter status screen Monitor item Buffer memory address Reference MODBUS R device assignment parameter setting existence Section 11 4 1 MODBUS R device assignmen...

Page 224: ... Configurator MB 8 6 3 Automatic communication status Monitor Test Purpose Monitor the communication status of the automatic communication function Operating procedure Monitor test screen Monitor Test Screen Figure 8 15 Automatic communication status screen Automatic communication ...

Page 225: ...d setting cannot be performed If the current value is Being requested change it to Not requested and start the test Table8 14 Setting items on the Automatic communication status screen Monitor test items Buffer memory address Reference CH1 CH2 Automatic communication operation status Section 11 4 1 Automatic communication error status Automatic communication parameter error code storage area 0C16H...

Page 226: ... Operating procedure Monitor test Screen Monitor Screen Monitor Items Figure 8 16 Error log screen Table8 15 Setting items on the Error log screen Monitor item Buffer memory address Reference Number of errors occurred 0CFEH 3326 Section 11 4 1 No 1 Detailed error code 0D00H 3328 Exception code 0D01H 3329 Function code 0D02H 3330 CH 0D03H 3331 Station No 0D04H 3332 Function 0D07H 3335 No 2 to 32 Sa...

Page 227: ...TIONS 4 MODBUS R STANDARD FUNCTIONS 5 FUNCTION 6 PRE OPERATIONAL PROCEDURES AND SETTINGS 7 PARAMETER SETTING 8 UTILITY PACKAGE GX Configurator MB 8 6 5 Communication status Monitor Purpose Monitor communication status Operating procedure Monitor test screen Monitor Screen Figure 8 17 Communication status screen Communication status ...

Page 228: ... 0F00H 3840 0F40H 3904 Bus communication error count 0F01H 3841 0F41H 3905 Character overrun error count 0F02H 3842 0F42H 3906 Message discard count 0F03H 3843 0F43H 3907 Data discard count 0F04H 3844 0F44H 3908 Failed transmission count 0F05H 3845 0F45H 3909 Diagnostic data for Master Received exception error count 0F0EH 3854 0F4EH 3918 No response count 0F0FH 3855 0F4FH 3919 Broadcast count 0F10...

Page 229: ...10 Slave no response count 0F07H 3847 0F47H 3911 Slave NAK count 0F08H 3848 0F48H 3912 Slave busy count 0F09H 3849 0F49H 3913 Exception error count 0F0AH 3850 0F4AH 3914 Communications event count 0F0BH 3851 0F4BH 3915 Section 4 12 2nd byte of end code 0F0CH 3852 0F4CH 3916 Section 4 11 4 Communications mode 0F0DH 3853 0F4DH 3917 Section 4 11 5 Communications event log count 0F1FH 3871 0F5FH 3935 ...

Page 230: ...uffer memory address 0200H to 037FH 0380H to 04FFH 2 Turn ON the Automatic communication parameter setting request Automatic communication start request Y4 YC 2 I O signals used for automatic communication parameter setting The automatic communication parameters are set using the following I O signals Table9 1 I O signals used for automatic communication parameter setting Signal Signal name CH1 CH...

Page 231: ...munication parametersetting errorcompleted Automaticcommunication operationstatus Automaticcommunication parametererrorcodestoragearea Automaticcommunication parametersettingresultstoragearea X10 OFF Intelligentfunctionmoduleswitch settingchangestatus OFF OFF OFF OFF X0 OFF Y4 YC X4 XC X5 XD X6 XE Parameter creation Module READY Automaticcommunication parametersettingrequest Automaticcommunication...

Page 232: ...in the Automatic communication parameter setting result storage area of the buffer memory address 0C17H 0C19H and an error code is stored in the Automatic communication parameter error code storage area address 0C16H 0C18H Identify the stored parameter check the error code and take corrective actions Then make the parameter setting request again Section 11 4 c Clearing the automatic communication ...

Page 233: ... 000AH to 000BH 10 to 11 Setting error status read device Section 7 3 4 000DH 13 CPU response monitoring timer value Section 7 3 6 000EH 14 Access target when mounted to MELSECNET H remote I O station Section 7 3 5 0900H to 09FFH 2304 to 2559 MODBUS device assignment parameter Section 7 3 1 Table9 3 I O signals used for MODBUS device assignment parameter setting Signal Signal name X0 Module READY ...

Page 234: ... device assignment parameter setting existence MODBUS device assignment parameter setting normally completed MODBUS device assignment parameter setting request Y8 X8 XA X9 OFF OFF OFF OFF X0 OFF R R 0C13H Parameter creation MODBUS device assignment parameter setting error completed 0C14H to 0C15H Module READY ON ON ON ON MODBUS device assignment parameter creation MODBUS device assignment paramete...

Page 235: ...meter setting request MODBUS device assignment parameter setting normally completed MODBUS device assignment parameter setting error completed MODBUS device assignment parameter setting existence MODBUS device assignment parameter error code storage area MODBUS device assignment parameter setting result storage area 0C13H 0C14H to 0C15H ON ON ON ON ON Error code and setting result storage Clear er...

Page 236: ... c When the MODBUS device assignment parameter setting error completed X9 is turned ON Correct the parameters by the following procedure 1 Refer to the MODBUS device assignment parameter setting result storage area address 0C14H to 0C15H to identify the erroneous parameter Section 11 4 1 2 Refer to the MODBUS device assignment parameter error code storage area address 0C13H to check the error deta...

Page 237: ...ces by either of the following methods Transfer by the auto refresh setting This section 3 c Transfer by using intelligent function module devices Un G This section 4 b 2 Automatic communication parameters are set from GX Configurator MB or a sequence program Figure 9 5 System configuration example for the automatic communication parameter setting Figure 9 6 Communications with the automatic commu...

Page 238: ... 900 500 5s Type specification of the target MODBUS device 0385H 901 0100H Read coils Read setting Head buffer memory address 0386H 902 2100H Target MODBUS device head number 0387H 903 15000 Access points 0388H 904 1024 CH2 automatic communication parameter 2 Setting parameter existence 038CH to 038DH 908 to 909 1H Target station No 038EH 910 1 Request interval timer value 038FH 911 0 Issue reques...

Page 239: ...6 6 1 When using GX Configurator MB 2 When not using GX Configurator MB b Automatic communication parameter 1 When using GX Configurator MB Set CH2 Automatic communication parameters in the Initial setting of GX Configurator MB Section 8 4 1 Set the values shown in the settings This section 2 b 2 When not using GX Configurator MB Set automatic communication parameters from the sequence program Thi...

Page 240: ... 9 PROGRAMMING c Auto refresh setting Configure the following auto refresh setting on GX Configurator MB Remark When not using GX Configurator MB program the processing equivalent to the auto refresh setting using intelligent function module devices This section 4 b Figure 9 10 Auto refresh setting ...

Page 241: ...ce 1H Target station No 2 Request interval timer value 6s Response monitoring timer value 5s CH2 Automatic communication parameter 1 Head buffer memory address 2100H Access points 1024 points Setting parameter existence 1H Target station No 1 Request interval timer value 0 CH2 Automatic communication parameter 2 Response monitoring timer value 5s Head buffer memory address 4A00H Access points 100 ...

Page 242: ...t required Figure 9 12 Program example for error completion of automatic communication parameters Figure 9 13 Program example for data transfer between QJ71MB91 and programmable controller CPU Data such as an error code are fetched into programmable controller CPU devices Processing for error completion Data to be stored in the programmable controller CPU are as follows D1500 CH2 Automatic communi...

Page 243: ...on the following MODBUS device assignment parameters are set for the setting target QJ71MB91 a MODBUS device assignment parameter assignment diagram Figure 9 14 System configuration example for the MODBUS device assignment parameter setting Figure 9 15 MODBUS device assignment diagram RS 422 485 GX Developer R Setting target QJ71MB91 1 Slave function Station No 1 MODBUS master device CH2 R Output ...

Page 244: ...umber 0901H 2305 0100H Head coil number 0902H 2306 0 000001 Assignment points 0903H 2307 512 points Input register assignment 1 Device code 0980H 2432 00A8H D Data register Head device number 0981H 2433 3500 Head input register number 0982H 2434 3499 303500 Assignment points 0983H 2435 5500 points Holding register assignment 1 Device code 09C0H 2496 F000H User free area Head device number 09C1H 24...

Page 245: ...he intelligent function module switches for the setting target QJ71MB91 as shown below Section 6 6 b MODBUS device assignment parameter 1 When using GX Configurator MB Set MODBUS device assignment parameter in the Initial setting of GX Configurator MB Section 8 4 2 Set the values shown in the settings This section 2 b 2 When not using GX Configurator MB Set MODBUS device assignment parameter from ...

Page 246: ...number 0 Assignment points 512 points Device code 00A8H Head device number 3500 Head input register number 3499 Input register assignment 1 Holding register assignment 1 Assignment points 5500 points Device code F000H Head device number 5500H Head holding register number 0 Assignment points 1024 points Processing for normal completion Processing for error completion MODBUS device assignment parame...

Page 247: ...ructions MBRW and MBREQ instructions on the same channel 1 System configuration In the following system configuration the automatic communication parameter and dedicated instructions shall be used on the same channel 1 The QJ71MB91 is to be mounted in slot 0 of the base unit with the head I O No set to 0 Figure 9 20 System configuration example for use of the automatic communication function and d...

Page 248: ... target slave 3 Method for normally executing dedicated instructions Step 1 Make setting in at least one of the automatic communication parameters so that the time for dedicated instruction execution can be ensured This section 4 a Step 2 Design the program so that dedicated instructions will be executed in the standby status of the automatic communications set in the above Step 1 This section 4 b...

Page 249: ...erval timer ms Tarb Tdrb St 10ms 1 1 The result of Tarb Tdrb St is rounded up in 10ms units 2 Set a value greater than the automatic communication function communication time Tac Appendix 3 3 Set a value greater than the dedicated instruction processing time Trc Appendix 3 4 To execute multiple dedicated instructions consecutively within the reserved time totalize the response monitoring timer val...

Page 250: ...he request interval timers in the automatic communication parameters need not to satisfy the 4 a condition Automatic communication parameter 1 Automatic communication parameter 2 Dedicated instruction executable timing Request interval timer Response monitoring timer Request message Response message Dedicated instruction executable timing Request interval timer Response monitoring timer Request me...

Page 251: ...storage area The automatic communication ready status can be confirmed 1 Ready represents the time during which dedicated instructions are executable that is shown in the figure in 2 Figure 9 22 Configuration of automatic communication ready status storage area Number indicates that of automatic communication parameter b5 b4 b3 b2 b1 b0 32 31 30 29 28 27 22 21 20 19 18 17 0CB0H 16 15 14 13 12 11 6...

Page 252: ...r 1 on channel 2 is in ready status In the program example on the next page the following device read write is executed to the holding register on the slave Station No 1 on channel 2 Continued on next page Figure 9 23 Processing of program example QJ71MB91 master Device memory QJ71MB91 master MODBUS slave device R D100 D199 W0000 W001F 100 points 32 points 400500 400531 411000 411099 MODBUS device...

Page 253: ...for executing dedicated instruction during ready status of automatic communication parameter 1 on channel 2 Latch this when the start command is a rise command Processing for error completion CH2 Automatic communication operation status Processing for normal completion CH2 Automatic communication ready status storage area Automatic communication parameter 1 CH2 Automatic communication parameter se...

Page 254: ...H 2 The QJ71MB91 is to be mounted in slot 0 of the base unit with the head I O No set to 40H Remark For details on construction and parameter setting of the MELSECNET H remote I O network refer to the following manual Q Corresponding MELSECNET H Network System Reference Manual Remote I O network Figure 9 25 System configuration example for the automatic communication parameter setting 4 2 5 3 1 6 ...

Page 255: ...NET H remote master station as shown below Figure 9 26 Communications When using GX Configurator MB Device 3 400001 Coil 400100 000001 015001 016024 065536 465536 QJ71MB91 Device MELSECNET H 1 MELSECNET H remote master station Programmable controller CPU MELSECNET H remote master module MELSECNET H link refresh 1 MELSECNET H remote I O station setting target MELSECNET H link scan 2 MELSECNET H rem...

Page 256: ...ork parameters This section 3 b 2 Set the MELSECNET H link scan by the network range assignment in the network parameters This section 3 b 3 By the auto refresh setting of GX Configurator MB transfer the automatic communication function buffer area data to the MELSECNET H remote I O module This section 3 d 4 Automatic communication parameters are set from GX Configurator MB This section 3 c ...

Page 257: ...ange assignment in the network parameters This section 3 b 3 Automatic communication parameters are set from sequence program This section 4 4 The automatic communication function buffer area data in the QJ71MB91 are transferred to the programmable controller CPU on the MELSECNET H remote master station with the REMTO REMFR instruction This section 4 400001 400100 000001 015001 016024 065536 46553...

Page 258: ...the target MODBUS device 0385H 901 0100H Read coils Read setting Head buffer memory address 0386H 902 2100H Target MODBUS device head number 0387H 903 15000 Access points 0388H 904 1024 CH2 automatic communication parameter 2 Setting parameter existence 038CH to 038DH 908 to 909 1H Target station No 038EH 910 1 Request interval timer value 038FH 911 0 Issue request immediately after receiving resp...

Page 259: ... as shown below Section 6 6 1 When using GX Configurator MB Figure 9 28 Intelligent function module switch setting When using GX Configurator MB 2 When not using GX Configurator MB Figure 9 29 Intelligent function module switch setting When not using GX Configurator MB b Network parameter Set the following network parameters for the MELSECNET H remote master station by GX Developer 1 Network type ...

Page 260: ...MING When not using GX Configurator MB Figure 9 31 Network range assignment When not using GX Configurator MB 7 Refresh parameters When using GX Configurator MB Figure 9 32 Refresh parameters When using GX Configurator MB When not using GX Configurator MB Figure 9 33 Refresh parameters When not using GX Configurator MB ...

Page 261: ...g of GX Configurator MB Section 8 4 1 Set the values shown in the settings This section 2 b Figure 9 34 CH2 Automatic communication parameter 2 When not using GX Configurator MB Set automatic communication parameters from the sequence program This section 4 b d Auto refresh setting Configure the following auto refresh setting on GX Configurator MB Figure 9 35 Auto refresh setting Remark When not u...

Page 262: ...ontrol from stopping even if the network detects an instantaneous error due to a cable problem noise or any other condition Note that the above 4 and 3 represent standard values POINT For details on interlock programs for the MELSECNET H remote master station and MELSECNET H remote I O station refer to the following manual Q Corresponding MELSECNET H Network System Reference Manual Remote I O netw...

Page 263: ...Type specification of the target MODBUS device 0100H Head buffer memory address 2100H Access points 1024 points Setting parameter existense 1H Target station No 1 Request interval timer value 0 CH2 Automatic communication parameter 2 Response monitoring timer value 5s Head buffer memory address 4A00H Access points 100 points Writing parameters by REMTO instruction When REMTO instruction is complet...

Page 264: ...on Processing for normal completion The following data are stored in the programmable controller CPU on the MELSECNET H remote master station D250 CH2 Automatic communication parameter error code D251 CH2 Automatic communication parameter setting result Processing for error completion Processing for error completion Refresh of the automatic communicationfunction buffer input area CH2 Automatic com...

Page 265: ...mpleted Completion of the REMTO REMFR instruction can be confirmed by the completion device of the instruction 2 To set parameters write the set values to the buffer memory by the REMTO instruction and then execute the parameter setting request after the completion device of the REMTO instruction turns ON Remark For details of the REMTO instruction and the troubleshooting for error completion of t...

Page 266: ...d in slot 0 of the base unit with the Start I O No set as 00H 2 The QJ71MB91 is to be mounted in slot 0 of the base unit with the head I O number set to 00H Remark For details on construction and parameter setting of the MELSECNET H remote I O network refer to the following manual Q Corresponding MELSECNET H Network System Reference Manual Remote I O network 4 2 5 3 1 6 7 FG FG R S 232 485 R S 422...

Page 267: ...rs are set for the setting target QJ71MB91 a MODBUS device assignment parameter assignment diagram Figure 9 41 MODBUS device assignment parameter settings R Output Y Coil 000001 Y0 Y100 Y2FF Y1FFF 065536 300001 303500 D3500 D8999 D12287 365536 308999 400001 401024 465536 MELSECNET H remote I O station device 000512 512 points Data register D 5500 points D0 QJ71MB91 buffer memory User free area 500...

Page 268: ...vice number 0901H 2305 0100H Head coil number 0902H 2306 0 000001 Assignment points 0903H 2307 512 points Input register assignment 1 Device code 0980H 2432 00A8H D Data register Head device number 0981H 2433 3500 Head input register number 0982H 2434 3499 303500 Assignment points 0983H 2435 5500 points Holding register assignment 1 Device code 09C0H 2496 F000H User free area Head device number 09...

Page 269: ... module switch setting Set the intelligent function module switches for the setting target QJ71MB91 as shown below Section 6 6 Figure 9 42 Intelligent function module switch setting b Network parameter Set the following network parameters for the MELSECNET H remote master station by GX Developer 1 Network type MNET H Remote master 2 Starting I O No 0000H 3 Network No 1 4 Total stations 1 5 Mode On...

Page 270: ...arameter 1 When using GX Configurator MB Set MODBUS device assignment parameter in the Initial setting of GX Configurator MB Section 8 4 2 Set the values shown in the settings This section 2 b Figure 9 45 MODBUS device assignment parameter 2 When not using GX Configurator MB Set MODBUS device assignment parameter from the sequence program This section 4 ...

Page 271: ...mer constant K Reason To prevent the control from stopping even if the network detects an instantaneous error due to a cable problem noise or any other condition Note that the above 4 and 3 represent standard values POINT For details on interlock programs for the MELSECNET H remote master station and MELSECNET H remote I O station refer to the following manual Q Corresponding MELSECNET H Network S...

Page 272: ...ad device number 0100H Head coil number 0 Assignment points 512 points Device code 00A8H Head device number 3500 Head input register number 3499 Assignment points 5500 points Device code F000H Head device number 5500H Head holding register number 0 Assignment points 1024 points Input register assignment1 holding register assignment1 Turns ON MODBUS device assignment parameter setting request when ...

Page 273: ... read write of actual data is completed Completion of the REMFR REMTO instruction can be confirmed by the completion device of the instruction 2 To set parameters write the set values to the buffer memory by the REMTO instruction and then execute the parameter setting request after the completion device of the REMTO instruction turns ON Remark For details of the REMTO instruction and the troublesh...

Page 274: ... by designating Designation of bit numbers is done in hexadecimal For example bit 10 of D0 is designated as However there can be no bit designation for timers T retentive timers ST and counters C Table10 1 Dedicated instruction list Dedicated instruction Description Reference MBRW Reads or write MODBUS device data from or a slave Section 10 2 MBREQ Communications with a slave in the request messag...

Page 275: ...asic model QCPU function version B or later or Universal model QCPU double quotation of the first argument can be omitted Table10 3 Devices available for the MBRW instruction Setting data Available device Internal device System user File register Link direct device J Intelligent function module device U G Index register Zn Constant Others Bit Word Bit Word K H S1 D1 S2 D2 ZP MBRW Z MBRW Z MBRW Un ...

Page 276: ... RTU mode ASCII mode Local devices and program based file registers are not available as the devices used for setting data Table10 4 Setting data of MBRW instruction Setting data Setting details Setting side 1 Data type Un Un Head I O number of the module 00H to FEH Upper 2 digits of the I O number in 3 digit notation User String BIN 16 bits S1 Head number of the device where control data is store...

Page 277: ...t slave station number 0 to 247 User S1 6 Specify 0 0 User S1 7 Response monitoring timer value Broadcast delay value Response monitoring timer value Target station No is 1 to 247 Specify the time for monitoring a response from the target device slave Unit 10ms 0 30 seconds 2 to 65535 Set value Response monitoring timer value set value x 10ms Broadcast delay value Target station No is 0 Specify th...

Page 278: ...Target file number Specify a file number when the target MODBUS device is the extended file register 0 to 65535 2 4 User S1 14 Target MODBUS device head number Specify the head number of the write target MODBUS device Specify the lower 5 digits of the device head number The device head number is specified as Actual device number 1 Except for the file number and device number of the extended file r...

Page 279: ...rogram set the value in hexadecimal 3 Set 0 for the case of write only 4 Set 0 for the case of read only POINT When accessing a bit device coil input of a slave the fraction bit is handled as described below Read When the read access points is 35 Write When the write access points is 5 to Read b0 b0 to D100 D101 D102 b15 Read data storage device D1 Target slave device area b15 116640 to 116625 116...

Page 280: ... a single instruction is allowed only for 0505H Read Write multiple registers Table10 6 Possible combinations of target MODBUS device type specification Target MODBUS device type specification Function code Valid access point range Setting value Read target Write target Read points Write points 0100H Coil No specification 01 Read coils 1 to 2000 points 0200H Input 02 Read discrete inputs 1 to 2000...

Page 281: ...of dedicated instructions to be simultaneously executed will not exceed the limit Failure to do so may cause the following 1 When execution of two or more MBRW instructions are attempted The executed instructions are ignored 2 When the MBRW instruction execution is attempted during execution of the MBREQ or UINI instruction An error occurs when the MBRW instruction is executed c Frame mode setting...

Page 282: ...or completed normally or not can be checked by the MODBUS exception code S1 2 the completion device D2 specified as set data and the error completion device D2 1 The completion device D2 turns ON in the END processing of the scan after completion of the MBRW instruction and turns OFF in the next END processing The error completion device D2 1 turns ON in the END processing of the scan after error ...

Page 283: ...ion status S1 1 b When processing on a slave completes in error When the processing on a slave completes in error an exception code is stored in S1 2 c Confirmation of error details Check the error code and exception code referring to the following and take corrective actions Table10 7 Error code and exception code for the MBRW instruction execution Item Reference Error code 03E8H to 4FFFH QCPU Us...

Page 284: ...mode The I O signals of the QJ71MB91 are X Y00 to X Y1F Figure 10 3 Configuration example for MBRW instruction execution MODBUS device 4 2 5 3 1 6 7 FG FG RS 232 485 RS 422 CH2 RDB RDA SDB SG SDA CH1 QJ71MB91 RUN RD NEU SD NEU RD SD CH1 CH2 ERR D100 W0000 400500 400531 411000 R Read W rite CH1 RS 232 QJ71MB91 master MODBUS slave device station No 1 QJ71MB91 master MODBUS slave device D199 W001F De...

Page 285: ...station No station No 1 Fixed to 0 Response monitoring timer value 30s R Target MODBUS device type specification 0505H Holding register read write Target file No R Target MODBUS device head number Access points 100 points Read data storage size is cleared to 0 Target file No R Target MODBUS device head number Access points 32 points Write data storage size 32 points Execution of dedicated instruct...

Page 286: ...t station No 01H Function code 17H Read head holding register number 2AF7H Read points n 0064H Write head holding register number 01F3H Number of write points m 0020H Number of bytes m x 2 0040H Write device data 1 value of W0000 Write device data m value of W001F Number of bytes m x 2 H H H H H Data L L Address field Function code Host station No 01H Function code 17H Number of bytes n x 2 Number...

Page 287: ...inating station is a Basic model QCPU function version B or later or Universal model QCPU double quotation of the first argument can be omitted Table10 8 Devices available for the MBREQ instruction Setting data Available device Internal device System user File resister Link direct device J Intelligent function module device U G Index register Zn Constant Others Bit Word Bit Word K H S1 S2 D1 D2 Un...

Page 288: ... setting data Remark For details on the protocol data unit refer to the following Section 4 2 Table10 9 Setting data of MBREQ instruction Setting data Setting details Setting side 1 Data type Un Un Head I O number of the module 00H to FEH Upper 2 digits of the I O number in 3 digit notation User String BIN 16 bits S1 Head number of the device where control data is stored User system BIN 16 bits S2...

Page 289: ...completion Other than 0 Error completion error code Section 11 4 3 System S1 2 Specify 0 0 User S1 3 Channel Specify the target channel 1 RS 232 2 RS 422 485 1 2 User S1 4 Specify 0 0 User S1 5 Target station No Specify the station number of the target slave 0 Broadcast 2 1 to 247 Slave station No 0 to 247 User S1 6 Specify 0 0 User S1 7 Response monitoring timer value Broadcast delay value Respon...

Page 290: ...the frame mode RTU mode ASCII mode Example When sending a request message to read the data of holding registers 440001 and 440002 with Read Holding Registers FC 03 Frame of request message to be sent in ASCII mode Figure 10 6 Request message example Contents in request message storage devices and their order Figure 10 7 Contents in request message storage devices and their order As shown on left U...

Page 291: ...INDEX POINT 1 The request message data stored in request message storage devices S2 1 to S2 n are sent in order of L lower to H upper bytes starting with the lowest device number 2 When the request message size is an odd number the last upper byte of the request message storage device is ignored The data are not sent ...

Page 292: ... in RTU format binary regardless of the frame mode RTU mode ASCII mode Example When a response message of Read Holding Registers FC 03 is received Received response message frame in ASCII mode Figure 10 8 Response message example Contents in response message storage devices and their order Figure 10 9 Contents in response message storage devices and their order As shown on left System Data 1 2 L 2...

Page 293: ...ated instructions is one instruction per channel Create a sequence program so that the number of dedicated instructions to be simultaneously executed will not exceed the limit Failure to do so may cause the following 1 When execution of two or more MBREQ instructions are attempted The executed instructions are ignored 2 When the MBREQ instruction execution is attempted during execution of the MBRW...

Page 294: ... the scan after completion of the MBREQ instruction and turns OFF in the next END processing The error completion device D2 1 turns ON in the END processing of the scan after error completion of the MBREQ instruction and turns OFF in the next END processing The device remains OFF in the case of normal completion 6 Error a When a dedicated instruction completes in error When the dedicated instructi...

Page 295: ...ond byte of the receive data in the response message and take corrective actions Section 11 4 2 3 For the MBREQ instruction the ACK and NAK states of the detailed LED status do not change Check whether communication processing completes normally or not by the response message stored in the response message storage device This section 4 4 Pay attention to the following when sending a request messag...

Page 296: ...to be sent Figure 10 13 Response message format to be received Normal completion 0 0 0 0 0 0 0 0 0 0 0 0 0 0 0 4 2 5 3 1 6 7 FG FG RS 232 485 RS 422 CH2 RDB RDA SDB SG SDA CH1 QJ71MB91 RUN RD NEU SD NEU RD SD CH1 CH2 ERR b15 b5 1 b15 b5 1 R QJ71MB91 master MODBUS slave device station No 1 CH2 RS 422 or RS 485 OR mask value Holding register 400003 Mask write OR b3 b0 b3 b0 Data L L L Address field ...

Page 297: ...re 10 14 Response message format to be received Error completion Data Address field Function code Function code Host station No Exception code 1 Reception order 01H 96H 2 bytes Request message Normal completion M0 ON M1 OFF Error completion M0 ON M1 ON Fixed to 0 Completion status is cleared to 0 Fixed to 0 Target channel is specified Fixed to 0 Target station No station No 1 Fixed to 0 Response m...

Page 298: ... and program based file registers are not available as the devices used for setting data Table10 14 Devices available for the UINI instruction Setting data Available device Internal device System user File resister Link direct device J Intelligentfunction module device U G Index register Zn Constant Others Bit Word Bit Word K H S1 D1 Table10 15 Setting data of UINI instruction Setting data Setting...

Page 299: ...Change the settings to the values set in S1 3 to S1 7 1 Restore the intelligent function module switch settings set in GX Developer 2 0 1 User S1 3 CH1 mode setting switch 1 Specify a mode for CH1 2 a 0 to 2 User S1 4 CH1 communication speed setting transmission setting switch 2 Specify a communication speed and transmission details for CH1 2 b 0 to 0B7EH User S1 5 CH2 mode setting switch 3 Specif...

Page 300: ...0DEDICATED INSTRUCTIONS POINT The UINI instruction cannot change the mode to Hardware test or Self loopback test To change the mode to either of these modify the intelligent function module switch settings in GX Developer ...

Page 301: ...t In the case of Present vertical parity check is performed b3 Even odd parity Even Odd Set even or odd parity This setting is valid only when Parity bit presence is set to Present b4 Stop bit 1 2 Set the stop bit b5 Frame mode RTU mode ASCII mode Set the frame mode Section 4 2 1 b6 Online change Disable Enable Set whether to enable or disable data writing to the RUN status programmable controller...

Page 302: ...below 1 Setting a value outside the range shown in the table results in a switch error Table10 19 Communication speed setting Communication speed Bit position Communication speed Bit position b15 to b8 b15 to b8 300 bps 00H 14400 bps 06H 600 bps 01H 19200 bps 07H 1200 bps 02H 28800 bps 08H 2400 bps 03H 38400 bps 09H 4800 bps 04H 57600 bps 0AH 9600 bps 05H 115200 bps 0BH Figure 10 18 CH1 2 station ...

Page 303: ...fter error completion of the UINI instruction and turns OFF in the next END processing The device remains OFF in the case of normal completion Table10 21 Checking in the buffer memory Address Application Description 0C06H CH1 operation mode status Current CH1 operation mode is stored 0C07H CH1 transmission status Current CH1 communication speed and transmission details are stored 0C08H CH2 operati...

Page 304: ...e CH1 CH2 station No setting Change the station No in the request message issued from the other device to a new station No of the QJ71MB91 If these station numbers differ communication is not available d Automatic communication function after UINI instruction execution A UINI instruction execution stops the automatic communication function restoring initial automatic communication parameter values...

Page 305: ... 4 CH2 Communication speed transmission setting 0560H Communication speed 9600bps Data bit 8 Parity bit presence Present Even odd parity Even Stop bit 1 Frame mode ASCII mode Online change Enable Switch 5 CH1 CH2 Station No setting 0200H CH1 Station No 0 CH2 Station No 2 Figure 10 20 UINI instruction program example Processing for normal completion Processing for error completion Dedicated instruc...

Page 306: ...91 Section 6 4 1 2 The ERR LED turned on Check the operation mode setting value of the intelligent function module switch Check the setting range of each intelligent function module switch and correct the value Section 6 6 Check the transmission setting status value of the intelligent function module switch Check the station number setting value of the intelligent function module switch Check that...

Page 307: ...unction Refer to Automatic communication operation status X6 XE does not turn on or Automatic communication error status X7 XF turned on This section 2 5 2 7 When using a dedicated instruction Refer to Dedicated instruction is not executed This section 3 1 When using the slave function Refer to The QJ71MB91 slave function does not return a response message to the request message This section 3 3 I...

Page 308: ...omatic communication parameters by GX Configurator MB and activate them Or set the automatic communication parameters by a sequence program and activate them Section 7 2 Section 9 1 1 Check if the Automatic communication parameter setting error completed X5 XD is on Refer to The Automatic communication parameter setting error completed X5 XD turned on This section 2 3 6 The Automatic communication...

Page 309: ... Were the automatic communication function and the MBRW or MBREQ instruction used on the same channel Set automatic communication parameters and create a sequence program appropriately so that each of the MBRW and MBREQ instructions can be executed in the right timing Section 9 2 3 8 The CH common CH1 error X1B or CH2 error X1C turned on Refer to The ERR LED turned on This section 1 2 9 The MODBUS...

Page 310: ... section 3 2 2 Dedicated instruction failed Check the error code and or exception code stored in the control data of the dedicated instruction Take corrective actions according to the error and exception codes and retry CHAPTER 10 Section 11 4 Does the target device support the function code MBRW instruction Modify the device type setting in the control data so that a function code supported by th...

Page 311: ...he MODBUS device assignment parameter setting existence XA is on Refer to MODBUS device assignment parameter setting existence XA does not turn on This section 2 9 Has the QJ71MB91 returned any exception code Confirm the exception code and take corrective actions Section 11 4 2 Check the Error log address 0CFEH to 0DFFH in the buffer memory and identify the error code Take corrective actions for t...

Page 312: ...1 3 Section 11 4 3 Received NAK count Examine the slave that returned the error and solve the problem Received busy count Message discard count When there is another master on the same network disconnect the master When a response is returned after occurrence of the response monitoring timer timeout error refer to the corrective actions for the error error code 7378H to 7379H When any of the other...

Page 313: ...normally This section 3 7 Failed transmission count Refer to the corrective actions for the CS signal OFF error error code 7403H Section 11 4 3 6 An error is found in the communications event log Communication error occurred Check the Error log address 0CFEH to 0DFFH in the buffer memory and take corrective actions for the error code Section 11 4 1 Character overrun error occurred Refer to the cor...

Page 314: ...nnect the other master When the QJ71MB91 is the master check if the communication target device is a MODBUS slave device Set a MODBUS slave device as the communication target When the QJ71MB91 is a slave check if the communication target device is a MODBUS master device Set a MODBUS master device as the communication target device 8 The interval of the communications with the slave in the automati...

Page 315: ...ance expression of the QJ71MB91 slave function The processing time must be within the range indicated by the result of the performance expression The processing time may be slower than the result of the performance expression if two channels are used simultaneously Appendix 3 When accessing the programmable controller CPU device in the slave function check if too many accesses to the programmable ...

Page 316: ...0C05H 2 Monitor Test screen of GX Configurator MB GX Configurator MB has a monitor test screen for the status display and testing of the QJ71MB91 Check the status of the QJ71MB91 on the Monitor test screen Section 8 6 Table11 4 Status checking method Method Reference LEDs on QJ71MB91 This section 1 Monitor Test screen of GX Configurator MB This section 2 System monitor screen of GX Developer This ...

Page 317: ...EX 3 System monitor screen of GX Developer The module status of the QJ71MB91 can be confirmed on the System monitor screen a Confirming the status on Module s Detailed Information of GX Developer 1 Starting procedure GX Developer Diagnostics System monitor Figure 11 2 Module s Detailed Information Module s Detailed Information ...

Page 318: ...number of the target module Implementation Position Displays the slot position where the module is mounted Product information Displays the serial No and function version of the target module 1 Module information Module access Displays Enable when the Module READY X0 is on and the Watch dog timer error X1F is off Status of I O Address Verify Displays whether or not the module parameterized by the ...

Page 319: ...ge area address 0006H 0007H of the buffer memory Figure 11 4 Detailed LED status storage area Module s Detailed Information H W Information b0 b1 b2 b3 b4 b5 b6 b7 b8 b9 b10 b11 b12 b13 b14 b15 b0 b1 b2 b3 b4 b5 b6 b7 b8 b9 b10 b11 b12 b13 b14 b15 1 0 CH1 side Detailed LED status storage area address 0006H CH2 side Detailed LED status storage area address 0007H 0 Off 1 On 0 Off 1 On Unused Fixed t...

Page 320: ...sage analysis error Normal 3 SIO 2 SIO error status Framing error or overrun error occurred Normal 4 C 1 ERR 2 CH common or CH1 side error occurred Intelligent function module switch setting error parameter error etc Normal CH2 ERR 2 CH2 side error occurred 5 Unused 6 7 8 ACK Normal completion Master Communication processing normally completed Slave Request message processing normally completed Ma...

Page 321: ...No Status signal name Description Reference 1 CH1 MODE Switch 1 CH1 operation mode setting status Section 6 6 2 1 CONFIG Switch 2 CH1 transmission setting status 3 CH2 MODE Switch 3 CH2 operation mode setting status 4 2 CONFIG Switch 4 CH2 transmission setting status 5 ST NO Switch 5 CH1 CH2 Station No setting status Table11 8 Input signals for status check Input signal Description Error type Refe...

Page 322: ...ption errors are received excluding the case of broadcast 0F0EH 3854 0F4EH 3918 Received NAK count 1 2 Counts the number of times that NAK responses were received from slaves 0F11H 3857 0F51H 3921 Received busy count 2 Counts the number of times that busy responses were received from slaves 0F12H 3858 0F52H 3922 Character overrun error count Counts the number of times that the request message size...

Page 323: ... 10 DEDICATED INSTRUCTIONS 11 TROUBLESHOOTING APPENDICES INDEX 1 The NAK count defined by the MODBUS protocol is stored in the Received NAK count Note that this count is different from the NAK LED on the QJ71MB91 2 It does not count when the request message is sent by the MBREQ instruction ...

Page 324: ...ssages 0013 0F0AH 3850 0F4AH 3914 Slave message count Counts the number of times that messages addressed to the host were processed Including when reception of broadcast request messages 0014 0F06H 3846 0F46H 3910 Slave no response count Counts the number of times that broadcast request messages were received 0015 0F07H 3847 0F47H 3911 Slave NAK count 2 Counts the number of times that the slave re...

Page 325: ...ogrammable controller CPU b Diagnostic counters for Slave function ThisSection 1 b When receiving the Clear Counters and Diagnostic Register 1 Section 4 11 6 When receiving the Restart communications option 1 Section 4 11 2 When receiving the Clear Overrun Counter and Flag 2 Section 4 11 6 Clearing the buffer memory to 0 by sequence program Power OFF ON By resetting the programmable controller CPU...

Page 326: ...vice assignment parameter setting result storage area Error device type 0C14H 3092 This section 4 Error assigned group No 0C15H 3093 Master function Automatic communication function Automatic communication operation status storage area parameters 1 to 32 0C20H to 0C21H 3104 to 3105 0C22H to 0C23H 3106 to 3107 This section 5 Automatic communication error code storage area parameters 1 to 32 0C28H t...

Page 327: ...n the Automatic communication parameter setting error completed X5 XD turns ON b Clear timing The automatic communication parameter number is cleared when the Automatic communication parameter setting normally completed X4 XC turns ON 3 MODBUS device assignment parameter error code storage area When an occurs with the MODBUS device assignment parameter setting request Y8 ON the corresponding error...

Page 328: ...o 32 Table11 12 Device type to be stored Error device type Value to be stored Coil 0001H 1 Input 0002H 2 Input register 0004H 4 Holding register 0005H 5 Figure 11 5 Configuration of automatic communication function operation status storage area b15 b13 b12 b11 b10 b14 16 15 14 13 12 11 b5 b4 b3 b2 b1 b0 32 31 30 29 28 27 22 21 20 19 18 17 6 5 4 3 2 1 b5 b4 b3 b2 b1 b0 32 31 30 29 28 27 22 21 20 19...

Page 329: ...device The automatic communication operation status storage area can be utilized as an area of an interlock signal for errors at a communication target device The following shows a program example 1 Program conditions The QJ71MB91 is mounted in slot 0 of the base unit with the head I O No set to 0 and automatic communication parameter 1 used 2 Program example 6 Automatic communication error code s...

Page 330: ... the power is turned off and then on again or when the programmable controller CPU is reset All bits turn OFF Figure 11 7 Configuration of automatic communication setting status storage area b5 b4 b3 b2 b1 b0 32 31 30 29 28 27 22 21 20 19 18 17 16 15 14 13 12 11 6 5 4 3 2 1 b5 b4 b3 b2 b1 b0 32 31 30 29 28 27 22 21 20 19 18 17 16 15 14 13 12 11 6 5 4 3 2 1 b15 b13 b12 b11 b10 b14 b15 b13 b12 b11 b...

Page 331: ...the count stops at FFFFH 65535 b Error log write pointer The number of the latest error log is stored 0 No error No error log entry 1 to 32 Error log number where the latest error log was entered Table11 13 Configuration of the Error log area Error log area name Address Number of errors occurred 0CFEH 3326 Error log write pointer 0CFFH 3327 Error log 1 Detailed error code 0D00H 3328 Exception code...

Page 332: ...h as during processing of a request from the master at power on or when changing a MODBUS device assignment parameter Section 11 4 3 Exception code Stores the exception code that was returned from a slave in reply to a request message sent by the automatic communication function or dedicated instruction Section 11 4 2 Stores the exception code returned to the master when an error occurs for a requ...

Page 333: ...tion code list The following is a list of exception codes used when the QJ71MB91 is a slave Continued on next page Table11 15 Exception code list Exception code Error name Description Corrective action Target device Master side QJ71MB91 Slave side 01H 1 Illegal Function The slave QJ71MB91 received an unsupported function code Check function codes supported by the QJ71MB91 and modify the request me...

Page 334: ...action Target device Master side QJ71MB91 Slave side 05H 5 Acknowledge As the slave is executing another processing a long duration of time is required to complete the requested processing Not issued by the slave function of the QJ71MB91 06H 6 Slave Device Busy As the slave is executing another processing the requested processing cannot be executed 07H 7 NAK Error The requested program function ca...

Page 335: ... Error code issued by the programmable controller CPU Refer to the following manual QCPU User s Manual Hardware Design Maintenance and Inspection 7301H 29441 Switch 1 error The setting of the intelligent function module switch 1 CH1 mode setting is incorrect Review the setting of the intelligent function module switch 1 7302H 29442 Switch 2 error The setting of the intelligent function module swit...

Page 336: ...es set with the MODBUS device assignment parameters are overlapped Review the head MODBUS device number and the number of assigned points 7333H 29491 Buffer memory assigned range error The assigned range of the QJ71MB91 buffer memory set with the MODBUS device assignment parameter exceeds the range of the user free area Review the head device number and the number of assigned points 7334H 29492 De...

Page 337: ...d buffer memory setting 7347H 29511 Automatic communication setting range error Other than 0 and 1 is set in the automatic communication parameter setting existence Review the setting of the automatic communication parameter setting existence 7348H 29512 MODBUS device number setting range error The MODBUS device range for the read write target set in the automatic communication parameter or dedica...

Page 338: ...ted instruction was used the target slave device returned an exception code in reply to the request message sent by the QJ71MB91 Refer to the exception code returned from the target slave device and solve the problem 7361H 29537 Byte count error In the automatic communication function or dedicated instruction the number of bytes in the received response message is too small or large On the target ...

Page 339: ...BUS device assignment parameter setting 7378H 29560 Response monitoring timer timeout error The response monitoring timer timed out in the automatic communication function In the case of broadcast the broadcast delay has expired before completion of the request message transmission When broadcast was performed beforehand response is not possible because the slave is currently executing the process...

Page 340: ...response monitoring timer timed out in the slave function If an error has occurred in the programmable controller CPU remove the error Set a larger value for the CPU response monitoring timer 7381H 29569 Function code error A request message with a function code that is not supported by the QJ71MB91 slave function was received Confirm the function codes supported by the QJ71MB91 slave function and...

Page 341: ...ster side from which the request message was sent 7386H 29574 The number of access points for the MODBUS device specified in the received request message exceeds the maximum access points allowed for the relevant function Check the specification of the MODBUS device on the master side from which the request message was sent 7388H 29576 No setting for error status read device No error status read d...

Page 342: ...399H 29593 Character overrun error The received message size excluding the start character in the ASCII mode exceeded 256 or 512 bytes Review the contents of the message issued by the station that sent the relevant message Check the relevant device Disconnect an erroneous device if any 739AH 29594 ASCII binary conversion error An ASCII code that cannot be converted to binary was received 739BH 295...

Page 343: ...k the operation In case of failure please consult your local Mitsubishi system service center or representative explaining a detailed description of the problem 73C1H 29633 ROM error An error was detected in the ROM test 73C2H 29634 Self loopback test error An error was detected in the self loopback test Take the following steps Check if the loopback connector is attached and if the wiring is corr...

Page 344: ...gainst noise Use one master in the system Adjust the transmission timing to prevent simultaneous data transmission 7402H 29698 Overrun error The next data was received before completion of the current reception processing The transmission speed exceeds the limit of the QJ71MB91 An instantaneous power failure occurred Check if the transmission speed is within the limit of the QJ71MB91 Check if no i...

Page 345: ...imer timed out Confirm that the cables are not disconnected Check the cable connection and correct the wiring so that the CS signal on the CH1 RS 232 side will be always ON 7480H to 75FFH 29824 to 30207 System error The OS of the QJ71MB91 detected a fault Take the following steps Check if the power supply module programmable controller CPU and QJ71MB91 are correctly mounted on the base unit Confir...

Page 346: ...has turned on it does not turn off automatically even if the status returns to normal Perform the following to turn off the ERR LED 11 5 1 Turning off the ERR LED by GX Configurator MB This section explains how to turn off the ERR LED from GX Configurator MB 1 Making the Monitor test screen active Make the Monitor test screen active Section 8 6 Table11 17 List of methods for turning off the ERR LE...

Page 347: ...RUCTIONS 11 TROUBLESHOOTING APPENDICES INDEX 2 Turning off the ERR LED Select Being requested in the Setting value field of the CH Common CH1 Error clear request Click the button Perform the same operation for CH2 Error clear request Figure 11 9 Turning off the ERR LED on the Monitor test screen Execute test Click Select Being requested ...

Page 348: ...cleared When the LED was turned off by Y1B CH common CH1 error clear request and Y1C CH2 error clear request turn on the corresponding bit in the Detailed LED clear request storage area by the device test on GX Developer Figure 11 10 Configuration of the Detailed LED clear request storage area b0 b1 b2 b3 b4 b5 b6 b7 b8 b9 b10 b11 b12 b13 b14 b15 1 0 1 0 1 0 1 0 1 0 b0 b1 b2 b3 b4 b5 b6 b7 b8 b9 b...

Page 349: ... INSTRUCTIONS 11 TROUBLESHOOTING APPENDICES INDEX 3 Confirming the ERR LED turned off When the processing is completed the Completed message is displayed Check that the current value fields of CH Common CH1 Error and CH2 Error have changed from Error occurred to No error Figure 11 11 Monitor test screen after the ERR LED turned off ...

Page 350: ...st turning on the corresponding bit When the above exception code storage area is turned on the Exception code storage error address 0002H 0004H in the buffer memory is cleared Figure 11 12 I O signal behavior when the ERR LED is lit Figure 11 13 Configuration of the Detailed LED clear request storage area Error occurred Error occurred Error occurred Error occurred CH common CHn error clear reques...

Page 351: ...4 I O signal behavior when turning off the ERR LED is requested Table11 18 Devices used for turning off the ERR LED Device name Device Application QJ71MB91 input output Input X0 Module READY Y1C CH2 error clear request External input command X20 ERR LED OFF command Table11 19 Buffer memory used for turning off the ERR LED Device name Address Application QJ71MB91 buffer memory 0009H 9 CH2 side Deta...

Page 352: ...ERR LED can be turned off by a request message from the master The following explains how to turn off the ERR LED by issuing a request message from the master 1 Procedure for turning off the ERR LED Send a request message containing the following to the slave QJ71MB91 from the master after removing possible error causes Restart communications option Section 4 11 2 Clear Counters and Diagnostic Reg...

Page 353: ... QJ71MB91 The QJ71MB91 version has been upgraded with a new function added and the specifications changed The new function and the utility package version are shown below Remark For information on how to check the serial number refer to Section 2 4 TableApp 1 New function and utility package version Function First 5 digits of serial No Supporting the UINI instruction 11042 or later ...

Page 354: ...9 ft Overall distance Max 1200m 3936 9 ft Overall distance Master function Automatic communication function Number of slaves None 32 per channel Function for send 7 functions Input area size 4k words Output area size 4k words Dedicated instruction No of simultaneously executable instructions 1 instruction per channel Function for send MBRW instruction 9 functions MBREQ instruction 19 functions Inp...

Page 355: ...ated instruction Slave function 2 Automatic response function MODBUS device assignment function 1 Link operation function Various settings using utility package Computer link function Function code Sub code Function AJ71UC24 S2 A1SJ71UC24 R2 S2 A1SJ71UC24 R4 S2 QJ71MB91 01 Read coils 02 Read discrete inputs 03 Read holding registers 04 Read input registers 05 Write single coil 06 Write single regi...

Page 356: ...lave function Automatic response function Program not required MODBUS device assignment function Program not required There is no compatibility in sequence programs since the I O signals and buffer memory assignments are different Modify the sequence program or make the setting again on GX Configurator MB Link operation function Program not required Program not required Make the setting in the int...

Page 357: ...erent For the MODBUS device assignment parameter setting refer to the following Section 9 1 2 TableApp 5 Comparisons of I O signals Input signal Signal name Compatibility Precautions for replacement AJ71UC24 S2 A1SJ71UC24 R2 S2 A1SJ71UC24 R4 S2 X0 Error occurrence on CH1 side X1B is used on the QJ71MB91 X1 Error occurrence on CH2 side X1C is used on the QJ71MB91 X2 to X6 Use prohibited X7 Module r...

Page 358: ...H to 0DFFH 3326 to 3583 0004H 4 CH2 side exception code storage area 0005H 5 CH2 side detailed error code storage area Check Error log 0CFEH to 0DFFH 3326 to 3583 0006H 6 CH1 side detailed LED status storage area On the QJ71MB91 some data are partially added 0007H 7 CH2 side detailed LED status storage area 0008H 8 CH1 side detailed LED clear request storage area 0009H 9 CH2 side detailed LED clea...

Page 359: ... 1 Request message transmission time ms Ktq Request message size bytes Bits of 1 character Transmission speed bps 1000 2 Response message transmission time ms Ktr Response message size bytes Bits of 1 character Transmission speed bps 1000 3 1 character time Bits of 1 character Transmission speed bps 1000 TableApp 8 Processing time calculation items for the automatic communication function Item Des...

Page 360: ...Request message Response message Response message Response message Request message Response message Master QJ71MB91 Enlarged Automatic communication function communication time Master QJ71MB91 Processing time QJ71MB91 Processing time Km Ta Message interval Ti Data transmission delay time Gt Request message transmission time Ktq Message interval Ti Target slave device processing time Ts Response me...

Page 361: ...on time ms Ttr Response message size bytes Bits of 1 character Transmission speed bps 1000 3 1 character time Bits of 1 character Transmission speed bps 1000 TableApp 9 Calculation items for the dedicated instruction processing time Item Description Unit Trc Dedicated instruction processing time ms St Local station scan time ms Km 9 Constant Ta Message conversion time RTU mode 0 ASCII mode 1 to 2 ...

Page 362: ...lculation items used when mounted with a programmable controller CPU Item Description Unit Tsl Request message processing time ms St Local station scan time ms Ks1 6 Constant Ks2 8 Constant Ta Message conversion time RTU mode 0 ASCII mode 1 to 2 ms Ttq Request message transmission time 1 ms Ttr Response message transmission time 2 ms Ti Message interval RTU mode When the transmission speed is 1920...

Page 363: ...er CPU Continued Item Description Unit n1 Any of the following values are applied depending on the function code and assignment status Function code When programmable controller CPU device is assigned When buffer memory is assigned 01 1 0 02 1 0 03 1 0 04 1 0 05 1 0 06 1 0 07 1 0 08 0 0 11 0 0 12 0 0 15 1 0 16 1 0 17 0 0 20 1 0 21 1 0 22 2 0 23 2 0 n2 Any of the following values are applied depend...

Page 364: ... to the Q Corresponding MELSECNET H Network System Reference Manual Remote I O network TableApp 11 Processing time calculation time used when mounted on a MELSECNET H remote I O station Item Description Unit Sm Remote master station scan time ms LS Link scan time 1 ms TRIOR I O refresh time 1 ms TRBF Time of refresh with buffer memory of intelligent function module 1 ms Other than the above Refer ...

Page 365: ... Dimensions 1 R1 Bending radius near terminal block Outer cable diameter 4 2 R2 Bending radius near connector Outer cable diameter 4 3 r1 Bending radius near crimp contact Connectable as long as not bended extremely FigureApp 3 External dimensions 90 3 54 4 5 0 18 27 4 1 08 Unit mm inch 98 3 86 R1 1 R2 2 r1 3 Cable diameter 4 10 23 0 91 4 0 16 ...

Page 366: ...App 14 Appendix 4 External Dimensions APPENDICES Memo ...

Page 367: ...ware test 6 6 I Initial Setting 8 15 Intelligent Function Module Switch Setting 6 19 I O signal list 3 10 L Link operation function 5 21 Listen only mode A 15 4 31 M Mask Write Register FC 22 4 59 Master function A 14 5 3 MODBUS R device assignment function 5 18 MODBUS R device assignment parameter 7 11 8 19 9 4 MODBUS R device assignment parameter status 8 31 MODBUS R Protocol A 14 A 15 MODBUS R ...

Page 368: ... 40 Return slave no response count sub function code 15 4 39 S Self loopback test 6 8 Slave function A 14 5 17 Software Version 2 11 T Troubleshooting 11 1 Turning off the ERR LED 11 41 U Unit test 6 6 Utility package 8 1 W Write File Record FC 21 SC 06 4 57 Write Multiple Coils FC 15 4 50 Write Multiple Registers FC 16 4 52 Write Single Coil FC 05 4 22 Write Single Register FC 06 4 23 X X Y Monit...

Page 369: ...ed not to be so by the user 2 Onerous repair term after discontinuation of production 1 Mitsubishi shall accept onerous product repairs for seven 7 years after production of the product is discontinued Discontinuation of production shall be notified with Mitsubishi Technical Bulletins etc 2 Product supply including repair parts is not available after production is discontinued 3 Overseas service O...

Page 370: ...f Intel Corporation in the United States and other countries Ethernet is trademark of Xerox Corporation MODBUS is the registered trademark of Schneider Electric SA All other company names and product names used in this manual are trademarks or registered trademarks of their respective companies SPREAD Copyright c 1996 FarPoint Technologies Inc SH NA 080578ENG G ...

Page 371: ......

Page 372: ......

Reviews: