background image

Owner’s Manual   5

Important Information

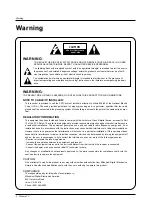
PRECAUTIONS

Please read this manual carefully before using your
Mitsubishi plasma TV and keep the manual handy for
future reference.

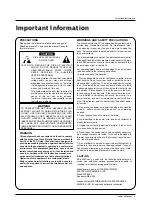
CAUTION

RISK OF ELECTRIC SHOCK

DO NOT OPEN

CAUTION:TO REDUCE THE RISK OF ELECTRIC

SHOCK, DO NOT REMOVE COVER. NO
USER-SERVICEABLE PARTS INSIDE. 
REFER SERVICING TO QUALIFIED 
SERVICE PERSONNEL.

This symbol warns the user that uninsulated
voltage within the unit may have sufficient
magnitude to cause electric shock. Therefore,
it is dangerous to make any kind of contact
with any part inside of this unit.

This symbol alerts the user that important lit-
erature concerning the operation and mainte-
nance of this unit has been included.
Therefore, it should be read carefully in order
to avoid any problems.

WARNING

TO PREVENT FIRE OR SHOCK HAZARDS, DO NOT
EXPOSE THIS UNIT TO RAIN OR MOISTURE. ALSO
DO NOT USE THIS UNIT’S POLARIZED PLUG WITH
AN EXTENSION CORD RECEPTACLE OR OTHER
OUTLETS, UNLESS THE PRONGS CAN BE FULLY
INSERTED. REFRAIN FROM OPENING THE CABINET
AS THERE ARE HIGH-VOLTAGE COMPONENTS
INSIDE. REFER SERVICING TO QUALIFIED SERVICE
PERSONNEL.

WARNING

This equipment has been tested and found to comply
with the limits for a Class B digital device, pursuant to
Part 15 of the FCC Rules. These limits are designed to
provide reasonable protection against harmful interfer-
ence when the equipment is operated in a commercial
environment. This equipment generates, uses, and can
radiate radio frequency energy and, if not installed and
used in accordance with the instruction manual, may
cause harmful interference to radio communications.
Operation of this equipment in a residential area is
likely to cause harmful interference in which case the
user will be required to correct the interference at his
own expense.

WARNINGS AND SAFETY PRECAUTIONS

The Mitsubishi plasma TV is designed and manufactured to
provide long, trouble-free service. No maintenance other
than cleaning is required. Use a soft dry cloth to clean the
panel. Never use solvents such as alcohol or thinner to clean
the panel surface. 

The plasma display consists of fine picture elements (cells).
Although Mitsubishi utilizes plasma display panels with more
than 99.99 percent active cells, there may be some cells that
do not produce light or remain lit.

For operating safety and to avoid damage to the unit, please
read and observe the following instructions. 
To avoid shock and fire hazards:

1. Provide adequate space for ventilation to avoid internal
heat build-up. Do not cover rear vents or install the unit in a
closed cabinet or shelves. The unit is equipped with cooling
fans. If you install the unit in an enclosure, make sure there
is adequate space at the top of the unit to allow hot air to rise
and escape. If this happens, turn off the power to the moni-
tor and unplug the power cord. If the room where the moni-
tor is installed is particularly hot, move the monitor to a
cooler location, and wait for the monitor to cool for 60 min-
utes. If the problem persists, contact your Mitsubishi dealer
for service.

2. Do not use the power cord polarized plug with extension
cords or outlets unless the prongs can be completely
inserted.

3. Do not expose the unit to water or moisture.

4. Avoid damage to the power cord, and do not attempt to
modify the power cord.

5. Unplug the unit during electrical storms or if the unit will
not be used over a long period.

6. Do not open the cabinet which has potentially dangerous
high voltage components inside. If the unit is damaged in
this way the warranty will be void. Moreover, there is a seri-
ous risk of electric shock.

7. Do not attempt to service or repair the unit. Mitsubishi  is
not liable for any bodily harm or damage caused if unquali-
fied persons attempt service or open the back cover. Refer
all service to authorized Mitsubishi  Service Centers.

CAUTION

PD-4225S can be used with the following optional acces-
sories. Use with other optional accessories is capable of
resulting in instability causing possible injury.

Manufacturer’s name: MITSUBISHI DIGITAL
ELECTRONICS AMERICA, INC
Stand: MB-4225
Speakers: MS-4225

Please contact MITSUBISHI DIGITAL ELECTRONICS
AMERICA, INC for approved optional accessories.

Important Information

Important Information

Summary of Contents for PD-4225

Page 1: ...Copyright 2003 Mitsubishi Digital Electronics America Mitsubishi Plasma TV PD 4225 Owner s Guide Technically Anything is Possible...

Page 2: ...ned to provide reasonable protection against harmful interference in a residential installation This equipment generates uses and can radiate radio frequency energy and if not installed and used in ac...

Page 3: ...Any mounting of the prod uct should follow the manufacturer s instructions and should use a mounting accessory recommended by the manufac turer 8 Transporting Product A product and cart combination s...

Page 4: ...uch dangerous voltage points or short out parts that could result in a fire or electric shock Never spill liquid of any kind on the product 19 Servicing Do not attempt to service this product yourself...

Page 5: ...ents such as alcohol or thinner to clean the panel surface The plasma display consists of fine picture elements cells Although Mitsubishi utilizes plasma display panels with more than 99 99 percent ac...

Page 6: ...type of damage Do not turn off ORBITER Always enable and use your computer s video game or DVD player screen saver during use with these sources Display a moving image whenever possible Change the po...

Page 7: ...r colored bars to fill the screen when used over extended periods of time or when viewed repeatedly can cause uneven aging of the phosphors used in plasma displays and can leave subtle ghosts of the s...

Page 8: ...asma TV with a soft non abrasive cloth such as cotton flannel or a clean cloth diaper lightly moistened with water Dry with a second dry soft non abrasive cloth General Cleaning Warnings DO NOT apply...

Page 9: ...your own home Multimedia Connect your plasma TV to a PC and you can use it for conferencing games and internet browsing The Picture in Picture fea ture allows you to view your PC and video images simu...

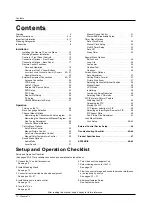
Page 10: ...u Options Auto Clock Setup 32 Manual Clock Setup 32 On Off Timer Setup 32 Auto Off 33 Sleep Timer 33 Special Menu Options Button Lock 34 Long Life 34 Low power 34 Caption Text 36 Captions 36 Screen Me...

Page 11: ...QV 4 GUIDE 2 5 8 0 TV MENU PIP POP HOME MUTE DEVICE CH VOL REW REV FF FWD PLAY STOP EXCH ZOOM INFO SLEEP AUDIO VIDEO PIP DEVICE ZOOM TV AUDIO CABLE DBS DTV DVD VCR MTS The plasma TV panel needs the ma...

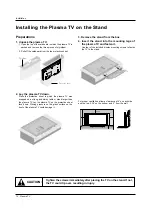
Page 12: ...e plasma TV Lay the plasma TV on the protective sheet face down Placing pressure on the glass surface on the front of the plasma TV could damage it 3 Remove the stand from the box 4 Insert the stand i...

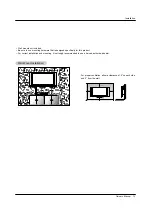
Page 13: ...d specifically for this product For correct installation and mounting it is strongly recommended to use a trained authorized dealer W Wall Mount Installation all Mount Installation For proper ventilat...

Page 14: ...of the Speaker Wire This will expose the copper wire Twist the copper wire counter clockwise as shown below Repeat this procedure for the other speaker wire 6 Press the red terminal tab on the back o...

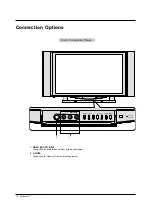
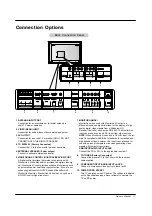
Page 15: ...V is on Lights green When the TV is in the Standby mode Lights red 4 DEVICE Switches the input in the following order ANT VIDEO REAR VIDEO FRONT S VIDEO COM PONENT RGB MONITORLINK 5 VOLUME D and E Adj...

Page 16: ...onnection Panel Front Connection Panel POWER STANDBY DEVICE POWER VOL CH MENU ADJ ADJ S VIDEO VIDEO AUDIO L R MONO FRONT 1 2 1 VIDEO FRONT INPUT Connection for audio video out from external equipment...

Page 17: ...election If you are not connecting a Mitsubishi HDTV Receiver Controller with MonitorLink features MonitorLink Control can be used as a RS 232C control signal input port 7 MONITORLINK DVI MonitorLink...

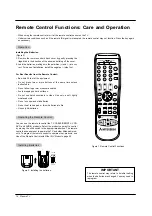
Page 18: ...he negative side first For Best Results from the Remote Control Be within 20 feet of the equipment Do not press two or more buttons at the same time unless instructed to Do not allow to get wet or bec...

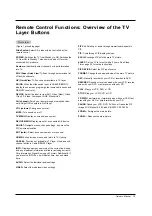
Page 19: ...er or menu item HOME Exit on screen menus and return to TV viewing CANCEL Function not available in TV layer Used as a sub channel button in Cable DBS DTV layer INFO Display on screen summary of the c...

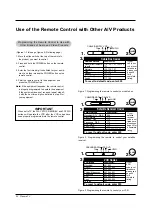
Page 20: ...121 122 123 124 125 126 127 139 137 102 101 116 112 113 117 100 If your cable box code is not listed here please see page 48 for a complete listing Cable Box Codes 1 2 3 TV AUDIO CABLE DBS DTV DVD VCR...

Page 21: ...devices is allowed for each slide switch position TV position TV A V receiver volume and mute only Cable DBS DTV position Cable box Satellite receiver DTV receiver VCR position VCR DVD position DVD L...

Page 22: ...es allow you to view Programming in different ways While watching the main screen you can display programs from other channels and other inputs To see which inputs can and cannot be used together see...

Page 23: ...not installed properly contact your dealer for assistance MONO VIDEO REAR INPUT VIDEO AUDIO RIGHT LEFT ANT IN VIDEO AUDIO RIGHT LEFT AV OUTPUT Signal Amplifier MONO VIDEO REAR INPUT VIDEO AUDIO RIGHT...

Page 24: ...IGHT LEFT AV OUTPUT TO DISPLAY S VIDEO OUT IN 3 4 R AUDIO L VIDEO OUTPUT SWITCH ANT OUT ANT IN After subscribing to a cable TV service from a local provider and installing a converter you can watch ca...

Page 25: ...deo Rear 2 Operate the corresponding external equipment Refer to external equipment operating guide The TV Component Ports Y PB PR DVD Player Video Output Ports Y Y Y Y Pb B Y Cb PB Pr R Y Cr PR How t...

Page 26: ...the TV s screen for a long period of time The fixed image may become permanently imprinted on the screen Use the Orbiter screen saver when possible The synchronization input form for Horizontal and V...

Page 27: ...eo Mini plug to L and R RCA adapter connect the L left and R right audio cables from the HD 5000 receiver controller to the Audio Input Mini plug on the back of the TV IMPORTANT Additional connection...

Page 28: ...t or disconnect the Tuner Box cable to the TV the TV will switch to the standby mode ON 1 Plug the power cord into an active AC power outlet 2 Press the on off button located underneath the left side...

Page 29: ...O PROGRAM and the other is called MANUAL PROGRAM In AUTO PROGRAM mode the TV will memorize the channels in ascending numerical order If there are additional channels you want to add or delete you can...

Page 30: ...D E button to select the PICTURE menu 2 Press the G button and then use D E button to select Auto Color temp 3 Press the G button and then use D E button to select either Medium Default High Preset L...

Page 31: ...sound treble bass and balance to the levels you prefer SOUND Prev Audio Mode Level Sound G Balance 0 Treble 50 Bass 50 SOUND MENU On Off SOUND Prev Audio Mode Level Sound Balance 0 Treble 50 G Bass 50...

Page 32: ...n and then use D E button to select Clock 3 Press the G button and then use D E button to select Auto 4 Press the G button and then use D E button to select your viewing area time zone Your choices ar...

Page 33: ...umber of minutes selected 3 To check the remaining minutes before the TV turns off press the SLEEP or INFO button once 4 To cancel the Sleep Timer press the SLEEP button repeatedly until Min appears A...

Page 34: ...D E button to select On or Off 4 Press the ENTER button to save With the BUTTON LOCK ON Button Lock appears on the screen if any button on the front panel is pressed Long Life Long Life SPECIAL Prev L...

Page 35: ...ctive system for the hearing impaired and it can also aid in teaching lan guage skills The picture at left shows a typical caption IGNITION Picture may flutter drift suffer from black spots or horizon...

Page 36: ...en use D E button to select Caption Text 3 Press the G button and then use D E button to select your caption selection Your choices are CC1 CC2 CC3 CC4 Text 1 Text 2 Text3 and Text4 4 Press the ENTER...

Page 37: ...use permanent phosphor burn in It s not available the Stretch and Expand picture format in PC mode 1 Press the Format button repeatedly to select the desired picture format You can also adjust FORMAT...

Page 38: ...Phase adjustment range is 0 31 The Clock adjustment range is 50 50 5 Press the ENTER button to save Phase 0 Clock 0 SCREEN Prev Auto Adjust Format Zoom in out Position Manual Adjust VCR Mode G Initial...

Page 39: ...menu 2 Press the G button and then use D E button to select VGA mode 3 Press the G button and then use D E button to select the desired VGA resolution 4 Press the ENTER button to save Use YNR to redu...

Page 40: ...Picture Sub Picture Component Video Component Video Video Component 1 Press the TV MENU button and then use D E button to select the PIP menu 2 Press the G button and then use D E button to select PI...

Page 41: ...ment Adjustment 1 Press the TV MENU button and then use D E button to select PIP menu 2 Press G the button and then use D E button to select Win Size 3 Press the G button and press the F G button to c...

Page 42: ...ntal guidance suggested PG 13 13 years and up R restricted NC 17 18 years and up X adult If you set PG 13 and Above G and PG movies will be available PG 13 R NC 17 and X will be blocked For Television...

Page 43: ...password Press the G button and then enter a four digit password Enter it again when requested 4 Press the D E button to select type of blocking to be set 5 Press the G button and then use D E button...

Page 44: ...such as the Mitsubishi HD 5000 Receiver Controller or an A V control system and control the TV s functions externally Connect the serial port of the control device to the RS 232C jack on the TV back p...

Page 45: ...minutes the screen gets dark The remote control doesn t work Check to see if there is any object between the TV and the remote control causing obstruction Are batteries installed with correct polarity...

Page 46: ...streaks in picture Check antenna Change the direction of the antenna Poor stereo sound Check the kind of input signal and select Mono Stereo or SAP with the MTS button Auto programming doesn t stop Pr...

Page 47: ...ture Range Operating Humidity Range PD 4225 TV TV w Speakers Base 40 3 4 49 5 8 26 27 5 8 4 3 8 10 7 8 65 2 81 7 AC100 240V 50 60Hz NTSC VHF 2 13 UHF 14 69 CATV 1 125 852 x 480 Dot 16 770 000 256 step...

Page 48: ...0 Oritron 263 268 Paite 262 Panasonic 250 Philips Magnavox 258 253 272 290 Pioneer 252 Saba 251 Sampo 263 Samsung 261 Sanyo 275 Sharp 260 SMC 275 Sylvania 264 Sony 254 278 279 Thompson 251 Toshiba 253...

Page 49: ...7 Instant Replay 044 043 Jensen 059 JVC 030 031 054 076 077 Kenwood 030 026 031 LXI 047 026 020 027 028 025 029 Magnavox 051 043 044 Marantz 030 031 Marta 026 Memorex 044 029 MGA 060 067 068 061 062 M...

Page 50: ...50 Plasma TV Notes Notes Notes...

Page 51: ...damage is caused by unauthorized modification alteration repairs to or service of the product by anyone other than an authorized MITSUBISHI service center physical abuse to or misuse of the product in...

Reviews: