


21
FEA
TURES &
FUNCTIONS
PRECAUTIONS
SPECIAL
FEA
TURES &
UNP
ACKING
CONNECTIONS
BEFORE
OPERA
TION
TROUBLE-
SHOOTING
CLEANING
OTHERS
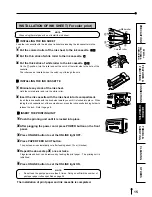
Thermal head
Cleaning part
Bottom part of thermal head
Cleaning part
A small amount of alcohol
ENLARGE SIZE
Ink sheet sensor
Metal spatula
Ink sheet sensor reflection plate
Reflection plate fixing screw
Thermal head
How to fold tissue paper
Cleaning kit (Option)
Cleaner pen (Option)
CLEANING
CLEANING
Cleaning as indicated below will help maintain stable printer operation and extend
the printer’s life.
Preparations
Alcohol (isopropyl alcohol)
Tissue paper (Fold in half about 4 times, and use the folded side to clean.)
Cotton buds
Cleaning kit (Option)*
Other : Cleaner pen (Option)*
*Please ask the dealer about options.
Make sure to turn off the power before cleaning.
1
1
1
1
1
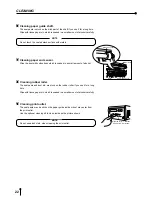
Press OPEN button to pull the printing unit out.
2
2
2
2
2
Remove the ink cassette and print paper.
3
3
3
3
3
Wipe the ink sheet sensor.
Clean the parts which the arrows show.
Wipe dust with cotton buds etc. which is soaked in a small amount of alcohol.
4
4
4
4
4
Wipe the ink sheet sensor reflection plate.
Clean the metal reflection plate.
Wipe with tissue paper etc. which is soaked in a small amount of alcohol carefully
.
NOTE
Reflection plate transport screw is fixed with bonding agent. Do not wipe this
bonding agent.
5
5
5
5
5
Wipe the head.
Cleaning the part under the thermal head which develops heat.
Wipe the head cleaning part carefully with tissue paper etc. which is soaked in a
small amount of alcohol.
NOTE
• Do not damage the thermal head.
• When the symptom of the poor print quality is not corrected even if the head
is cleaned, replacing the thermal head is required. Contact your dealer.
• Thermal head is hot right after printing. W ait until the head temperature is
low when cleaning the thermal head.