background image

6A1 ENGINE (E - W) -

Timing Belt

11A-4-8

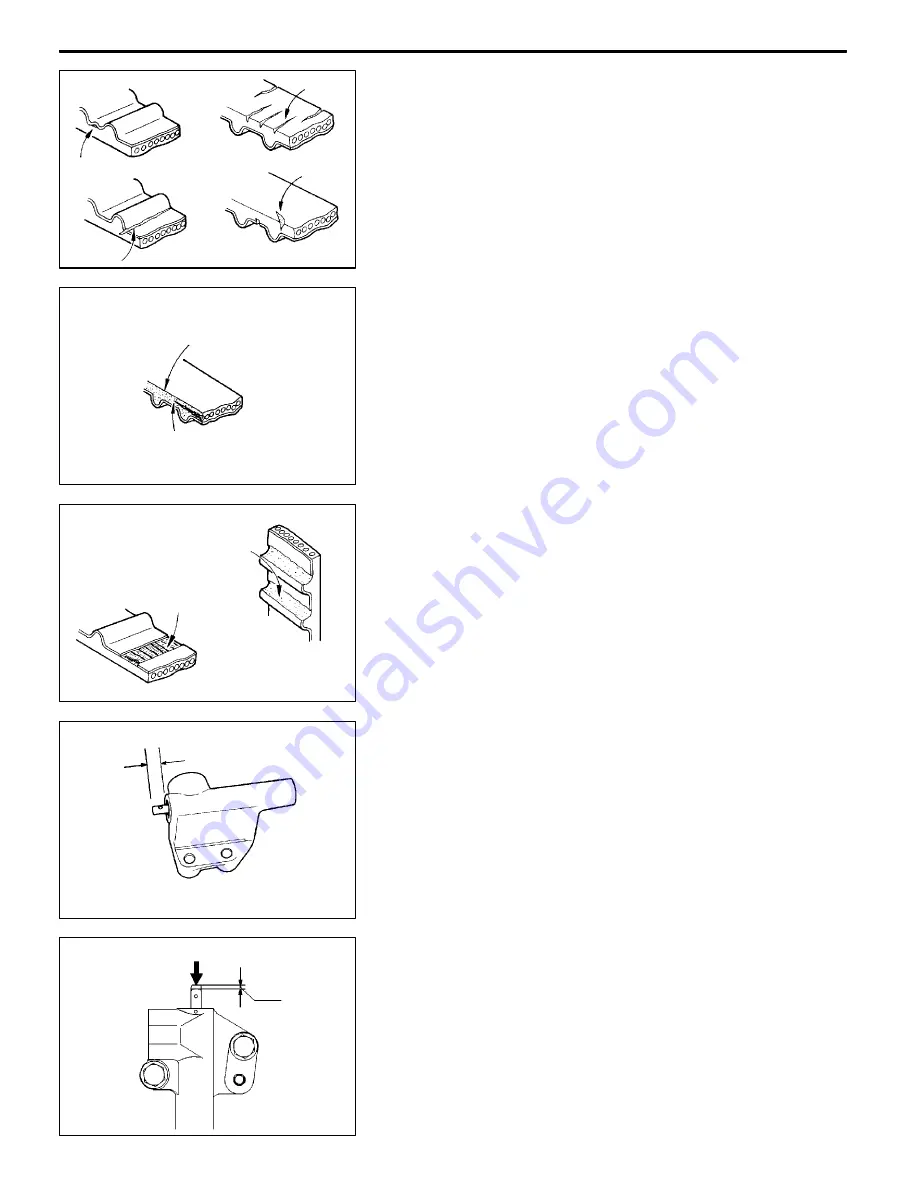
(2) Cracks on rubber back.

(3) Cracks or peeling of canvas.

(4) Cracks on tooth bottom.

(5) Cracks or belt sides.

(6) Abnormal wear of belt sides. The sides are normal if

they are sharp as if cut by a knife.

(7) Abnormal wear on teeth.

(8) Missing tooth.

AUTO-TENSIONER

(1) Check for oil leaks. If oil leaks are evident, replace the

auto-tensioner.

(2) Check the rod end for wear or damage and replace the

auto-tensioner if necessary.

(3) Measure the rod projection length “L”. If the reading is

outside the standard value, replace the auto tensioner.

Standard value “L”: 12 mm

(4) Press the rod by a force of 98 to 196 N and measure

the rod stroke. If the measured value exceeds the standard

value, replace the tensioner.

Standard value:

1 mm or less

PWEE9622

E

Feb. 1997

Mitsubishi Motors Corporation

1EN0249

Cracks

Cracks

Cracks

Peeling

8EN0067

Rounded edge

Abnormal wear

(Fluffy strand)

8EN0068

Rubber exposed

Tooth missing

and canvas

fiber exposed

6AE0046

“L”

6EN1033

98 - 196 N

Stroke

Summary of Contents for 6A1 series

Page 1: ...EL AND EMISSION CONTROL PARTS 11A 5 1 6 IGNITION SYSTEM 11A 6 1 7 WATER PUMP AND WATER PIPE 11A 7 1 8 INTAKE MANIFOLD AND EXHAUST MANIFOLD 11A 8 1 9 ROCKER ARM AND CAMSHAFT SOHC 11A 9 1 10 ROCKER COVER AND CAMSHAFT MIVEC 11A 10 1 11 ROCKER ARM AND ROCKER SHAFT CAP MIVEC 11A 11 1 12 CYLINDER HEAD AND VALVES 11A 12 1 13 OIL PUMP CASE AND OIL PAN 11A 13 1 14 PISTON AND CONNECTING ROD 11A 14 1 15 CRAN...

Page 2: ...11A 0 2 PWEE9622 E Feb 1997 Mitsubishi Motors Corporation NOTES ...

Page 3: ...lve Opens BTDC 15 Low speed cam 37 5 High speed cam 15 Closes ABDC 41 Low speed cam 82 5 High speed cam 53 Exhaust valve Opens BBDC 41 Low speed cam 75 High speed cam 53 Closes ATDC 15 Low speed cam 30 High speed cam 15 Lubrication system Pressure feed full flow filtration Pressure feed full flow filtration Oil pump type Trochoid type Trochoid type Cooling system Water cooled forced circulation Wa...

Page 4: ...d cam 34 40 33 90 High speed cam 35 86 35 36 Camshaft journal diameter mm 26 Valve clearance mm Intake 0 10 Exhaust 0 13 Cylinder head and valve Flatness of cylinder head gasket surface mm Cylinder head gasket surface grinding limit including grinding of cylinder block gasket surface mm Less than 0 03 Cylinder head overall height SOHC 119 9 120 1 mm MIVEC 119 6 119 8 Cylinder head bolt nominal len...

Page 5: ...Oil pump tip clearance mm 0 06 0 18 Oil pump side clearance mm 0 04 0 10 Oil pump body clearance mm 0 10 0 18 0 35 Piston and connecting rod Piston outside diameter mm 6A12 78 4 6A13 81 0 Piston ring side clearance mm No 1 ring 0 02 0 06 No 2 ring 0 02 0 06 Piston ring end gap mm No 1 ring 0 20 0 35 0 8 No 2 ring 0 35 0 50 0 8 Oil ring 0 20 0 50 1 0 Piston pin outside diameter mm 19 0 Piston pin p...

Page 6: ... 0 01 or less Cylinder block internal diame 6A12 78 4 ter mm 6A13 81 0 Bearing cap bolt nominal length mm 71 1 Piston to cylinder clearance mm 0 02 0 04 REWORK DIMENSIONS Item Standard Cylinder head and valves Cylinder head oversize valve guide hole diameter mm 0 05 O S 11 05 11 07 0 25 O S 11 25 11 27 0 50 O S 11 50 11 52 Oversize intake valve seat SOHC 0 3 O S 29 80 29 82 ring hole diameter mm 0...

Page 7: ...over 11 Engine support bracket 49 Angle sensor 9 Angle sensor connector bracket 11 Tensioner pulley 48 Tensioner arm 24 Auto tensioner 21 Camshaft sprocket bolt 88 Idler pulley 35 Timing belt rear cover 11 Angle sensor connector bracket 11 Fuel and emission control parts Air intake plenum stay 18 Connector bracket 11 EGR valve 22 Throttle body 12 Air intake plenum 18 Delivery pipe 12 Fuel pipe 9 F...

Page 8: ...emperature sensor 29 Heater pipe SOHC 23 Water inlet fitting 18 Water outlet fitting 18 Thermostat housing 23 Water pipe 13 Water pump 23 Intake manifold and exhaust manifold Intake manifold 17 Heat protector 13 Exhaust manifold stay 44 Exhaust manifold 49 Rocker arm and camshaft SOHC Rocker cover 4 Rocker arm and rocker shaft 31 Thrust case 24 Rocker arm and camshaft MIVEC Rocker cover 4 Oil cont...

Page 9: ...ose 30 Bolt 68 Drain plug 39 Oil level sensor 9 Oil pan 7 Oil screen 19 Baffle plate 9 Relief plug 44 Oil pump case 14 Oil pump case cover 12 Piston and connecting rod Connecting rod 18 90 100 Crankshaft cylinder block flywheel and drive plate Detonation sensor 23 Idler pulley bracket 35 Flywheel bolt 98 Drive plate bolt 98 Rear plate 11 Bell housing cover 9 Oil seal case 11 Bearing cap bolt 25 90...

Page 10: ...ent As required Water outlet fitting Mitsubishi Genuine Part No MD970389 or equivalent As required Engine coolant temperature sensor 3M Nut Locking Part No 4171 or equivalent As required Engine coolant temperature gauge unit 3M ATD Part No 8660 or equivalent As required Camshaft bearing 3M ATD Part No 8660 or equivalent As required Cam cap 3M ATD Part No 8660 or equivalent As required Oil control ...

Page 11: ...in between the joined surfaces In this case however care must be taken to prevent damage to the joined surfaces For removal of the oil pan the special tool Oil Pan Remover MD998727 is available Be sure to use the special tool to remove the oil pan Surface Preparation Thoroughly remove all substances deposited on the gasket application surfaces using a gasket scraper or wire brush Check to ensure t...

Page 12: ... MD998719 MB991477 Valve adjusting wrench Adjustment of valve clearance MIVEC MB991478 Valve adjusting wrench feeler gauge set Adjustment of valve clearance MIVEC MB991479 Rocker arm piston checker Adjustment of valve clearance MIVEC MB991614 Angle gauge Tightening cylinder head bolt MB991653 Cylinder head bolt wrench Tightening and loosening of cylinder head bolt MB991659 Guide D Removal of pisto...

Page 13: ...h adjuster in rocker arm at time of removal and installation of rocker arm and rocker shaft assembly MD998713 Camshaft oil seal installer Installation of camshaft oil seal MD998716 Crankshaft wrench Rotation of crankshaft when installing piston and timing belt MD998717 Crankshaft front oil seal installer Installation of crankshaft front oil seal MD998719 Pulley holder pin 2 Use with MB990767 MD998...

Page 14: ...ve spring compressor Removal and installation of valve and related parts MD998774 Valve stem seal installer Installation of valve stem seal MD998775 Valve stem seal installer Installation of valve stem seal MD998776 Crankshaft rear oil seal installer Installation of crankshaft rear oil seal Use with MB990938 MD998777 Camshaft oil seal installer adapter Installation of camshaft oil seal PWEE9622 E ...

Page 15: ...0 SETTING TOOL Piston pin Removal and installation of piston pin MD998781 Flywheel stopper Holding flywheel and drive plate MD998784 Valve spring compressor adapter Compression of valve spring MIVEC Use with MD998772 PWEE9622 E Feb 1997 Mitsubishi Motors Corporation ...

Page 16: ...m Removal steps 1 Drive belt 2 Alternator 3 Oil level gauge dipstick 4 Oil level gauge guide 5 O ring 6 Tensioner pulley 7 Engine hanger 8 Tensioner pulley bracket A 9 Tensioner pulley bracket B 10 Adjusting stud 11 Adjusting bolt AA AA 12 Crankshaft bolt 13 Special washer 14 Crankshaft pulley 15 Flange 16 Engine cover PWEE9622 E Feb 1997 Mitsubishi Motors Corporation ...

Page 17: ...val steps 1 Drive belt 2 Alternator 3 Oil level gauge dipstick 4 Oil level gauge guide 5 O ring 6 Tensioner pulley 7 Engine hanger 8 Tensioner pulley bracket A 9 Tensioner pulley bracket B 10 Adjusting stud 11 Adjusting bolt AA AA 12 Crankshaft bolt 13 Special washer 14 Crankshaft pulley 15 Flange 16 Engine cover PWEE9622 E Feb 1997 Mitsubishi Motors Corporation ...

Page 18: ... in position with the special tool before removing the crankshaft pulley bolts INSTALLATION SERVICE POINTS AA CRANKSHAFT PULLEY BOLT INSTALLATION 1 Hold the flywheel or drive plate in position with the special tool before installing the crankshaft pulley bolts PWEE9622 E Feb 1997 Mitsubishi Motors Corporation 6AE0039 MD998781 ...

Page 19: ...right 2 Timing belt front cover upper left 3 Timing belt front cover lower 4 Engine support bracket 5 Angle sensor AA CA 6 Timing belt 7 Tensioner pulley 8 Tensioner arm 9 Tensioner spacer BA 10 Auto tensioner 11 Crankshaft sprocket 12 Sensing plate 13 Crankshaft spacer AB AA 14 Camshaft sprocket bolt 15 Camshaft sprocket 16 Idler pulley 17 Timing belt rear cover center 18 Connector bracket PWEE96...

Page 20: ...ng belt front cover lower 4 Engine support bracket 5 Angle sensor 6 Angle sensor 7 Spacer AA DA 8 Timing belt 9 Tensioner pulley 10 Tensioner arm 11 Tensioner spacer BA 12 Auto tensioner 13 Crankshaft sprocket 14 Sensing plate 15 Washer AB AA 16 Camshaft sprocket bolt 17 Camshaft sprocket 18 Camshaft sprocket with sensing plate 19 Idler pulley 20 Timing belt rear cover left 21 Timing belt rear cov...

Page 21: ...installation 2 Loosen the bolt that secures the tensioner pulley to remove the timing belt AB CAMSHAFT SPROCKET BOLT REMOVAL INSTALLATION SERVICE POINTS AA CAMSHAFT SPROCKET BOLT INSTALLATION PWEE9622 E Feb 1997 Mitsubishi Motors Corporation 6AE0135 6AE0044 6AE0137 MB990767 MD998719 6AE0045 MB990767 MD998754 6AE0138 MB990767 MD998719 ...

Page 22: ...om the vice CA TIMING BELT INSTALLATION 1 Turn the crankshaft sprocket so that its timing mark will be away from the mating timing mark by approx three teeth Caution D If the timing marks are aligned the piston is brought to the TDC When the camshaft is turned under this condition the valves may interfere with the piston 2 Bring the timing marks of the camshaft sprockets as shown in the illustrati...

Page 23: ... sure that the left bank portion of the belt is not slack when the belt is fitted on the tensioner pulley If it is slack remove the belt and fit it again beginning with the first step 5 Move the tensioner pulley in the direction of the arrow and hold it in raised position by tightening the tensioner pulley bolt 6 Check that all timing marks are aligned correctly 7 Turn the crankshaft counterclockw...

Page 24: ... the mating timing mark and then turn the crankshaft counterclockwise by one tooth 4 Place the timing belt over the sprockets in the following method Caution D The camshaft sprockets on the right bank can turn very easily because of the valve spring tension Use care not to allow your fingers to get caught between the sprockets 1 Align the timing mark of the right bank exhaust camshaft sprocket wit...

Page 25: ...ith the torque wrench 11 While holding the tensioner pulley tighten the center bolt to specification 12 Turn the crankshaft clockwise 2 turns and let it stand for about 5 minutes 13 Make sure that the wire which has been inserted when installing the auto tensioner can be removed easily Belt tension should be acceptable if the wire can be easily removed Remove the wrench The belt tension can also b...

Page 26: ... or damage and replace the auto tensioner if necessary 3 Measure the rod projection length L If the reading is outside the standard value replace the auto tensioner Standard value L 12 mm 4 Press the rod by a force of 98 to 196 N and measure the rod stroke If the measured value exceeds the standard value replace the tensioner Standard value 1 mm or less PWEE9622 E Feb 1997 Mitsubishi Motors Corpor...

Page 27: ... Nm 7 Removal steps 1 Air intake plenum stay front 2 Air intake plenum stay rear 3 EGR valve 4 Gasket 5 Vacuum pipe 6 Throttle body CA 7 Gasket 8 Air intake plenum 9 Gasket 10 Control harness 11 Delivery pipe and injector 12 Insulator 13 Insulator BA 14 Injector 15 Grommet 16 O ring 17 Fuel pipe 18 O ring AA 19 Fuel pressure regulator 20 O ring 21 Delivery pipe 22 Alternator bracket PWEE9622 E Feb...

Page 28: ...take plenum stay rear 3 Vacuum pipe 4 Throttle body CA 5 Gasket 6 Connector bracket 7 Connector bracket 8 Accelerator cable bracket 9 Ignition failure sensor 10 Air temperature sensor 11 Gasket 12 Air intake plenum 13 Gasket 14 Control harness 15 Delivery pipe and injector 16 Insulator 17 Insulator BA 18 Injector 19 Grommet 20 O ring 21 Fuel pipe 22 O ring AA 23 Fuel pressure regulator 24 O ring 2...

Page 29: ...rt it into the delivery pipe Check it again for smooth rotation before securing BA INJECTOR INSTALLATION 1 Install new grommet and O ring on the injector 2 Apply spindle oil or gasoline to the O ring of the injector 3 While turning the injector in both directions install it in the delivery pipe 4 Make sure that the injector turns smoothly Caution D If the injector does not turn smoothly the O ring...

Page 30: ...tion System 11A 6 1 6 IGNITION SYSTEM REMOVAL AND INSTALLATION SOHC 1 2 3 4 25 Nm 11 Nm 13 Nm Removal steps 1 Spark plug cable 2 Spark plug 3 Water cover AA 4 Distributor PWEE9622 E Feb 1997 Mitsubishi Motors Corporation ...

Page 31: ...T AA DISTRIBUTOR INSTALLATION 1 Turn the crankshaft clockwise to bring the No 1 cylinder piston to the compression stroke top dead center 2 Align the mark on the distributor housing with the mark on the coupling 3 Install the distributor while aligning the coupling key with the keyway in the camshaft end PWEE9622 E Feb 1997 Mitsubishi Motors Corporation 6AE0151 Alignment mark ...

Page 32: ...Nm 23 Nm 23 Nm 18 Nm Removal steps FA 1 Engine coolant temperature gauge unit EA 2 Engine coolant temperature sensor 3 Water hose 4 Water hose 5 Heater pipe 6 O ring 7 Water inlet fitting DA 8 Thermostat CA 9 Water outlet fitting 10 Thermostat housing 11 Gasket BA 12 O ring BA 13 Water pipe BA 14 O ring AA 15 Water pump PWEE9622 E Feb 1997 Mitsubishi Motors Corporation ...

Page 33: ... Nm 23 Nm Removal steps 1 Engine hanger FA 2 Engine coolant temperature gauge unit EA 3 Engine coolant temperature sensor 4 Water hose 5 Water hose 6 Water inlet fitting DA 7 Thermostat CA 8 Water outlet fitting 9 Thermostat housing 10 Gasket BA 11 O ring BA 12 Water pipe BA 13 O ring AA 14 Water pump PWEE9622 E Feb 1997 Mitsubishi Motors Corporation ...

Page 34: ... thermostat housing has been installed CA SEALANT APPLICATION TO WATER OUTLET FITTING Specified sealant Mitsubishi Genuine Part No MD970389 or equivalent DA THERMOSTAT INSTALLATION 1 Install the thermostat so that the jiggle valve will be located in the thermostat housing as shown EA SEALANT APPLICATION TO ENGINE COOLANT TEMPERATURE SENSOR Specified sealant 3M Nut locking Part No 4171 or equivalen...

Page 35: ... E W Water Pump and Water Pipe 11A 7 4 FA SEALANT APPLICATION TO ENGINE COOLANT TEMPERATURE GAUGE UNIT Specified sealant 3M ATD Part No 8660 or equivalent PWEE9622 E Feb 1997 Mitsubishi Motors Corporation 6AE0071 ...

Page 36: ...AL AND INSTALLATION SOHC 1 2 3 4 5 6 7 8 9 13 Nm 17 Nm 44 Nm 49 Nm 49 Nm 13 Nm Removal steps 1 Intake manifold 2 Gasket 3 Heat protector right 4 Exhaust manifold stay 5 Exhaust manifold right 6 Gasket 7 Heat protector left 8 Exhaust manifold left 9 Gasket PWEE9622 E Feb 1997 Mitsubishi Motors Corporation ...

Page 37: ...MIVEC 1 2 3 4 5 6 7 8 9 13 Nm 17 Nm 44 Nm 49 Nm 49 Nm 13 Nm Removal steps 1 Intake manifold 2 Gasket 3 Heat protector right 4 Exhaust manifold stay 5 Exhaust manifold right 6 Gasket 7 Heat protector left 8 Exhaust manifold left 9 Gasket PWEE9622 E Feb 1997 Mitsubishi Motors Corporation ...

Page 38: ... Nm 31 Nm 12 12 9 9 8 8 7 7 Removal steps 1 Rocker cover 2 Rocker cover gasket 3 Oil seal DA 4 Oil seal AA CA 5 Rocker arm and rocker shaft AA CA 6 Rocker arm and rocker shaft CA 7 Rocker shaft spring 8 Rocker arm A 9 Rocker arm B 10 Rocker arm shaft BA 11 Lash adjuster 12 Rocker arm C 13 Rocker arm shaft BA 14 Lash adjuster 15 Thrust case 16 O ring AA 17 Camshaft PWEE9622 E Feb 1997 Mitsubishi Mo...

Page 39: ... down 4 or 5 times while pushing down lightly on the check ball in order to bleed out the air 3 Insert the lash adjuster to rocker arm being careful not to spill the diesel fuel Then use the special tool to prevent adjuster from falling while installing it CA ROCKER SHAFT SPRING ROCKER ARMS AND ROCKER ARM SHAFT INSTALLATION 1 Temporarily tighten the rocker shaft with the bolt so that all rocker ar...

Page 40: ...ted DA CAMSHAFT OIL SEAL INSTALLATION 1 When installing the left bank camshaft oil seal use the special tool to prevent interference with the knock pin INSPECTION CAMSHAFT 1 Measure the cam height lobe diameter and if the limit is exceeded replace the camshaft Standard value 35 20 mm Intake side 34 91 mm Exhaust side Limit 34 70 mm Intake side 34 41 mm Exhaust side PWEE9622 E Feb 1997 Mitsubishi M...

Page 41: ...special tool Air bleed wire MD998442 and press the plunger If the plunger is hard to be pushed in the lash adjuster is normal If the plunger can be pushed in all the way readily bleed the lash adjuster again and test again If the plunger is still loose replace the lash adjuster Caution D Upon completion of air bleeding hold lash adjuster upright to prevent inside diesel fuel from spilling 4 After ...

Page 42: ...2 13 14 4 Nm 24 Nm 11 Nm 11 Nm 11 Nm 9 24 Nm 24 Nm 24 Nm 9 Nm Removal steps GA 1 Rocker cover 2 Rocker cover gasket 3 Oil seal FA 4 Circuit packing EA 5 Oil seal DA 6 Camshaft holder DA 7 Semi circular packing CA 8 Oil control valve BA 9 Cam cap 10 Oil control valve holder BA 11 Camshaft bearing cap 12 Arm spring holder 13 Arm spring AA 14 Camshaft PWEE9622 E Feb 1997 Mitsubishi Motors Corporation...

Page 43: ...hown in the illustration BA CAMSHAFT BEARING CAP CAM CAP INSTALLATION 1 Apply sealant to the illustrated points of the camshaft holders Specified sealant 3M ATD part No 8660 or equivalent 2 Install the bearing caps and cam caps correctly according to the I intake and E exhaust marks as well as the stamped cap numbers and front marks 3 Tighten the bolts in the sequence of the numbers shown in the i...

Page 44: ...t surface of the camshaft holder Caution D Since the FIPG could cause blocking of engine oil passages be careful not to apply FIPG to other locations than specified Specified sealant Mitsubishi Genuine Part No MD970389 or equivalent 3 Install the semi circular packings 4 Raise the rocker arms until the rollers come into contact with the cams and install the camshaft holder 5 Tighten the bolts in t...

Page 45: ...TALLATION 1 Apply the specified sealant to the area shown Specified sealant 3M ATD Part No 8660 or equivalent INSPECTION OIL CONTROL VALVE 1 Connect a 12VDC power supply between terminals 1 and 2 of the oil control valve and check if the valve operates smoothly PWEE9622 E Feb 1997 Mitsubishi Motors Corporation 6AE0306 Right bank MD998713 6AE0307 Left bank MD998713 MD998777 6AE0241 MD998713 6AE0242...

Page 46: ...d exhaust valves with the piston at the compression stroke top dead center 1 Bring the No 1 cylinder piston into the compression stroke top dead center 2 Use the special tool to loosen the adjusting screw 3 Insert a thickness gauge of the thickness specified below between the low speed cam narrow cam and roller Intake 0 10 mm Exhaust 0 13 mm 4 Screw in one of the two adjusting screws until it come...

Page 47: ...ain when the turning torque changes and tighten the lock nut 7 Remove the thickness gauge 8 Screw the special tool into the top of piston of the rocker arm H and pull up the tool to make sure that the piston can be lifted smoothly by hand 9 Perform valve clearance adjustments for other cylinders by turning every time the crankshaft through 120 60 in camshaft sprocket angle and following the above ...

Page 48: ...1 12 11 12 4 Removal steps BA 1 Rocker shaft cap 2 Seal cap A 3 Seal cap C 4 Intake rocker arm assembly A 5 Nut 6 Adjusting screw 7 Intake rocker arm H 8 Piston H 9 Piston spring H 10 Intake T lever AA 11 Spring guide 12 Wave washer 13 Exhaust rocker arm assembly A 14 Nut 15 Adjusting screw 16 Exhaust rocker arm H 17 Piston H 18 Piston spring H 19 Exhaust T lever L AA 20 Spring guide 21 Wave washe...

Page 49: ...e side toward the rocker arm The waved washer may be installed with either side out BA ROCKER SHAFT CAP INSTALLATION 1 Tighten the bolts in the sequence shown 2 Make sure that each rocker arm moves smoothly PWEE9622 E Feb 1997 Mitsubishi Motors Corporation 6AE0247 Spring guide Waved washer T lever Either side may be out Concave side 6AE0249 9 7 8 10 3 4 1 2 5 6 ...

Page 50: ... bolt 2 Cylinder head 3 Cylinder head gasket AB CA 4 Retainer lock 5 Valve spring retainer BA 6 Valve spring 7 Intake valve AB CA 8 Retainer lock 9 Valve spring retainer BA 10 Valve spring 11 Exhaust valve AC AA 12 Valve stem seal 13 Valve spring seat AC AA 14 Valve stem seal 15 Valve spring seat 16 Intake valve guide 17 Exhaust valve guide 18 Intake valve seat 19 Exhaust valve seat 20 Cylinder he...

Page 51: ...r head 3 Cylinder head gasket AB CA 4 Retainer lock 5 Valve spring retainer BA 6 Valve spring 7 Intake valve AB CA 8 Retainer lock 9 Valve spring retainer BA 10 Valve spring AD 11 Exhaust valve AC AA 12 Valve stem seal 13 Valve spring seat AC AA 14 Valve stem seal 15 Valve spring seat 16 Intake valve guide 17 Exhaust valve guide 18 Intake valve seat 19 Exhaust valve seat 20 Cylinder head PWEE9622 ...

Page 52: ... BOLT REMOVAL 1 Using the special tool loosen the cylinder head bolts Loosen evenly little by little AB RETAINER LOCK REMOVAL 1 Store removed valves springs and other parts tagged to indicate their cylinder Nos and location for reassembly PWEE9622 E Feb 1997 Mitsubishi Motors Corporation 6AE0166 SOHC MB991653 6AE0408 MIVEC MB991653 6AE0167 SOHC MD998772 6AE0253 MIVEC MD998784 MD998772 6EN1068 MD99...

Page 53: ... they are broken Never try to break the valves and expose sodium to the air When worn exhaust valves are to be discarded have them disposed of by a salvage company equipped with special disposal system notifying them that the valves contain sodium Should the exhaust valves be broken neutralize sodium using the method described below and discard the valves in the same way as ordinary valves 3 How t...

Page 54: ...m seal D Always use the special tool to install the valve stem seal If the seal is improperly fitted engine oil may work its way down along the valve stem BA VALVE SPRING INSTALLATION 1 Install the valve spring with the painted end on the rocker arm side CA RETAINER LOCK INSTALLATION 1 The valve spring if excessively compressed causes the bottom end of retainer to be in contact with and damage the...

Page 55: ...of 20 Nm in the specified tightening sequence 5 Make paint marks on the cylinder head bolts and cylinder head 6 Give a 120 turn to the bolts in the specified tightening sequence Caution D If the bolts are tightened by an angle of less than 120 they may not hold the cylinder head with sufficient strength D If a bolt is overtightened completely remove all the bolts and carry out the installation pro...

Page 56: ... 119 8 mm MIVEC VALVE 1 Check the valve face for correct contact If incorrect reface using a valve refacer Valve should make a uniform contact with the seat at the centre of valve face 2 If the margin is smaller than the service limit replace the valve Standard value mm Limit mm Intake 1 0 0 5 Exhaust 1 3 0 8 3 Measure the overall height of the valve If the specified limit is exceeded replace the ...

Page 57: ...stem projection between the end of the valve stem and the spring seating surface If the measurement exceeds the specified limit replace the valve seat Standard value mm Limit mm SOHC 48 45 48 95 MIVEC 48 40 48 90 VALVE GUIDE 1 Measure the clearance between the valve guide and valve stem If the limit is exceeded replace the valve guide or valve or both Standard value Intake 0 02 0 05 mm Exhaust 0 0...

Page 58: ...32 mm 0 6 O S SOHC 30 10 30 12 mm MIVEC 32 60 32 62 mm Exhaust valve seat hole diameter 0 3 O S SOHC 27 80 27 82 mm MIVEC 29 80 29 82 mm 0 6 O S SOHC 28 10 28 12 mm MIVEC 30 10 30 12 mm 3 Before fitting the valve seat either heat the cylinder head up to approximately 250_C or cool the valve seat in liquid nitrogen to prevent the cylinder head bore from galling 4 Correct the valve seat to the speci...

Page 59: ...ss the valve guide from the cylinder head top surface D Valve guide for intake valve and that for exhaust valve are different in length 45 5 mm for intake valve 50 5 mm for exhaust valve 4 After the valve guide has been installed insert a new valve to check for smooth sliding motion PWEE9622 E Feb 1997 Mitsubishi Motors Corporation 1EN0106 14 mm SOHC 6AE0254 DOHC 19 mm 19 mm ...

Page 60: ...switch HA 2 Oil filter 3 Oil filter cover 4 Water hose for Europe and GCC 5 Water pipe for Europe and GCC 6 Water pipe for Europe and GCC 7 Bolt for Europe and GCC GA 8 Oil cooler for Europe and GCC 9 Drain plug FA 10 Gasket 11 Oil level sensor For Europe 12 Cover DA 13 Oil pan lower DA 14 Oil pan upper 15 Buffle plate 16 Oil screen 17 Gasket 18 Relief plug 19 Relief spring 20 Relief plunger CA 21...

Page 61: ... Nm 44 Nm 7 Nm 7 Nm 10 Nm 14 Nm 18 12 Nm Removal steps IA 1 Oil pressure switch HA 2 Oil filter 3 Oil filter cover 4 Drain plug FA 5 Gasket AA EA 6 Oil pan 7 Oil screen 8 Gasket 9 Buffle plate 10 Relief plug 11 Relief spring 12 Relief plunger CA 13 Oil seal BA 14 Oil pump case 15 O ring 16 Oil pump case cover AA 17 Outer rotor AA 18 Inner rotor PWEE9622 E Feb 1997 Mitsubishi Motors Corporation ...

Page 62: ...TOR INSTALLATION 1 Apply engine oil to the rotors Then install the rotors ensuring that the alignment dots made at disassembly are properly aligned BA SEALANT APPLICATION TO OIL PUMP CASE Specified sealant Mitsubishi Genuine Part No MD970389 or equivalent CA OIL SEAL INSTALLATION 1 Apply engine oil to the oil seal lip Using the special tool knock the oil seal into the oil pump case PWEE9622 E Feb ...

Page 63: ...uivalent Bolt hole Groove f 4 EA OIL PAN INSTALLATION MIVEC 1 Clean the cylinder block and oil pan gasket application surfaces 2 Install the oil pan within 15 minutes after FIPG has been applied to the entire flange surfaces of the oil pan Specified sealant Mitsubishi Genuine Part No MD970389 or equivalent FA DRAIN PLUG GASKET INSTALLATION 1 Install the drain plug gasket in the shown direction PWE...

Page 64: ...e cylinder block surface and then give the oil filter one more turn or tighten with a 16 Nm torque NOTE For MD135737 oil filter the tightening torque should be 14 Nm IA SEALANT APPLICATION TO SEALANT TO OIL PRESSURE SWITCH 1 Apply sealant to the threads of the switch Specified sealant 3M ATD Part No 8660 or equivalent Caution D Use care not to allow the sealant to plug the oil passage INSPECTION O...

Page 65: ...ove the float up and down with the oil at a temperature either lower than 40 C or higher than 80 C and check for continuity 40 C Float position Switch ON OFF Condition when down ON continuity Condition when up ON continuity 80 C Float position Switch ON OFF Condition when down OFF no continuity Condition when up ON continuity PWEE9622 E Feb 1997 Mitsubishi Motors Corporation 6AE0090 6AE0192 ...

Page 66: ...g parts before installation 6AE0095 Removal steps GA 1 Nut AA FA 2 Connecting rod cap EA 3 Connecting rod bearing DA 4 Piston and connecting rod EA 5 Connecting rod bearing CA 6 Piston ring No 1 CA 7 Piston ring No 2 BA 8 Oil ring AB AA 9 Piston pin 10 Piston 11 Connecting rod 12 Bolt PWEE9622 E Feb 1997 Mitsubishi Motors Corporation ...

Page 67: ...ton from the side on which the front mark is stamped in the piston head and attach the guide D to the push rod end 2 Place the piston and connecting rod assembly on the Piston Pin Setting Base special tool with the front mark facing upward 3 Using a press remove the piston pin NOTE Keep the disassembled pistons piston pins and connecting rods in order according to the cylinder number PWEE9622 E Fe...

Page 68: ...phery of the piston pin 6 Insert the piston pin push rod and guide A assembly having assembled in step 3 from the guide A side into the piston pin hole on the front marked side 7 Screw the guide B into the guide A until the gap between both guides amounts to the value L obtained in step 2 plus 3 mm 8 Place the piston and connecting rod assembly onto the piston setting base with the front marks dir...

Page 69: ...n CA PISTON RING NO 2 PISTON RING NO 1 INSTALLATION 1 Using piston ring expander install the piston rings with their side having identification marks facing up Identification mark No 1 ring T No 2 ring 2T NOTE The piston ring is stamped with the following size mark Size Size mark Standard size None 0 50 mm O S 50 1 00 mm O S 100 DA PISTON AND CONNECTING ROD INSTALLATION 1 Liberally coat engine oil...

Page 70: ...ntification marks stamped on the crankshaft 6A12 Crankshaft pin Connecting rod bearing Identification mark Outer diameter mm Identification mark I 42 995 43 000 1 II 42 985 42 995 2 III 42 980 42 985 3 6A13 Crankshaft pin Connecting rod bearing Identification mark Outer diameter mm Identification mark I 50 995 51 000 1 II 50 985 50 995 2 III 50 980 50 985 3 FA CONNECTING ROD CAP INSTALLATION 1 Mat...

Page 71: ...ace of the nut 3 Install each nut to the bolt and tighten it finger tight Then tighten the nuts alternately to install the cap properly 4 Tighten the nuts to a torque of 18 Nm 5 Make a paint mark on the head of each nut 6 Make a paint mark on the bolt at the position 90 to 100 from the paint mark made on the nut in the direction of tightening the nut 7 Give a 90 to 100 turn to the nut and make sur...

Page 72: ...Standard value No 1 0 25 0 40 mm No 2 0 40 0 55 mm Oil 0 10 0 35 mm Limit No 1 No 2 0 8 mm Oil 1 0 mm CRANKSHAFT PIN OIL CLEARANCE PLASTIC GAUGE METHOD 1 Remove oil from crankshaft pin and connecting rod bearing 2 Cut the plastic gauge to the same length as the width of bearing and place it on crankshaft pin in parallel with its axis 3 Install the connecting rod cap carefully and tighten the bolts...

Page 73: ...te M T EA 8 Drive plate bolt A T 9 Adapter plate A T 10 Drive plate A T 11 Rear plate 12 Bell housing cover MIVEC DA 13 Oil seal case CA 14 Oil seal BA 15 Bearing cap bolt BA 16 Bearing cap AA 17 Crankshaft bearing lower 18 Crankshaft AA 19 Thrust bearing AA 20 Crankshaft bearing upper 21 Cylinder block Caution On the flexible wheel equipped engines do not remove any of the bolts A of the flywheel...

Page 74: ...k Bearing Bore Crankshaft Bearing Identi fication mark Outer diameter mm Identifi cation mark Inner diameter mm Identifica tion mark 0 60 000 60 006 1 1 55 994 56 000 1 60 006 60 012 2 2 60 012 60 018 3 0 60 000 60 006 2 2 55 988 55 994 1 60 006 60 012 3 2 60 012 60 018 4 0 60 000 60 006 3 3 55 982 55 988 1 60 006 60 012 4 2 60 012 60 018 5 2 Install the bearings having an oil groove to the cylind...

Page 75: ...ion 90 to 100 in the direction of tightening the bolt 7 Give a 90 to 100 turn to the bolts in the tightening sequence Make sure that the paint mark on the bolt and that on the area around the bolt bearing surface are in alignment Caution D If the bolts are tightened by an angle of less than 90 they may not hold the cap with sufficient strength D If a bolt is tightened by an angle exceeding 100 com...

Page 76: ...Locking Part No 4171 or equivalent 5 Tighten the bolts to specified torque INSPECTION CRANKSHAFT OIL CLEARANCE PLASTIC GAUGE METHOD 1 Remove oil from crankshaft journal and crankshaft bearing 2 Install the crankshaft 3 Cut the plastic gauge to the same length as the width of bearing and place it on journal in parallel with its axis 4 Install the crankshaft bearing cap carefully and tighten the bol...

Page 77: ...linder gauge measure the cylinder bore and cylindricity If worn badly correct cylinder to an oversize and replace piston and piston rings Measure at the points shown in illustration Standard value Cylinder I D 6A12 78 40 78 43 mm 6A13 81 00 81 03 mm Out of roundness and taper of cylinder bore 0 01 mm or less BORING CYLINDER 1 Oversize pistons to be used should be determined on the basis of the lar...

Page 78: ...ing bore cylinders working from No 1 No 2 No 3 No 4 No 5 and No 6 5 Hone to final finish dimension piston O D clearance between piston O D and cylinder 6 Check clearance between piston and cylinder Clearance between piston and cylinder 0 02 0 04 mm NOTE When boring cylinders finish all of four cylinders to same oversize Do not bore only one cylinder to an oversize PWEE9622 E Feb 1997 Mitsubishi Mo...

Page 79: ...NOTES ...

Page 80: ...Service Bulletins Click on the applicable bookmark to select the Service Bulletin ...

Page 81: ...ription It has been found that when the 6A1 engine is installed the water pump impeller interferes with the cylinder block Therefore the procedures for positioning the water pump that are to be followed when the water pump is installed have been introduced 2 Applicable Manuals Manual Pub No Language Page s ENGINE 6A1 W E PWEE9202 English 11A 7 2 Workshop Manual PWES9203 Spanish PWEF9204 French PWE...

Page 82: ...ION TO WATER OUTLET FITTING Specified sealant Mitsubishi Genuine Part No MD970389 or equivalent THERMOSTAT INSTALLATION 1 Install the thermostat so that the jiggle valve will be located in the thermostat housing as shown SEALANT APPLICATION TO ENGINE COOLANT TEMPERATURE SENSOR Specified sealant 3M Nut locking Part No 4171 or equivalent ENGINE 6A1 E W Workshop Manual 6A1 ENGINE E W Water Pump and W...

Page 83: ...ter pump and tighten the bolts 1 and 2 in that order 2 Turn the pulley by hand and ensure that the impeller does not interfere with the cylinder block 3 Tighten the bolts other than bolts 1 and 2 Added 6AE0415 Water pump ...

Reviews: