background image

E-27

The dotted lines indicate the proper condition

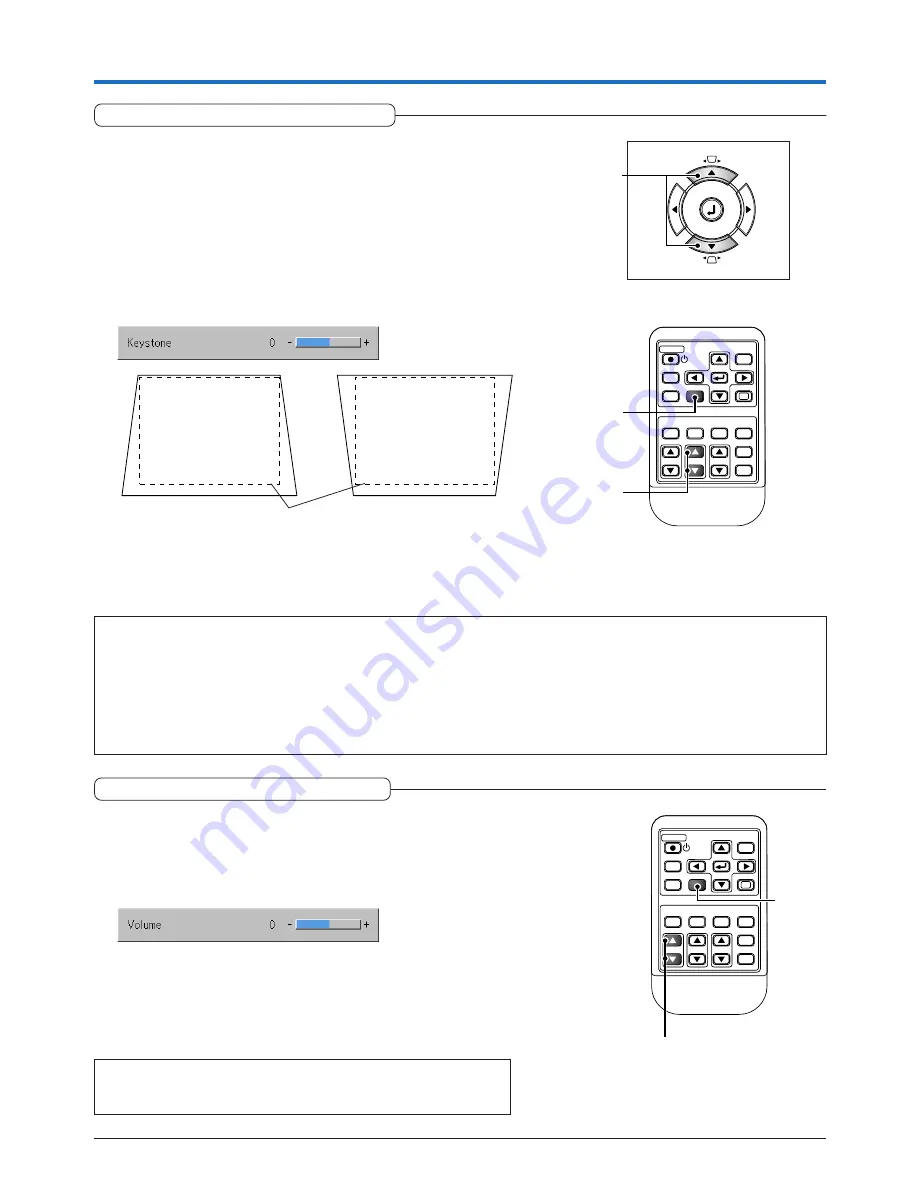
Keystone Manual Adjustment

Use this to adjust for trapezoidal (keystone) distortion of the pro-
jected image. The projector has both an automatic and a manual key-
stone adjustment function. The manual adjustment will be described
here.

Adjustment Method

(1) Press the (

왖왔

) buttons of the projector, or the (

왖왔

) KSTN but-

tons of the remote control and set the left and right sides so that
they are parallel.

The keystone adjustment display appears when one of the buttons is
pressed.

General Operation

RGB

STANDBY

VIDEO

FREEZE

MUTE LAMP MODE AUTO

ASPECT

TIMER

VOL

ZOOM

QUICK

MENU

ENTER

Q

1

2

3

4

KSTN

CANCEL

(1)

(2)

Press the 

 button.

Press the 

 button.

SOURCE

AUTO

(Projector button)

(2) To exit the display immediately, press the CANCEL button of the

remote control.

The display will close when there has not been an operation in about
10 seconds.

Note:

* Screen examples have been drawn in an exaggerated style for the purpose of description.
* Please note that depending on the projected picture and the projection conditions, it may not be possible to eliminate keystone distortion

completely.

* When the Auto Keystone function is OFF, the keystone adjustment settings will be maintained even when the power has been turned off.
* See “Adjustment of the Projection Screen” on Page E-22 for information about the Auto Keystone function.

See “Auto Keystone” on Page E-46 for information about turning Auto Keystone ON and OFF.
Also see “Keystone” on Page E-46 for information about making manual adjustments using the on-screen menu.

Adjustment of the Volume

This function adjusts the volume of the built-in speaker.

(1) Press the 

 or 

 VOL button to adjust the volume.

The volume adjustment display appears when one of the buttons is
pressed.

The 

 button increases the volume and the 

 button decreases the

volume.

RGB

STANDBY

VIDEO

FREEZE

MUTE LAMP MODE AUTO

ASPECT

TIMER

KSTN

ZOOM

QUICK

MENU

ENTER

Q

1

2

3

4

VOL

CANCEL

(1)

(2)

(2) Press the CANCEL button to immediately close the display.

The display will close when there has not been an operation in about
10 seconds.

Note:

* Adjustment of the volume will not produce any sound unless an image is

being projected.

(1)

Summary of Contents for XD80

Page 1: ...GA is a registered trademark of Video Electronics Standards Association Microsoft Windows and PowerPoint are registered trademarks of Microsoft Corporation U S A and other countries Macintosh is a trademark of Apple Computer Inc U S A Note that even in the absence of explanatory notes serious attention is paid to the trademarks of the various companies and to the product trademarks DATA PROJECTOR ...

Page 2: ...THE POWER ON MODE CAUTION Not for use in a computer room as defined in the Standard for the Protection of Electronic Computer Data Processing Equipment ANSI NFPA 75 The attached power cords are to be used exclusively for this product Never use them for other products WARNING TO PREVENT FIRE OR SHOCK HAZARD DO NOT EXPOSE THIS APPLIANCE TO RAIN OR MOISTURE CAUTION TO PREVENT ELECTRIC SHOCK DO NOT US...

Page 3: ...el If you are not sure of the type of power please consult your appliance dealer or local power company 11 Power cord protection Power supply cords should be routed so that they are not likely to be walked on or pinched by items placed upon or against them Pay particular atten tion to cords at plugs convenience receptacles and points where they exit from the appliance Do not put the power cord und...

Page 4: ...ay lead to fire if you keep using the equipment Do not face the projector lens to the sun It can lead to fire Use correct voltage If you use incorrect voltage it can lead to fire Do not place the projector on uneven surface Place the projection on a leveled and stable surface only Please do not place equipment on unstable surfaces Do not look into the lens when it is operating It may hurt your eye...

Page 5: ... based on specifications 䡵 Powerful functions for presentations A wide variety of easy to set functions have been built into the projector from a digital keystone correction function used when making settings that corrects picture distortion to an auto adjustment function that automatically identifies the PC signal There is also a built in Presentation Timer function for further presentation conve...

Page 6: ...onnector E 17 Connections with the AUDIO Jack E 18 Power Cable Connections and Switching the Power On Off E 19 Operating E 19 Finishing E 21 Adjustment of the Projection Screen E 22 Adjustment of the Projection Screen E 22 Making Adjustments with the Adjusters E 23 General Operation E 24 Input Selection E 24 Automatic Adjustment E 24 Selection of Aspect Ratio E 25 Freezing a Moving Picture E 26 Ca...

Page 7: ...When an Indicator is Lit or Blinking E 54 Troubleshooting E 55 Cleaning E 56 Replacing the Lamp Cartridge E 57 Specifications E 60 Table of Supported Frequency E 61 Cabinet Dimensions E 62 Declaration of Conformity Model Number XD80U Trade Name MITSUBISHI ELECTRIC Responsible party Mitsubishi Digital Electronics America Inc 9351 Jeronimo Road Irvine CA 92618 U S A Telephone number 1 949 465 6000 T...

Page 8: ...10 Power cable 1 8 m 5 9 feet 1 Each power cable supplies power to the unit See Page E 19 about connections US No 246C484 10 EU No 246C484 20 UK No 246C484 30 WARNING Handling the cables supplied with this product will ex pose you to lead a chemical known to the State of Cali fornia to cause birth defects or other reproductive harm Wash hands after handling RG B VID EO FR EE ZE MU TE LA MP MO DE A...

Page 9: ...ide Focus ring E 23 Exhaust vents Front adjusters E 23 Lamp cover E 58 Ventilation slots Remote control sensor E 11 Lens Ventilation slots Rear adjuster E 23 Speaker Lens cover Zoom ring E 22 Built in security slot See description below Built in Security Slot This security slot supports the MicroSaver Security System manufactured by Kensington Microware Inc ...

Page 10: ...onnector E 19 Remote control sensor E 11 RGB connector E 14 17 S VIDEO connector E 16 VIDEO connector E 16 AUDIO connector E 18 Ventilation slot STATUS indicator E 19 54 Buttons used in menu and quick menu operations E 32 33 SOURCE button E 24 MENU button E 33 STANDBY indicator E 19 54 AUTO button E 24 ENTER button E 20 STANDBY button E 19 SELECT 왖왔왗왘 buttons DUAL COLOR MODE button E 26 Keystone M...

Page 11: ...elects the vertical and horizontal ratio of the screen KSTN button E 27 Keystone correction adjustment R G B S T A N D B Y V I D E O F R E E Z E M U T E L A M P M O D E A U T O A S P E C T T I M E R V O L K S T N Z O O M C A N C E L Q U I C K M E N U E N T E R Q 1 2 3 4 Precautions Handling of the Remote Control Do not drop the remote control or handle it inappropriately Do not expose the remote c...

Page 12: ...spose of used batteries according to your local regulations Preparing the Remote Control 30 50 50 4m 13 1 feet 7m 23 0 feet 7m 23 0 feet 20 20 30 3 m 9 8 f e e t 6m 19 7 feet 4 m 1 3 1 f e e t Remote Control Range Point the infrared transmitter of the remote control toward the remote control sensor located at the front or rear of the main unit and operate Reception of the remote control signal sho...

Page 13: ...t with DLP type projectors in rare cases there may be black spots or bright spots among the picture elements Note Please purchase a screen A component cable order code 246C558 10 which is available separately is required to connect a DVD player or other equipment with YCbCr connectors A component cable order code 246C558 10 which is available separately is required to connect high definition HD vi...

Page 14: ... 0 65 0 78 Screen Size Designation Inches Screen Size Width x Height Projection Distance Height h1 Height h2 1 73 1 30 2 67 2 00 4 00 3 00 5 33 4 00 6 67 5 00 8 00 6 00 10 00 7 50 12 00 9 00 13 33 10 00 16 67 12 50 20 00 15 00 m feet 3 94 5 04 6 08 7 64 9 19 10 23 12 30 12 82 15 41 15 42 18 52 19 31 23 18 23 20 27 84 25 79 30 95 32 28 38 73 38 76 46 50 1 52 2 34 3 51 4 68 5 85 7 02 8 78 10 53 11 7...

Page 15: ...otebook computer or the on line help Connections with Personal Computer Please check the following before making connections with the personal computer A suitable resolution for this projector is 1024 768 dots XGA The maximum displayable resolution is 1280 1024 dots S XGA Make changes to a displayable resolution at the personal computer side Please check with Table of Supported Frequency on Page E...

Page 16: ... Page E 53 2 Should a sign not be output from the notebook computer please try the operation described below For an IBM PC AT compatible computer press the Fn key plus any one of the F1 to F10 keys See the table below Note When the liquid crystal display of the notebook computer and the projector are displayed at the same time the projected image might not be correct even though the liquid crystal...

Page 17: ...ormat Video See Input Format on Page E 49 Video Equipment with S VIDEO Connectors Connect to the projector s S VIDEO connector using a commercially available S Video cable The input setting of the S VIDEO connector has been set to Auto at the factory however if the projector does not project please change the input setting to Your Country s Television Broadcast System using the menu sequence of Se...

Page 18: ...the setting under the menu of Color Color Space See Color Space on Page E 43 Component cable Available as an option Mini D sub 15 pin to RCA 3 Order code 246C558 10 Green Blue Red Green Blue Red Note In some rare cases the picture may not be displayed depending on the connected device When the input format has been switched you may be required to reconnect the input signal Projecting component sig...

Page 19: ...he projector provides monaural audio To enjoy convincing audio reproduction please connect the audio output of the video equipment to your audio system The built in speaker outputs the audio of the equipment connected to the AUDIO jack White Red Audio conversion cable Mini jack RCA pin plug Not supplied Audio cable Mini plug Not supplied Audio cable Mini plug Not supplied Cable Ferrite core Mounti...

Page 20: ...he standby mode 1 S T A T U S S T A N D B Y S O U R M E N U D U A L C O L O R M O D E 2 S T A T U S S TA N D B Y S O U R M E N U D UA L C O LO R M O D E STATUS STANDBY Lit amber STATUS STANDBY STATUS STANDBY STATUS STANDBY This indicator is also lit green in Low mode Blinking green Approximately 60 seconds Lit green Power is on Lit amber Note When the power plug will be unplugged from the power ou...

Page 21: ...lign the deep blue cursor with English Cursor 2 Press the ENTER button to set This will set the language and Menu Language Select will close This completes the selection of the display language Caution Menu Language Select will not appear the next time the power is switched on Should a change of language become necessary see Language on Page E 50 RGB STANDBY VIDEO FREEZE MUTE LAMP MODE AUTO ASPECT...

Page 22: ...ing amber Approximately 90 seconds Lit amber Standby mode STATUS STANDBY STATUS STANDBY STATUS STANDBY Lit green 3 Unplug the power cable Check that the STANDBY indicator is lit in amber and then unplug the power cable The STANDBY indicator will go off when the power cable is un plugged 4 햲 Turn the lens cover counterclockwise until it stops 햳 The lens cover will stop with a click 1 S T A T U S S ...

Page 23: ...ctor not being perpendicular to the screen Set the projector so that it is pointing straight toward the screen 5 The vertical keystone distortion of the projection screen will be corrected automatically Auto Keystone Function An automatic adjustment will be made approximately 2 seconds after the projection angle has been fixed When the adjustment is completed the Auto Keystone Complete message wil...

Page 24: ... 2 raise the projector to align the image with the screen then release your fingers Turn the left and right front adjusters for fine adjustment Adjust so that there is no shaking of the projector Lowering the projection image Lower the front adjusters using the operation described above To lower the projection screen further raise the rear ad juster Fine adjustments are made by turning the left an...

Page 25: ...e selected source the projector automati cally selects the next source that has an input signal When Auto Source is Off The projector switches to the selected source regardless of whether an input sig nal is present Note When you do not operate source selection the projector will assume the input selec tion condition that was previously used See Auto Source on Page E 47 for information about the A...

Page 26: ...ct Maintains the aspect ratio and projects a picture of the maximum displayable size Real Projects the input signal without pixel conversion RGB STANDBY VIDEO FREEZE MUTE LAMP MODE AUTO TIMER VOL KSTN ZOOM CANCEL QUICK MENU ENTER Q 1 2 3 4 ASPECT Input Signal Auto Direct Real The setting is higher than the display reso lution of the projector The setting is lower than the display reso lution of th...

Page 27: ...FREEZE LAMP MODE AUTO ASPECT TIMER VOL KSTN ZOOM 1 4 MUTE 2 3 Use this if the picture is projected on a small screen and the picture is too bright or when projecting images in dark rooms Pressing the LAMP MODE button will set the lamp mode Low STATUS indicator is lit green The lamp s brightness is reduced to approximately 80 extending the lamp s service life Normal STATUS indicator is off The lamp...

Page 28: ...that depending on the projected picture and the projection conditions it may not be possible to eliminate keystone distortion completely When the Auto Keystone function is OFF the keystone adjustment settings will be maintained even when the power has been turned off See Adjustment of the Projection Screen on Page E 22 for information about the Auto Keystone function See Auto Keystone on Page E 46...

Page 29: ... No enlargement Approximately 2 times enlargement The image can also be moved in the following circumstances When Aspect is set to Real by the signal of the personal computer and the input resolution is higher than the display resolution of the projector When Aspect is set to Zoom by the video signal Zoom 0 Zoom 21 3 Press the CANCEL button to immediately close the display The display will close w...

Page 30: ...time The setting contents are Off and from 10 to 60 minutes in 10 minute intervals Settings can also be made with the SELECT 왗왘 buttons Gauge Blue Press the ENTER button to restart the timer The timer will start with the same time setting Press the CANCEL button to close the timer display The timer setting will return to Off Moving the Position of the Timer Display The SELECT 왖왔왗왘 buttons on the r...

Page 31: ...e place Note To cancel the number you have input press the CANCEL button The asterisks disappear and the display returns to the input standby mode at the first place To cancel the password registration mode press the CANCEL button again The Pass word display turns off This completes password registration The Password input display appears the next time the power is turned on 2 Use the number butto...

Page 32: ... appears at the first place Next press number buttons 4 4 and 1 in that order Asterisks appear in all four places If the password matches the window turns off and the projector can be used normally Canceling the password Changing the password The password is canceled and changed using the menus For instructions on operating the menus see Menu Operation Method on E 33 Canceling the password Select ...

Page 33: ...nu will not be displayed unless the signal of the con nected equipment is input Please select the input that you wish to adjust Remote control operation 1 A press of the QUICK MENU button brings up the quick adjustment display Further presses cause the adjustment display to change in sequence The adjustment display can be selected with use of either the SELECT 왖 or 왔 button 2 Press the cursor 왗 or...

Page 34: ...al values The adjustment setting items and contents will differ depending on the input selection and the adjustment setting items that can be used with the input signal are displayed on the menu RGB STANDBY VIDEO FREEZE MUTE LAMP MODE AUTO ASPECT TIMER VOL KSTN ZOOM QUICK MENU Q 1 2 3 4 CANCEL ENTER MENU button Used for menu display and menu closure SELECT 왖왔왗왘 buttons Used in the selection of men...

Page 35: ...mits setting adjustment of the item located at the cursor position Item Name This is the name of the adjustment or setting Icon Pressing the ENTER button displays the sub menu or setting contents Settings Contents Item Name Sub menu Adjustment Bar Adjustment Bar and Settings Contents Adjustment Bar The increases and decreases in bar length express the adjustment condition Setting Contents Displays...

Page 36: ...le in which the Keystone item name is selected 1 Press the MENU button to display the menu Menu Display The menu name that existed when the menu was closed previously will be displayed Note Please check that the cursor of the item name has disappeared at the time of menu name selection Press the CANCEL button to make the cursor disappear RGB STANDBY VIDEO FREEZE MUTE LAMP MODE AUTO ASPECT TIMER VO...

Page 37: ... and align the cursor with the desired item name There are also some items for which the setting display or the verification display will appear Please see the various item descriptions RGB STANDBY VIDEO FREEZE MUTE LAMP MODE AUTO ASPECT TIMER VOL KSTN ZOOM CANCEL QUICK MENU ENTER Q 1 2 3 4 Sub menu 5 Press the SELECT 왗왘 button and make the adjustment or setting while viewing the image When a butt...

Page 38: ... off the item name cursor Press the SELECT 왗왘 button and select the menu name Menu names cannot be selected when the item name cursor is displayed Note A press of the QUICK button while the menu is displayed will close the menu and display the quick menu A press of the MENU button while the quick menu is displayed will close the quick menu and display the menu RGB STANDBY VIDEO FREEZE MUTE LAMP MO...

Page 39: ... E O Menu name Image Color View Brightness E 40 嘷 嘷 嘷 嘷 Item Name Sub Menu Item Name Contrast E 40 嘷 嘷 嘷 嘷 嘷 Picture Adj Fine Picture E 40 H Position E 41 V Position E 41 嘷 嘷 嘷 嘷 E 41 Reset E 41 嘷 嘷 嘷 嘷 嘷 嘷 嘷 嘷 Gamma E 42 嘷 嘷 嘷 嘷 Dual Color Mode E 42 Color Temp E 43 嘷 嘷 嘷 嘷 White E 43 嘷 嘷 嘷 嘷 Color Space E 43 嘷 White Balance E 44 嘷 Aspect E 45 嘷 嘷 嘷 嘷 Filter E 45 嘷 嘷 嘷 嘷 Vertical Flip E 46 嘷 嘷 嘷 嘷...

Page 40: ...嘷 嘷 嘷 嘷 嘷 嘷 嘷 嘷 嘷 嘷 嘷 嘷 嘷 嘷 嘷 嘷 Video E 49 S Video E 49 Volume E 49 E 49 嘷 嘷 嘷 嘷 Presentation Timer E 49 嘷 嘷 Language On Screen Background Startup Screen Option E 50 嘷 嘷 嘷 嘷 E 50 嘷 嘷 嘷 嘷 E 50 嘷 嘷 嘷 嘷 E 51 嘷 嘷 嘷 嘷 Security Lock E 51 嘷 嘷 嘷 嘷 Status E 52 嘷 嘷 嘷 嘷 Factory Default E 52 嘷 嘷 嘷 嘷 Lamp Timer Reset E 52 嘷 嘷 嘷 嘷 嘷 嘷 嘷 嘷 嘷 嘷 Resolution E 53 嘷 Frequency E 53 嘷 Lamp Timer E 53 嘷 嘷 嘷 嘷 I n p u t ...

Page 41: ... the SELECT 왗왘 buttons so that the vertical bands disappear and brightness becomes uniform across the screen Note When the image extends beyond the boundaries of the screen or is smaller than the screen check that the View Aspect setting is set to Auto See Aspect on Page E 45 Brightness Contrast Color Tint Sharpness Picture qualities such as brightness and contrast will change depend ing on the wh...

Page 42: ... Position Adjust this when the picture is shifted up or down Select the V Position item name and adjust with the SELECT 왗왘 buttons Reset This function resets i e returns to the standard settings the adjust ment setting value of the Image menu name A press of the ENTER button forces the reset Note The item name Fine Picture at the time of RGB input will not be reset Reset of the menu name Image can...

Page 43: ... Dual Color Mode item name and select the setting contents with the SELECT 왗왘 buttons Dynamic Select this to prioritize brightness Vivid Select this to prioritize color Gamma Gamma corrects the proportion of change of the dark portions from the bright portions of the input signal Set this to reproduce natural color tone or to distinctly project a per sonal computer picture in a bright conference r...

Page 44: ...ing contents Select the desired degree of white from among Low Medium and High Note When Vivid is selected for Dual Color Mode the White adjustment item is displayed in gray and cannot be selected or adjusted See Dual Color Mode on E 42 Color Space Set this function when a component signal YPbPr is projected and the image is extremely red or extremely green Select the item name Color Space and use...

Page 45: ...ted personal computer will be set to black 3 Press the ENTER button The display will change to Adjusting Black and the black level will be adjusted 4 The adjustment of the black level is completed and the display changes to Input White Signal 5 The screen background color of the connected personal computer will be set to white 6 Press the ENTER button The display will change to AdjustingWhite and ...

Page 46: ...atically enlarges or reduces the image to project a full screen in a ratio of 4 3 Direct Maintains the aspect ratio and projects a picture of the maximum displayable size Real Projects the input signal without pixel conversion Video Signals Auto While maintaining the aspect ratio projects a full screen so that no por tions extend beyond the boundaries of the screen The top and bottom of the 16 9 i...

Page 47: ...ase note that depending on the projected picture and the projection conditions it may not be possible to eliminate keystone distortion completely When the Auto Keystone function is OFF the keystone adjustment settings will be maintained even when the power has been turned off See Adjustment of the Projection Screen on Page E 22 for information about the Auto Keystone function See Keystone Manual A...

Page 48: ...he image is projected Auto Source This function switches off the projector power automatically when the input of the projector enters a no signal condition Select item name Auto Power Off and select the setting contents with the SELECT 왗왘 buttons On The power is switched off when there is no signal Off The power is not switch off even when there is no signal Operation when Function is On The No Si...

Page 49: ...creen and the picture is too bright or when projecting images in dark rooms Select the item name Lamp Mode and select the setting contents with the SELECT 왗왘 buttons Low The lamp s brightness is reduced to approximately 80 extending the lamp s service life STATUS indicator is green Normal The lamp brightness is set to 100 and the screen is bright STATUS indicator is off Note Frequent switching thi...

Page 50: ...dentification NTSC Fixed to the NTSC system NTSC 4 43 Fixed to the NTSC 4 43 system PAL Fixed to the PAL system PAL M Fixed to the PAL M system PAL N Fixed to the PAL N system PAL 60 Fixed to the PAL 60 system SECAM Fixed to the SECAM system Presentation Timer The presentation is given while checking the timer displayed on the screen The gauge display allows the remaining time to be known at a gla...

Page 51: ...ttons On Screen This function switches on off the messages displayed with a black frame such as the input signal information and the aspect ratio Select item name On Screen and select the setting contents with the SELECT 왗왘 buttons On The message is displayed Off The message is not displayed Note Even when set to off messages that are not in a black frame will be dis played Example of a display wh...

Page 52: ...ssword can be registered and the security lock set in order to prevent unauthorized use of the projector For instructions on using the security function see Protecting the Projector with the Security Lock on E 30 Select item name Security Lock and select the setting contents with the SELECT 왗왘 buttons Disable The security lock is disabled The projector can be operated without inputting the passwor...

Page 53: ...ll the in put sources to the standard factory default values Select item name Factory Default and press the ENTER button There is a change to the display Press ENTER to Factory Default Set Press the ENTER button to initialize To cancel press the CANCEL button and there will be a return to the menu Items that are not set to the factory default Vertical Flip Horizontal Flip Language and Lamp Timer a...

Page 54: ...there has been switching between the modes When Lamp Life Has Been Reached Replace the Lamp Cartridge is displayed on the screen for 10 seconds in a 1 minute interval Please replace the lamp with a new one See Replacing the Lamp Cartridge on Page E 57 for information about lamp cartridge replacement When Over 100 Hours Have Elapsed Since Reaching Lamp Life Including Low Mode Warning System Shutdow...

Page 55: ...cool place If the projector s internal temperature is high check the cooling fan s ventilation slots and clean them if they are clogged When the temperature protector is activated the power turns off and in some cases will not turn back on immediately In this case wait about 90 seconds then try again The fan has stopped Unplug the power cable and contact a store that sells the XD80U for repairs Th...

Page 56: ...or is moved from a cool storage area to a warm place and the power is turned on condensation may form on the lens or internal optical parts If this happens wait until the condensation has evaporated before using the projector For a computer input are the horizontal and vertical positions properly ad justed Does the input signal have a compatible resolution and frequency Check the computer s resolu...

Page 57: ...r body with your nails or other hard object since this will cause scratches Dirty Lens Clean using the same method you would use to clean a camera lens Use a commercial blower for camera use or cleaning paper for eye glasses Be careful not to scratch the lens at this time Dust of the Intake and Outflow Holes Dust that collects in the intake and outflow holes will obstruct the ventilation and cause...

Page 58: ...replacement lamp for the XD80U order code 915P051 10 CAUTION Replacement of the lamp cartridge is performed after switching off the power waiting for the cooling fan to stop disconnecting the power plug from the power outlet and then leaving the projector for about 60 minutes before replacement is started Replacement of the lamp cartridge during operation or immediately after operation stops will ...

Page 59: ...plug the power cord 2 Turn the projector upside down 3 Remove the lamp cover 1 Turn the lamp cover s set screw counterclockwise and loosen until the screw turns freely The screw does not come off 4 Remove the lamp cartridge 1 Fully loosen the lamp cartridge s two screws The screws do not come off 2 Grasp the lamp cartridge s handle and pull upward to re move the lamp cartridge 2 Open the lamp cove...

Page 60: ...r Reset on Page E 52 2 Turn the lamp cartridge s two screws clockwise to tighten them 2 Turn the lamp cover s screw clockwise to tighten it Note After reaching the lamp service life if the lamp is used for more than another 100 hours it will not be possible to switch on the power Should this happen while the projector is in the standby mode simultaneously holding down the projector s SOURCE button...

Page 61: ...80i 720p automatic or manual switching RGB Horizontal 15 to 80 kHz Vertical 50 to 85 Hz Color Reproduction Full color 16 770 000 colors Resolution VGA 640 480 expansion true S VGA 800 600 expansion true XGA 1024 768 true S XGA 1280 1024 compression Input Current 1 9 A Power Requirement 100 240 V AC 50 60 Hz Power Consumption 190 watts 170 watts in Low mode Mechanical Dimensions Excluding Stand 186...

Page 62: ...0 400 720 400 640 480 640 480 640 480 640 480 800 600 800 600 800 600 800 600 800 600 1024 768 1024 768 1024 768 1024 768 1280 1024 640 480 823 624 1024 768 1152 870 1920 1080 1920 1080 1280 720 720 576 720 480 720 576 720 480 15 734 15 625 31 5 31 5 31 5 31 5 37 9 37 9 37 9 31 5 37 9 37 5 43 3 35 2 37 9 46 9 48 1 53 7 48 4 56 5 60 0 68 7 64 0 35 0 49 7 60 2 68 7 33 8 28 1 45 0 31 3 31 5 31 3 31 5...

Page 63: ...E 62 STATUS STANDBY SOURCE AUTO MENU DUAL COLOR MODE Cabinet Dimensions Unit mm inch 186 7 3 46 1 8 176 6 9 ...

Page 64: ...MITSUBISHIELECTRICCORPORATION 1 Zusho Baba Nagaokakyo City Kyoto Japan ...

Reviews: